
When constructing a full-stack software, you’d sometimes separate your frontend out of your backend. Usually, every of those implementations are written utilizing completely different frameworks for the frontend and backend companies, and are hosted on separate distant servers.
For these companies to carry out holistic enterprise functionalities, there have to be some communication between them, resembling within the type of generally used mechanisms like REST, SOAP, GraphQL, and so on.
Flutter is an open-source, cross-platform instrument created by Google. It’s used to develop interactive, reactive, and adaptive frontend functions (desktop, internet, and cell) that may run on a number of working techniques utilizing one codebase. Flask is an open-source, beginner-friendly Python framework appropriate for constructing monolithic and microservice backend functions with a light-weight codebase.
Utilizing a fundamental to-do app, this tutorial will reveal the way to combine your frontend Flutter software with a Flask backend service. The applying will ship HTTP requests from the frontend to the RESTful backend to carry out customized operations on a neighborhood or distant server.
Soar forward:
Conditions
- Python ≥ v 3 put in in your machine
- Working information of Flask and Python
- Intermediate-level information of CLIs
- Elementary information of Flutter and the Flutter SDK put in in your machine
- Working information of constructing and consuming REST APIs
- Any appropriate IDE or textual content editor. I’ll be utilizing VS Code to construct the Flask service and Android Studio for the Flutter app
- Postman API platform for testing the Flask APIs
Challenge overview
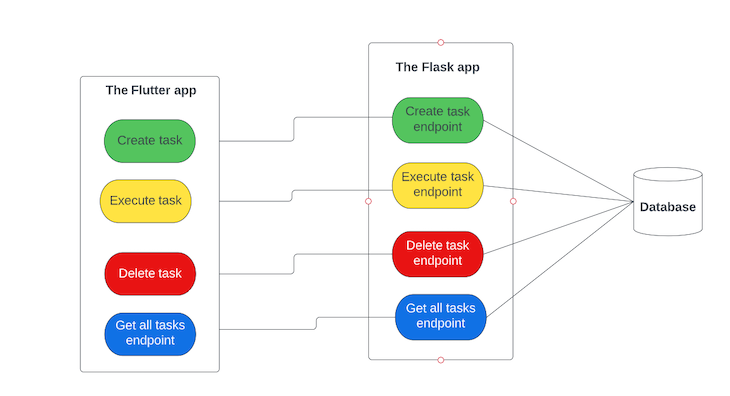
The Flutter app will function the frontend part that the person will work together with to create, execute, and delete to-do duties. Firstly of the appliance, the Flutter app will routinely ship an HTTP GET request to the Flask server to fetch all of the created duties saved within the database. For the create, execute, and delete operations, the person will explicitly set off the requests to the Flask server by clicking their respective buttons.
Whereas options like these may be achieved utilizing solely a Flutter app with out the necessity for a backend service, the goal right here is to reveal the way you’d sometimes carry out frontend-backend integrations, utilizing Flutter and Flask as case research.
The operations carried out by the Flask app will work together with the database the place the to-do duties reside. Flask-SQLAlchemy, a library for simply integrating SQLAlchemy with Flask, will handle the database operations. The Flask-Marshmallow and Marshmallow-SQLAlchemy packages will probably be liable for serializing and deserializing the Python objects.
The processes concerned on this software may be utilized to another full-stack integration, as long as it abides by the REST structure of constructing and consuming APIs. That’s, you’ll be able to construct your backend service utilizing another internet framework, and expose the endpoints to the Flutter app and vice versa.
Constructing the Flask backend service
Let’s start by constructing the backend service. Run the next instructions in your terminal to arrange the Flask app:
mkdir flask_todo
cd flask_todo
Step one is to create and activate the digital atmosphere for the appliance with the under instructions:
pip set up pipenv
pipenv shell
The above instructions activate your digital atmosphere by making a Pipfile that accommodates all of the packages and dependencies you’ll set up within the software.
Subsequent, set up the Flask framework and the dependencies obligatory to construct and run the appliance.
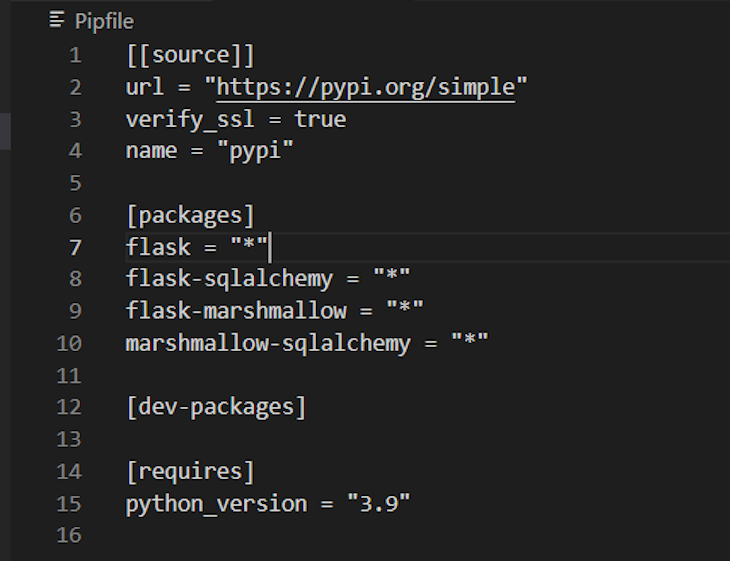
pipenv set up flask flask-sqlalchemy flask-marshmallow marshmallow-sqlalchemy
After efficiently putting in the framework and dependencies, your Pipfile must be just like the under picture:
Initialize the Flask app and configure the database
Create a Python file named major.py and add the next code to the code as ordered under:
from flask import Flask, request, jsonify
from flask_sqlalchemy import SQLAlchemy
from flask_marshmallow import Marshmallow
import os

app = Flask(__name__)
basedir = os.path.abspath(os.path.dirname(__file__))

app.config['SQLALCHEMY_DATABASE_URI'] = 'sqlite:///' + os.path.be a part of(basedir, 'db.sqlite')


# suppress SQLALCHEMY_TRACK_MODIFICATIONS warning
app.config['SQLALCHEMY_TRACK_MODIFICATIONS'] = False

db = SQLAlchemy(app)
ma = Marshmallow(app)
The code snippet above units up and initializes the Flask app and its database configurations. The basedir variable represents the basis listing, inside which you’ll create a file with the title db.sqlite. The db and ma variables characterize the initialized SQLAlchemy and Marshmallow objects, respectively.
The Todo mannequin and schema
Right here is the code snippet for the Todo mannequin, schema creation, and initialization:
Extra nice articles from LogRocket:
class TodoItem(db.Mannequin):
    id = db.Column(db.Integer, primary_key=True)
    title = db.Column(db.String(100))
    is_executed = db.Column(db.Boolean)

    def __init__(self, title, is_executed):
        self.title = title
        self.is_executed = is_executed


# Todo schema
class TodoSchema(ma.Schema):
    class Meta:
        fields = ('id', 'title', 'is_executed')


# Initialize schema
todo_schema = TodoSchema()
todos_schema = TodoSchema(many=True)
Every TodoItem entity has an ID, a reputation, and an execution standing represented by the is_executed property. A job or to-do that has been executed or achieved can have an is_executed worth of True and, if in any other case, False.
At any time limit, you’re both performing an operation on a single TodoItem entity or on a number of entities. The todo_schema handles a single entity, whereas the todos_schema handles a number of entities as declared utilizing the many=True argument.
Database creation
Open the Python shell by operating the python command in your terminal. This can swap the CLI to the Python shell, the place you’ll write the under Python scripts to create the database as proven under:
from major import db
db.create_all()
exit()
from major import db: This imports the SQLAlchemy object initialized with thedbvariable within themajor.pyfiledb.create_all(): This creates the SQLite database. You’ll discover adb.sqlitefile with encoded content material routinely created in your challenge root folder after operating this methodologyexit(): Exit the Python shell
Right here’s a visible illustration of the above course of:

Add a To-do API
Create an endpoint for the Flutter software to set off so as to add a brand new to-do job to the database.
@app.route('/todo', strategies=['POST'])
def add_todo():
    title = request.json['name']
    is_executed = request.json['is_executed']

    new_todo_item = TodoItem(title, is_executed)
    db.session.add(new_todo_item)
    db.session.commit()

    return todo_schema.jsonify(new_todo_item)
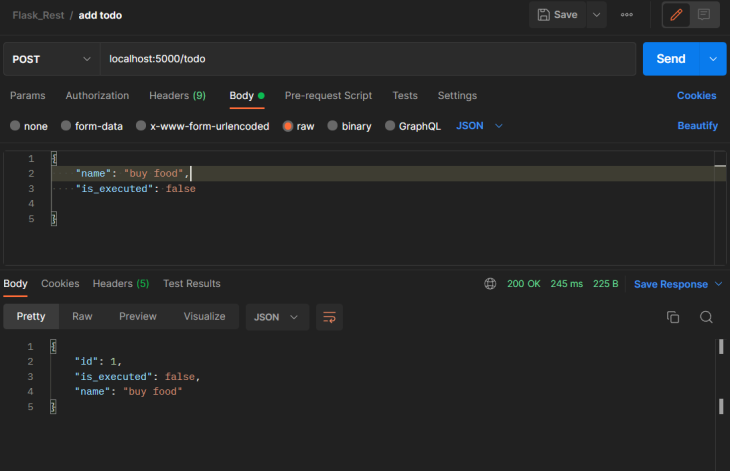
The above endpoint receives a POST request and expects a JSON payload with the title and is_executed keys, in addition to their respective values. Utilizing the request package deal imported from Flask on the prime of the major.py file, the values of the title and is_executed keys are extracted into the title and is_executed variables, respectively. Then a brand new TodoItem object is created and saved to the database. The endpoint returns a JSON object of the newly created entity.
To confirm that the endpoint works as anticipated, add the under to the top of the file:
if __name__ == '__main__':
    app.run(debug=True)
Then run the appliance out of your terminal with the under command:
python major.py
By default, the appliance will run on port 5000, as proven under:

Proceed to check the endpoint from Postman by sending a POST request to localhost:5000/todo.
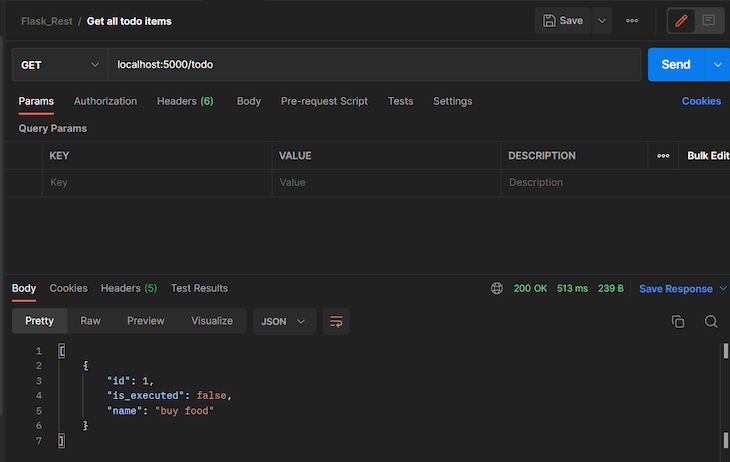
Get all To-Dos API
The endpoint under receives a GET request by means of the /todo path and is liable for fetching all of the TodoItem entities which were created within the database.
@app.route('/todo', strategies=['GET'])
def get_todos():
    all_todos = TodoItem.question.all()
    end result = todos_schema.dump(all_todos)

    return jsonify(end result)
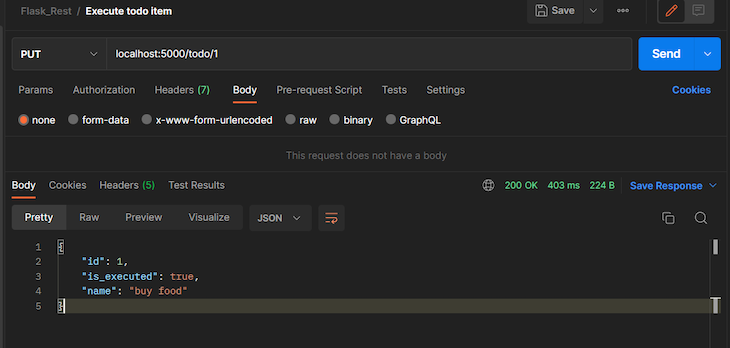
Execute the To-do API
@app.route('/todo/<id>', strategies=['PUT', 'PATCH'])
def execute_todo(id):
    todo = TodoItem.question.get(id)

    todo.is_executed = not todo.is_executed
    db.session.commit()

    return todo_schema.jsonify(todo)
The endpoint receives the ID of the TodoItem by means of a PUT or PATCH request to fetch the entity from the database. Then, the endpoint converts the present worth of the is_executed property to its reverse worth earlier than saving it once more to the database — that’s, if its present worth is True, it converts it to False, and vice versa.
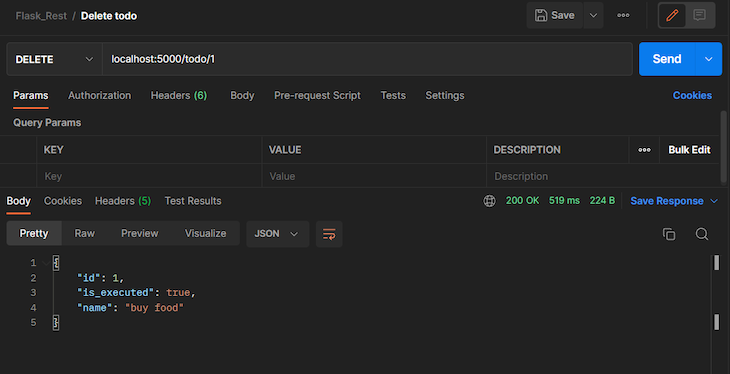
Delete a To-do API
Right here’s the endpoint to delete a TodoItem from the database:
@app.route('/todo/<id>', strategies=['DELETE'])
def delete_todo(id):
    todo_to_delete = TodoItem.question.get(id)
    db.session.delete(todo_to_delete)
    db.session.commit()

    return todo_schema.jsonify(todo_to_delete)
The endpoint receives the ID of the TodoItem by means of a DELETE request to fetch the entity from the database and deletes the merchandise from the database.
Integrating the Flutter app with the Flask backend service
Proceed to create the Flutter software by operating the next command in your terminal:
flutter create flutter_todo
Set up the next dependencies:
- HTTP: This package deal makes the community communication between the Flutter app and the Flask service
- Supplier: This package deal manages the state of the appliance. Along with the documentation, you may also study in regards to the Supplier state administration package deal right here
flutter pub add http

flutter pub add supplier
Constructing the mannequin
Create a Dart file with the title todo_item and add the under snippet to the file:
class TodoItem{
  dynamic id;
  String itemName;
  bool isExecuted;

  TodoItem({this.id, required this.itemName, required this.isExecuted});
}
The properties of the category declared above are just like these of the TodoItem we created earlier, within the Flask app. The values of every of the Flutter TodoItem object’s properties will probably be displayed on the display.
State administration and speaking with the Flask app
Create one other Dart file with the title todo_provider and add the next code to it:
import 'dart:convert';

import 'package deal:flutter/materials.dart';
import 'package deal:todo/fashions/todo_item.dart';
import 'package deal:http/http.dart' as http;

class TodoProvider with ChangeNotifier{
  Record<TodoItem> _items = [];
  last url="http://localhost:5000/todo";

  Record<TodoItem> get gadgets {
    return [..._items];
  }

  Future<void> addTodo(String job) async {
      if(job.isEmpty){
      return;
    }

    Map<String, dynamic> request = {"title": job, "is_executed": false};
    last headers = {'Content material-Kind': 'software/json'};
    last response = await http.put up(Uri.parse(url), headers: headers, physique: json.encode(request));
    Map<String, dynamic> responsePayload = json.decode(response.physique);
    last todo = TodoItem(
        id: responsePayload["id"],
        itemName: responsePayload["name"],
The asynchronous addTodo methodology receives the title of the duty to be created and makes use of this worth to assemble the request payload for including a brand new TodoItem to the Flask service. Recall that the Flask endpoint to create a brand new to-do expects a POST request and a request physique with the keys title and is_executed. The worth of the is_executed key within the request is ready to false as a result of, by default, the newly created to-do shouldn’t be executed until explicitly triggered by the person by means of the execute endpoint. The json.encode operation codecs the request map to a JSON physique in order that it’s suitable with the format and construction that the Flask server expects.
Observe: In the event you’re operating the appliance from an emulator, exchange the bottom URL from localhost to 10.0.2.2. That’s, the worth of the url variable must be http://10.0.2.2:5000/todo. It’s because localhost on the emulator doesn’t level to 127.0.0.1; this might trigger your software to fail when sending HTTP requests to a neighborhood server from an emulator. The response physique from the Flask server accommodates a JSON physique within the following format:
{
    "id": 1,
    "is_executed": false,
    "title": "purchase meals"
}
The server routinely creates an ID for the newly created TodoItem and returns it as a part of the response physique. The values of the JSON physique are unmarshalled into the Flutter TodoItem object and added to the _items checklist. The notifyListeners() methodology from the ChangeNotifierclass notifies all of the listeners of the state of the appliance in regards to the new TodoItem addition.
Right here’s the implementation for fetching all of the TodoItem entities from the backend:
 Future<void> get getTodos async {
    var response;
    attempt{
      response = await http.get(Uri.parse(url));
      Record<dynamic> physique = json.decode(response.physique);
      _items = physique.map((e) => TodoItem(
          id: e['id'],
          itemName: e['name'],
          isExecuted: e['is_executed']
      )
      ).toList();
    }catch(e){
      print(e);
    }

    notifyListeners();
  }
The getTodos methodology above asynchronously sends a GET request to the backend server to fetch all of the created TodoItem entities as a JSON checklist. Then it iterates by means of the response physique to unmarshal the values into TodoItem objects.
Future<void> deleteTodo(int todoId) async {
    var response;
    attempt{
      response = await http.delete(Uri.parse("$url/$todoId"));
      last physique = json.decode(response.physique);
      _items.removeWhere((factor) => factor.id == physique["id"]);
    }catch(e){
      print(e);
    }
    notifyListeners();
  }
The deleteTodo methodology is liable for deleting the TodoItem entity within the database and within the Flutter app. It performs this operation by making an HTTP DELETE request to the backend API within the anticipated format. The response physique accommodates a JSON payload of the deleted merchandise. Utilizing the ID of this merchandise, the article can be recognized within the _items checklist and eliminated.
Lastly, the executeTask methodology under expects the ID of the TodoItem and sends a PATCH request to the Flask endpoint anticipating this request. The server executes the duty, as earlier illustrated within the Flask API part of this tutorial, then it returns a response physique that accommodates the executed TodoItem with the worth of its is_executed property flipped. That’s, if the TodoItem had an is_executed worth of false earlier than sending the request to the server, it’s going to return with a true worth and vice versa.
 Future<void> executeTask(int todoId) async {
    attempt{
        last response = await http.patch(Uri.parse("$url/$todoId"));
        Map<String, dynamic> responsePayload = json.decode(response.physique);
        _items.forEach((factor) => {
        if(factor.id == responsePayload["id"]){
            factor.isExecuted = responsePayload["is_executed"]
        }
        });
    }catch(e){
      print(e);
    }
    notifyListeners();
  }
Creating the job widget
Create a duties.dart file and following code to the file:
import 'package deal:flutter/materials.dart';
import 'package deal:supplier/supplier.dart';

import '../suppliers/todo_provider.dart';

class TasksWidget extends StatefulWidget {
  const TasksWidget({Key? key}) : tremendous(key: key);

  @override
  State<TasksWidget> createState() => _TasksWidgetState();
}

class _TasksWidgetState extends State<TasksWidget> {
  TextEditingController newTaskController = TextEditingController();

  @override
  Widget construct(BuildContext context) {
    return Padding(
      padding: const EdgeInsets.all(20.0),
      baby: Column(
        youngsters: [
          Row(
            children: [
              Expanded(
                child: TextFormField(
                  controller: newTaskController,
                  decoration: InputDecoration(
                    labelText: 'New Task',
                    border: OutlineInputBorder(),
                  ),
                ),
              ),
              SizedBox(width: 10,),
              ElevatedButton(
                  style: ButtonStyle(
                      backgroundColor: MaterialStateProperty.all(Colors.amberAccent),
                      foregroundColor: MaterialStateProperty.all(Colors.purple)
                  ),
                  child: Text("Add"),
                  onPressed: () {
                    Provider.of<TodoProvider>(context, listen: false).addTodo(newTaskController.text);
newTaskController.clear();
                  }
              )
            ],
          ),
          FutureBuilder(
            future: Supplier.of<TodoProvider>(context, pay attention: false).getTodos,
            builder: (ctx, snapshot) =>
            snapshot.connection state == ConnectionState.ready
                ? Heart(baby: CircularProgressIndicator())
                :
            Shopper<TodoProvider>(
              baby: Heart(
                heightFactor: MediaQuery.of(context).dimension.peak * 0.03,
                baby: const Textual content('You don't have any duties.', fashion: TextStyle(fontSize: 18),),
              ),
              builder: (ctx, todoProvider, baby) => todoProvider.gadgets.isEmpty
                  ?  baby as Widget
                  : Padding(
                padding: const EdgeInsets.solely(prime: 20),
                baby: Container(
                  peak: MediaQuery.of(context).dimension.peak * 0.6,
                  baby: ListView.builder(
                      itemCount: todoProvider.gadgets.size,
                      itemBuilder: (ctx, i) => Padding(
                        padding: const EdgeInsets.solely(backside: 10.0),
                        baby: ListTile(
                          tileColor: Colours.black12,
                          main: Checkbox(
                              worth: todoProvider.gadgets[i].isExecuted,
                              activeColor: Colours.purple,
                              onChanged:(newValue) {
                                Supplier.of<TodoProvider>(context, pay attention: false).executeTask(todoProvider.gadgets[i].id);
                              }
                          ),
                          title: Textual content(todoProvider.gadgets[i].itemName),
                          trailing: IconButton(
                              icon: Icon(Icons.delete, coloration: Colours.crimson),
                              onPressed: ()  {
                                Supplier.of<TodoProvider>(context, pay attention: false).deleteTodo(todoProvider.gadgets[i].id);
                              }
                          ) ,
                          onTap: () {},
                        ),
                      )
                  ),
                ),
              ),
            ),
          )
        ],
      ),
    );
  }
}
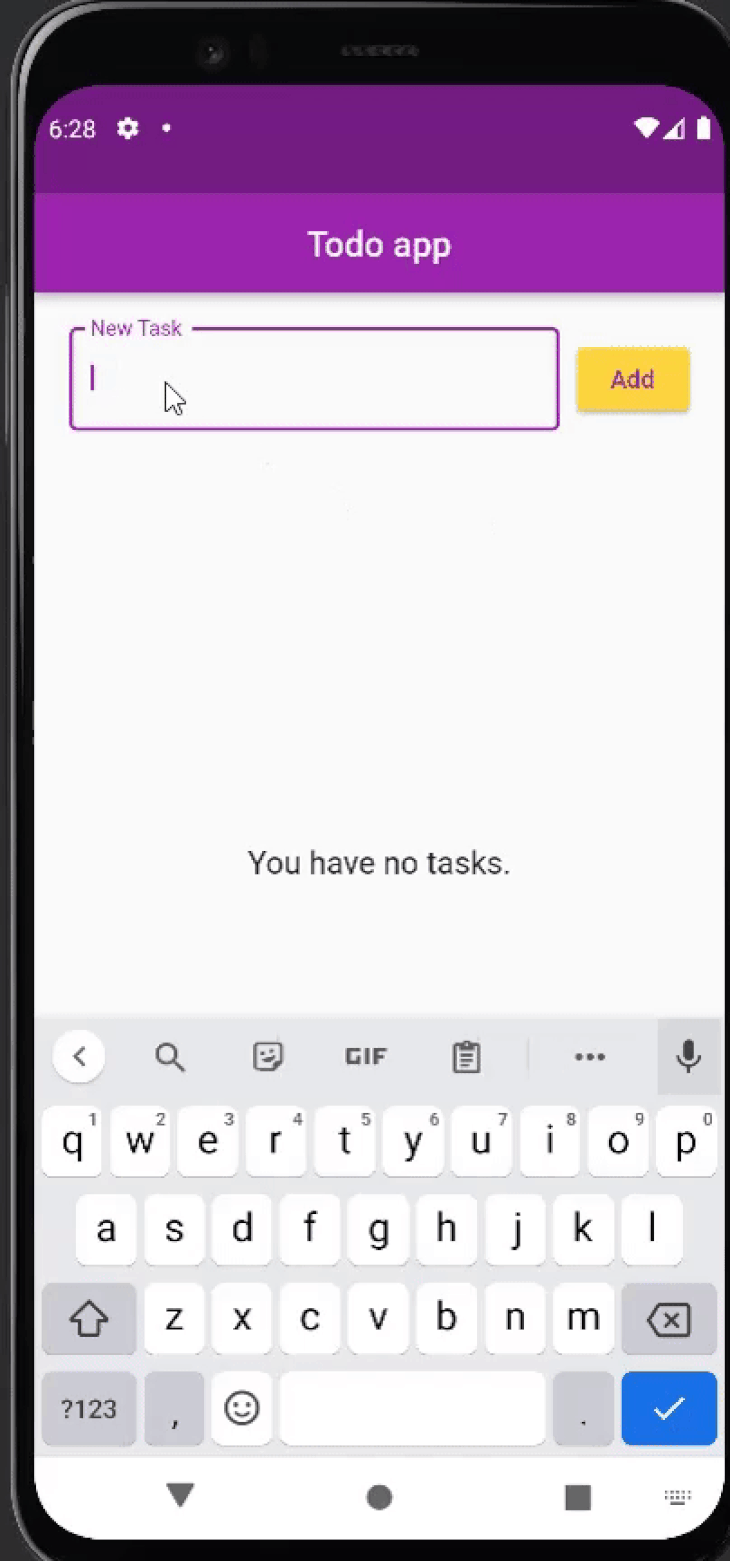
The TaskWidget class is a stateful widget that’s liable for constructing the interface and widgets of the appliance that the person will work together with. The widget renders the TextInputField to obtain the worth of the brand new job, ElevatedButton to submit the enter worth by invoking the addTodo methodology of the TodoProvider class and a ListView of the created duties.

When the widget builds, it fetches all of the created gadgets within the database by calling the getTodos methodology within the TodoProvider class. Every job on the display is a ListTile that accommodates a checkbox, the title of the duty and a delete icon. Every click on on the checkbox invokes the TodoProvider execute methodology to alter the isExecuted worth of that TodoItem object within the backend server and inside the Flutter app. Clicking the delete icon invokes the deleteTodo methodology to delete the chosen job.
![]()
![]()
Right here’s the content material of the major.dart file that’s the entry level for the appliance:
import 'package deal:flutter/materials.dart';
import 'package deal:supplier/supplier.dart';
import 'package deal:todo/suppliers/todo_provider.dart';
import 'package deal:todo/widgets/duties.dart';

void major() {
  runApp(const MyApp());
}

class MyApp extends StatelessWidget {
  const MyApp({tremendous.key});

  @override
  Widget construct(BuildContext context) {
    return ChangeNotifierProvider.worth(
        worth: TodoProvider(),
      baby: MaterialApp(
      debugShowCheckedModeBanner: false,
      title: 'Flutter Demo',
      theme: ThemeData(
        primarySwatch: Colours.purple,
      ),
      house: const MyHomePage(title: 'Todo app'),
    )
    );
  }
}

class MyHomePage extends StatefulWidget {
  const MyHomePage({tremendous.key, required this.title});
  last String title;

  @override
  State<MyHomePage> createState() => _MyHomePageState();
}

class _MyHomePageState extends State<MyHomePage> {

  @override
  Widget construct(BuildContext context) {
    return Scaffold(
      resizeToAvoidBottomInset: false,
      appBar: AppBar(
        title: Textual content(widget.title),
        centerTitle: true,
      ),
      physique: TasksWidget(),
    );
  }
}
Conclusion
The method of integrating a frontend app with a backend service is sort of comparable throughout completely different frontend and backend frameworks, relying on the chosen community communication mechanism. This tutorial demonstrated how you’ll combine your Flutter software on the frontend with a Flask service on the backend by means of Restful API structure. The idea of HTTP communication adopted right here may be utilized to different frontend and backend frameworks chances are you’ll select.
You may take a look at the codebase for the Flutter app in this repo, and right here’s the code for the Flask service.
