
Chrome extensions are filled with options which can be very useful for making your work somewhat simpler. Plasmo, a comparatively new framework, helps to construct chrome extensions with ease utilizing React!
Sure, meaning you need to use React’s component-based improvement to construct Chrome extensions effectively and quick! Sounds good, proper?
On this article, we’ll be having a look at how you need to use Plasmo to construct a Chrome extension with React.
Right here’s what we’ll cowl:
- Initialize a brand new Plasmo undertaking
- Set-up Tailwind CSS
- Constructing the front-end
- Writing the logic
- Including native storage assist
To observe alongside, consult with this repo, and go to the Plasmo docs for extra integration guides.
Initialize a brand new Plasmo undertaking
Spin up the terminal, transfer to your undertaking folder and initialize a brand new Plasmo undertaking by doing the next:
npm x plasmo init
Or just arrange Plasmo with Subsequent.js utilizing this repo.
I’m an enormous Subsequent.js fan, therefore I’ll be utilizing it on this tutorial. Go forward and set up the next dependencies:
npm set up [email protected]
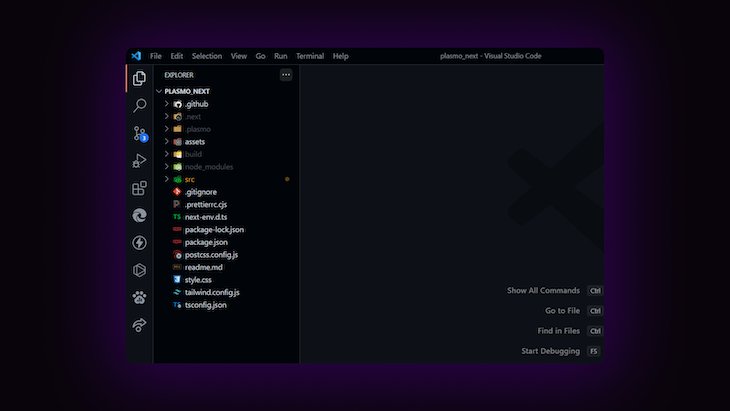
You’ll now have an analogous setup to the next picture:
Some issues to remember whereas utilizing Plasmo:
- You’re constructing a Chrome extension and never an internet web page. Static website regeneration is out of the equation, right here
- Every thing is fetched on the client-side.
- All the essential React functionalities ought to work as anticipated
- Plasmo remains to be in its improvement stage, therefore, there could also be small bugs right here and there
- Subsequent.js routing doesn’t work in Plasmo. (as a matter of truth, it’s not vital, as routing in Subsequent.js is thought for the way in which it renders the web page statically)
- Your supply code resides within the
srclisting
Subsequent, let’s set-up Tailwind CSS within the undertaking.
Establishing Tailwind-CSS
Set up the next dev dependencies required for Tailwind CSS:
npm set up autoprefixer postcss tailwindcss --save-dev
Subsequent up, run the init command to generate the tailwind.config.js and postcss.config.js recordsdata.
npx tailwindcss init -p
Within the tailwind.config.js file, add the next path to the content material property:
module.exports = {
  content material: ["./**/*.{ts,tsx}"],
  theme: {
    prolong: {}
  },
  plugins: []
}
Then, create a brand new kinds.css file and add the @tailwind directives to it.
@tailwind base;
@tailwind elements;
@tailwind utilities;
With that carried out, add the import to this file within the ./src/elements/major.tsx file.
import "../../model.css"

export perform Most important ({ title = "Extension" }) {...
}
(Notice: In case you ever get caught, you’ll be able to observe the Tailwind CSS integration information for Subsequent.js right here)
Constructing out the frontend
With somewhat assist from Tailwind CSS, let’s construct out the frontend of our Chrome extension.
Extra nice articles from LogRocket:
Let’s first make a structure for our Chrome extension that can wrap across the Most important element.
Create a brand new file in ./src/elements/layouts/Container.tsx:
perform Container ({ youngsters }) {
  return (
    <div>{chidlren}</div>
  );
}

export default Container;
Let’s greet the consumer after they spin up the extension:
perform greeting() {
  const time = new Date().getHours()
  if (time < 12) {
    return "Good Morning!"
  }
  if (time < 18) {
    return "Good Afternoon!"
  }
  return "Good Night!"
}
Add this to the Container element as follows…
return (
  <div>
    <div>
      <p>{greeting()}</p>
    </div>
    {youngsters}
  </div>
)
…and a pinch of CSS✨
return (
  <div
    model={{
      padding: "40px 20px",
      // add gradient
      background: "linear-gradient(to prime, #BADBFB , #FFFFFF )"
    }}
  >
    // physique
  </div>
);
Now, wrap this Container wrapper round major.tsx.
With that carried out, now let’s arrange the event surroundings for Plasmo, so that you simply see your modifications in real-time, similar to how you’ll make modifications to a web site throughout improvement.
First, head to chrome://extensions and swap to Developer mode.
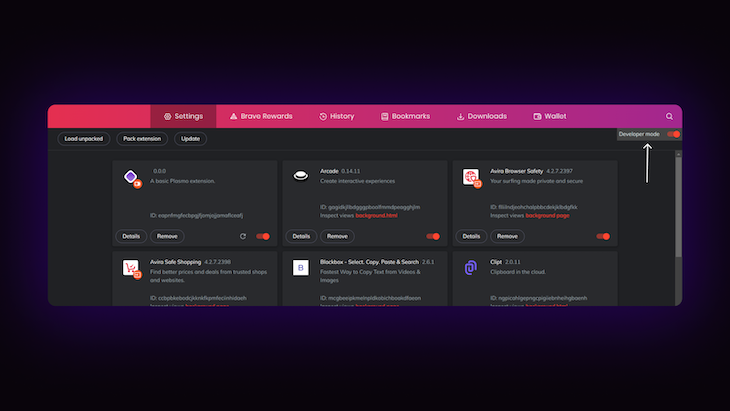
(Notice: I’m utilizing the Courageous browser right here, which makes use of the Chromium net browser underneath the hood, so the method would be the similar for regular Chrome browsers, too.
Click on on Load unpacked and go to your undertaking listing, then choose the construct/chrome-mv3-dev folder. To view the extension, click on on the puzzle emblem close to your Extensions part and choose the Plasmo undertaking.
(Notice: In case you get caught, checkout the Plasmo Docs right here)
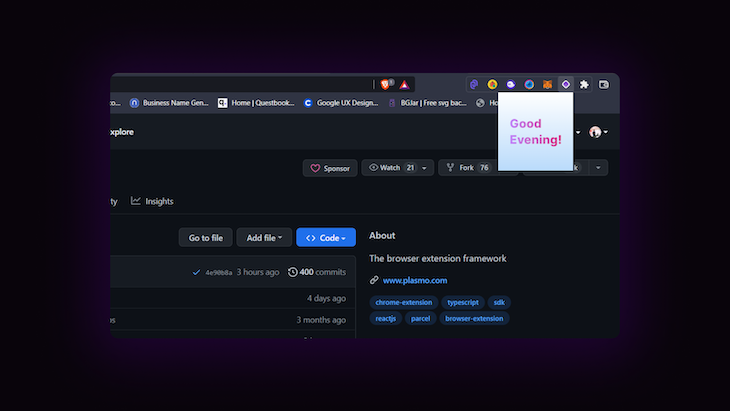
Your extension ought to now look one thing like this:
With that carried out, let’s arrange the half for coming into duties and displaying them. In major.tsx, let’s add an enter discipline for coming into the duties and a button for including them.
To begin with, add two states — one for capturing enter from the textual content field, and the opposite one to maintain monitor of the duties.
import { useState } from "react";

export perform Most important ( ) {
  const [data, setData] = useState("");

  const [tasks, setTasks] = useState([]);

  return (
    <Container>
      {...stuff}
    </Container>
  )
}
Now, inside Container, add the next:
return (
  <Container>
    <div>
      <enter
        className="rounded-md my-3 p-2 border-2 border-gray-300"
        onChange={(e) => setData(e.goal.worth)}
        worth={knowledge}
        placeholder="Add new job"
      />
    </div>
  <Container/>
);
In case you now log knowledge onto the console, you must be capable of see the enter knowledge.
To examine the applying on Chrome DevTools, right-click on the specified extension:

With that carried out, let’s add a button for saving the state of the present duties.
<button kind="submit" onClick={submitHandler} className="button-blue">
  Add job
</button>
Make a brand new perform for the onClick occasion:
perform submitHandler () {
  // ...stuff
  console.log(knowledge);
}
For now, we are going to merely log the present worth of the information onto the console.
Subsequent, let’s construct the element to show the duties. Make a brand new element referred to as Duties.tsx. As props, go knowledge, and setData — this might be helpful whereas displaying the duties and eradicating them.
In Duties.tsx, for now, let’s simply show a random checklist of duties.
{knowledge?.size !== 0 ? (
  knowledge?.map((job, index) => (
    <div
      className={...kinds}
      key={index}
    >
      <p>{job}</p>

      <button
        aria-label="Take away job"
        kind="button"
        <TrashIcon className="w-10 h-10 pr-1" />
      </button>
    </div>
  ))
  ) : (
  <p className="mx-auto w-fit my-8">No duties but!</p>
)}
(Notice: To consult with the kinds, go to this repo at GitHub. Icons used listed here are from react-icons)
You’ll be able to add some dummy knowledge for duties and see if the element works as anticipated.
Writing the logic
Now, let’s add the essential performance of including and eradicating duties.
First, let’s work on the submitHandler we outlined earlier on the button. Every time the consumer provides a job, we wish the earlier duties to stay, and likewise to clear the enter discipline.
async perform submitHandler() {
  setTasks([...tasks, data]);
  setData("");
}
Now, within the Duties.tsx, we’ve handed two props (particularly the knowledge and the setTasks perform). The duties needs to be displayed now everytime you add any new job.
What’s remaining is the removeTask perform, which is certain to the trash-icon in every job.
Contained in the removeTask perform:
perform removeTask () {
  setTasks(
    knowledge.filter(
      (job: string, i: quantity) => i !== index
    )
  );
}
What this piece of code mainly does is filter by way of the knowledge array containing the duties and returns solely the duties that don’t match the index of the duty to be eliminated; then it units the present duties utilizing the setTasks perform.
Including native storage assist
Till now, we have been capable of enter new duties and consider them, however if you happen to shut the extension or hot-reload the event server, the duties disappear. The perfect answer for that is including native storage assist to your extension.
Plasmo offers an in-built answer for this, referred to as @plasmohq/storage. Set up it utilizing the next:
npm set up @plasmohq/storage
We’ll fetch duties from localStorage, if there are any current.
import { Storage } from "@plasmohq/storage";
import { useEffect } from "react";

const storage = new Storage();

export perform Most important () {
  // ...code

  useEffect(() =>  []),
        // if there aren't any duties, set an empty array
        // this often will get triggered if the strategy fails or returns an error
        () => setTasks([])
      ),
    // run as soon as on mount
    []
  );
}
Contained in the useEffect, we use the storage.get() technique to verify for any saved fields, with the sector duties. If duties is current, we set the duties state. We will even set off one other callback right here if the promise is rejected, therefore setting the duties array as empty.
With that carried out, now we’ll add a job to native storage when the consumer clicks the submit button.
Contained in the submitHanlder:
async perform submitHanlder () {
  setTasks([...tasks, data]);
  setData("");

  // save to native storage
  await storage.set("duties", [...tasks, data]);
}
Right here, utilizing the storage.set() technique, the present checklist of duties is fed into the localStorage underneath the important thing duties.
With that carried out, the extension ought to now be capable of persist duties, even when the extension hot-reloads throughout improvement or if the extension is closed and re-opened.
Once more, we are able to use the storage.set() technique to take away the particular job.
Contained in the removeTask() perform, make the next modifications:
perform removeTask(index: quantity) {
  setTasks(knowledge.filter((job: string, i: quantity) => i !== index));

  // take away from native storage
  storage.set(
    "duties",
    knowledge.filter((job: string, i: quantity) => i !== index)
  )
}
The identical logic we used beforehand is utilized, whereas eradicating the particular job from the localStorage.
(Notice: To learn extra about @plasmohq/storage, go to the Plasmo Docs)
And, lastly, we’ve efficiently constructed an extension utilizing React and Plasmo that may preserve monitor of your duties. You’ll be able to add extra new cool options of your individual, and attempt to ship one to the Chrome Retailer!
Conclusion
Plasmo is a good framework to construct extensions with; particularly if you happen to’re simply beginning out and have a little bit of expertise with React.
The documentation I’ve linked on this article is beginner-friendly and comprises just about every thing it is advisable get began with Plasmo.
Plasmo remains to be underneath lively improvement, so remember which you could encounter bugs and different issues. Be sure you be part of Plasmo’s official Discord Server if you’re caught anyplace or have any strategies for upcoming variations, and naturally be at liberty to go away your ideas within the feedback part beneath.
Full visibility into manufacturing React apps
Debugging React functions will be tough, particularly when customers expertise points which can be laborious to breed. In case you’re occupied with monitoring and monitoring Redux state, routinely surfacing JavaScript errors, and monitoring sluggish community requests and element load time, strive LogRocket. 

LogRocket is sort of a DVR for net and cellular apps, recording actually every thing that occurs in your React app. As a substitute of guessing why issues occur, you’ll be able to mixture and report on what state your software was in when a difficulty occurred. LogRocket additionally displays your app’s efficiency, reporting with metrics like consumer CPU load, consumer reminiscence utilization, and extra.
The LogRocket Redux middleware bundle provides an additional layer of visibility into your consumer classes. LogRocket logs all actions and state out of your Redux shops.
Modernize the way you debug your React apps — begin monitoring without cost.
