
React Native pointerEvents are certainly one of many View responder props that decide how a View interacts with contact occasions. On this article, we might be tips on how to use pointerEvents to deal with totally different occasions in our React Native functions.
Bounce forward:
To comply with this tutorial, you will want to have React Native put in in your laptop and an understanding of how React Native works.
A quick historical past of inputs and occasions for net apps
Years in the past, computer systems had been primarily designed for mouse inputs. In consequence, net apps solely needed to hear for and work together with mouse occasions, which made issues straightforward and easy for builders too, who solely needed to write logic for these mouse occasions.
Mouse occasions are occasions which are triggered on an motion or motion of the mouse. They hearth when a consumer makes use of the mouse to work together with an internet app’s DOM components. Examples of mouse occasions embrace onMouseEnter, onMouseLeave, onDoubleClick, onDrag, onDragEnter, and so forth.
As years handed, innovation and modernization led to newer units — together with cellular units — that included different types of inputs, like contact inputs and pen inputs. Therefore, totally different occasion sorts had been designed to deal with these new occasions, together with contact occasions.
Contact occasions are occasions which are triggered when a consumer interacts with touchable elements on a touchscreen gadget. Examples of contact occasions embrace onTouchCancel, onTouchEnd, onTouchMove, onTouchStart, and so forth.
Nevertheless, writing and duplicating the identical logic for various occasions and totally different units was a bit pointless and ambiguous, to say the least. There was additionally the problem of compatibility, because the logic for mouse occasions wouldn’t work for touchscreens and vice versa.
A brand new type of enter known as a pointer enter was constructed to resolve this subject. A pointer might be any type of contact made by the consumer and encompasses contact inputs, pen inputs, multi-touch, and mouse inputs.
Equally, the pointerEvents prop was designed to deal with this enter kind and mix the occasions above; i.e., contact occasions, mouse occasions, and pen assist.
What’s the React Native pointerEvents prop?
In React Native, the View is essentially the most basic part for constructing a consumer interface. pointerEvents controls whether or not the View might be the goal of a contact occasion or not — occasions which are triggered when a consumer makes a degree or contact contact with the gadget floor.
These occasions contains pointerDown, pointerUp, and so forth.
Let’s have a look at the instance beneath:
{/* App.js */}

 <View type={types.app} pointerEvents="none">
      <View type={types.header}>
        <Textual content type={types.title}>React Native for Net</Textual content>
      </View>
      <Button onPress={() => console.log("take a look at")} title="Instance button" />
</View>
Within the instance above, we added pointerEvents to the foundation View and set it to none. What this implies is that the View — with its corresponding kids — is deactivated from being the goal of any pointer occasion. In different phrases, for those who attempt to click on on the kid Button, it is not going to be clickable.
The none property is certainly one of three pointerEvents properties in React Native. Let’s be taught extra about these properties and the way they have an effect on the View.
Understanding pointerEvents properties in React Native
In React Native, pointerEvents have 4 properties:
autononebox-onlybox-none
The default worth of pointerEvents in React Native is auto. Setting pointerEvents to auto signifies that the View and its corresponding kids might be the goal of contact occasions. Copy the code within the instance beneath and check out clicking on the ensuing button:
{/* App.js */}

 <View type={types.app} pointerEvents="auto">
      <View type={types.header}>
        <Textual content type={types.title}>React Native for Net</Textual content>
      </View>
      <Button onPress={() => console.log("take a look at")} title="Instance button" />
</View>
Since pointerEvents is about to auto, the button needs to be clickable.
Extra nice articles from LogRocket:
In distinction, as we noticed earlier, the none property worth signifies that neither the View nor its corresponding kids will ever be the goal of contact occasions.
Nevertheless, setting the pointerEvents prop to box-none signifies that whereas the View is rarely the goal of the contact occasions, its kids might be. Let’s have a look at the next instance View set to box-none:
{/* App.js */}

 <View type={types.app} pointerEvents="box-none">
      <View type={types.header}>
        <Textual content type={types.title}>React Native for Net</Textual content>
      </View>
      <Button onPress={() => console.log("take a look at")} title="Instance button" />
</View>
Within the instance above, the View just isn’t the goal of contact occasions, however its subviews can nonetheless be the targets, which is why the kid Button might be clicked on this case.
Lastly, setting the pointerEvents prop to box-only signifies that the View might be the goal of the contact occasions, however its kids can’t be. Let’s have a look at the next instance View set to box-only:
{/* App.js */}

 <View type={types.app} pointerEvents="box-only">
      <View type={types.header}>
        <Textual content type={types.title}>React Native for Net</Textual content>
      </View>
      <Button onPress={() => console.log("take a look at")} title="Instance button" />
</View>
Within the instance above, the Button can’t be clicked as a result of it isn’t a goal of contact occasion; solely the mother or father View is.
Advantages of React Native pointerEvents
Within the transient historical past part above, we reviewed the aim of pointerEvents in React Native. Now, let’s go over their advantages — in different phrases, the explanation why the pointerEvents prop is essential.
Establishing compatibility throughout enter sorts
The pointerEvents prop makes compatibility potential throughout units with totally different enter varieties, unifying mouse, contact, and pen occasions.
This implies as a substitute of rewriting the logic for separate occasion listeners, you possibly can apply the identical logic for all enter sorts on the similar time utilizing pointerEvent listeners. Check out the instance code blocks beneath.
As an alternative of doing this:
/* TouchScreen units */
one thing.addEventListener("landing", () => {
    // write your logic
});

/* Mouse units */
one thing.addEventListener("mousedown", () => {
    // write your logic
});
You are able to do this as a substitute:
/* TouchScreen and Mouse units */
one thing.addEventListener("pointerdown", () => {
    // write your logic
});
Bettering app efficiency
In addition to making compatibility potential throughout enter sorts, making use of the identical logic for all enter sorts utilizing the pointerEvents prop can assist with among the heavy lifting in your code.
Look again on the code instance above. As an alternative of writing the identical logic for various units — contact and mouse units — we merely used pointerEvents to mix the 2 into one. pointerdown will at all times work for mousedown, landing, and different occasions.
Because you don’t need to duplicate your code to hearken to totally different occasions for various gadget inputs, you possibly can lower down among the code ambiguity, which helps enhance or optimize the applying’s efficiency.
Detecting enter sorts
One other good thing about the pointerEvent prop is that it may distinguish between enter sorts if mandatory. Which means it may detect when the consumer is utilizing a contact, mouse, or pen enter gadget.
/* TouchScreen and Mouse units */
one thing.addEventListener("pointerdown", (e) => {
    // write your logic
    console.log(e.pointerType)
});
Within the above code, we’re listening for the mousedown and the landing occasions utilizing the pointerdown occasion. While you click on the mouse on the internet or make a contact contact on a cellular gadget, you possibly can examine the console logs to see the kind of occasion that was known as.
Let’s have a look at the code beneath to grasp this profit higher:
/* App.js */
import React from "react";
import { Button, StyleSheet, Textual content, View } from "react-native";

perform App() {
  const getDeviceType = (e) => {
    console.log(e);
  };

  return (
    <View type={types.app} pointerEvents="box-none">
      <View type={types.header}>
        <Textual content type={types.title}>React Native for Net</Textual content>
      </View>
      <Button onPress={getDeviceType} title="Instance button" />
    </View>
  );
}

const types = StyleSheet.create({
  app: {
    marginHorizontal: "auto",
    maxWidth: 500
  },
  header: {
    padding: 20
  },
  title: {
    fontWeight: "daring",
    fontSize: "1.5rem",
    marginVertical: "1em",
    textAlign: "middle"
  }
});
export default App;
Within the code above, we expanded on the instance we’ve been utilizing. After we click on on the ensuing button, we will once more examine the developer console to see what occasion or occasions we triggered.
Open up your developer console in your browser to see what we’re speaking about. It’s best to see one thing that appears just like the picture beneath:
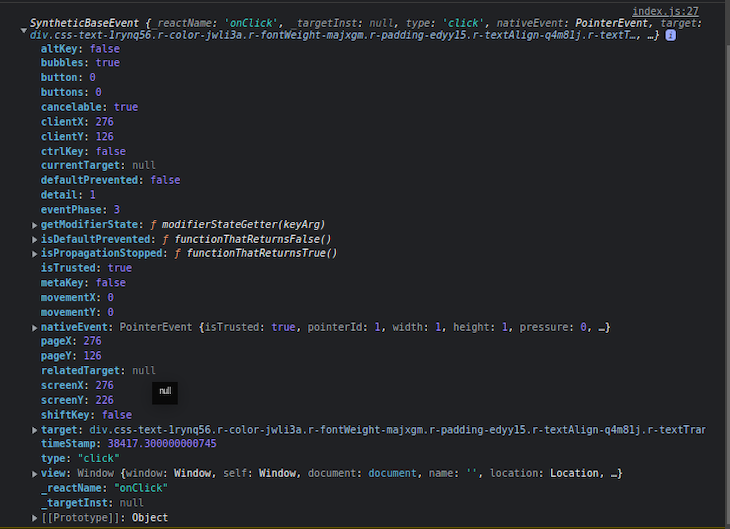
If you happen to have a look at the nativeEvent, you possibly can see the pointerEvent object displaying the pointerId, width, top, and different properties.
One pointerEvent object property is the pointerType, which exhibits the gadget enter. With this kind, we will decide if the gadget is a mouse, pen, or touchscreen gadget.
Contained in the getDeviceType perform in our App.js file, let’s change the console.log technique to the next:
/* App.js */

const getDeviceType = (e) => {
  console.log(e.nativeEvent.pointerType); // "contact" for touchscreen units
};
Faucet on the button after modifying your code, and you will notice contact logged to the console because the gadget sort, which exhibits that we’re on a touchscreen gadget. It should present mouse if we’re operating our utility on a mouse enter gadget like a pc.
If you happen to like, you should use this and do no matter you need primarily based on the gadget the consumer is utilizing.
/* App.js */

const getDeviceType = (e) => {
   if (e.nativeEvent.pointerType === "contact") {
     // do one thing
   } else if (e.nativeEvent.pointerType === "mouse") {
     // do one thing totally different
   } else {
     // do one thing else fully
   }
};
For instance, if you’re constructing a specific characteristic for cellular units solely and are not looking for that characteristic to run on the internet, you possibly can alert the consumer when the consumer tries the characteristic on the internet.
/* App.js */
useEffect(() => {
    window.addEventListener("pointerdown", (e) => {
      if (e.nativeEvent.pointerType === "contact") {
        console.log(e.pointerType);
      } else if (e.nativeEvent.pointerType === "mouse") {
        alert("Net characteristic just isn't supported");
      }
    });
  }, []);
Utilizing pointerEvents in a TextInput kind
We will use the pointerEvent in lots of conditions — like including a drag characteristic to graphic creator like Canva, making a drag and quick ahead characteristic for video gamers, and in lots of different state of affairs. On this instance, we are going to see how we will use it in a textual content enter kind.
Think about that we’re constructing a relationship utility and we wish to provide customers the power to use their Google or Fb account to log in.
Let’s say the consumer logs in with the Google account. Their Google login info gives us some particulars just like the consumer’s identify, e mail handle, and picture. After the consumer is logged in, we would like the consumer to fill out the opposite particulars that the applying requires, like age, nationality, intercourse, occupation, and so forth.
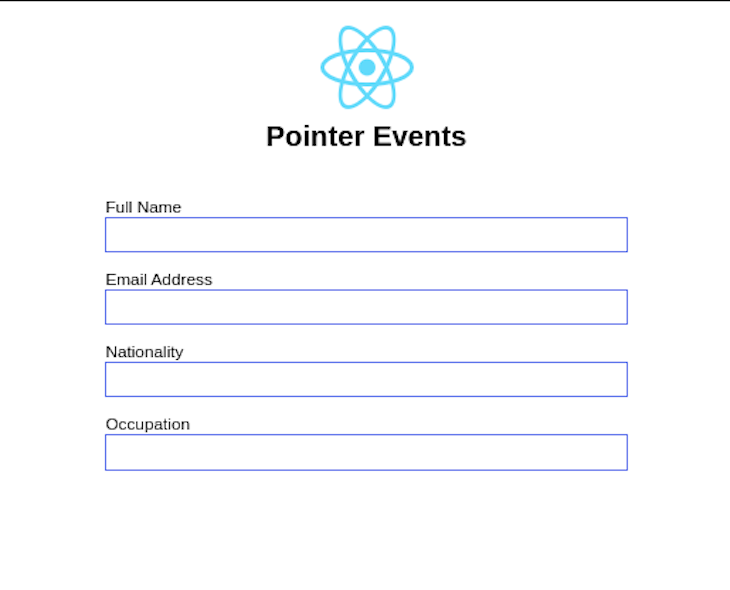
On this state of affairs, we may have a easy kind that appears like this:
/* App.js */

import React from "react";
import { TextInput, Picture, StyleSheet, Textual content, View } from "react-native";
const logoUri =
  "https://d33wubrfki0l68.cloudfront.web/554c3b0e09cf167f0281fda839a5433f2040b349/ecfc9/img/header_logo.svg";
perform App() {
  return (
    <View type={types.app}>
      <View type={types.header}>
        <Picture
          accessibilityLabel="React emblem"
          supply={{ uri: logoUri }}
          resizeMode="include"
          type={types.emblem}
        />
        <Textual content type={types.title}>Pointer Occasions</Textual content>
      </View>
      <View>
        <View type={types.textInputParent}>
          <Textual content>Full Identify </Textual content>
          <TextInput type={types.textInput} />
        </View>
        <View type={types.textInputParent}>
          <Textual content>Electronic mail Handle </Textual content>
          <TextInput type={types.textInput} />
        </View>
        <View type={types.textInputParent}>
          <Textual content>Nationality </Textual content>
          <TextInput type={types.textInput} />
        </View>
        <View type={types.textInputParent}>
          <Textual content>Occupation</Textual content>
          <TextInput type={types.textInput} />
        </View>
      </View>
    </View>
  );
}
const types = StyleSheet.create({
  app: {
    marginHorizontal: 100,
    maxWidth: 500
  },
  emblem: {
    top: 70
  },
  header: {
    padding: 20
  },
  textInputParent: {
    marginVertical: 7
  },
  textInput: {
    backgroundColor: "clear",
    borderWidth: 2,
    borderColor: "#516beb",
    width: "100%",
    top: 30
  },
  title: {
    fontWeight: "daring",
    fontSize: "1.5rem",
    marginVertical: ".4em",
    textAlign: "middle"
  }
});
export default App;
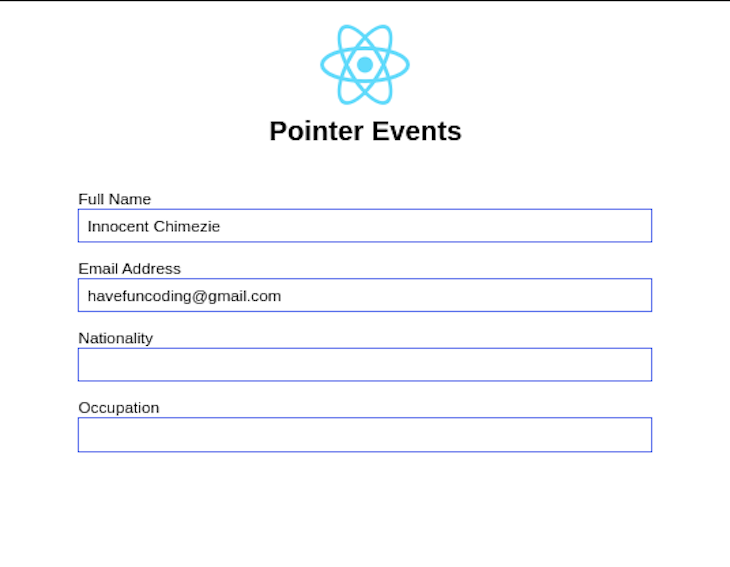
For the reason that consumer is logging into the applying utilizing their Google login info, it means we have already got entry to their e mail handle and identify. We will autofill this info to optimize the consumer’s expertise and use pointerEvents to disable the autofilled textual content inputs in order that the consumer can’t edit them.
To do that, we are going to add the pointerEvent props to the View that accommodates our textual content enter in order that it really works just for that View and its kids:
/* App.js */

 <View
          type={types.textInputParent}
          pointerEvents={userDetails.identify ? "none" : "auto"}
        >
          <Textual content>Full Identify </Textual content>
          <TextInput type={types.textInput} worth={userDetails.identify} />
        </View>
        <View
          type={types.textInputParent}
          pointerEvents={userDetails.e mail ? "none" : "auto"}
        >
          <Textual content>Electronic mail Handle </Textual content>
          <TextInput type={types.textInput} worth={userDetails.e mail} />
        </View>
We’re utilizing a conditional assertion to examine if the consumer’s e mail and identify exist. If this info exists, then we autofill the suitable fields and deactivate the View. In any other case, the consumer can fill these fields themselves.
This works very well as a result of you should use the identical kind for each Google and Fb logins, in addition to for Apple logins and the conventional login kind, too. You solely deactivate the shape enter when the required particulars are already obtainable.
Check out the complete code and output beneath:
/* App.js */

import React, { useState } from "react";
import { TextInput, Picture, StyleSheet, Textual content, View } from "react-native";
const logoUri =
  "https://d33wubrfki0l68.cloudfront.web/554c3b0e09cf167f0281fda839a5433f2040b349/ecfc9/img/header_logo.svg";
perform App() {
  const [userDetails, setUserDetails] = useState({
    identify: "Harmless Chimezie",
    e mail: "[email protected]",
    nationality: "",
    occupation: ""
  });
  return (
    <View type={types.app}>
      <View type={types.header}>
        <Picture
          accessibilityLabel="React emblem"
          supply={{ uri: logoUri }}
          resizeMode="include"
          type={types.emblem}
        />
        <Textual content type={types.title}>Pointer Occasions</Textual content>
      </View>
      <View>
        <View
          type={types.textInputParent}
          pointerEvents={userDetails.identify ? "none" : "auto"}
        >
          <Textual content>Full Identify </Textual content>
          <TextInput type={types.textInput} worth={userDetails.identify} />
        </View>
        <View
          type={types.textInputParent}
          pointerEvents={userDetails.e mail ? "none" : "auto"}
        >
          <Textual content>Electronic mail Handle </Textual content>
          <TextInput type={types.textInput} worth={userDetails.e mail} />
        </View>
        <View type={types.textInputParent}>
          <Textual content>Nationality </Textual content>
          <TextInput type={types.textInput} />
        </View>
        <View type={types.textInputParent}>
          <Textual content>Occupation</Textual content>
          <TextInput type={types.textInput} />
        </View>
      </View>
    </View>
  );
}
const types = StyleSheet.create({
  app: {
    marginHorizontal: 100,
    maxWidth: 500
  },
  emblem: {
    top: 70
  },
  header: {
    padding: 20
  },
  textInputParent: {
    marginVertical: 7
  },
  textInput: {
    backgroundColor: "clear",
    borderWidth: 2,
    borderColor: "#516beb",
    width: "100%",
    top: 30,
    paddingLeft: 6
  },
  title: {
    fontWeight: "daring",
    fontSize: "1.5rem",
    marginVertical: ".4em",
    textAlign: "middle"
  }
});
export default App;
Conclusion
On this article, we went over what the React Native pointerEvents prop is and checked out a few of its properties and advantages. We additionally went over an instance displaying how pointerEvents works within the sensible state of affairs of detecting enter sorts, together with an instance use case for pointerEvents in a TextInput kind.
I hope this text about React Native pointerEvents has been useful for you. You probably have feedback or questions, let me know within the feedback part beneath.
LogRocket: Immediately recreate points in your React Native apps.

LogRocket is a React Native monitoring answer that helps you reproduce points immediately, prioritize bugs, and perceive efficiency in your React Native apps.
LogRocket additionally helps you improve conversion charges and product utilization by displaying you precisely how customers are interacting together with your app. LogRocket’s product analytics options floor the explanation why customers do not full a specific move or do not undertake a brand new characteristic.
Begin proactively monitoring your React Native apps — attempt LogRocket free of charge.
