
Somebody offered you on Flutter? Improbable! Ship them my regards; they did an excellent factor, as you’ll be constructing apps very quickly. You’ll doubtless discover that working and testing flutter apps is far more frustration free than you might need skilled with different frameworks like Ionic or React Native. Quickly, you’ll by no means need to construct apps in anything ever once more!
So, now that I’ve bought you all enthusiastic about constructing Flutter apps, you could be questioning what’s the easiest way to run and take a look at your shiny new app? For instance, with Ionic, you in all probability relied on the browser for lots of the event work. Perhaps this wasn’t supreme, however it supplied an thought of how the app’s UI behaved.
With Flutter, you possibly can really nonetheless do that, though the identical limitation applies. Nevertheless, if the {hardware} you’re meant to make use of within the app isn’t out there by way of the browser, you’ll haven’t any selection however to resort to one thing just a little extra superior – testing with simulators or actual gadgets.
As at all times, when selections are offered one should weigh the choices. In any case, utilizing the suitable instrument for the suitable job is the primary common rule in software program improvement.
On this article, we’ll discover the advantages of utilizing simulation vs. actual machine testing for Flutter apps. By the tip of this information, you’ll hopefully see that neither possibility is admittedly optionally available! The excellent news? With Flutter, each simulation and actual machine testing work rather well and are largely frustration-free.
If you happen to’re on a Home windows machine, you possibly can ignore all iOS-related steps on this information. For Android, every little thing talked about on this article must be related.
Leap forward:
Getting began
Earlier than we get into the primary portion of the article, I’d wish to make a fast detour to spotlight just a few essential factors.
- Even if you’re simply planning to construct a easy “Hey World” app, you’ll shortly understand that the simulator is indispensable when designing and constructing Flutter apps; much like the browser in internet improvement, the simulator turns into the instrument you possibly can’t actually keep away from
- If you happen to’re going to construct Flutter apps that are supposed to run on iOS, you’ll haven’t any selection however to develop them on an Apple machine. Particularly, you’ll want a MacOS-powered machine, as you’ll want Xcode not only for signing the app, however just a few different ins and outs like including the icons, and so forth.
- Xcode additionally comes with all the most recent out there simulators. Compared to Android Studio the place it’s important to set up it individually, on a macOS machine you don’t have to fret about any of that
- Whether or not you’re on an Intel Mac or Apple Silicon (M1, M2), simulators will work simply wonderful; nevertheless, fewer Android simulators are at present out there for Apple Silicon
- If you happen to’re growing on an Apple Silicon machine, you possibly can technically get away with out utilizing a simulator, though the method turns into a tad extra time consuming. iOS and iPadOS apps run simply wonderful on macOS so long as it’s an M1/M2 machine, however you’ll must construct the apps and set up, them to see them run, which takes significantly longer than Flutter’s scorching reload
- Creating on an Apple Silicon machine requires Rosetta 2, so be sure to have it put in earlier than you try constructing any apps
N.B., for additional context, the event machine used within the information is an Apple MacBook Air M2 with macOS Monterey 12.5.1, 16 GB RAM, and 512 SSD
Checking the well being of your Flutter dev atmosphere
Earlier than I begin growing an app, I at all times run Flutter physician to ensure I’m beginning with a wholesome Flutter improvement atmosphere. That is a particularly helpful instrument, and all it’s important to do is sort flutter physician within the command line after which press Enter.
Ideally, you’ll need to see each related requirement checked off. For instance, when you’re not focused on growing Android apps, seeing the ❌ subsequent to the Android-specific gadgets, isn’t one thing it’s worthwhile to fear about.
If you happen to’re like me, although, and need to see every little thing with the ✅ mark, then simply be sure to comply with Flutter physician’s directions.
Subsequent, let’s fireplace up some simulators and see why they’re so essential to your Flutter improvement stream.
Organising and working simulators and emulators
Enjoyable truth: Apple calls its app testing instruments simulators, however within the Android world they’re known as emulators. Virtually talking, although, there isn’t any distinction; simulators and emulators do the identical factor.
You’ll discover that Apple’s simulators are typically extra light-weight on system assets, whereas Android’s emulators are a tad extra bloated, which might result in slower boot occasions and even working out of reminiscence. Having stated that, emulators have improved quite a bit since 2015, or so.
iOS simulators
That is the place putting in Xcode turns into inevitable. The excellent news is that, for simulators, all you really want to do is set up it and settle for phrases and situations if and when it asks. Xcode is out there on the Mac App Retailer, and I might extremely advise in opposition to downloading it from anyplace else. The very last thing you need is a compromised improvement atmosphere.
Downloading and putting in Xcode will take an unusually very long time. The shortest time I’ve seen was slightly below half-hour. Watch an episode of your favourite present, have a meal, name your mother and father, or take your pet ferret for a stroll. It’ll take some time. 🙂
As soon as Xcode is put in, it is suggested that you simply run the next two instructions in your terminal:
sudo xcode-select --switch /Functions/Xcode.app/Contents/Developer
sudo xcodebuild -runFirstLaunch
To be completely sincere, I’ve by no means run these instructions and I’ve at all times someway gotten away with it. So, when you neglect to run these instructions, it in all probability gained’t be the tip of the world. Flutter can also be nice at telling you what must be completed in case you missed one thing.
Extra nice articles from LogRocket:
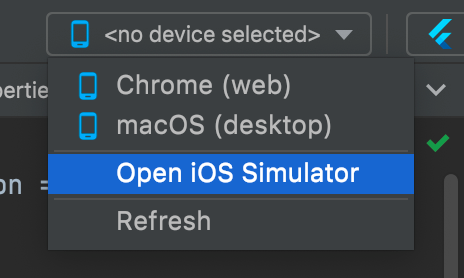
Like most issues on a Mac, working a simulator may be completed in a number of methods. Listed here are three choices:
- by way of the command line, like so:
open -a Simulator - by typing Simulator into Highlight
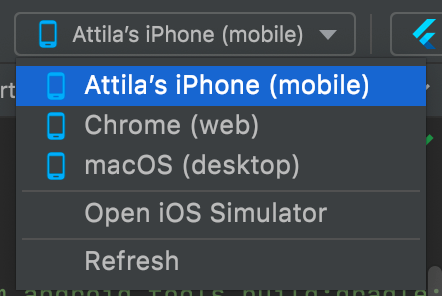
- or, my favourite, by way of Android Studio, within the high machine dropdown record, choose Open iOS Simulator
I believe it’s additionally price noting which you could have multiple simulator open on the identical time.
At this level, all there may be left to do is fireplace up that incredible new app you began constructing. The quickest method to try this is by urgent the inexperienced Play button in Android Studio together with your chosen simulator chosen.
Earlier than closing the simulator, I like to recommend stopping the app with the pink Cease button. Closing the simulator occasion is so simple as urgent the Shut button on the machine window, however that gained’t really shut the Simulator app. If you happen to’d like to shut that too, the only method is to right-click on the Simulator icon, then choose Give up.
Android emulators
Putting in Android emulators is a tad extra concerned, however simply an additional few clicks, nothing too sophisticated. The principle distinction between Xcode and Android Studio is that the latter doesn’t include gadgets already put in. It’s fully as much as you what machine and what Android model you need to add.
So as to add a brand new machine, go to the Digital Gadget Supervisor in Android Studio after which go to View > Device Home windows > Gadget Supervisor. To make sure a easy expertise, I like to recommend choosing a machine working with 16GB of RAM. Including a brand new machine is so simple as urgent the Create Gadget button and choosing the suitable machine from the record.
That is the purpose the place issues in all probability begin to really feel acquainted. To make sure your app has an Android machine to run on, you’ll want to start out that machine out of your machine supervisor by urgent the Play button. If you happen to skip this step, the machine gained’t present up in your machine record whenever you need to run your app.
![]()
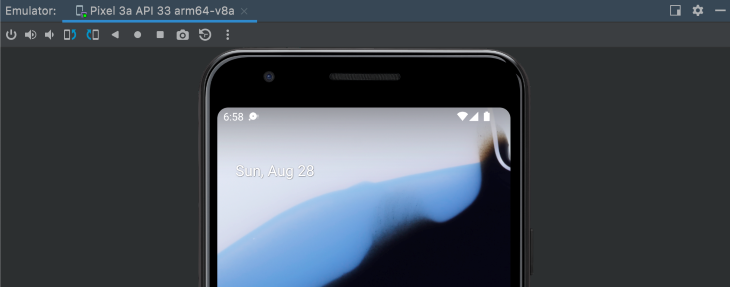
Now that you simply’re all set as much as run an app in an Android emulator, you are able to do precisely what you’ve been doing with iOS situations. Choose the machine, press the inexperienced Play button, and watch your app come to life on an Android machine!
Closing the emulator is a tad much less intuitive in comparison with iOS simulators. You’ll must go to the window your emulator is working in, and press the ✖️ subsequent to the emulator’s identify.
When is it greatest to make use of simulators vs. actual gadgets?
Opening a simulator may be completed each from the command line, from Android Studio’s GUI and even VS Code’s GUI. I choose utilizing the GUIs as they permit me to pick the precise simulator I need, however it’s best to use the tactic that feels most snug.
The largest promoting level of a simulator is its hassle-free setup. Upon getting Xcode put in, you’re good to go.
The identical goes for Android apps. When you’ve added a simulator, you merely begin it after which merrily work away in your app. There’s no must stress about code signing, developer profiles, or accounts.
Throughout a time of more and more complicated software program improvement, working Flutter apps on a simulator feels uncharacteristically easy and easy.
The second-biggest selling-point of simulators is the velocity. Sizzling reload is just about instantaneous, and even a contemporary run may be as quick as just some seconds. For instance, a mid-level complexity app that I’m engaged on proper now can spin up in simply 8.8sec on an Apple M2 MacBook Air.
Organising and working Flutter apps on actual gadgets
iOS actual gadgets
Operating your app on a bodily iOS machine is usually simple; nevertheless, there are two classes of builders:
- These with a free Apple developer account
- These with a paid Apple developer account subscription
If you happen to’re a part of the primary class of builders, you’ll must arrange an Apple Developer Provisioning Profile manually.
I like to recommend that anybody critically contemplating constructing iOS apps, buy an Apple developer account subscription. The developer account subscription makes issues just about plug-and-play and it’s required to launch the app.
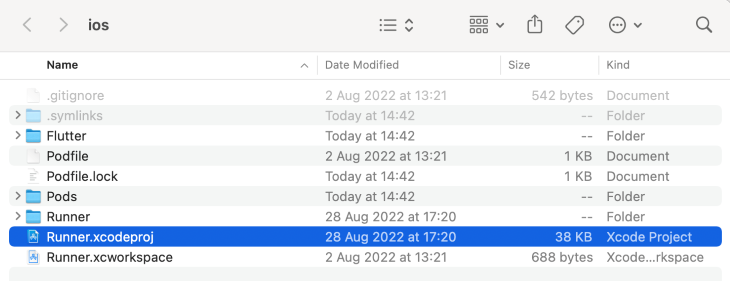
If you happen to’d reasonably not spend the upfront subscription price, you’ll must open the Runner.xcodeproj file situated in your Flutter venture’s iOS folder.
Subsequent, you’ll want to finish a number of fields underneath Id, similar to “Show Identify”, “Bundle Identifier”, “Model”, “Construct”. What’s essential right here is to decide on a reasonably distinctive app identify, maybe one thing like: com.yourFullName.yourAppName
You’ll need to mechanically handle signing and select your self because the group, like so:
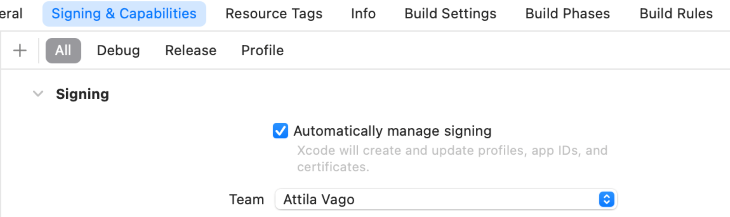
You’ll doubtless be prompted to permit keychain entry; to avoid wasting your self some additional clicks, choose At all times Enable.
Lastly, given that you simply’re on a free developer account, on the related iPhone or iPad, you’ll in all probability must go to Settings > Basic > VPN and Gadget Administration and belief the app and developer.
If you happen to’re a part of the second class of builders, you’ll simply want to pick the suitable group, test that Mechanically Handle Signing is on, plug the machine in, faucet Belief on the immediate, and you ought to be able to go!
All that’s left to do now could be choose the machine from the dropdown and run the app.
N.B., if at any level in the course of the construct you get bizarre permission points like “iproxy can’t be opened as a result of the developer can’t be verified”, this may be simply resolved by going to System Preferences > Safety & Privateness and clicking Enable Anyway
Android actual gadgets
In relation to working on an actual Android machine, identical to for emulators, issues do get a tad extra concerned. If you happen to’re used to working with Apple, I like to recommend paying specific consideration to the Android steps to avoid wasting your self pointless hair pulling and frustration.
On Android, you first want to permit a tool for use in developer mode.
- Go to Settings > About Telephone
- Scroll all the way down to Construct Quantity and faucet repeatedly till you see the message: “You at the moment are a developer”. If solely it was that simple to turn into a developer! 😆
- Go to System > Superior > Developer Choices
- Make certain Developer Choices is On
- Scroll all the way down to USB debugging and switch it On
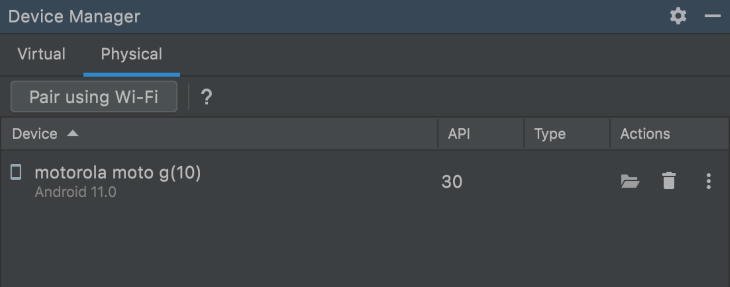
In Android Studio’s Gadget Supervisor, it’s best to see your machine listed underneath Bodily. For instance, as soon as I added my take a look at Moto G10 machine, it appeared as proven under.
The excellent news is that you simply don’t must fiddle with developer provisioning profiles such as you would on Xcode. You simply must run the app, and it’ll pop up in your machine. Sizzling reload also needs to work and must be close to instantaneous.
When is it greatest to make use of actual gadgets vs. simulators?
Simulators and emulators are wonderful, and I might typically advise utilizing them 90 p.c of the time throughout improvement. The truth that they’re proper there on the display screen subsequent to your code, require no extra gadgets to run, and require no cables to attach is a comfort that can not be understated.
Mix all that with Flutter’s scorching reload, and you’ve got your self a very snug developer atmosphere that’s (in my view) a pleasure to make use of.
Nevertheless, there comes some extent whenever you need to see your app outdoors the dev atmosphere and expertise the UX in a extra actual life setup. That is when the actual gadgets come into play.
There are a number of capabilities which you could solely actually take a look at with a bodily machine, similar to scanning a QR code off one other machine or testing NFC capabilities. One other instance is ensuring that your SQLite database is working as anticipated outdoors the event atmosphere earlier than speeding your app to Apple’s App Retailer or Google’s Play Retailer.
Conclusion
Testing Flutter apps on actual gadgets is just about inevitable, however it is going to in all probability not be your foremost focus as you design and construct your app. That being stated, it’s nonetheless essential to make bodily gadgets a part of your improvement workflow. Failing to take action will lead to catching bugs far too late, maybe even in manufacturing. Given how course of intensive it’s to push new updates to cell apps, stopping embarrassing bugs must be paramount for each software program developer.
On this article, we reviewed easy methods to test the well being of your improvement atmosphere, easy methods to arrange and run iOS simulators and Android emulators, and easy methods to arrange and run Flutter apps on actual iOS and Android gadgets. We additionally mentioned when and why to include each simulation and actual machine testing into your Flutter app improvement.
I hope you discovered this text helpful!
LogRocket proactively surfaces and diagnoses a very powerful points in your apps and web sites

Hundreds of engineering and product groups use LogRocket to scale back the time it takes to know the foundation reason for technical and value points. With LogRocket, you’ll spend much less time on back-and-forth conversations with prospects and take away the limitless troubleshooting course of. LogRocket lets you spend extra time constructing new issues and fewer time fixing bugs.
Be proactive – strive LogRocket at present.
