
This tutorial is a fast newbie information on the right way to make a desk in InDesign. We’ll create a yearly calendar that you could replace simply.

Tips on how to make a desk in InDesign is an enormous matter. On this newbie’s information, I am going to present you the right way to insert a desk in InDesign to make a yearly calendar. This helpful organizer might be up to date with totally different colours for various years.
And for those who choose video tutorials, remember to go to the Envato Tuts+ channel. There you may discover a great deal of helpful sources, like this new video on the right way to create a desk in InDesign:
Discover Excessive-High quality Fonts and Sources at Envato Parts


Are you in search of calendar templates which are prepared to make use of? Envato Parts is an superior platform with wonderful belongings. For a small month-to-month price, you’ve got entry to high-quality belongings and limitless downloads. Yow will discover something from fonts to images, graphic templates, and rather more!
What You will Study in This InDesign Tutorial
On this tutorial on the right way to create a desk in InDesign, you may study:
- Tips on how to correctly arrange an InDesign doc
- Tips on how to insert a desk in InDesign
- Tips on how to create desk types
- Tips on how to edit strokes and cell colours in a desk
What You will Want
For this tutorial, you may want entry to Adobe InDesign and the Constructio font. Set up the font in your system and also you’re prepared to start!
1. Tips on how to Set Up an InDesign File
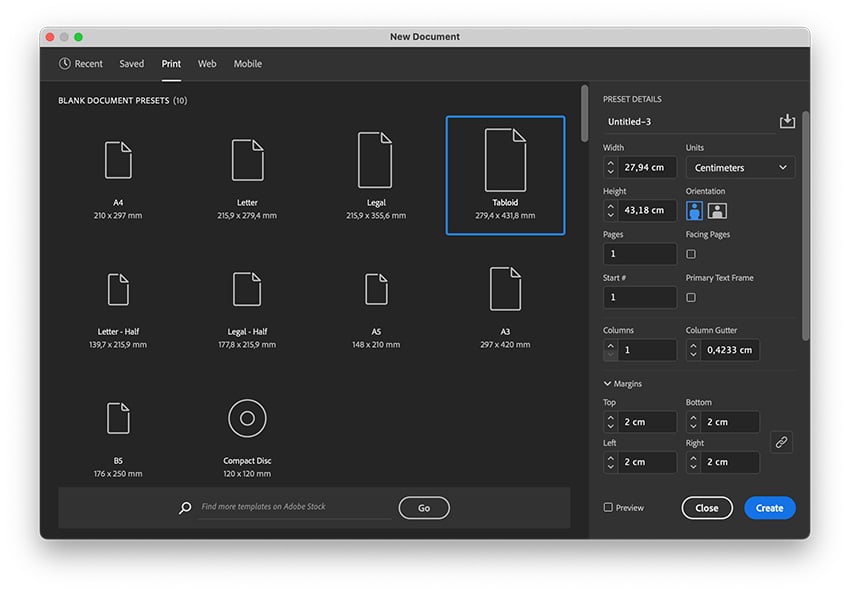
Open InDesign and create a New Doc.
Within the popup window, choose Print from the highest menu. Choose the Tabloid clean doc preset. Beneath Preset Particulars, set the Models to Centimeters. Set the Margin to 2 cm.
Click on Create.


2. Tips on how to Create a Desk in InDesign
Step 1
First, we’ll add the yr to the calendar through the use of Tables.
To create a desk in InDesign, choose the Textual content Software (T) from the toolbar. Create a textual content field that runs via the peak of the doc, margin to margin. Set the Width to 5.1 cm on the Management panel.


Step 2
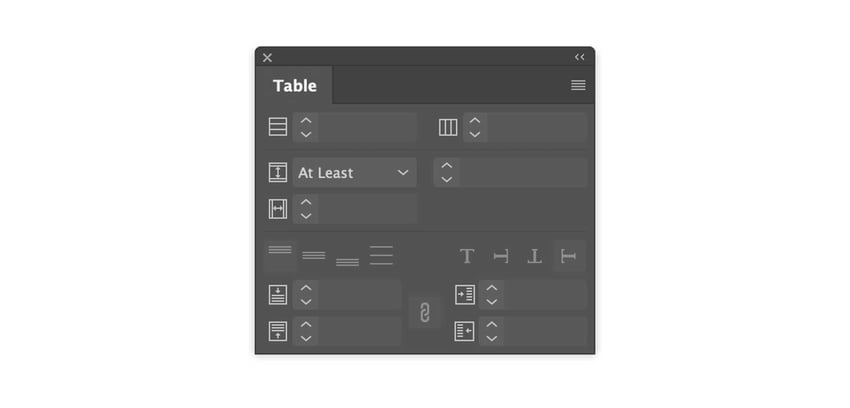
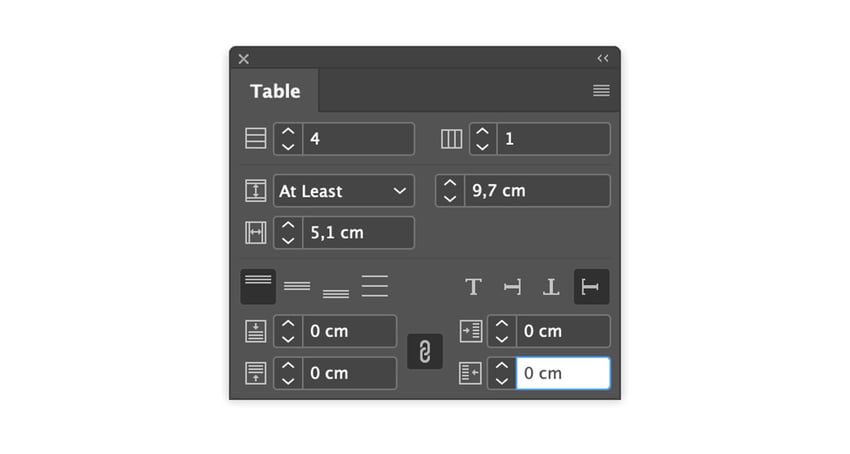
Go to Window > Desk to open the Desk panel.


Step 3
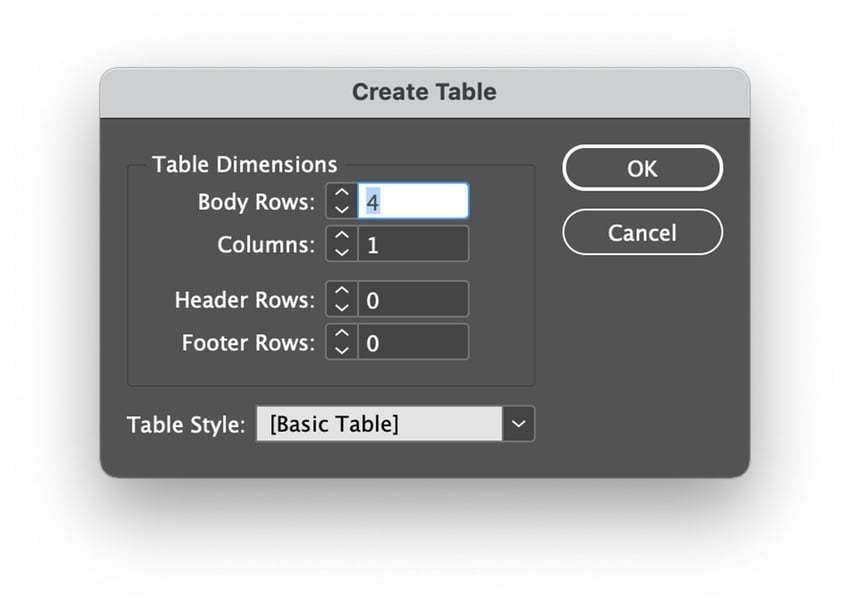
Double-click throughout the textual content body we created. Go to Desk > Create Desk. Within the popup window, set the Physique Rows to 4 and the Columns to 1. Click on OK.

Step 4
To pick out the desk, double-click on the primary cell and prolong your mouse to the opposite cells.
Within the Desk panel, set the Row Peak to At Least and 9.7 cm. Choose the Align to High button and the Rotate Textual content 270° button. Set all of the Inset values to 0.


Step 5
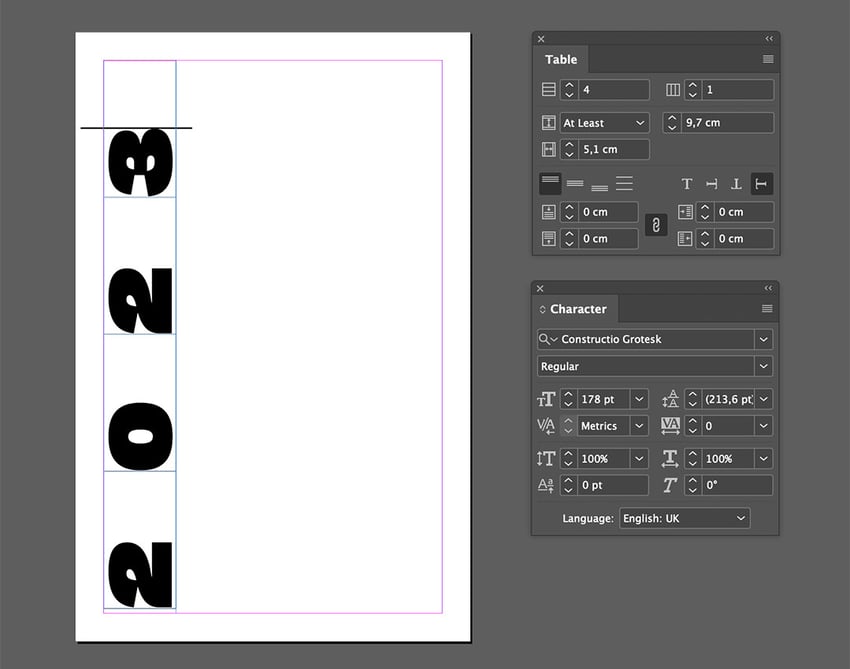
Go to Window > Sort > Characters to open the Characters panel.
With the entire cells nonetheless chosen, go to the Character panel. Set the Font to Constructio Grotesk, and set the Measurement to 178 pt.


Step 6
Click on on the underside cell of the desk and add the quantity “2”. Click on on the next cells so as to add the remainder of the yr “023.”


Step 7
Choose the entire cells and choose the Align Middle choice on the Management panel.


Step 8
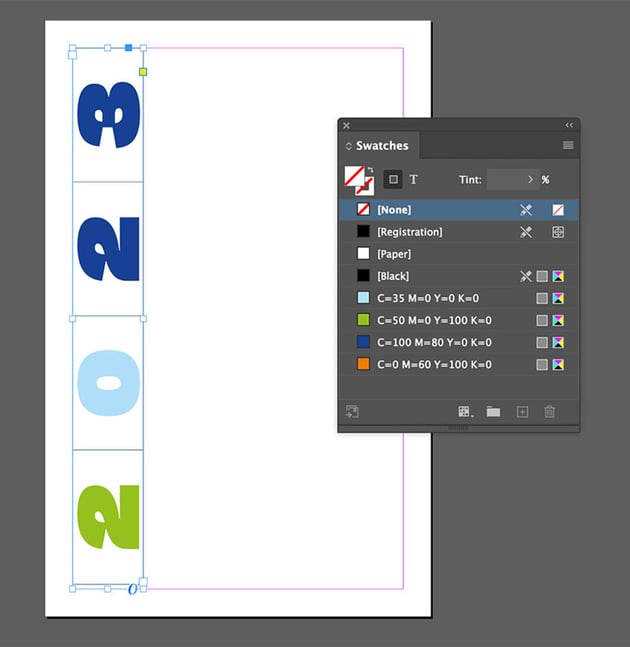
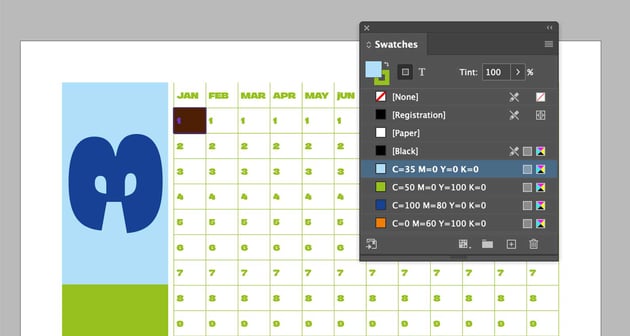
Go to Window > Swatches. Right here we’ll add just a few coloration swatches to make use of on the calendar. Click on on the Add New Swatch button. The primary coloration is Mild Blue; set the Cyan to 35 and depart the remainder of the colours on 0.


Step 9
Repeat the earlier step and add the next colours:
- Inexperienced: C=50, M=0, Y=100, Ok=0.
- Darkish Blue: C=100, M=80, Y=0, Ok=0.
- Orange: C=0, M=60, Y=100, Ok=0.


Step 10
Choose the primary “2” of the yr. Utilizing the Swatches panel, set the colour to Inexperienced. Make sure you are solely deciding on the textual content and never the entire cell.
Set the following quantity to Mild Blue and the final two to Darkish Blue.


Step 11
To paint the cells, choose the cell as for those who had been deciding on the textual content, however prolong the mouse somewhat extra. Shade the cells with Mild Blue, Darkish Blue, Inexperienced, and the final cell with Mild Blue.


Step 12
The remainder of the house we’ll use for the calendar.
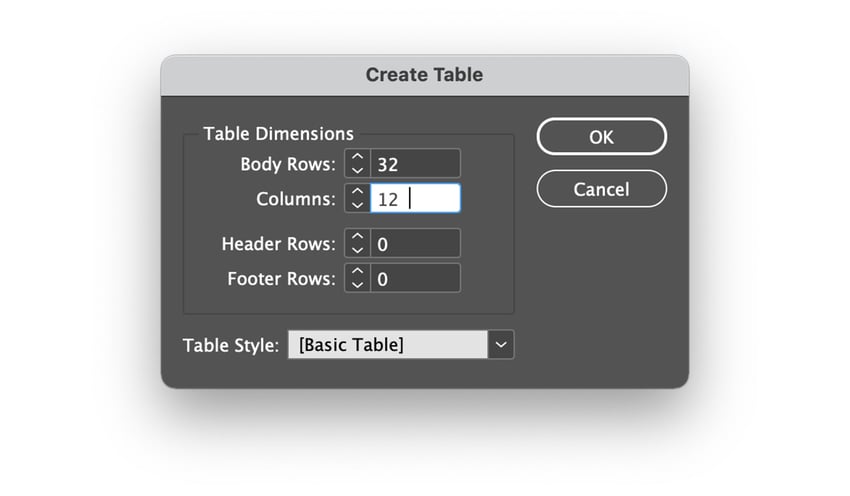
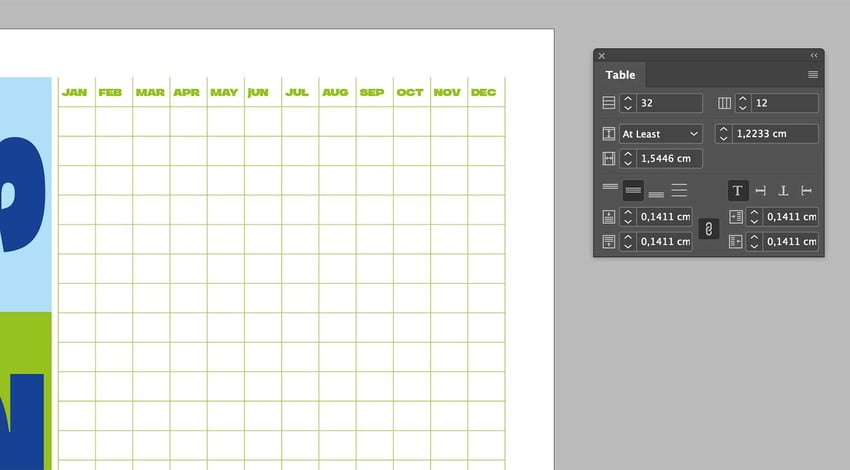
One other method to insert tables in InDesign is by going to Desk > Create Desk. Within the popup window, set the Physique Rows to 32 and Columns to 12.


Step 13
Place the desk just a few millimetres from the yr and prolong it to the remainder of the margins.


Step 14
Choose the entire cells.
Go to Desk > Cell Choices > Strokes and Fills. Beneath Cell Stroke, choose the entire strokes. They’re going to change to blue when chosen. Set the Weight to 0.5 pt and the Shade to Inexperienced. Click on OK.

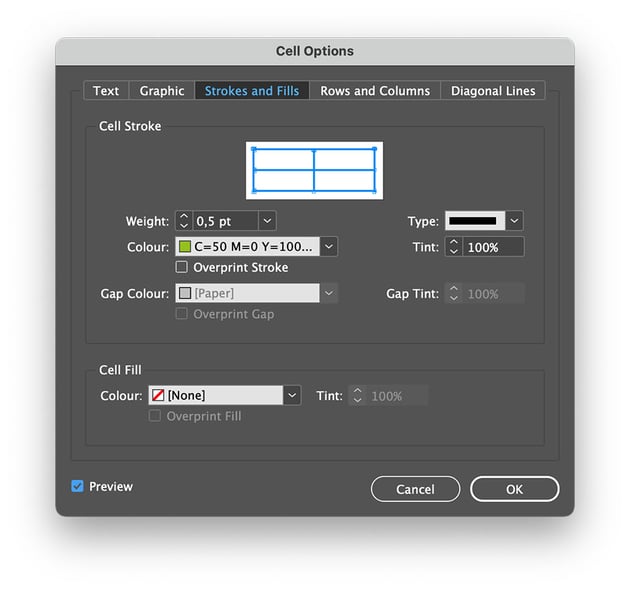

Step 15
Choose the entire of the highest row. One other method to edit the desk is to go to the Management bar. Within the cell window, choose solely the highest stroke.
Set the Stroke Shade to None.


Step 16
Choose the entire cells.
On the Characters panel, set the Font to Constructio Grotesk and the Measurement to 12 pt.
On the Swatches panel, press J in your keyboard—this may help you change the colour of the textual content. Set the Swatch to Inexperienced.


Step 17
Click on on the very first cell from the primary row and begin including the months briefly kind and all caps.
Choose the entire cells, and within the Desk panel, choose the Align Middle button.


Step 18
Beneath the cell containing JAN, begin with the dates. Add 1, and proceed with the remainder of the column till you get to 31.


Step 19
Choose the entire cells containing the dates, ensuring to exclude the month. Press Command-C to Copy.
Choose the cells from the opposite columns, ensuring to exclude the cells with the months. Press Command-V to Paste. InDesign means that you can paste on a number of cells on the similar time.
Delete the additional dates for the months which have solely 28 and 30 days.


3. Tips on how to Create Cell Types in InDesign
Step 1
Earlier than creating desk types in InDesign, now we have to discover ways to create cell types.
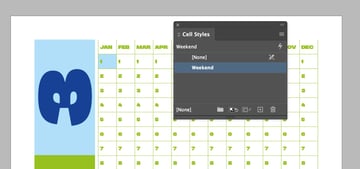
All our calendar is lacking is the weekends. For this, we’ll add a cell model that may look distinctive from the opposite common days.
Choose the cell containing January 1st. Go to the Swatches panel, and set the fill coloration to Mild Blue.


Step 2
Go to Window > Types > Cell Types.
Make sure you continue to have the January 1st cell chosen. On the Cell Types panel, click on on the Create New Type button.
Double-click on the brand new Cell Type and Rename it to Weekend.


Step 3
Test in your pc’s calendar which dates fall on a weekend. Choose the dates and click on on the Weekend cell model to model it.


Step 4
Now so as to add the financial institution holidays. Use an asterisk subsequent to the date to signify a financial institution vacation. Set the colour to Orange on the Swatches panel.


4. Tips on how to Export a PDF File in InDesign
Step 1
To export your calendar, go to File > Export.
Within the popup window, set the Format to PDF (Print).
Click on Save.


Step 2
Within the Export Adobe PDF window, set the Preset to Excessive High quality Print.
Click on Export.


That is It!
On this tutorial, you realized the right way to make a desk in InDesign by designing a yearly calendar. You realized the right way to insert tables in InDesign with totally different instructions and types. Such a calendar might be up to date yearly with your individual colours. Tables are a necessary a part of InDesign and sometimes underused, however they are often helpful for in depth editorial design.
If you happen to’re in search of wonderful belongings, you should definitely take a look at Envato Parts. For a small month-to-month price, you’ve got entry to high-quality belongings and limitless downloads. Yow will discover something from fonts, images, graphic parts, and rather more!
If you happen to favored this tutorial, you may like:
