The UI of a Flutter utility is made up of assorted widgets put collectively. A few of these widgets are seen, whereas others should not.
Seen widgets show components to the person, akin to textual content or pictures. Invisible widgets, or structure widgets, outline how the seen ones are laid out on the display screen.
Structure widgets are important to your app’s success. The composition of your widgets decide how customers will work together together with your app. Flutter presents a number of widgets, like Container and Padding, for the aim of laying out your UI.
On this tutorial, we’ll introduce Flutter’s field mannequin, an idea used when discussing layouts. We’ll additionally learn to implement margin and padding to put out widgets in our Flutter app.
The field mannequin
The field mannequin is a field containing the content material, padding, border, and margin of a displayed widget. The objective is to make sure that the developer has a well-modeled UI.
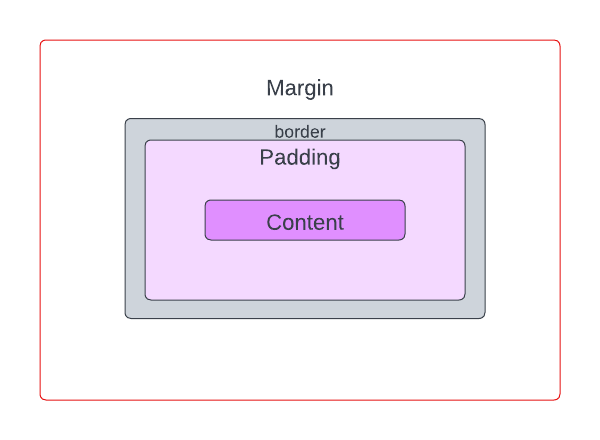
Throughout the field mannequin, let’s break down the parts.
The primary is content material. Content material is the seen factor that may be sized utilizing width and top properties.
Subsequent, we’ve padding. That is the empty house across the content material. Its worth is included within the width and top of the seen factor.
Then, we’ve the border. A border wraps across the padding and content material. Its worth is included within the padding of the seen factor as properly.
Lastly, we’ve the margin. That is the empty house across the seen factor. It’s fully invisible and clears the realm exterior the border.
Flutter presents a Container widget that can be utilized to implement the field mannequin in our apps. Container is handy as a result of it may be used to handle a number of widgets’ widths, heights, margins, padding, colours, and extra. It does this by combining widespread portray, positioning, and sizing widgets.
The margin and padding properties of Container are used to set the margin and padding (is smart, proper?) for the seen components in our UI.
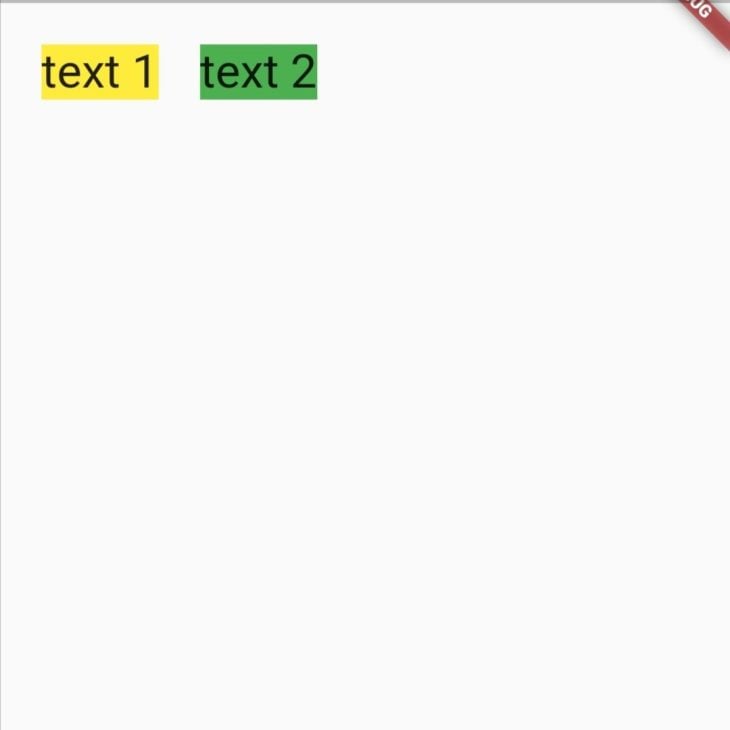
The app under renders two Textual content widgets contained in the Container. The colours of every Container have been set to obviously display the results of setting the margin and padding within the instance under:
Row(
  mainAxisAlignment: MainAxisAlignment.begin,
  crossAxisAlignment: CrossAxisAlignment.begin,
  kids: [
    Container(
      child: Text(
        "text 1",
        style: TextStyle(fontSize: 32),
      ),
      decoration: BoxDecoration(color: Colors.yellow),
    ),
    Container(
      child: Text(
        "text 2",
        style: TextStyle(fontSize: 32),
      ),
      decoration: BoxDecoration(color: Colors.green),
    ),
  ],
),
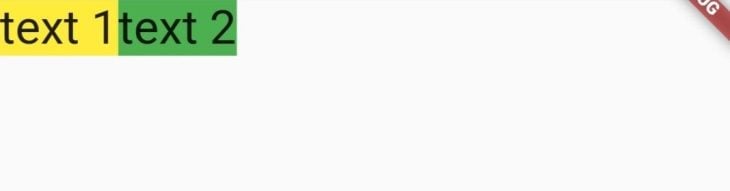
The code snippet above paints two Containers aspect by aspect with none whitespace. We’ll must set the margin and padding for the seen Textual content widget. However earlier than we try this, it’s vital that we’ve an understanding of the EdgeInsets class.
The EdgeInsets class
The margin and padding properties of a Container widget count on a worth of the sort EdgeInsetsGeometry, an summary class. Which means that that EdgeInsetsGeometry can’t be used straight so we’ve to utilize its subclasses, EdgeInsets and EdgeInsetsDirectional, to set the margin and padding.
EdgeInsets units margin and padding based mostly on the left, high, proper, and backside path parameters. EdgeInsetsDirectional, then again, units margin and padding based mostly on the beginning, high, finish, and backside path parameters.
The primary distinction between the 2 is that EdgeInsetsDirectional is a locale direction-aware widget, not like EdgeInsets.
We will set the insets of theEdgeInsets class utilizing the next properties:
EdgeInsets.zero: Units a zero offset in all instructionsEdgeInsets.all: Units one widespread offset in all instructionsEdgeInsets.solely: Units an offset solely within the specified instructions. The left, high, proper, and backside instructions will be laid out in any orderEdgeInsets.fromLTRB: Units an offset in all instructions based mostly on the worth handed for every. The instructions should be specified within the left, high, proper, and backside order.EdgeInsets.symmetric: Units a vertical or horizontal offset
We will set the insets of the EdgeInsetsDirectional class utilizing the next properties:
EdgeInsets.zero: Units a zero offset in all instructionsEdgeInsets.all: Units one widespread offset in all instructionsEdgeInsets.solely: Units an offset solely within the specified instructions. The beginning, high, finish, and backside instructions will be laid out in any orderEdgeInsets.fromSTEB: Units an offset in all instructions based mostly on the worth handed for every. The instructions should be specified within the begin, high, finish, and backside order
On this tutorial, we’ll use the EdgeInsets class.
Setting the margin
The margin property of Container is used to set the margin. It provides an empty house across the Container.
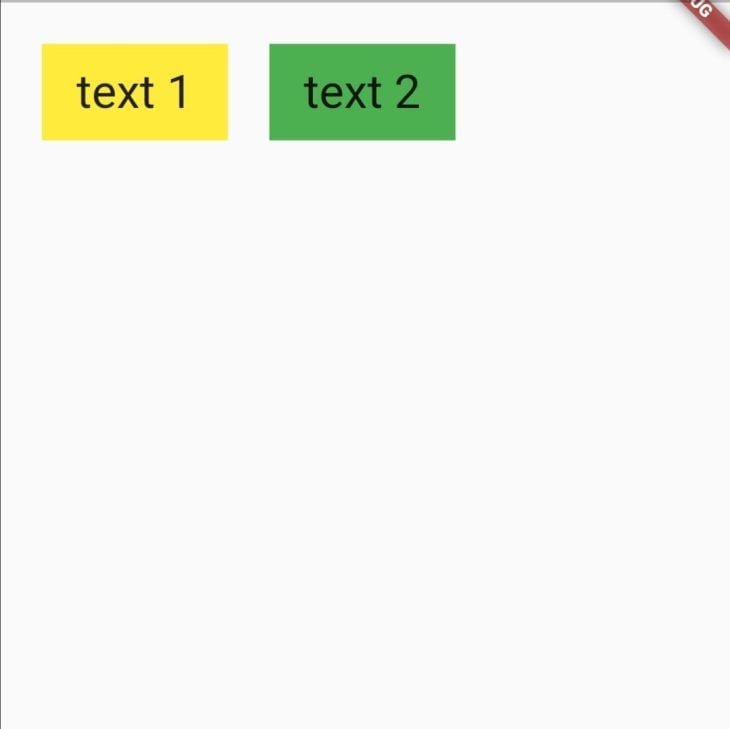
First, we’ll add a margin across the first Container as proven under:
Container(
  margin: EdgeInsets.all(24),
  baby: Textual content(
    "textual content 1",
    type: TextStyle(fontSize: 32),
  ),
  ornament: BoxDecoration(shade: Colours.yellow),
)
Subsequent, we’ll add a high margin to the second Container solely:
Container(
  margin: EdgeInsets.solely(high: 24),
  baby: Textual content(
    "textual content 2",
    type: TextStyle(fontSize: 32),
  ),
  ornament: BoxDecoration(shade: Colours.inexperienced),
)
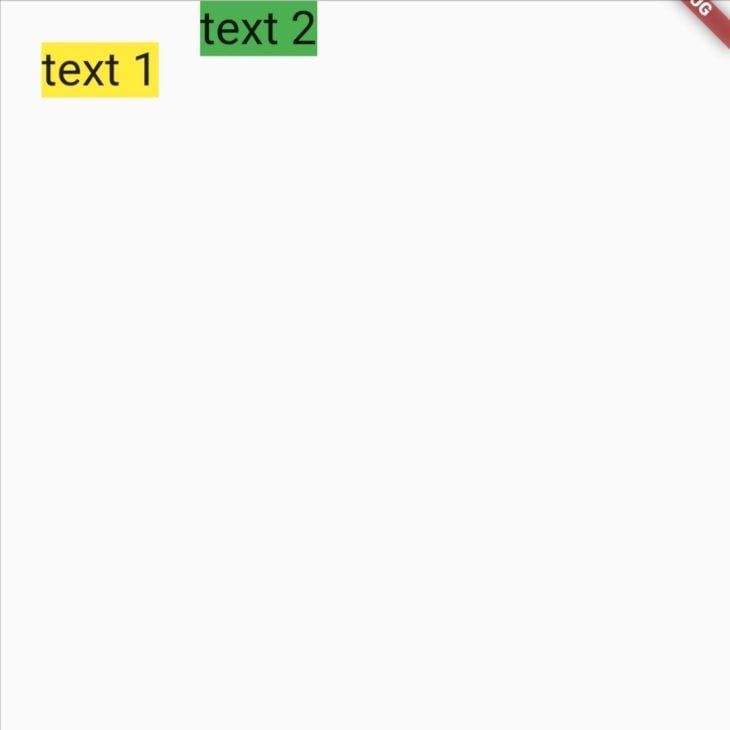
Our widgets at the moment are separated with an empty house.
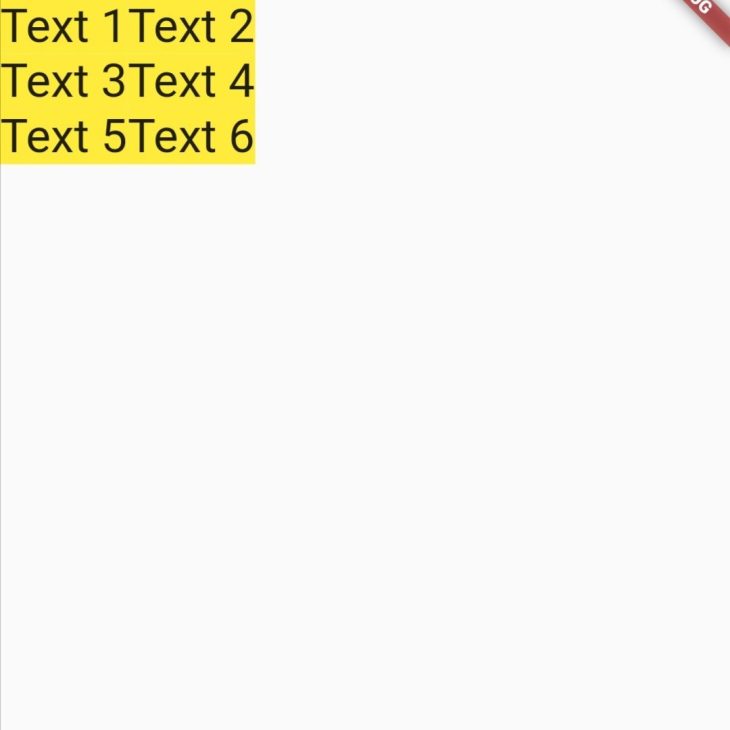
Setting the padding
The padding property of Container is used so as to add empty house contained in the embellished Container. We’ll add horizontal and vertical padding to our widgets, as proven within the code under:
padding: EdgeInsets.symmetric(horizontal: 20, vertical: 12)
This code snippet provides horizontal and vertical padding to our widgets. It units an offset of 20 to the left and proper and an offset of 12 to the highest and backside.
Our content material is now padded and appears higher!
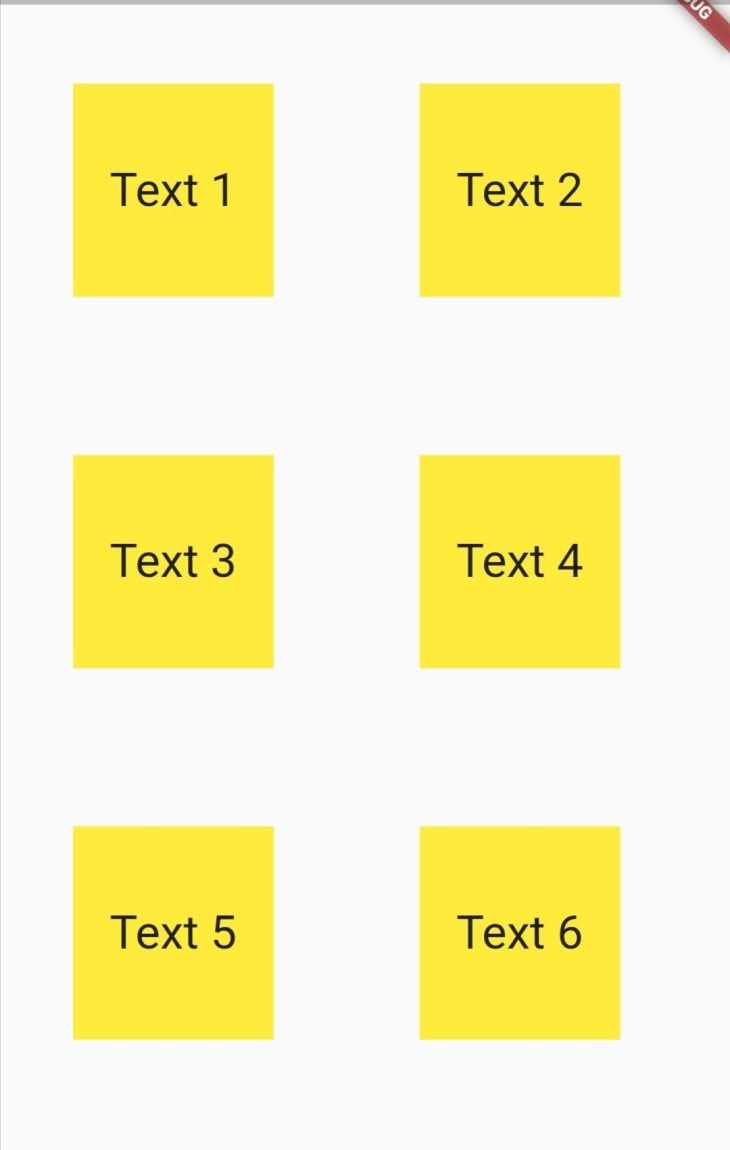
Dynamically setting the margin and padding
Setting a hardcoded worth for our margin and padding will doubtless solely look good on our testing gadget. On completely different display screen sizes, the meant structure may not be what the person truly sees. Due to this fact, you will need to set the margin and padding dynamically based mostly on display screen dimension.
We’ll use the MediaQuery class to get the display screen dimension of our app. Then, we’ll be capable of dynamically set the margin and padding based mostly on the dimensions of the widgets.
First, we’ll retailer the gadget’s width and top values in variables like this:
Widget construct(BuildContext context) {
  ultimate top = MediaQuery.of(context).dimension.top;
  ultimate width = MediaQuery.of(context).dimension.width;
  return ...
Subsequent, we’ll set the margin and padding properties as a fraction of the gadget’s width and top:
margin: EdgeInsets.symmetric(horizontal: width *0.1, vertical: top *0.05),
padding: EdgeInsets.symmetric(horizontal: width *0.05,vertical: top*0.05),
This lays out our widgets with margin and padding that adapt to completely different sized screens.
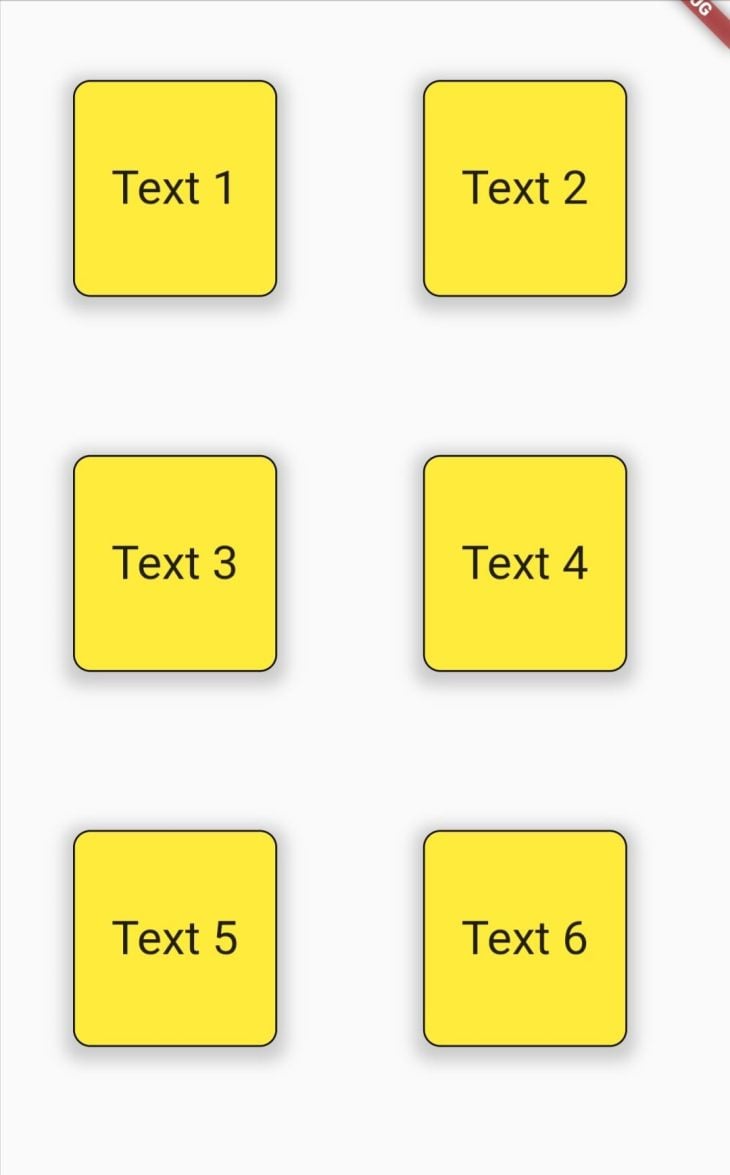
Adorning the packing containers
We will add some decorations to our container utilizing the ornament property. This expects the summary class for all decorations, known as the Ornament class, and applies the types to our widget.
The code snippet under makes use of the BoxDecoration class so as to add a shade, border, border radius, and field shadow to the Container.
ornament: BoxDecoration(
  shade: Colours.yellow,
  borderRadius: BorderRadius.round(10),
  border: Border.all(),
  boxShadow: [
    BoxShadow(
      color: Colors.grey.withOpacity(0.5),
      spreadRadius: 5,
      blurRadius: 7,
      offset: const Offset(0, 3),
    ),
  ],
),
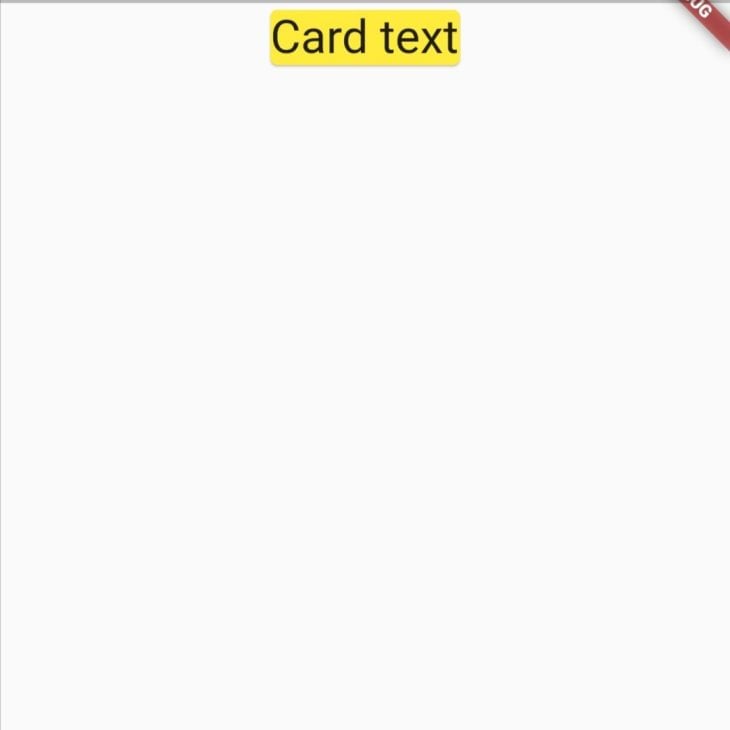
We might have so as to add padding to a widget that doesn’t implement the Padding class in its properties. As an example, the Card widget under attracts a card with textual content in it.
Heart(
  baby: Card(
    shade: Colours.yellow,
    baby: Textual content(
      "Card textual content",
      type: TextStyle(fontSize: 32),
    ),
  ),
)
So as to add some house across the textual content, we will wrap the Textual content widget with a Padding widget. The Padding widget requires a padding property. The property is about so as to add empty house across the desired widget through the EdgeInsetsGeometry class.
baby: Heart(
  baby: Card(
    shade: Colours.yellow,
    baby: Padding(
      padding: EdgeInsets.all(24.0),
      baby: Textual content(
        "Card textual content",
        type: TextStyle(fontSize: 32),
      ),
    ),
  ),
)

Conclusion
On this tutorial, we mentioned the field mannequin and regarded into how margins and paddings can be utilized to construct layouts in Flutter. We additionally regarded into the Container widget and learn how to set its margin, padding, and decorations. Lastly, we used the Padding widget so as to add padding.
With that, you at the moment are in a position to fastidiously lay out widgets in your UI to boost your person interactions. All of the code on this article is out there on GitHub.
I hope you loved this tutorial!
