
A speech-to-text function turns your voice into textual content, and a text-to-speech function reads the textual content out loud. By including this function, customers can work together together with your app through voice (along with consumer gestures), enhancing the consumer expertise. This might help you construct, in essence, a Google assistant-like app.
The way in which it really works is that you just say one thing or ask the app one thing, and the app processes your request after which speaks the consequence.
On this tutorial, we’ll construct an instance utilizing the speech recognition and text-to-speech plugin.
We’ll undergo a step-by-step course of for the instance that offers you a base for constructing a voice assistant app. We’ll additionally cowl circumstances not dealt with by the plugin by default, reminiscent of steady listening on Android units.
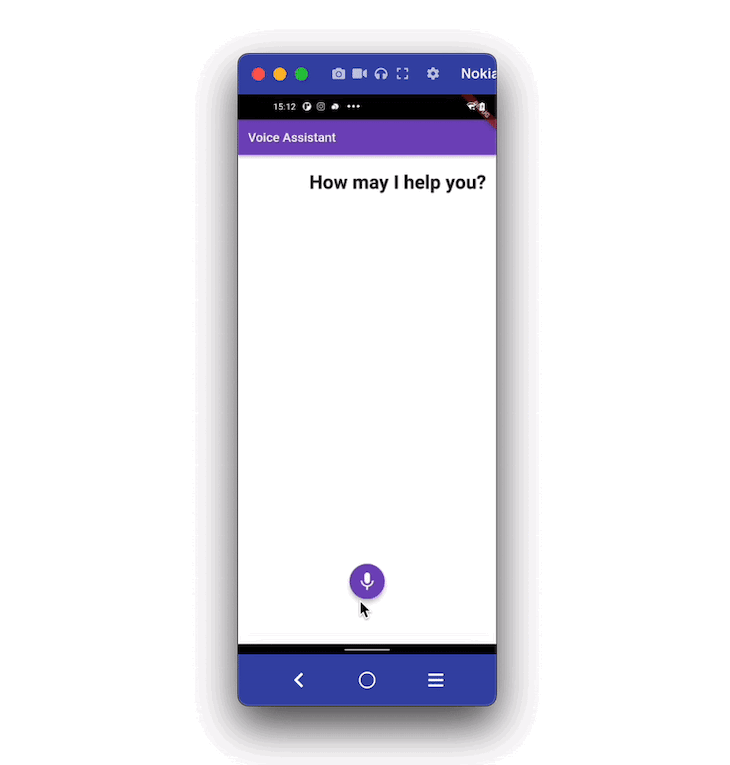
Right here’s the way it appears when accomplished:
Right here’s what we’re going to cowl on this tutorial:
Including speech-to-text in a Flutter app
Within the instance app, when a consumer faucets on the mic button, the app begins to hear. Because the consumer begins talking, the voice is transformed into textual content and displayed on the display screen. Customers can cease the listening service by clicking on the cease button.
You’ll be able to implement such a requirement by using the speech recognition plugin. Internally, it makes use of Speech API for iOS and SpeechRecognizer for Android. It means that you can add speech recognition for any locale with units supporting iOS10+ and Android 4.1+.
This plugin presents a number of useful strategies that you need to use to begin, cease, and cancel the listening.
Listed here are the step-by-step directions on including the speech-to-text help:
Step 1: Including dependencies
The very first step begins with including dependency contained in the pubspec.yaml file.
The contents contained in the pubspec.yaml file shoud seem like this:
dependencies:
  flutter:
    sdk: flutter
  cupertino_icons: ^1.0.2
  speech_recognition: ^0.3.0+1 #NEW
Step 2: Including permissions
For the plugin to document audio, it is advisable give permission for each the Android and iOS platform. For this you may replace the platform-specific recordsdata.
For Android
Find the AndroidManifest.xml file on the your_project/android/app/src/principal/AndroidManifest.xml and replace the file as follows:
<manifest xmlns:android="http://schemas.android.com/apk/res/android"
    bundle="com.instance.speech_to_text_demo">

    <!-- 1. Permission -->
    <uses-permission android:title="android.permission.RECORD_AUDIO" />

    <!-- 2. To beat bind to recognition service failed concern -->
    <queries>
        <bundle android:title="com.google.android.googlequicksearchbox"/>
    </queries>


   <software
        android:label="speech_to_text_demo"
        android:title="${applicationName}"
        android:icon="@mipmap/ic_launcher">
        <exercise
            android:title=".MainActivity"
            android:exported="true"
            android:launchMode="singleTop"
            android:theme="@type/LaunchTheme"
            android:configChanges="orientation|keyboardHidden|keyboard|screenSize|smallestScreenSize|locale|layoutDirection|fontScale|screenLayout|density|uiMode"
            android:hardwareAccelerated="true"
            android:windowSoftInputMode="adjustResize">
    </software>
</manifest>
Right here’s what’s going on within the code above:
- Including
android.permission.RECORD_AUDIOto document audio - This helps you repair the “bind to recognition service failed concern” on some Android units.
For iOS
Find the information.plist file on the your_project/ios/Runner/information.plist and add the next permissions:
<key>NSMicrophoneUsageDescription</key>
<string>This software must entry your microphone</string>
<key>NSSpeechRecognitionUsageDescription</key>
<string>This software wants the speech recognition permission</string>
(Word: Above permissions will present a message to the consumer earlier than beginning the speech recognition)
Step 3: Including required variables
On this step, you’ll add variables which can be required to keep up the app state. For instance, You need to want a variable to know whether or not the speech recognition is began. These will probably be helpful for exhibiting and hiding widgets based mostly on numerous conditions.
Listed here are some important variables that you just want:
// 1.
late SpeechRecognition _speech;
// 2.
bool _isSpeechStarted = false;
// 3.
bool _isListening = false;
// 4.
String transcription = '';
String currentText="";
// 5.
bool _isEndOfSpeech = false;
- This will probably be used to create the occasion of
SpeechRecognitionand later entry it to begin and cease listening - This will probably be used to point out/cover the mic and cease buttons
- This will probably be used to point out/cover ‘Listening…’ textual content. Though we are able to use the earlier variable (i.e
_isSpeechStarted), this variable is useful to know if consumer is definitely talking - That is to know that the speech recognition has stopped
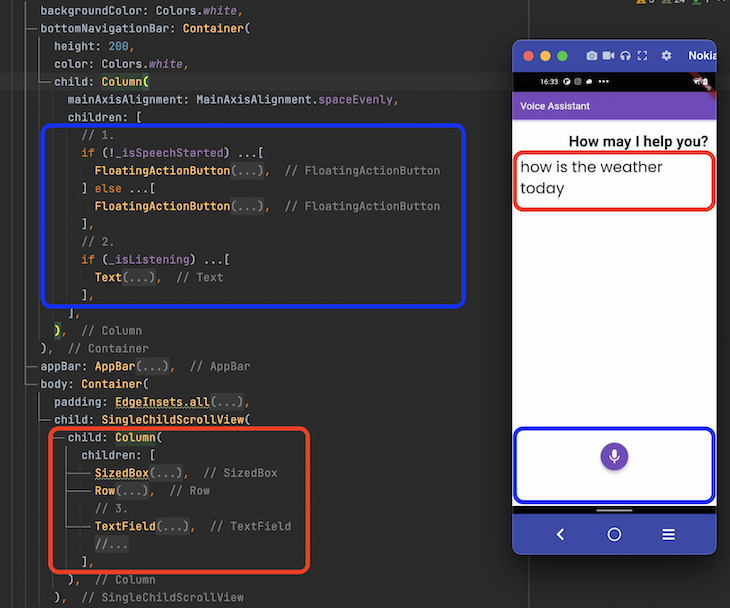
Step 4: Constructing the web page UI
The web page UI consists of the 2 principal sections. The primary part shows the dialog between the voice assistant and the consumer; and the second part shows the realm to begin and cease speech recognition.
Right here’s what the naked minimal code appears like for this:
SafeArea(
  youngster: Scaffold(
    backgroundColor: Colours.white,
    bottomNavigationBar: Container(
      peak: 200,
      colour: Colours.white,
      youngster: Column(
        mainAxisAlignment: MainAxisAlignment.spaceEvenly,
        kids: [
          // 1. <-- SEE HERE
          if (!_isSpeechStarted) ...[
            FloatingActionButton(
              backgroundColor: const Color(0xff764abc),
              child: Icon(
                Icons.mic,
                size: 35,
              ),
              onPressed: () {
                _startSpeechRecognition();
              },
            ),
          ] else ...[
            FloatingActionButton(
              backgroundColor: const Color(0xff764abc),
              child: Icon(
                Icons.stop,
                size: 35,
              ),
              onPressed: () {
                _stopSpeechRecognition();
              },
            ),
          ],
          // 2. <-- SEE HERE
          if (_isListening) ...[
            Text(
              kListening,
              style: GoogleFonts.nunito(
                  textStyle:
                      TextStyle(color: Colors.black, fontSize: 22.5)),
            ),
          ],
        ],
      ),
    ),
    appBar: AppBar(
      title: Textual content('Voice Assistant'),
      backgroundColor: const Colour(0xff764abc),
    ),
    physique: Container(
      padding: EdgeInsets.all(16),
      youngster: SingleChildScrollView(
        youngster: Column(
          kids: [
            SizedBox(
              height: 10,
            ),
            Row(
              mainAxisAlignment: MainAxisAlignment.end,
              children: [
                Text(
                  _ttsGreet,
                  style: GoogleFonts.poppins(
                    textStyle: TextStyle(
                        fontSize: 30.5, fontWeight: FontWeight.bold),
                  ),
                ),
              ],
            ),
            // 3. <-- SEE HERE
            TextField(
              controller: _myController,
              readOnly: true,
              onChanged: (String textual content) {
                setState(() {
                  _isContentsPresent = textual content.isNotEmpty;
                });
              },
              //focusNode: _nodeText1,
              cursorColor: Colours.gray,
              type:
                  GoogleFonts.poppins(textStyle: TextStyle(fontSize: 30.5)),
              keyboardType: TextInputType.multiline,
              maxLines: null,
              ornament: InputDecoration(
                border: InputBorder.none,
                hintStyle: GoogleFonts.nunito(),
              ),
            ),
          ],
        ),
      ),
    ),
  ),
);
Right here’s fast rundown of the code above:
- This half accommodates two FloatingActionButtons; one to begin speech recognition and one other one to cease. However, just one is displayed based mostly on the
_isSpeechStartedvariable - That is used to point out/cover the ‘Listening…’ textual content
- The speech-to-text consequence (precise consumer voice command) is displayed right here. Right here,
TextFieldwidget is used as a substitute of theTextual contentwidget to allow customers edit the voice command (if required)
Right here’s methods to code translated into the design:
Step 5: Including speech recognition strategies
After organising the variables and web page UI, it’s time to name the plugin strategies which can be chargeable for driving the speech recognition function.
Beneath are a few of the essential strategies that you’ll use to begin and cease the popularity service.
// 1.
void _activateSpeechRecognizer() {
  _requestPermission();
  _speech = new SpeechRecognition();
  _speech.setAvailabilityHandler(onSpeechAvailability);
  _speech.setRecognitionStartedHandler(onRecognitionStarted);
  _speech.setRecognitionResultHandler(onRecognitionResult);
  _speech.setRecognitionCompleteHandler(onRecognitionComplete);
  _speech
      .activate()
      .then((res) => setState(() => _speechRecognitionAvailable = res));
}
// 2.
void onRecognitionResult(String textual content) {
  if (_isEndOfSpeech) {
    _isEndOfSpeech = false;
    return;
  }
  setState(() {
    transcription = textual content;
    _isListening = true;
    print('acknowledged textual content is- $transcription');
    _myController.textual content = transcription;
    _myController.choice = TextSelection.fromPosition(
        TextPosition(offset: _myController.textual content.size));
  });
}
// 3.
void onRecognitionComplete() {
  print('Recognition Accomplished');

  if (transcription.isNotEmpty) {
    _isContentsPresent = true;
    _processRequest(transcription);
    _toggleSpeechRecognitionStatus(isSpeechStarted: false);
  }
}
- This prompts the speech recognizer within the background. This have to be referred to as as quickly because the web page is loaded
- This outputs the popularity consequence on the
TextFieldwidget - This will probably be referred to as when the consumer is completed offering the voice command. Right here you may seize the transcription (voice transformed to textual content) and carry out the enterprise logic or no matter you need to do with the transcription
Superior! you now know methods to add speech-to-text help. Let’s assume you’ve gotten processed the request and its time to talk out the consequence. Let’s see check out how to try this.
Including text-to-speech in a Flutter app
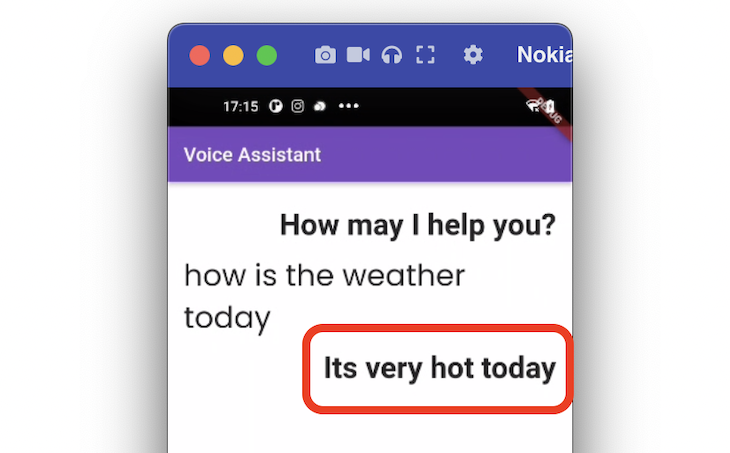
Within the instance app, after displaying the consumer’s voice command on-screen, the voice command is processed and the result’s learn out by the voice assistant (along with displaying it on display screen).
You’ll be able to implement such a requirement by using the textual content to speech (TTS) plugin. It really works on iOS, Android, internet, and macOS. With this plugin, it’s also possible to change Quantity, Fee, and Pitch of the voice.
Listed here are the step-by-step directions for including the text-to-speech help:
Step 1: Including dependencies
Add the textual content to speech dependency contained in the pubspec.yaml file.
The contents contained in the pubspec.yaml file ought to seem like this:
dependencies:
  flutter:
    sdk: flutter
  cupertino_icons: ^1.0.2
  speech_recognition: ^0.3.0+1
  text_to_speech:  #NEW
Step 2: Including permissions
For the plugin to talk out the textual content, you solely have to allow the permission for the Android platform.
Right here what the AndroidManifest.xml (situated at your_project/android/app/src/principal/AndroidManifest.xml) file ought to seem like:
<manifest xmlns:android="http://schemas.android.com/apk/res/android"
    bundle="com.instance.speech_to_text_demo">

    <queries>
        <bundle android:title="com.google.android.googlequicksearchbox"/>
        <intent>
            <motion android:title="android.intent.motion.TTS_SERVICE" />
        </intent>
    </queries>

   <software
    </software>
</manifest>
Step 3: Including required variables
On this step, you’ll add variables which can be required to begin and move the message to the TTS (text-to-speech) service.
Listed here are some variables that you just want:
// 1.
TextToSpeech tts = TextToSpeech();
// 2.
String _ttsGreet="How might I allow you to?";
// 3.
String _ttsStaticResult="Its highly regarded at the moment";
- It will create the intance of
TextToSpeech, which you need to use to set off the TTS service - That is greeting message proven after the web page is loaded
- This to point out and converse out a dummy message
Step 4: Constructing the web page UI
The web page UI merely exhibits a greeting message and a message answering the consumer’s question in a textual content widget (under the consumer question).
For the sake of simplicity, the web page UI is stored easy. You’ll be able to prolong this and use ListView to construct versatile UI that finest matches your requirement.
The code appears like this:
if (_isShowResult)
  Row(
    mainAxisAlignment: MainAxisAlignment.finish,
    kids: [
      Text(
        _ttsStaticResult,
        //textAlign: TextAlign.end,
        style: GoogleFonts.poppins(
          textStyle: TextStyle(
              fontSize: 30.5, fontWeight: FontWeight.bold),
        ),
      ),
    ],
  ),
Step 5: Including textual content
When you have arrange the variables and web page UI, you may set off the speech after processing the consumer question by calling the converse() methodology on the occasion of the TextToSpeech.
Right here’s the way you do it:
_processRequest(String transcription) {
  // Course of request right here
  /// Your online business logic right here
  //Converse out the consequence
  setState(() {
    _isShowResult = true;
  });
  _tts(_ttsStaticResult);
}

_tts(String message) {
  tts.converse(message); //<-- SEE HERE
}
Congratulations! now you know the way so as to add text-to-speech help.
Enabling steady listening on Android
Once you run the app with the speech recognition plugin, you’ll doubtless discover that the speech recognition in Android behaves barely totally different to iOS.
In Android, once you begin the service and don’t converse for a second, the system routinely stops listening (which isn’t the case in iOS).
Technically, it ought to preserve the service open till the consumer begins talking — the plugin doesn’t have an answer for this for the time being, so I’ll clarify methods to repair it your self.
Steps to allow the continual listening on Android are as follows:
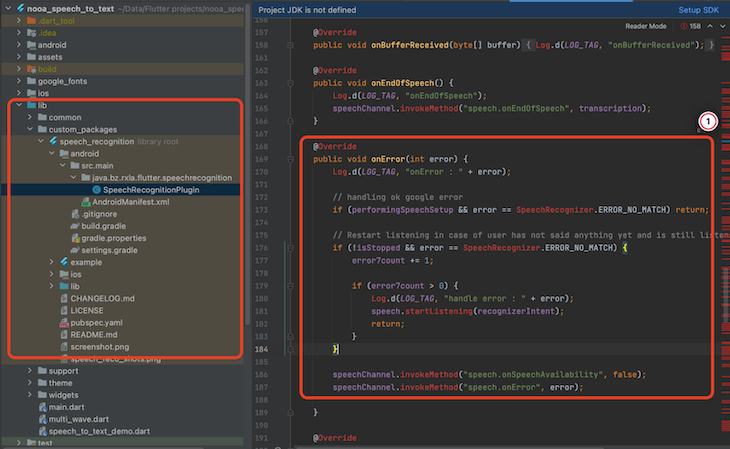
- Obtain the plugin code and place it contained in the lib/custom_package folder
- Open the
SpeechRecognitionPluginfile at lib/custompackage/packagefolder/android/src/principal/java/bz/rxla/flutter/speechrecognition. - Exchange the onError methodology with the next code
@Override
public void onError(int error) {
Log.d(LOG_TAG, "onError : " + error);
// dealing with okay google error
if (performingSpeechSetup && error == SpeechRecognizer.ERROR_NO_MATCH) return;

// Restart listening in case of consumer has not mentioned something but and continues to be listening i.e not stopped by consumer
if (!isStopped && error == SpeechRecognizer.ERROR_NO_MATCH) {
    error7count += 1;
if (error7count > 0) {
    Log.d(LOG_TAG, "deal with error : " + error);
    speech.startListening(recognizerIntent);
    return;
}
}
speechChannel.invokeMethod("speech.onSpeechAvailability", false);
speechChannel.invokeMethod("speech.onError", error);
}
The concept right here is to restart the speech recognition when it encounters the SpeechRecognizer.ERROR_NO_MATCH error (that pops up when the service is stopped routinely).
After making adjustments as per the above code, the speech recognition service will preserve working so long as the consumer manually stops it (which is what we wish).
Right here’s what it appears like:
The total supply code will be discovered right here.
Conclusion
Including speech-to-text and text-to-speech options presents the possibility to offer further functionality to for customers work together together with your app.
On this tutorial, we first regarded on the methods to add speech-to-text after which explored including the text-to-speech service.
We went by way of step-by-step directions in organising the variables, UI, and strategies. We additionally discovered methods to allow the continual listening for Android units.
