
Study 39 totally different tips about learn how to prepare a GAN to success
I had by no means completed neural nets earlier besides whereas taking Andrew Ng’s course on ML on Coursera. Vow! What a course, that was! Profession altering. Isn’t it?
Often, every time I really feel threatened by the flip of know-how, I provide you with some pet undertaking that mixes a variety of unknowns. It helps me to discover the house and get some consolation really feel. It’s on this line, I began my pet undertaking on coaching a GAN to generate Aerial satellite tv for pc pictures. All applied sciences concerned — Neural nets, CNNs, GAN, Tensorflow, Python, and so on. have been all considerably new to me. So, that’s a invaluable undertaking from my perspective.
Step one was to get some low-res satellite tv for pc pictures. The pictures I discovered on web have been all Big. One thing like 23000×12000 or so. Python picture processing library, PIL, would all the time crash every time I even open them to resize. Anyway, resizing such a excessive decision picture to one thing like 64×64 would destroy all the small print. That didn’t appear to be a good suggestion. That’s when I discovered the “Common Maps Downloader” software program that would obtain 256×256 pictures from a geographic area of your alternative. The free model solely downloaded 50 cm low decision satellite tv for pc pictures which was okay for my experimental functions.

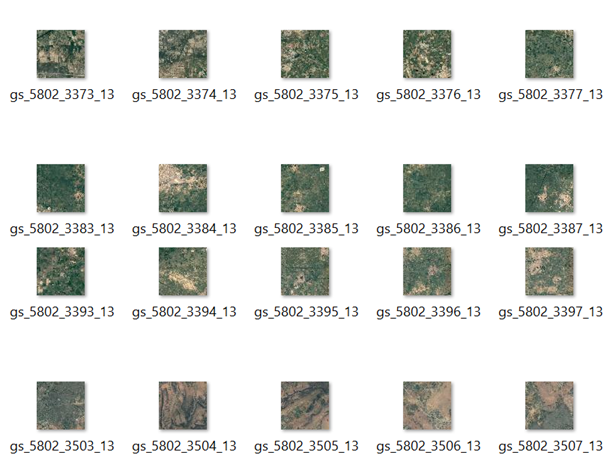
It’s a clear software program that does what it guarantees to do. Listed below are some actual footage downloaded by the software program. For practitioners, who’re searching for actual satellite tv for pc pictures, “Amazon Earth” is a really promising useful resource. I imagine it will get pictures from Landsat program of US authorities.
I labored for five months part-time to get this undertaking operating. It will have taken far much less if I had some prior data and had labored full-time with GPUs. I developed all code from scratch with out re-using any code from any repository (apart from Leaky RelU operate from OpenAI). So this gave me an opportunity to make a variety of errors and I’m documenting all that right here to your reference. Hope this helps.
This documented is organized into the next sections
- How NOT to coach a GAN
- A fast comparability between Cloud GPU suppliers: Crestle vs FloydHub
- Generated Photographs
- Turing Check
- Turing Check Reply
I’ve organized this part into 4 elements every of which speak about potential “errors”
- Basic Tips
— Not following customary architectures
— Underestimating compute wants
— Not coaching on GPUs
— Not utilizing in-memory pictures for Cloud GPU coaching
— Not sustaining an Statement log
— Not preliminary Seeding RNG
— Mixing Monochrome/Shade pictures, Poor Enter
— Not normalizing the inputs
— Not doing intermediate Mannequin Checkpointing
— Not dumping generated pictures to verify on Studying - TensorFlow Associated Tips
— Not utilizing Picture format
— Lacking implicit normalization from APIs
— Utilizing TF for Studying/Writing Photographs
— Creating Orphaned tensors
— Operating decide and loss collectively in identical name - Neural Web Associated Tips
— Not Protecting Generator/Discr Symmetrical
— Not utilizing TANH for remaining Generator
— Not utilizing zero initializer for Bias
— Not utilizing Xavier Init
— Not utilizing right variety of Filter Banks
— Not utilizing Strided convolution as an alternative of Pooling
— Not utilizing Leaky Relu
— Not batch normalizing to speedup compute
— Not utilizing Regularizer
— Not selecting the best Regularizer fixed
— Doing batch norm in final layer of Gen/First of Discr
— Not mitigating Checkerboard impact - Coaching Associated Tips
— Dedicating all CPU Cores for Coaching
— Not remodeling enter pictures to -1 and +1
— Operating much less iterations
— Very excessive studying price
— Re-using Adam optimizer object
— Not utilizing Historic pictures for coaching
— Producing Separate picture for Historical past functions
— Not performing Historical past picture transformation
— Prioritizing Generator over Discriminator
— Highly effective Discr/Highly effective Gen
— Web arch with Batch norm
— Unmoderated Coaching
MISTAKE 1
Not Following Customary Web Architectures
DCGAN is an efficient structure to start out with they usually work for 64×64 pictures. You may have examples in Github — each OpenAI in addition to Carpedm20’s DCGAN Tensorflow implementation.
Don’t attempt any novel structure to start with. Simply implement the essential DCGAN working correctly. That itself would aid you perceive lot of fundamentals correctly.
I began making random adjustments to the community with out implementing the DCGAN structure totally. I had much less layers, totally different variety of filter banks in every layer and so forth. I needed to rapidly see the output that I get… However what you get in a short time in GAN is simply BS. You wouldn’t need that.
MISTAKE 2
Underestimating the Compute Want
Deep studying is LOT of Compute. Don’t underestimate that.
In case your laptop computer/desktop has a heating downside, I’d not advocate operating Deep studying. You’re going to soften it. Don’t preserve your sizzling laptop computer in your mattress or on flammable settings. Desk mate is an efficient possibility for docking your laptop computer for lengthy runs. It’s made from fiber and doesn’t get heated up.
For compute, GPUs are the most suitable choice — arms down — when you have entry to 1.
If you’re constrained by a laptop computer/desktop CPU or some such, begin with a modest objective (Say lesser picture decision) and as soon as you might be clear learn how to method the issue, go for GPUs on cloud.
I began with 256×256 picture era with out understanding what I get into. It will have taken a 12 months to coach that on my laptop computer. Poor alternative.
MISTAKE 3
Not coaching on GPUs
If you’re not coaching your GAN on GPUs, you might be probably not going wherever. It takes practically 1000 iterations for the preliminary shapes to return up.
Coaching for 20,000 iterations is frequent.
If you’re operating on CPUs, these coaching can run for days collectively and it is going to be a number of hours earlier than you determine to name off a mode-collapse (or) an unstable coaching path.
Hyper Parameter tuning will also be very tough. It’ll suck all of your time. Not value it.
MISTAKE 4
Not protecting pictures in reminiscence whereas coaching on GPU powered Notebooks on Cloud
Cloud GPU Jupyter pocket book suppliers like FloydHub / Crestle typically have a sluggish IO subsystem. They probably use Amazon S3 or some form of Blob storage or a novel FS to retailer your recordsdata. Which means, studying pictures from these storage for each iteration can get very sluggish.
In case you don’t have sufficient reminiscence, use async IO to learn your subsequent batch whereas processing the present batch. Overlapping GPU compute with IO can be a good suggestion too!
MISTAKE 5
Not sustaining an Statement log
Keep an commentary log the place you doc all adjustments you’re making, the consequences you might be seeing and so forth. That may actually assist from avoiding the identical pitfalls time and again.
You may also preserve “Pending checklist” in a separate sheet so that you don’t miss out in your concepts.
MISTAKE 6
Not preliminary seeding the RNG
You will need to seed the RNG with a relentless quantity in the beginning so you’ll be able to perceive how your hyper-parameter-changes are literally affecting the educational.
tf.set_random_seed(1234) #Lets encourage some Determinism
By evaluating intermediate outputs of successive runs with configuration adjustments, you’ll be able to see if the educational is going on sooner (or) has it develop into slower (or) has it degenerated and so forth.
With out nailing the RNG, you can’t make any inference about your hyper-parameter adjustments. The commentary log is not going to be helpful.
MISTAKE 7
Mixing monochrome and Shade pictures in enter (or) Poor options in enter pictures
Preserve your inputs uniform and feature-rich
Generally, we might combine Monochrome and coloration pictures within the enter. Since monochrome has only one channel whereas Shade pictures have 3 channels, mixing them will trigger errors whereas processing. Generally, while you create a data-set of a number of thousand pictures, your processing will fail in some batch and it’ll take you some time to determine this out. That is true particularly if you’re not studying all the pictures in 1 shot throughout initialization time.
MISTAKE 8
Not Normalizing the inputs
Normalizing the inputs will keep away from giant logit values which in flip screws up the gradients and the educational course of. This is among the first issues I learnt. If you’re utilizing pictures which has values between 0 to 255, convert them between 0 and 1.
If you concentrate on how neural nets work, the pictures values are multiplied with weights and summed up and served to sigmoid/Relu activation. When the resultant values are giant, the curve is kind of flat in these areas and therefore gradients are fairly much less and it’ll not take the educational ahead. Gradient is studying. If there isn’t any Gradient, then there isn’t any studying.
MISTAKE 9
Not checkpointing the mannequin and saving solely in any case iterations full
Something that may go flawed, will go flawed — Murphy’s regulation.
To make sure failure restoration, all the time checkpoint the mannequin each 500 iterations or so. It’s simple to revive from the place you left. Tensorflow helps easy APIs for this operation. A mannequin save leads to creation of a number of recordsdata sharing the identical model-name prefix. You may merely use the model-name prefix alone to load and save fashions.
Be sure to clear off all checkpoints manually upon getting the ultimate output. GAN Fashions depart big disk footprint.
saver = tf.prepare.Saver()
savePath = saver.save(session,
outputFolder + "/" + thisRunTime + "." + str(step))....SavedModelCheckpoint = "/house/nbuser/output/1510295650.2870145.4000"
restorer = tf.prepare.Saver()
restorer.restore(session, SavedModelCheckpoint)
MISTAKE 10
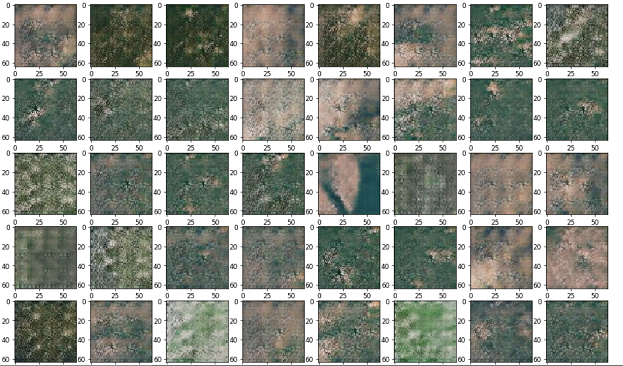
Not dumping generated pictures to verify on studying
That is somewhat trivial and simple. All the time dump a random generated picture, each tenth iteration. You’re going to get an concept the place the coaching goes.
NOTE: The generated picture is a operate of a “noise” vector. Relying on the “noise” vector, the generated picture might look good (or) it could look dangerous. So, when you see that the generator is producing silly pictures typically, it doesn’t imply that it has degenerated. Simply that the random noise vector might be a less-probable vector or so. Don’t attempt to interpret the dumped picture an excessive amount of.
MISTAKE 11
Not utilizing the proper Picture format in TensorFlow
Most NN associated picture operations, like tf.nn.conv2d, tf.nn.conv2d_transpose settle for a 4-Dimensional Tensor. 4D often is for an array of RGB Photographs.
There are 2 supported picture codecs by Tensorflow APIs — NHWC and NCHW.
NHWC Structure — [Batch, Height, Width, Channels]
NCHW Structure — [Batch, Channels, Height, Width]
Select the related one relying on how you may have learn your enter recordsdata. The default is NHWC which must be okay. But when your pictures are totally different, make sure you specify the format within the API name.
MISTAKE 12
Lacking the “implicit” normalization completed by APIs
Tensorflow presents tf.picture.convert_image_dtype API that robotically scales pictures between 0 and 1 while you convert the “information kind” to “float” from “uint8”. 0–255 Int picture will get mapped to 0–1 float picture and vice versa. In case you divide the picture once more by 255., then you might be in for some silent struggling.
That is one thing I missed studying correctly in Documentation. Dump the pictures that’s being fed to the community. That can give a good suggestion if issues are working the best way you assume they’re working.
MISTAKE 13
Utilizing Tensorflow APIs to learn/write pictures
Sure. Don’t use TF to learn pictures. Studying pictures as Numpy arrays in Tensorflow will not be simple. At the very least, not as simple as I would really like it to be. Some documentation talks about Queue runners (for what?) and doing different gymnastics — which is an excessive amount of complication for doing a easy factor. On this facet, I can relate to the “Tensorflow sucks” man.
Use “matplotlib” to learn recordsdata as Numpy arrays. It’s a clear possibility. See the next code-snippet for an excellent instance of how to do that.
import matplotlib.pyplot as plt
import matplotlib.picturedef listFolder(folder) :
f = []
for (dirpath, dirnames, filenames) in stroll(folder):
jpgfiles = checklist(filter(lambda x : x.cut up(".")[-1] == "jpg" or x.cut up(".")[-1] == "jpeg", filenames))
f.prolong(jpgfiles)
return fclass originalDistribution :
def __init__(self, imageInputFolder):
self.srcFolder = imageInputFolder
self.listOfFiles = listFolder(self.srcFolder)
np.random.shuffle(self.listOfFiles) #Inplace shuffling
if floydRun or crestleRun:
self.imagesInMemory = np.asarray(checklist(map(lambda x : matplotlib.picture.imread(self.srcFolder+"/"+x), self.listOfFiles)))/255.
else:
self.imagesInMemory = np.asarray(checklist(map(lambda x : matplotlib.picture.imread(self.srcFolder+""+x), self.listOfFiles)))/255.And so forth.......
Saving a generated picture, which is a numpy array, utilizing matplotlib API
import matplotlib.pyplot as plt
import matplotlib.pictureplt.imsave(tempImages + "GEN_STEP_" + '{:05d}'.format(step) + ".png", genMap[0], format='png', vmin=-1, vmax=1)
Use Tensorflow Placeholders to serve the learn pictures to the TF Graph
inputTensorPlaceholder   = tf.placeholder(tf.float32, form=(nSamples, inputheight, inputwidth, inputchannels))                        ....._ = session.run([d_opt_1], feed_dict={
inputTensorPlaceholder: inputNumPy,
realBenchmarksPlaceholder:benchmarkones
})
MISTAKE 14
Creating orphaned Tensors.
This can trigger memory-leak in your program leading to “Utility failures” and a few “Home windows Bashing”. Hey! Why can’t home windows simply run it? Linux would rock it. Isn’t it? Nope! Orphaned Tensors suck reminiscence!
An instance of orphaned tensor may be seen beneath. I used the operate beneath to learn “mini-batches” from file-system for each iteration. Studying from disk itself is a foul concept as we see later. However the necessary level is that, these tensors simply keep on the market with out getting cleaned up ready for the session to shut. This can progressively blow up your system reminiscence particularly if you end up operating for 1000s of iterations. It may possibly damage your weekend run.
#
# DON'T USE THIS FUNCTION
# MEMORY LEAK AHEAD
# YOU HAVE BEEN WARNED!!
#def makeImageTensor(filename):
fileTensor = tf.read_file(tf.convert_to_tensor(filename))
intImage = tf.picture.decode_jpeg(fileTensor, channels=inputchannels)
floatImage = tf.picture.convert_image_dtype(intImage, tf.float32)
return floatImage                    .............#
# Repeatedly calling the code beneath will trigger reminiscence leak
#inputImageTensorList = [makeImageTensor(x) for x in imageFiles]
inputImagesTensor = tf.stack(inputImageTensorList)
inputNumPy = inputImagesTensor.eval()
session.run([some list],
feed_dict={inputImageTensor: inputNumPy and so forth...})
MISTAKE 15
Operating optimizer and loss collectively in a single Run
The code beneath will not be deterministic as a result of TensorFlow doesn’t specify the order of execution of its operations. So, it’s not potential to determine if “d_opt_1” ran earlier than “d_real_loss” or after that. So, is the reported “d_real_loss” earlier than the optimization or after?
#
# This code beneath is NOT deterministic
#_, l, dregloss, dt1 = session.run([d_opt_1, d_real_loss, d_reg_loss, DiscriminatorGraph],
feed_dict={
inputTensorPlaceholder: inputNumPy,
realBenchmarksPlaceholder:benchmarkones,
})
All the time run the “loss” in a separate session.run() name after operating the optimizer. This manner, you may be positive, the loss printed is after the Optimization
MISTAKE 16
Not protecting Generator and Discriminator Symmetrical
The DCGAN paper doesn’t speak in regards to the Discriminator structure totally (or) most likely it’s a reference. Simply go along with a symmetric structure. In case you have 7 layers in Generator, guarantee that you’ve got the identical in discriminator.
This will also be associated to the equal-power configuration for Discriminator and the Generator.
MISTAKE 17
Not utilizing TANH for the ultimate Generator output
TANH activation returns -1 to +1. That is what is recommended in DCGAN and can also be seen in OpenAI code. No concept why. Simply use the identical and be completely happy.
MISTAKE 18
Initializing Bias with a non-constant, non-zero initializer
All Bias variables need to be initialized with a “fixed” initializer with “0” as preliminary worth.
This can permit the algorithm to be taught its personal bias. Protecting a big bias initially, with none distinguished motive, could make the coaching course of extraordinarily sluggish because the Bias would affect the fee a lot that different variables is not going to see their results (and therefore gradient) accurately.
gb1 = tf.get_variable("gb1", form=[SecondChannels], dtype=tf.float32, initializer=tf.constant_initializer(0.0),
regularizer = g_reg)
MISTAKE 19
Not utilizing nuanced initialization like Xavier / Glorot-Bengio initialization
It’s true that Batch normalization can treatment the impact of dangerous initialization. However an excellent initialization, like Xavier init is all the time welcome transfer. So, don’t ignore it.
A easy intuitive rationalization of Xavier init may be discovered at Andy Jones’ weblog.
g_dc1_fanin = 5*5*FirstChannelsg_dc1_fanout = 5*5*ThirdChannelsg_dc1_scale = np.sqrt(6./(g_dc1_fanin + g_dc1_fanout))dc1filter = tf.get_variable("dc1filter", form=[5,5,SecondChannels, FirstChannels], dtype=tf.float32, initializer=tf.random_uniform_initializer(minval=-g_dc1_scale,maxval=g_dc1_scale), regularizer = g_reg)
MISTAKE 20
Not utilizing ample variety of Filter Banks
DCGAN begins with 4×4 decision with 1024 filter banks within the Generator and progressively reduces the variety of filter banks whereas growing the decision.
On the Discriminator aspect too, you will have comparable variety of filter banks as a result of symmetry.
One factor that I believe is the variety of Filter banks is straight proportional to the Filter measurement that one makes use of. That is true within the Discriminator context (or) Picture classification context. In case you select 1024 banks for 5×5, then you’ll have to select 4096 banks for 11×11 filter. 11×11 can seize extra patterns than 5×5 and therefore we’ll want extra variety of filter banks to seize all variations. That’s my line of thought.
MISTAKE 21
Not utilizing Strided Convolution and utilizing a Pooling layer as an alternative
DCGAN paper clearly discourages use of pooling layer and as an alternative proposes to make use of “strided convolution” and “transposed convolution with fractional strides” for down-sampling and up-sampling respectively.
MISTAKE 22
Not utilizing Leaky Relu in Discriminator
Leaky RelU leads to a strong discriminator. Don’t miss this within the Discriminator.
This isn’t wanted in Generator in response to DCGAN paper. However my commentary log exhibits that LRelu in Generator did produce superb outcomes. However, for some motive, the ultimate profitable run by no means used it. So, Be happy to check out Leaky Relu with Generator too!
MISTAKE 23
Not utilizing Batch normalization to hurry up compute
DCGAN recommends Batch normalization for each the Generator and Discriminator.
Batch normalization may also help overcome dangerous initialization and might speed up coaching course of.
You will need to use the identical batch-size whereas producing pictures from the realized mannequin (publish coaching section). In case you use a special batch-size, the batch statistics will differ and the realized batch-norm associated parameters will not be relevant
(or) You’ll have to save the batch-size statistics whereas coaching and take a weighted common of those statistics and use these parameters for batch normalization whereas producing a non-standard batch-size of pictures.
(or) Use the Digital Batch Normalization launched by OpenAI whereas the normalization is all the time with respect to an exterior pre-configured batch
MISTAKE 24
Not utilizing a Regularizer
Tensorflow doesn’t implement setting a Regularizer. It’s as much as you to go for a Regularizer.
Not performing Regularization can destabilize coaching course of while you run for a number of 1000s of iterations.
For some motive, I couldn’t discover a first rate documentation on learn how to apply regularization in TensorFlow. So, I simply referred the sources to grasp how it’s completed. I’ve summarized the identical beneath.
#
# Declare a Regularizer.
# d_reg is a operate which may be known as with weights.
# It returns a Graph that computes L2 regularization.
# Select the Fixed properly in response to the variety of parameters
# to be optimized.
#d_reg = tf.contrib.layers.l2_regularizer(scale=DREG_SCALE, scope="REG-DISCR")#
# Cross the declared regularizer when creating Variables.
# Relying on which scope the variables are created, Regularizer
# may even be related to the identical name
#c1filterVar = tf.get_variable("c1Filter", form=[5,5,inputchannels,c1Banks], dtype=tf.float32, initializer=tf.random_uniform_initializer(minval=-c1scale, maxval=c1scale), regularizer=d_reg)#
# get_reg_loss: Makes use of TF API to get all regularization associated
# losses equivalent to the "scope" after which add them up utilizing
# tf.add_n() API
# NOTE: The "add_n" is what ties all of the free L2 regularizer graphs
# collectively into 1 significant
#def get_reg_loss(regscope):
return tf.add_n(tf.losses.get_regularization_losses(scope=regscope))#
# Name the get_reg_loss() with the scope of the variables
# that you simply wish to regularize.
# d_reg_loss = get_reg_loss(regscope="DISCR")#
# Add the loss to the common loss
#
d_loss = d_real_loss + d_fake_loss + d_reg_loss
MISTAKE 25
Not selecting an excellent Regularization Fixed
All the time print the ultimate loss breakups whereas utilizing with Regularization. This can inform us what fraction of the overall loss are dominated by Regularization losses. If regularization losses are vital throughout begin of coaching, you most likely must lower the fixed
Beneath is my configuration
Variety of Generator Parameters     = 19,154,627
Variety of Discriminator Parameters = 19,616,609
Discriminator Regularizer Scaling Fixed = 0.0001
Generator     Regularizer Scaling Fixed = 0.0001
MISTAKE 26
Doing Batch-normalization within the final layer in Generator / First layer of discriminator
Batch normalizing the enter to the lone TANH unit on the finish of the Generator will make sure that the enter fed to TANH unit is having a imply of 0 and restricted variance. This isn’t fascinating in any respect as a result of we wish the activation to unfold out between -1 and +1. So, don’t batch normalize the final layer within the Generator.
dc5relu = tf.nn.relu(batchNormalize(tf.nn.bias_add(dc5, gb5), "BN_DC5Filter"))#Distinction the above with the beneathdc6relu = tf.nn.tanh(tf.nn.bias_add(dc6, gb6))
Similar holds good for the primary layer of discriminator. This can make sure the variance within the generated picture propagates to all layers downstream.
MISTAKE 27
Not doing sufficient to mitigate checkerboard impact
On the finish of the Generator pipeline, simply earlier than the TANH layer, run just a few convolution-transpose layers with 1×1 stride and no change in decision to take away the checkerboard impact launched by 2×2 and different strided convolutions upstream. I ran 1 layer further. However when you have good compute energy, you may run just a few extra. Remember to replicate the identical within the Discriminator layer to protect symmetry. I bear in mind seeing this in OpenAI code.
MISTAKE 28
Dedicating all CPU cores for Coaching
If in any respect you utilize CPU for coaching, don’t allocate all cores for the Coaching. TensorFlow may be configured. See the beneath snippet.
#
# My laptop computer has 4 cores. The code beneath supplies the context for the # major coaching loop.
# Leaving 1 core free for OS and different apps.
# This can guarantee machine is interactive regardless of GAN coaching
#with tf.Session(config=tf.ConfigProto(intra_op_parallelism_threads=2, inter_op_parallelism_threads=1)) as session:
MISTAKE 29
Not remodeling enter pictures to -1 to +1 vary
You will need to notice that generated pictures are from -1 and +1. Enter pictures are often from 0 to 1 after normalization. You have to 1 extra stage of conversion to maneuver it to -1 to +1. See beneath.
inputImagesTensor = (inputTensorPlaceholder * 2.) - 1.
MISTAKE 30
Operating much less variety of iterations
Check out what others have printed. 20,000 iterations is frequent. You don’t get something in 500 or 700 iterations even when that ran for 12 hours in your laptop computer.
It takes a variety of iterations to be taught something vital.
MISTAKE 31
Utilizing very excessive studying price
Very excessive studying charges can destabilize the coaching course of.
Even when you use Batch normalization and good initialization, the usage of studying charges like 0.001 can destabilize the entire coaching course of relying in your batch measurement.
It may be famous that larger “batch measurement” often can help the next coaching price. Later, I discovered that this level is mentioned within the “Environment friendly Backdrop” paper as nicely.
If you’re utilizing 512 as your batch measurement, 0.001 could be a good studying price. In case your batch measurement is 64, persist with 0.0002 (DCGAN really useful)
Picture Decision = 64 x 64
Mini Batch measurement  = 64
Generator Studying Charge     = 0.0002
Discriminator Studying Charge = 0.00015
MISTAKE 32
Re-using Adam Optimizer Object
Adam optimizer is a stateful optimizer and is really useful for GAN coaching in comparison with Gradient descent optimizer. Nevertheless, reusing the Adam Optimizer object can result in mindless conduct due to its stateful nature.
Adam optimizer computes the gradient as a exponentially decaying weighted common of previous gradients. The thought is to speed up studying round minimas, traverse flat areas sooner and so forth.
Use a separate Adam optimizer object for each loss minimization. For e.g. within the scheme that I used, I used 4 optimizer objects. One for D_REAL_LOSS, one other for D_FAKE_LOSS, one other for D_REAL_LOSS + D_FAKE_LOSS and one other for GEN_LOSS.
MISTAKE 33
Not utilizing historic pictures to coach the Discriminator
That is one thing I learnt from Soumith Chintala’s GAN suggestions and methods weblog. And in addition recommended by Steve Messina, from AIDL Fb group.
Feeding historic pictures to the Discriminator often may also help break repeated cycles between Discriminator and the Generator and stabilize all the coaching course of.
This one positively has worth within the studying course of. I included this coaching for 30% of the time in the primary coaching loop. First signs of studying began to look solely after together with this step.
MISTAKE 34
Producing a separate picture for Historical past functions
Make sure that the pictures saved for historical past are re-used from the batch you already generated.
If you’re producing a separate picture for historical past functions, then it is not going to work as anticipated as a result of batch-normalization is in power. So, it’s prudent to only decide a picture from the generated batch and go along with that.
MISTAKE 35
Not remodeling picture whereas feeding Historical past of Generated Photographs to Discriminator
The coaching course of feeds a pattern from cached generated historic pictures to the Discriminator typically (not all the time as that is conditionally run). Once we do that, we have to be conscious that the “graph” path might count on a picture from 0 to 1 values. This is dependent upon your coaching logic. So, convert the generated picture to be between 0 and 1 earlier than storing it within the Historical past cache, in case your logic requires that.
hc = np.random.randint(0, nSamples) #historical past candidate
candidateForHistory = genMap[hc]
candidateForHistory = candidateForHistory + 1.
candidateForHistory = candidateForHistory / 2.
GCache.addImage(candidateForHistory, step)
MISTAKE 36
Prioritizing Generator than Discriminator
Initially, folks take a look at optimizing Generator greater than the Discriminator. That is flawed as a result of Discriminator is an important a part of the GAN. Discriminator leads the best way and teaches Generator by offering him wholesome gradients.
On the finish of GAN coaching too, the discriminator filter banks can be utilized for object detection and creating environment friendly classifiers. Since he has been bombarded with a variety of faux pictures, he may even be much less prone to Adversarial assaults or so I believe.
MISTAKE 37
Highly effective Discriminator / Highly effective Generator
It’s potential to extend the facility of Discriminator by including extra layers or growing variety of filter banks. This may setup for mode collapse as a result of Discriminator can race previous and push Generator to essentially dangerous areas (poor gradients) from the place Generator is unable to return out.
Equally highly effective Generator can have no discriminator to guide him. The discriminator, who has to prepared the ground and train, is now subdued. This config is dangerous too.
The best setting for a secure GAN coaching is the place each Discriminator and Generator are equally highly effective and repeatedly be taught from one another.

Within the above determine, one can see that Generator is skilled twice all of the occasions. Discriminator is optimized typically for pure-1 losses and pure-0 losses individually and another occasions optimized on the overall loss incurred on each 1 and 0. The thought is to alternate between the 2 relying on how the losses are progressing and to maintain a steadiness on the coaching. Extra on the precise technique below “Unmoderated Coaching”
MISTAKE 38
Selecting flawed Tensor graph structure whereas utilizing Batch Normalization
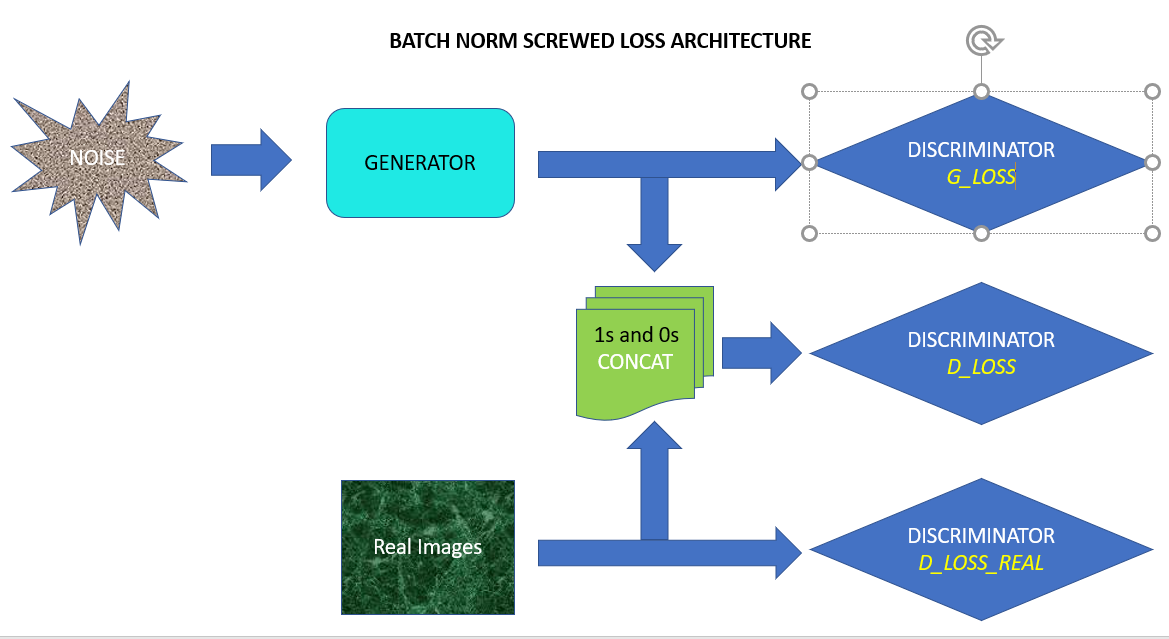
The structure above will bomb if we use Batch normalization in Discriminator. Why?
Take into account the three batches fed to the Discriminator. The “batch measurement” and “statistics” of the three batches are totally different. Agree? Their Mu-Sigma goes to affect Batch normalization carried out contained in the Discriminator community. Every batch can be normalized in another way.
So, you will notice that the D_LOSS reported is much less suggesting that “Discriminator” is nice at protecting the 0s at bay. So, you’ll count on G_LOSS to be big. However… then you will notice that G_LOSS reported can also be much less. That is due to the distinction in batch statistics.
The exact same “0” pictures when fed alone to the discriminator has totally different batch-statistics in comparison with the batch containing each “0” and “1” pictures. This structure will not setup the struggle between Discriminator and Generator. Coaching can be degenerate and nothing can be learnt. Ah!

The structure above will not be prone to Batch norm associated points as a result of batch statistics is not going to change. Have a look!
MISTAKE 39
Unmoderated Coaching
The coaching course of described within the unique GAN paper from Dr. Goodfellow talks about coaching the Discriminator “okay” occasions in each step whereas coaching the Generator solely as soon as in each step. That is to make sure that Discriminator is forward within the studying curve. This system nonetheless is dependent upon the relative strengths of the Discriminator and Generator. Additionally, as coaching proceeds, it’s fairly potential that Discriminator or Generator can develop into too highly effective and the primary training-loop doesn’t accommodate for these dynamic adjustments.
In my coaching setup, I had opted for a dynamic scheme of issues. I’m not positive the way it will work for various picture data-sets. So, no assure!
In my setup, I select between 2 totally different paths for coaching the Discriminator. One path makes the discriminator very robust in opposition to Generator. Allow us to name this PATH-A. The opposite path might or might not make the discriminator robust in opposition to Generator. That is PATH-B. I select PATH-A when both 50% of constructive labels are recognized as “detrimental” or 50% of detrimental labels are recognized are “constructive” or each. If not, I proceed the lighter PATH-B that offers respiratory house for the Generator. This ensures that none grows very robust, that there’s all the time a steadiness between Discriminator and Generator and that their studying are intertwined. The determine beneath exhibits the precise logic.
The “Beta1” charges for the Adam optimizer for this scheme should be set to a lesser worth and to not 0.9. It’s because successive runs could also be fairly aside iteration-wise as we swap between PATH-A and PATH-B throughout coaching. I had set it to 0.5 and it labored positive.

Go along with www.crestle.com if you’re a experimental developer.
Go along with www.floydhub.com if you’re an enterprise, searching for help, number of platforms and devoted GPU situations.
Each of them account for utilization in “seconds”. That’s nice!
Crestle presents GPU (K80) powered notebooks for a fraction of value of the rivals like FloydHub (0.34$ (now 0.59$) vs 1.14$). Crestle presents a unix command-line proper in your browser (known as Jupyter console) which can be utilized to create directories that you simply want, zip the output recordsdata, unzip enter recordsdata, set up the packages you want and so forth. That is known as flexibility, my expensive. You need to use the Jupyter pocket book interface to add your enter and it’s simply “clear”. You may get began in a matter of minutes. However with Crestle, you could know that you’re on an Amazon Spot occasion internally. Although your recordsdata are persevered throughout Runs in Crestle (which itself is a superb characteristic), your runs may be abruptly reduce brief. Oops!
Distinction that with “Floyd Hub” which presents Python packages known as floyd-CLI which is required for “loading” information and code. This seems foolish on the outset … However… Floyd helps resume of obtain/uploads which may be of nice use if you’re utilizing a flaky web connection or if you’re with out energy backup! Floyd CLI additionally takes care of compression of recordsdata and un-compressing them on the server finish too. Floyd hub additionally presents higher help and devoted situations for a good larger value.
Floyd Hub helps re-using the output of a job as enter for an additional job utilizing “mounting”. It’s actually an advanced interface in comparison with what “Crestle” presents. Crestle simply opens up the file-system for you and it’s as much as you to learn/write the best way you prefer it. No mounting, no name-space confusions and so forth. Crestle is a transparent winner right here for a lazy easy developer like me.
I selected Crestle for my GAN work. My firm (www.tavant.com) reimburses all these bills. However nonetheless, Much less is extra. Isn’t it?

Scroll just a little please……
Reply: Pretend pictures are organized in a sample of N
