
My preliminary configuration of a Netgate 6100 and PFSense
This can be a continuation of posts on Community Safety
Within the final put up I confirmed you how you can direct all DNS requests to your most popular DNS servers.
As famous that put up didn’t embrace DNS over HTTPS (DoH) and also you would wish to cope with that individually or block it.
Now I’m testing out the PFSense 6100. Different Netgate safety home equipment might be related. I’m going to undergo what I did to initially set it up step-by-step — to some extent. That is half one in all extra posts to observe.
Concerning the Netgate 6100
If you wish to see a terrific video explaining the options out there on the Netgate 6100 try this video:
Issues when establishing a brand new community gadgets
I don’t need to simply broadly open this as much as the Web with out with the ability to examine the site visitors. I wrote about that right here:
I prohibit entry to the mananagement port to a bodily connection on a single port. I can’t be bodily linked to my two firewall gadgets without delay from a single ethernet port on my laptop computer.
I’m going to see if I can plug in a community cable to 2 separate computer systems and monitor that approach.
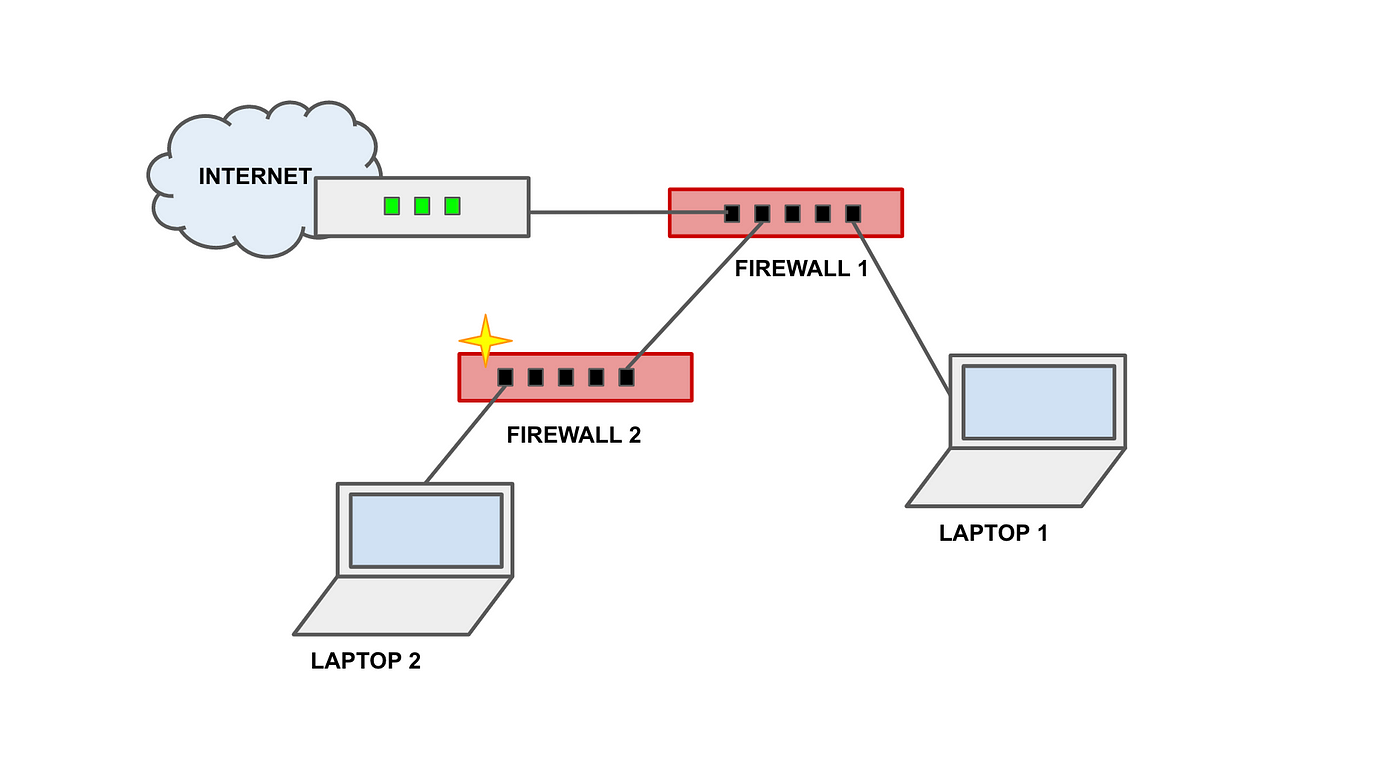
- Join LAPTOP 1 to the administration port on FIREWALL 1.
- Open the firewall logs on FIREWALL 1 and confirm you may examine the site visitors.
Now I’m going to fireplace up the second laptop computer and plug it into one of many ports on the firewall one so I can examine the site visitors that the machine generates.
- Join LAPTOP 2 to the primary LAN port on the 6100 (FIREWALL 2).
Netgate has an image right here of the completely different ports with the LAN ports as #5:

- Plug in FIREWALL TWO WAN port 1 (#2 RJ-45 above) into the suitable port on FIREWALL 1.
- Plug within the machine.
- If you wish to see the site visitors earlier than you permit it, you may block all site visitors on the port to which you join the brand new firewall. (Unsure what havoc this may wreak…we’ll discover out.)

Now in my final put up I used two completely different distributors to carry out this check which might be a greater check, however I’m not performing a whole safety evaluation of this product. I simply need to see what it’s as much as after I plug it in.

I see two issues.
- Checking for Web entry I’m guessing utilizing ICMP.
- DNS site visitors going to some host apart from my configured DNS servers.
The very first thing I need to do is have the firewall use CloudFlare for DNS. Let’s see if I can login into it now. As with most routers the IP tackle ought to be: 192.168.1.1. I had already configured FIREWALL 1 to a unique IP tackle so there ought to be no battle, and my LAPTOP2 can be linked on to FIREWALL2.
It’s unlucky that pfsense nonetheless makes use of a typical username and password. That is one more reason to not join it on to the Web on preliminary begin up however slightly have it behind one other machine. Most machine producers are actually publishing a singular password for every machine and it seems on a sticker on the machine. Some legal guidelines will quickly be imposing this. Hopefully newer gadgets from Netgate will make that change.
Preliminary Configuration
Undergo the PFSense wizard to initially configure the machine.
- Navigate to https://192.168.1.1
- Comply with the prompts.
- Change your DNS servers to CloudFlare should you like.
- Change the time servers from one thing apart from the default NTP pool should you like. For instance, you may select to make use of NIST ntp servers at time.nist.gov.
- Change the username and password.
- Don’t examine for updates as a result of we nonetheless have some networking blocked.
- Don’t change the IP tackle. Once I did that I couldn’t log into the machine anymore. I’m undecided if that was because of the specific IP tackle I selected.
Make an observation of all that as a result of should you’re like me you’ll overlook the password later. 😀 Retailer your passwords someplace safe clearly.
Check your new login and configuration modifications
Check entry along with your new configuration to be sure you can nonetheless get to FIREWALL2 from LAPTOP2 and your new person identify and password works. No level in redoing all of your configuration over again if one thing goes fallacious with that.
Initially I modified the IP vary for the machine and locked myself out. I reset the machine and began over since I hadn’t executed a lot.
Resetting the 6100 in case of preliminary misconfiguration
The reset directions will not be precisely clear. The place is the reset button? An image could be useful. It’s on the facet of the field and it’s the highest indented button you can press in. Don’t press too exhausting as a result of I’ve had a Ubiquiti community machine reset button break on me. I examined this one and also you don’t need to push exhausting to get it to work. In addition to that the directions are satisfactory to return to issue reset should you can’t login.
Console Entry ~ should you get locked out of the online UI
Should you lock your self out of the online UI on account of a misconfigured firewall rule at any level, as an alternative of beginning over, you need to use console entry to revert to a previous configuration. You’ll must learn by means of the documentation right here and set up the suitable driver in your system.
I take advantage of a serial connection and the display screen command on a Mac described right here:
Including the Aliases
Now that we’ve got our firewall up and operating we are able to restore the aliases from one other machine as I defined in a previous put up I’m going to try this earlier than I connect with the Web.
With a view to get my guidelines over to the machine the place I’m linked to the PFSense I simply emailed the recordsdata to myself, linked to Wi-Fi, logged into e mail and grabbed the recordsdata, then bought off Wi-Fi once more. You might need a greater answer however that labored for me.
Add Firewall Guidelines
Now I may attempt to restore the firewall guidelines on my different machine, however the issue with that’s that this machine doesn’t have the identical interface names and even the identical variety of interfaces. For that reason I’m going to manually arrange my firewall guidelines on this machine.
The very first thing I’m going to do is add a default deny rule to every interface and explicitly solely permit the site visitors I need to go on that interface.
I’m going so as to add guidelines to dam essentially the most egregious offenders utilizing my aliases as defined in different posts. Yow will discover all my community posts right here.
One of many issues I like concerning the 6100 is that the ports are discrete by default. I needed to configure that on the 3100 to stop site visitors from being allowed between completely different ports. I want to check this additional as soon as I get the machine arrange.
Add guidelines to entry the PFSense Console and take away the Auto-Lockout Rule
One of many issues that I don’t like concerning the PFSense Auto-Lockout Rule that ensures you don’t lock your self out. I wish to have a bit extra management over that rule. Nonetheless, should you do that you simply danger locking your self out. You possibly can then use the console and roll again to a earlier configuration or reset the machine.
Disable storing the username and password within the browser
- Go to System > Superior > Admin Entry. Uncheck this field.

Disable IPv6
I select to disable IPv6. You possibly can learn extra about that right here:
Redirect all DNS site visitors to most popular DNS servers
Should you’re like me and don’t need to create a bunch of various guidelines for gadgets which have minds of their very own in terms of DNS site visitors you might need to redirect all that to your most popular DNS servers earlier than you open up site visitors to the Web. I wrote about that right here:
You may as well arrange guidelines to redirect ICMP site visitors. This will likely break a number of issues so that you’ll need to try it out for every completely different machine for which you find yourself redirecting site visitors.
Disable DNS Resolver
You could or could not need to do that however I disable the DNS Resolver. A number of the different settings I’ve described right here gained’t work except you disable this.

There are execs and cons to doing that — perhaps a subject for an additional put up.
Verify the firewall logs — create a rule for DHCP site visitors
Configuring the firewall enabled some new performance.
- Verify the firewall logs once more to see what we’ve got now.
- Create a rule to permit DHCP site visitors
Now that I’ve configured the machine I can see that port 67 is blocked. That’s used for DCHP, which permits the firewall to get an IP tackle from the upstream machine and connect with the community.

Within the screenshot above you may see that protocol is UDP and we’ve bought our machine plugged into PORT 2. We’re utilizing IPv4 solely so we’ll create the rule as follows.

The supply port in our site visitors above is 68 and the vacation spot port is 67 so we’ll open these in a brand new firewall rule.

Save after which Apply the modifications.
Question the site visitors for the interface two which we’ve plugged within the firewall once more and now DHCP is allowed by our new rule.

No Route To Host
At this level, should you proceed to examine your logs on Firewall 1 and Firewall 2 to seek out out what else is blocked, you’ll discover an error: “No Route To Host.”
That’s a subject I touched on earlier than and might be lined in one other put up hopefully. On the date this put up is printed I’ll be instructing an Azure class so undecided how briskly I’ll get to that one. You’re in all probability going to see some Azure subjects earlier than I get to that.
Comply with for updates.
Teri Radichel
Should you preferred this story please clap and observe:
******************************************************************
Medium: Teri Radichel or E mail Listing: Teri Radichel
Twitter: @teriradichel or @2ndSightLab
Requests providers by way of LinkedIn: Teri Radichel or IANS Analysis
******************************************************************
© 2nd Sight Lab 2022
____________________________________________
Creator:
Cybersecurity for Executives within the Age of Cloud on Amazon

Want Cloud Safety Coaching? 2nd Sight Lab Cloud Safety Coaching
Is your cloud safe? Rent 2nd Sight Lab for a penetration check or safety evaluation.
Have a Cybersecurity or Cloud Safety Query? Ask Teri Radichel by scheduling a name with IANS Analysis.
Cybersecurity & Cloud Safety Sources by Teri Radichel: Cybersecurity and Cloud safety lessons, articles, white papers, shows, and podcasts
