
There are various methods to go about programming. One of the crucial productive paradigms is interactive: You employ a REPL (read-eval-print loop) to jot down and take a look at your code as you code, after which copy the examined code right into a file.
The REPL methodology, which originated in LISP growth environments, is well-suited to Python programming, as Python has all the time had good interactive growth instruments. The disadvantage of this model of programming is that when you’ve written the code it’s a must to individually pull out the assessments and write the documentation, save all that to a repository, do your packaging, and publish your bundle and documentation.
Donald Knuth’s literate programming paradigm prescribes writing the documentation and code in the identical doc, with the documentation geared toward people interspersed with the code meant for the pc. Literate programming has been used extensively for scientific programming and knowledge science, typically utilizing pocket book environments, similar to Jupyter Notebooks, Jupyter Lab, Visible Studio Code, and PyCharm. One situation with notebooks is that they often don’t play nicely with repositories as a result of they save an excessive amount of info, together with metadata that doesn’t matter to anybody. That creates an issue when there are merge conflicts, as notebooks are cell-oriented and supply code repositories similar to Git are line-oriented.
Jeremy Howard and Hamel Husain of quick.ai, together with about two dozen minor contributors, have give you a set of command-line utilities that not solely enable Jupyter Notebooks to play nicely with Git, but in addition allow a extremely productive interactive literate programming model. Along with producing right Python code rapidly, you may produce documentation and assessments on the identical time, put it aside all to Git with out worry of corruption from merge conflicts, and publish to PyPI and Conda with a couple of instructions. Whereas there’s a studying curve for these utilities, that funding pays dividends, as you might be executed along with your growth mission in concerning the time it will usually take to easily write the code.
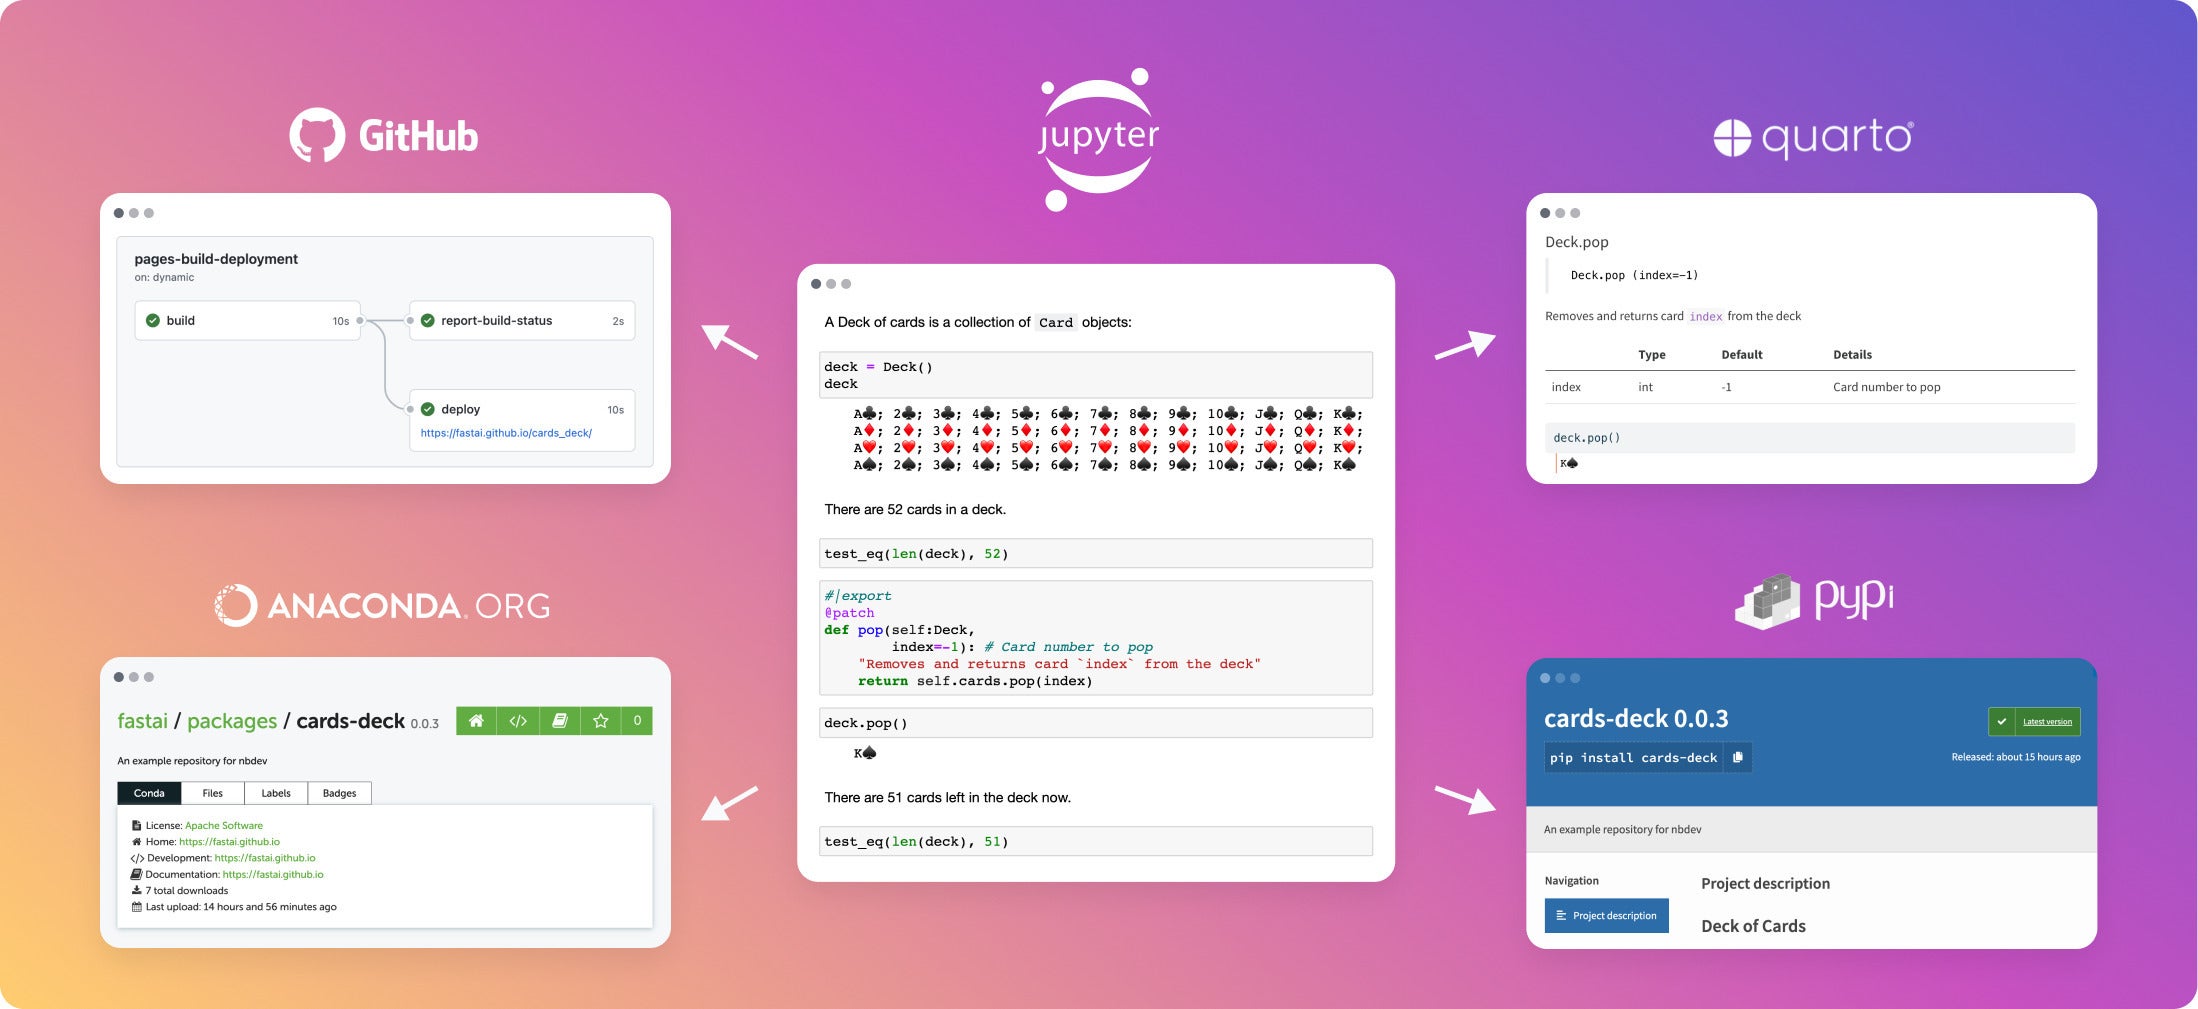
As you may see within the diagram under, nbdev works with Jupyter Notebooks, GitHub, Quarto, Anaconda, and PyPI. To summarize what each bit of this technique does:
- You’ll be able to generate documentation utilizing Quarto and host it on GitHub Pages. The docs help LaTeX, are searchable, and are robotically hyperlinked.
- You’ll be able to publish packages to PyPI and Conda in addition to instruments to simplify bundle releases. Python finest practices are robotically adopted, for instance, solely exported objects are included in __all__.
- There’s two-way sync between notebooks and plaintext supply code, permitting you to make use of your IDE for code navigation or fast edits.
- Exams written as peculiar pocket book cells are run in parallel with a single command.
- There’s steady integration with GitHub Actions that run your assessments and rebuild your docs.
- Git-friendly notebooks with Jupyter/Git hooks that clear undesirable metadata and render merge conflicts in a human-readable format.
 IDG
IDGThe nbdev software program works with Jupyter Notebooks, GitHub, Quarto, Anaconda, and PyPi to supply a productive, interactive setting for Python growth.
nbdev set up
nbdev works on macOS, Linux, and most Unix-style working methods. It requires a current model of Python 3; I used Python 3.9.6 on macOS Ventura, working on an M1 MacBook Professional. nbdev works on Home windows underneath WSL (Home windows Subsystem for Linux), however not underneath cmd or PowerShell. You’ll be able to set up nbdev with pip or Conda. I used pip:
pip set up nbdevThat put in 29 command-line utilities, which you’ll be able to record utilizing nbdev_help:
% nbdev_help
nbdev_bump_version              Increment model in settings.ini by one
nbdev_changelog                 Create a CHANGELOG.md file from closed and labeled GitHub points
nbdev_clean                     Clear all notebooks in `fname` to keep away from merge conflicts
nbdev_conda                     Create a `meta.yaml` file able to be constructed right into a bundle, and optionally construct and add it
nbdev_create_config             Create a config file.
nbdev_docs                      Create Quarto docs and README.md
nbdev_export                    Export notebooks in `path` to Python modules
nbdev_filter                    A pocket book filter for Quarto
nbdev_fix                       Create working pocket book from conflicted pocket book `nbname`
nbdev_help                      Present assist for all console scripts
nbdev_install                   Set up Quarto and the present library
nbdev_install_hooks             Set up Jupyter and git hooks to robotically clear, belief, and repair merge conflicts in notebooks
nbdev_install_quarto            Set up newest Quarto on macOS or Linux, prints directions for Home windows
nbdev_merge                     Git merge driver for notebooks
nbdev_migrate                   Convert all markdown and pocket book information in `path` from v1 to v2
nbdev_new                       Create an nbdev mission.
nbdev_prepare                   Export, take a look at, and clear notebooks, and render README if wanted
nbdev_preview                   Preview docs domestically
nbdev_proc_nbs                  Course of notebooks in `path` for docs rendering
nbdev_pypi                      Create and add Python bundle to PyPI
nbdev_readme                    None
nbdev_release_both              Launch each conda and PyPI packages
nbdev_release_gh                Calls `nbdev_changelog`, allows you to edit the outcome, then pushes to git and calls `nbdev_release_git`
nbdev_release_git               Tag and create a launch in GitHub for the present model
nbdev_sidebar                   Create sidebar.yml
nbdev_test                      Check in parallel notebooks matching `path`, passing alongside `flags`
nbdev_trust                     Belief notebooks matching `fname`
nbdev_update                    Propagate change in modules matching `fname` to notebooks that created them
The nbdev builders counsel both watching this 90-minute video or going by way of this roughly one-hour written walkthrough. I did each, and in addition learn by way of extra of the documentation and a number of the supply code. I discovered completely different materials from every, so I’d counsel watching the video first after which doing the walkthrough. For me, the video gave me a transparent sufficient concept of the bundle’s utility to encourage me to undergo the tutorial.
Start the nbdev walkthrough
The tutorial begins by having you put in Jupyter Pocket book:
pip set up pocket bookAfter which launching Jupyter:
jupyter pocket bookThe set up continues within the pocket book, first by creating a brand new terminal after which utilizing the terminal to put in nbdev. You’ll be able to skip that set up for those who already did it in a shell, like I did.
Then you need to use nbdev to put in Quarto:
nbdev_install_quartoThat requires root entry, so that you’ll must enter your password. You’ll be able to learn the Quarto supply code or docs to confirm that it’s secure.
At this level you might want to browse to GitHub and create an empty repository (repo). I adopted the tutorial and known as mine nbdev_hello_world, and added a reasonably generic description. Create the repo. Seek the advice of the directions for those who want them. Then clone the repo to your native machine. The directions counsel utilizing the Git command line in your machine, however I occur to love utilizing GitHub Desktop, which additionally labored positive.
In both case, cd into your repo in your terminal. It doesn’t matter whether or not you employ a terminal in your desktop or in your pocket book. Now run nbdev_new, which can create a bunch of information in your repo. Then commit and push your additions to GitHub:
git add .
git commit -m'Preliminary commit'
git push
Return to your repo on GitHub and open the Actions tab. You’ll see one thing like this:
 IDG
IDGGitHub Actions after preliminary commit. There are two: a steady integration (CI) workflow to scrub your code, and a Deploy to GitHub Pages workflow to put up your documentation.
Now allow GitHub Pages, following the elective directions. It ought to appear to be this:
 IDG
IDGEnabling GitHub Pages.
Open the Actions tab once more, and also you’ll see a 3rd workflow:
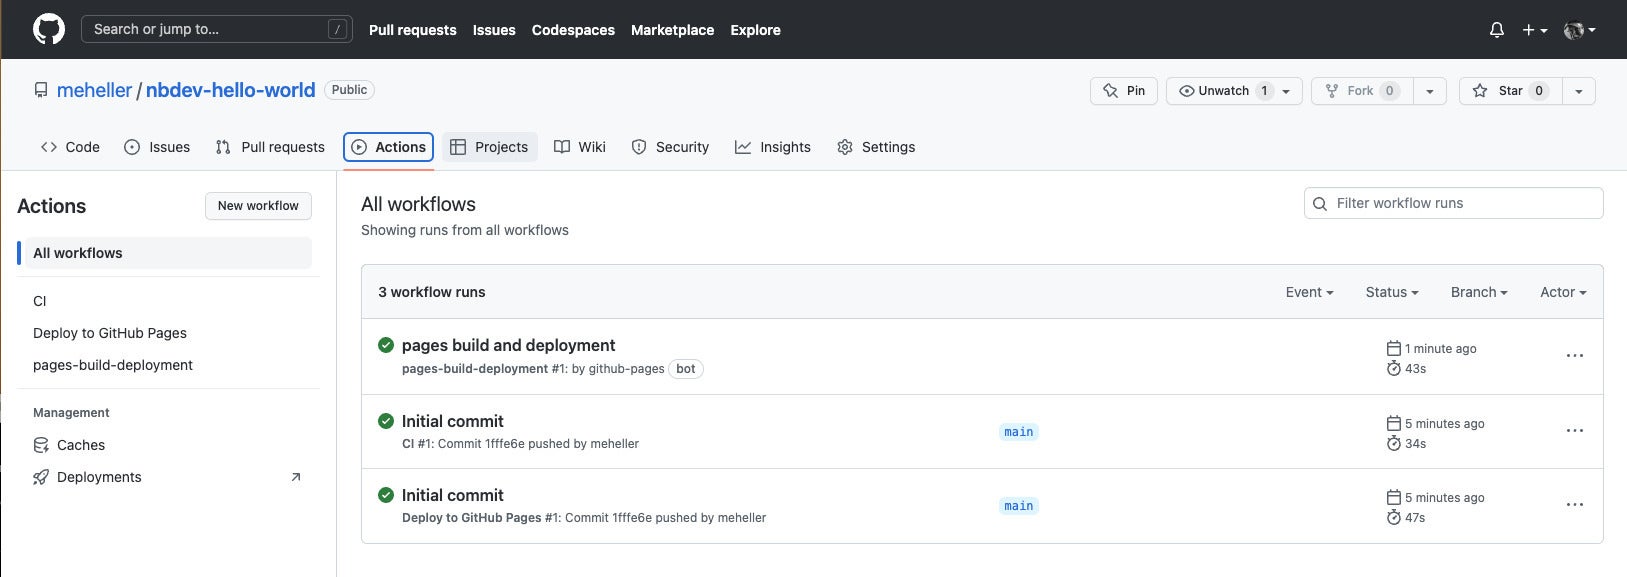 IDG
IDGThere are actually three workflows in your repo. The brand new one generates internet documentation.
Now open your generated web site, at https://{consumer}.github.io/{repo}. Mine is at https://meheller.github.io/nbdev-hello-world/. You’ll be able to copy that and alter meheller to your individual GitHub deal with and see one thing just like the next:
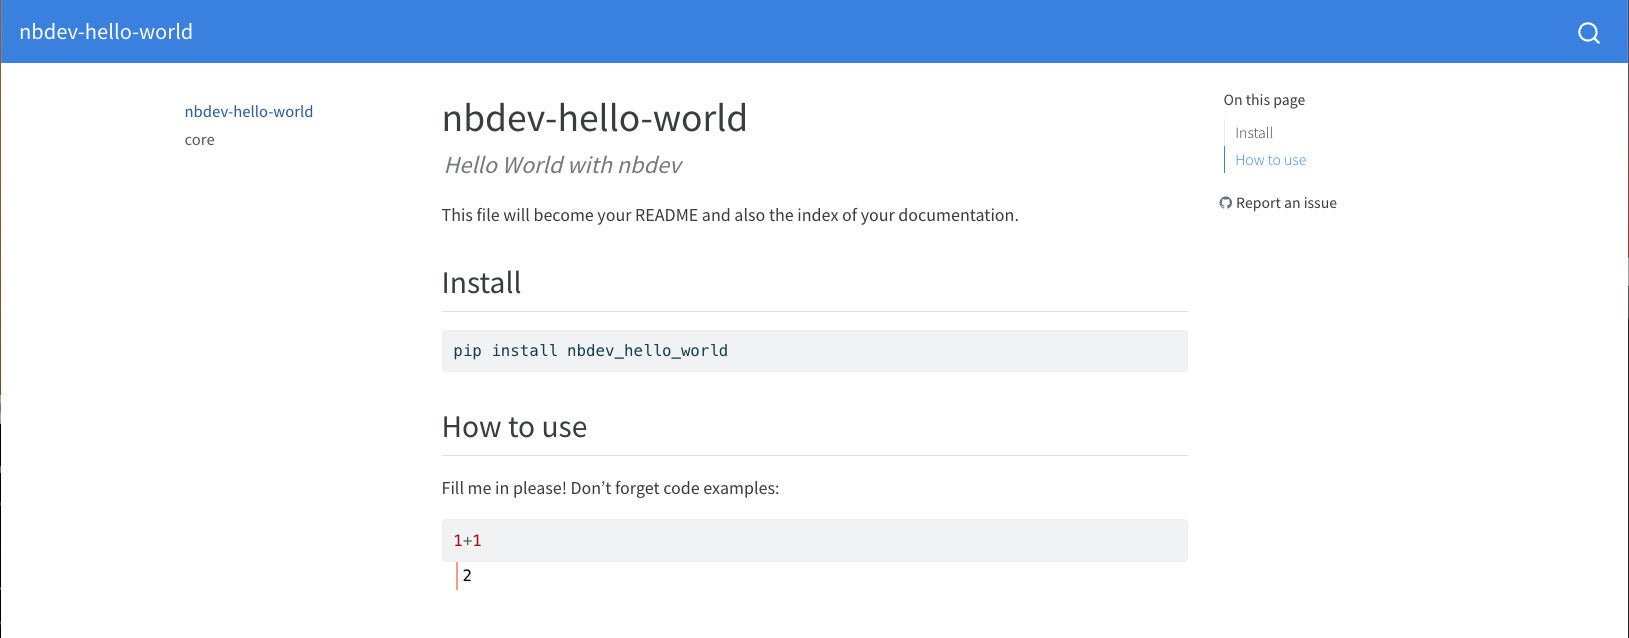 IDG
IDGPreliminary internet documentation web page for the bundle.
Proceed the nbdev walkthrough
Now we’re lastly attending to the great things. You’ll set up internet hooks to robotically clear notebooks while you examine them in,
nbdev_install_hooksexport your library,
nbdev_exportset up your bundle,
nbdev_exportpreview your docs,
nbdev_preview(and click on the hyperlink) and in the end begin modifying your Python pocket book:
jupyter pocket book(and click on on nbs, and click on on 00_core.ipynb).
Edit the pocket book as described, then put together your adjustments:
nbdev_prepare
Edit index.ipynb as described, then push your adjustments to GitHub:
git add .
git commit -m'Add `say_hello`; replace index'
git push
If you want, you may push on and add superior performance.
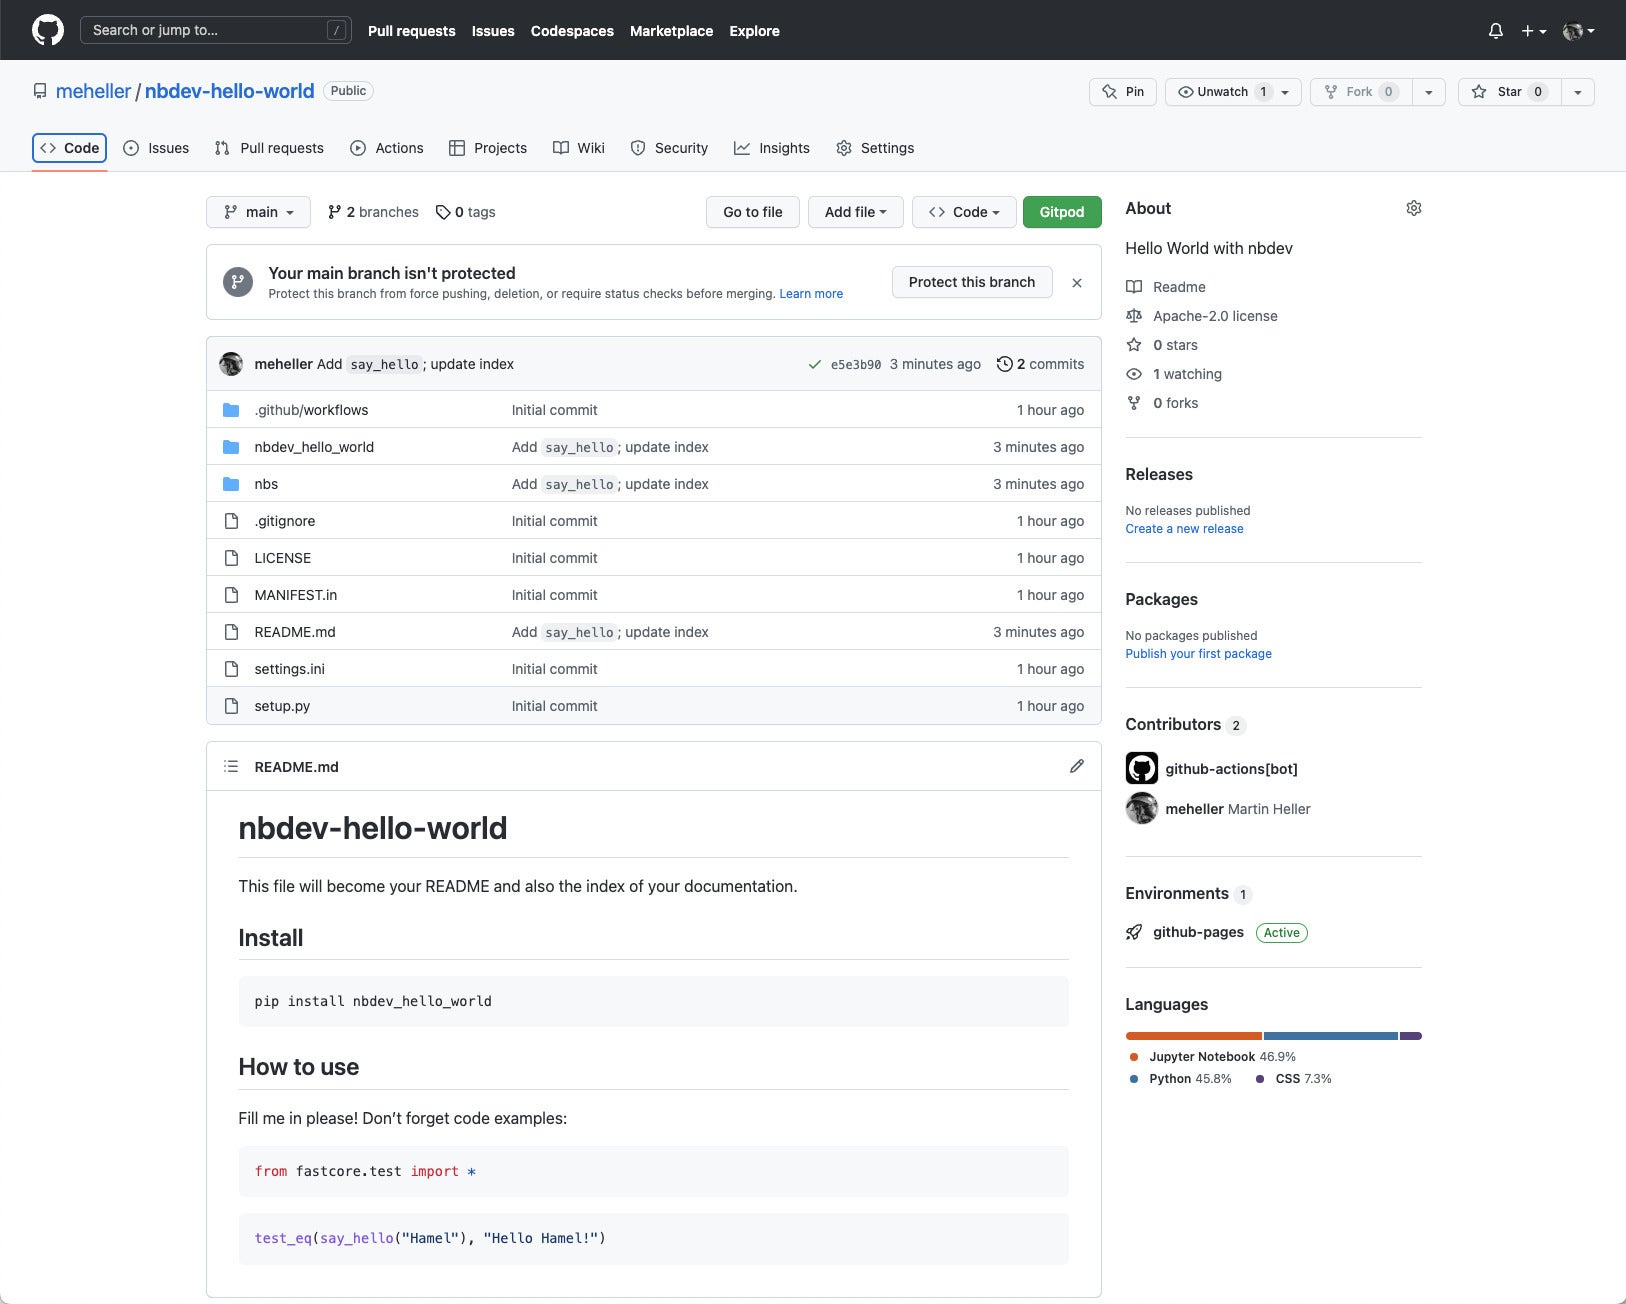 IDG
IDGThe nbdev-hello-world repo after ending the tutorial.
As you’ve seen, particularly for those who’ve labored by way of the tutorial your self, nbdev can allow a extremely productive Python growth workflow in notebooks, working easily with a GitHub repo and Quarto documentation displayed on GitHub Pages. Should you haven’t but labored by way of the tutorial, what are you ready for?
—
Contact: quick.ai, https://nbdev.quick.ai/
Value: Free open supply underneath Apache License 2.0.
Platforms: macOS, Linux, and most Unix-style working methods. It really works on Home windows underneath WSL, however not underneath cmd or PowerShell.
Copyright © 2023 IDG Communications, Inc.
