
Pagination is a typical UX downside that comes up in lots of data-driven purposes. We have to restrict how a lot is proven on display screen; if my content material requires an excessive amount of scrolling, navigating round my web site turns into a painful expertise for my customers.
On this publish, we’ll take a look at a typical method to clear up this downside by constructing a NestJS server with GraphQL after which eat it on a React frontend. By going step-by-step by means of the next sections, we are going to construct a easy pagination system that may be utilized to every kind of purposes.
This information might be cut up into three important sections:
- The pagination algorithm
- Organising an API utilizing NestJS, GraphQL, and Mongoose
- Constructing a React frontend to eat the API
It is a sensible information to implementing a easy pagination system in NestJS and GraphQL. You may enhance on the appliance that we’ll construct on this information to create one thing extra production-ready.
I like to recommend coding alongside to solidify the ideas. All of the code written on this information will be discovered on my GitHub.
What are we constructing?
The appliance we’ll construct is a straightforward React frontend that enables a consumer to web page by means of a listing of customers. It’s simply easy sufficient to simply perceive the completely different ideas we’ll cowl, whereas nonetheless sensible sufficient to switch for present purposes.
Earlier than establishing the undertaking, it’s value it to undergo the pagination algorithm we’ll be implementing. This can aid you make sense of every a part of the undertaking as we begin creating recordsdata and writing code.
Let’s skip forward and try the ultimate GraphQL question that we’ll be calling to fetch and paginate the checklist of customers.
{
  rely
  customers(take: 20, skip: 0) {
    firstName
    lastName
  }
}
The question consists of two sources, rely and customers.
The primary one, rely, as you’ll be able to in all probability inform from the identify, merely returns a rely of all of the customers within the database. The opposite useful resource, customers lets us specify what number of customers we wish to retrieve (take), in addition to an offset to begin fetching from (skip).
How can we implement pagination with this straightforward question?
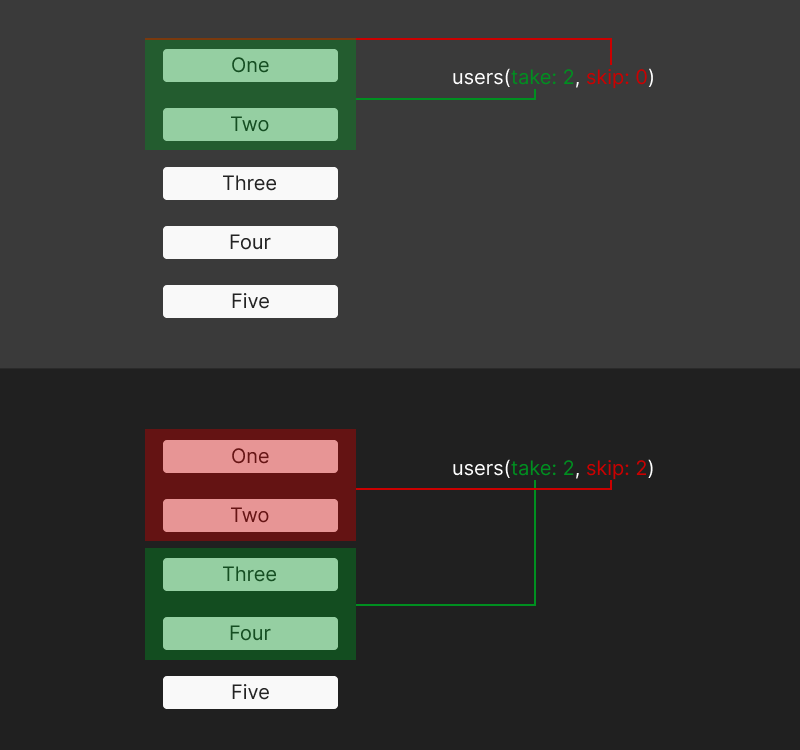
Contemplate a state of affairs the place we’ve 5 sources:
[one, two, three, four, five]
If we run the above question with the arguments take = 2, skip = 0, we’ll get the next sources:
[one, two]
And if we ran the identical question once more, however with the next arguments:
take = 2, skip = 2
we’d get the next sources:
[three, four]
take and skip work, however visuallyBy maintaining observe of what number of customers we’ve retrieved on the frontend, we will cross a quantity to the skip argument to retrieve the proper variety of subsequent customers. This can develop into clearer after we implement the frontend.
For now, let’s arrange the API to implement the performance mentioned up to now.
Organising an API utilizing NestJS, GraphQL, and Mongoose
Normally, we’d begin by establishing a contemporary NestJS undertaking and putting in a number of dependencies to get us going.
Nevertheless, to skip all of the painful components of establishing a undertaking to observe a tutorial, I’ve gone forward and arrange a repository with all the required libraries and setup recordsdata.
The repository is a monorepo containing each backend and frontend parts. This permits us to construct each the API and the frontend in a single repo, unlocking further velocity in growth time.
It depends on Yarn workspaces, so that you’ll must have each npm and Yarn put in.
Clone the repository and run the next instructions to get began.
git clone https://github.com/ovieokeh/graphql-nestjs-pagination-guide.git
npm set up

cd ../workspaces/frontend
npm set up

cd workspaces/backend
npm set up

mkdir src && cd src
When you run any of the instructions within the bundle.json recordsdata, they’ll almost certainly error out. You might also see eslint errors if in case you have your editor configured. That is fantastic. We’ll repair these as we work by means of the information.
Now that you just’ve put in the entire required packages, we will begin constructing the completely different parts of our API.
Mongoose schema setup
First, we have to arrange a database that can question GraphQL. I’ve determined to go together with Mongoose for this information as a result of it’s one of the fashionable database ORMs on the market, however it’s best to be capable to apply the identical ideas with different ORMs.
We’ll begin by making a src/mongoose folder and a src/mongoose/schema.ts file to carry our database sorts, fashions, and schema.
mkdir mongoose
contact mongoose/schema.ts
Now, let’s configure our schema.ts file.
// src/mongoose/schema.ts

import { Prop, Schema, SchemaFactory } from '@nestjs/mongoose'
import { Doc } from 'mongoose'

export kind UserDocument = UserModel & Doc

@Schema()
export class UserModel {
  @Prop()
  firstName: string

  @Prop()
  lastName: string

  @Prop()
  e mail: string

  @Prop()
  dateOfBirth: Date
}

export const UserSchema = SchemaFactory.createForClass(UserModel)
UserDocumentis a TypeScript kind representing a consumer mannequin and Mongoose docUserModelrepresents a single consumer to be saved within the databaseUserSchemais a Mongoose schema derived from theUserModel
We’ll be making use of those as we end establishing the API.
NestJS and GraphQL
Subsequent, we have to create some recordsdata and folders, which might be defined as we fill the contents.
mkdir customers && cd customers

mkdir dto entities
contact dto/fetch-users.enter.ts entities/consumer.entity.ts
dto/fetch-users.enter.ts
// dto/fetch-users.enter.ts

import { Subject, Int, ArgsType } from '@nestjs/graphql'
import { Max, Min } from 'class-validator'

@ArgsType()
export class FetchUsersArgs {
  @Subject(() => Int)
  @Min(0)
  skip = 0

  @Subject(() => Int)
  @Min(1)
  @Max(50)
  take = 25
}
FetchUsersArgs is a information switch object (DTO), which signifies that it describes a bit of knowledge being despatched over the community. On this case, it’s describing the arguments, skip and take, that we’ll cross to the API when querying the customers.
The subsequent set of recordsdata we’ll create are the consumer service, resolver, and module.
Creating the customers.service.ts file
contact customers.service.ts customers.resolver.ts customers.module.ts

import { Mannequin } from 'mongoose'
import { Injectable } from '@nestjs/widespread'
import { InjectModel } from '@nestjs/mongoose'

import { UserDocument, UserModel } from '../../mongoose/schema'
import { FetchUsersArgs } from './dto/fetch-users.enter'
import { Person } from './entities/consumer.entity'

@Injectable()
export class UsersService {
  constructor(
    @InjectModel(UserModel.identify) personal userModel: Mannequin<UserDocument>,
  ) {}

... continues beneath (1) ...
NestJS injects the Mongoose database we created earlier into the UsersService class utilizing the @InjectModel ornament. This permits us to question the database utilizing the getCount and findAll strategies.
... continues from (1) ...
  async getCount(): Promise<quantity> {
    const rely = await this.userModel.countDocuments()
    return rely
  }
... continues beneath (2) ...
UsersService.getCount() is a technique that enables us to fetch the overall variety of customers within the database. This rely might be helpful for implementing the numbered pagination element within the frontend.
... continues from (2) ...
  async findAll(args: FetchUsersArgs = { skip: 0, take: 5 }): Promise<Person[]> {
    const customers: Person[] = (await this.userModel.discover(null, null, {
      restrict: args.take,
      skip: args.skip,
    })) as Person[]

    return customers
  }
}
UsersService.findAll({ skip, take }) is a technique that fetches a specified quantity of customers (with the take argument) together with an offset (skip).
These two strategies kind the bottom of the pagination system we’ll be constructing.
Creating the customers.resolver.ts file
import { Resolver, Question, Args } from '@nestjs/graphql'

import { Person } from './entities/consumer.entity'
import { UsersService } from './customers.service'
import { FetchUsersArgs } from './dto/fetch-users.enter'

@Resolver(() => Person)
export class UsersResolver {
  constructor(personal readonly usersService: UsersService) {}

  @Question(() => Quantity, { identify: 'rely' })
  async getCount(): Promise<quantity> {
    return this.usersService.getCount()
  }

  @Question(() => [User], { identify: 'customers' })
  async findAll(@Args() args: FetchUsersArgs): Promise<Person[]> {
    return this.usersService.findAll(args)
  }
}
The UsersResolver class is the GraphQL resolver for the rely and customers queries. The strategies merely name the corresponding UsersService strategies.
Creating the customers.module.ts file
import { Module } from '@nestjs/widespread'
import { MongooseModule } from '@nestjs/mongoose'

import { UserModel, UserSchema } from '../../mongoose/schema'
import { UsersService } from './customers.service'
import { UsersResolver } from './customers.resolver'

@Module({
  imports: [
    MongooseModule.forFeature([{ name: UserModel.name, schema: UserSchema }]),
  ],
  suppliers: [UsersResolver, UsersService],
})
export class UsersModule {}
The UsersModule class imports the Mongoose schema and configures the resolver and repair lessons, as outlined above. This module will get handed to the principle app module and permits for the question outlined earlier.
Creating the app.module.ts file
Lastly, to tie all the things collectively, let’s create an app.module.ts file to eat all of the modules we’ve outlined up to now.
import { Module } from '@nestjs/widespread'
import { GraphQLModule } from '@nestjs/graphql'
import { ApolloDriver, ApolloDriverConfig } from '@nestjs/apollo'
import { MongooseModule } from '@nestjs/mongoose'

import { UsersModule } from './customers/customers.module'
import { ConfigModule, ConfigService } from '@nestjs/config'
import configuration from '../nest.config'

@Module({
  imports: [
    UsersModule,
    ConfigModule.forRoot({
      load: [configuration],
    }),
    MongooseModule.forRootAsync({
      imports: [ConfigModule],
      useFactory: async (configService: ConfigService) => ({
        uri: configService.get('databaseUrl'),
      }),
      inject: [ConfigService],
    }),
    GraphQLModule.forRoot<ApolloDriverConfig>({
      driver: ApolloDriver,
      autoSchemaFile: 'schema.gql',
      embody: [UsersModule],
    }),
  ],
})
export class AppModule {}
This could all be acquainted if you have already got expertise with GraphQL and NestJS. We’re importing:
GraphQLModulefor establishing GraphQLMongooseModulefor the databaseUsersModulefor the customers useful resourceConfigModulefor establishing surroundings variables
Now, make sure that to setup a MongoDB database and create a .env file utilizing the .env.instance as a information earlier than including your database connection URI.
At this level, now you can take a look at the API by doing the next:
- Be sure that you’re within the backend listing —
cd src/workspaces/backend - Run
yarn seedto seed in some faux consumer information - Run
yarn begin:devto begin the server on port 3000 - Navigate to
http://localhost:3000/graphqlin your browser to open the GraphQL playground, the place you’ll be able to attempt the question from the “The pagination algorithm” part like so:{ rely customers(take: 20, skip: 0) { firstName lastName } }
When you’ve made it this far, you’re a rock star 😎.
It is a good time to take a break and undergo the backend code once more. Take your time to know it, perhaps seize a cup of juice (or tea, should you’re fancy), after which proceed with the frontend.
Constructing a React frontend to eat the API
With our backend all arrange, we will now create a shiny React frontend to implement a primary pagination system.
Constructing the parts
As a substitute of establishing a complete new frontend undertaking, you can also make use of the workspaces/frontend folder, which already has a React app arrange with all the required dependencies put in.
cd ../frontend/src
Let’s begin with a bottom-up method to constructing out the parts, earlier than lastly integrating all of it on the finish.
We’ll want the next parts:
Customers— queries the API and renders a listing of customersPagination— supplies the pagination logic and renders the controlsApp— renders each Customers and PaginationIndex— wraps the app in an Apollo supplier and renders to the DOM
Writing our customers.tsx element

The element will question the GraphQL API utilizing the @apollo/shopper library and render a listing of customers when the question is resolved.
// make sure you're in /workspaces/frontend/src
contact Customers.tsx
Open up the newly created file.
// Customers.tsx
import { gql, useQuery } from '@apollo/shopper'

const GET_USERS = gql`
  question GetUsers($skip: Int!, $amountToFetch: Int!) {
    customers(skip: $skip, take: $amountToFetch) {
      id
      firstName
      lastName
    }
  }
`

kind Person = {
  id: string
  firstName: string
  lastName: string
}
... continues beneath (3) ...
On the high of the file, we import gql and useQuery from the @apollo/shopper library talked about earlier.
gql permits us to construct a GraphQL question with performance like dynamic variable alternative. The GET_USERS variable is a question that requests a listing of customers of size $amountToFetch from an offset $skip .
We’re querying the id , firstName, and lastName properties of every consumer. The Person variable is a TypeScript kind that specifies the construction of a consumer.
... continues from (3) ...

const Customers = (props: { skip?: quantity; amountToFetch?: quantity }) => {
  const { information } = useQuery<{ rely: quantity; customers: Person[] }>(GET_USERS, {
    variables: props,
  })

  const renderedUsers = information?.customers?.map(({ id, firstName, lastName }) => {
    const identify = `${firstName} ${lastName}`
    return (
      <div key={id}>
        <p>{identify}</p>
      </div>
    )
  })

  return <div className="Customers">{renderedUsers}</div>
}

export default Customers
Lastly, we’ve a Customers element that accepts two props: skip and amountToFetch.
It instantly kicks off a question to the API the GET_USERS question in addition to passing the props as variables.
Then we map over the array of customers (utilizing the ternary operator, in case the information isn’t prepared but) and return a div containing the identify of every consumer.
On the finish, the return assertion completes this element.
The pagination.tsx element

Hopefully you’re conversant in the renderProps approach in React. This element makes use of renderProps to render a element with props in addition to render a choose enter and a few buttons.
Create a brand new Pagination.tsx file and open it.
// make sure you're in /workspaces/frontend/src
contact Pagination.tsx
We’ll begin by importing some sorts and utilities from React and setup some state variables to trace the present state of the pagination element.
import { ChangeEvent, cloneElement, FunctionComponentElement, useState } from 'react'

const Pagination = ({ rely, render }: {
  rely: quantity
  render: FunctionComponentElement<{ skip: quantity; amountToFetch: quantity }>
}) => {
  const [step, setStep] = useState(0)
  const [amountToFetch, setAmountToFetch] = useState(10)

... continues beneath (4) ...
The Pagination element accepts two props:
rely— The full variety of customers within the database. Used to calculate the variety of steps to render within the UIrender— A React element that can obtain further props from thePaginationelement
It additionally has two state variables:
step— The present step in being renderedamountToFetch— Quantity of customers to fetch at any given time
... continues from (4) ...

const steps = rely ? Math.ceil(rely / amountToFetch) : 0
const renderedSteps = new Array(steps).fill(0).map((num, index) => (
  <button
    data-is-active={index === step}
    key={index}
    kind="button"
    onClick={() => setStep(index)}
  >
    {index + 1}
  </button>
))

const renderWithProps = cloneElement(render, {
  skip: step * amountToFetch,
  amountToFetch,
})

... continues beneath (5) ...
Subsequent, outline three variables:
steps— This does some easy arithmetic to get the variety of steps to render
> if rely = 10 customers and amountToFetch = 5
> steps = 2 // < 1 2 >
> if rely = 10 customers and amountToFetch = 2
> steps = 5 // < 1 2 3 4 5 >renderedSteps— Makes use ofstepsto render an array of buttons from1..steps. Every button has anonClickhandler that updates thestepstaterenderWithProps— Clones the element handed within therenderprop and provides two new props to it:skip— how a lot to skip by when querying the customersamountToFetch— the quantity of customers to retrieve
 ... continues from (5) ...

return (
<>
{renderWithProps}
 <choose
    identify="quantity to fetch"
    id="amountToFetch"
    worth={amountToFetch}
    onChange={(e: ChangeEvent<HTMLSelectElement>) => {
      const newAmount = +e.goal.worth
      setAmountToFetch(newAmount)
      setStep(0)
    }}
  >
    <possibility worth={10}>10</possibility>
    <possibility worth={20}>20</possibility>
    <possibility worth={50}>50</possibility>
  </choose>
  <button
    kind="button"
    disabled={step === 0}
    onClick={() => setStep((prevstep) => prevstep - 1)}
  >
    {'<'}
  </button>

  {renderedSteps}

  <button
    kind="button"
    disabled={(step + 1) * amountToFetch > rely}
    onClick={() => setStep((prevstep) => prevstep + 1)}
  >
    {'>'}
  </button>
</>
)
}

export default Pagination
Lastly, we render 5 components to the DOM:
renderWithProps: Therenderelement cloned with props addedchoose: Controls theamountToFetchstate variable and permits a consumer to alter how a lot customers to fetch per web page. We’ve at the moment hardcoded three steps of 20, 50, and 100. TheonChangehandler updates theamountToFetchstate and resets thestepbutton: Permits the consumer to maneuver again one steprenderedSteps: An inventory of buttons that enables switching to the corresponding stepbutton: Permits the consumer to maneuver ahead one step
Once more, take a while to breathe, chill out, and perceive the ideas lined up to now. Taking a stroll might not be such a foul thought 😉
React and Apollo
We’re so near the end line now! All that is still is to hook up the Customers element with the Pagination element and render.
Create an App.tsx file and open it.
// make sure you're in /workspaces/frontend/src
contact App.tsx
Listed here are our file contents:
import { gql, useQuery } from '@apollo/shopper'

import Customers from './Customers'
import Pagination from './Pagination'

import './App.css'

const GET_USERS_COUNT = gql`
  question GetUsersCount {
    rely
  }
`

operate App() {
  const { information } = useQuery<{ rely: quantity }>(GET_USERS_COUNT)

  return (
    <div className="App">
      <Pagination rely= 0 render={(<Customers />) as any} />
    </div>
  )
}

export default App
It is a comparatively easy element. We import:
gqlanduseQueryfor a question we are going to outline beneath- The
CustomersandPaginationparts - A CSS stylesheet that comes with the undertaking
Then we outline the GET_USERS_COUNT question, which merely requests the overall quantity of customers within the database.
The App operate requests the GET_USERS_COUNT question and shops the consequence within the information variable.
Within the return assertion, we render the Pagination element in a div and —
- Go the
information.relyvariable because therelyprop - Go the
Customerselement because therenderprop
Only one closing piece stays and also you’ll be capable to take a look at your ends in the browser. Whew!
Now, create an index.tsx file and open it.
// make sure you're in /workspaces/frontend/src
contact index.tsx
Right here once more are our file contents:
import React from 'react'
import ReactDOM from 'react-dom/shopper'
import { ApolloClient, InMemoryCache, ApolloProvider } from '@apollo/shopper'

import App from './App'

import './index.css'

const shopper = new ApolloClient({
  uri: course of.env.REACT_APP_API_GRAPHQL_URL,
  cache: new InMemoryCache(),
})

const root = ReactDOM.createRoot(doc.getElementById('root') as HTMLElement)

root.render(
  <React.StrictMode>
    <ApolloProvider shopper={shopper}>
      <App />
    </ApolloProvider>
  </React.StrictMode>
)
A lot of the content material on this file ought to really feel acquainted by now. What’s attention-grabbing is that we’re creating a brand new Apollo shopper to hook up with our API and passing it to the Apollo supplier within the root.render assertion.
Notice: Be sure that to create a .env file utilizing the .env.instance as a information, and including your API URL (almost certainly http:localhost:3000/graphql).
At this level, now you can begin the frontend within the browser and marvel at your creation.
- Be sure that the backend is working (
yarn begin:dev) - Be sure that you’re in
workspaces/frontendand runyarn begin - Navigate to http://localhost:3001

Conclusion
Go forward and work together with the pagination controls. Possibly yow will discover a method to truncate the center part and even add some good styling; it is a base pagination system that you could customise to no matter information kind or state of affairs.
You may discover the supply code for this text on my GitHub.
When you managed to remain till the top, you deserve an excellent pat on the again. I do know it was slightly dense at instances however hopefully this was helpful to you.
Monitor failed and gradual GraphQL requests in manufacturing
Whereas GraphQL has some options for debugging requests and responses, ensuring GraphQL reliably serves sources to your manufacturing app is the place issues get harder. When you’re all for guaranteeing community requests to the backend or third celebration providers are profitable, attempt LogRocket.
 https://logrocket.com/signup/
LogRocket is sort of a DVR for internet and cellular apps, recording actually all the things that occurs in your web site. As a substitute of guessing why issues occur, you’ll be able to combination and report on problematic GraphQL requests to shortly perceive the basis trigger. As well as, you’ll be able to observe Apollo shopper state and examine GraphQL queries’ key-value pairs.
LogRocket devices your app to file baseline efficiency timings akin to web page load time, time to first byte, gradual community requests, and in addition logs Redux, NgRx, and Vuex actions/state. Begin monitoring totally free.
