
Have you ever ever needed to create your personal Procreate customized brushes? Perhaps you’d prefer to customise a few of your favourite brushes or simply get extra conversant in Procreate’s wealth of brush settings. On this tutorial, we’ll take take a look at some Procreate brush fundamentals and settings, and you will learn to create and customise a Procreate brush.
However what if you wish to save a while and discover ready-to-use Procreate brushes? We have you lined.
Obtain Limitless Premium Procreate Brushes for iPad (For Industrial Use)
If you would like to seek out the finest Procreate brushes on your digital drawings, you have come to the precise place. Scroll down and you will find a collection of premium Procreate brush units from Envato Parts, from hair brush Procreate kits to Procreate sample brushes. Verify them out:
Watch Find out how to Make a Brush in Procreate
If you happen to favor to observe this Procreate customized brushes tutorial in motion, we have got this video for you. Right here you will learn to make brushes in Procreate and the best way to customise brushes. And if you wish to be taught extra and watch extra nice tutorials, observe the Envato Tuts+ YouTube channel:
What You Will Study in This Procreate Customized Brushes Tutorial
- Find out how to get began with Procreate brushes
- Find out how to edit your Procreate customized brushes
- Find out how to make a brush in Procreate
For this tutorial, I am utilizing an Apple Pencil on an iPad Professional. You may also use a appropriate third-party stylus, however this will end in fewer pencil settings.
1. Find out how to Get Began With Brushes in Procreate
Step 1
First, it is necessary to notice the Brush Measurement and Brush Opacity in your primary work space. Slide them up and down to change your Brush Measurement and Opacity as you’re employed. Within the instance beneath, my Brush Opacity and Brush Measurement are all the best way up at 100%.


Step 2
You may also change the Coloration of your brush within the higher left-hand nook. For this tutorial, select any shade you want, apart from the identical shade because the background.


Step 3
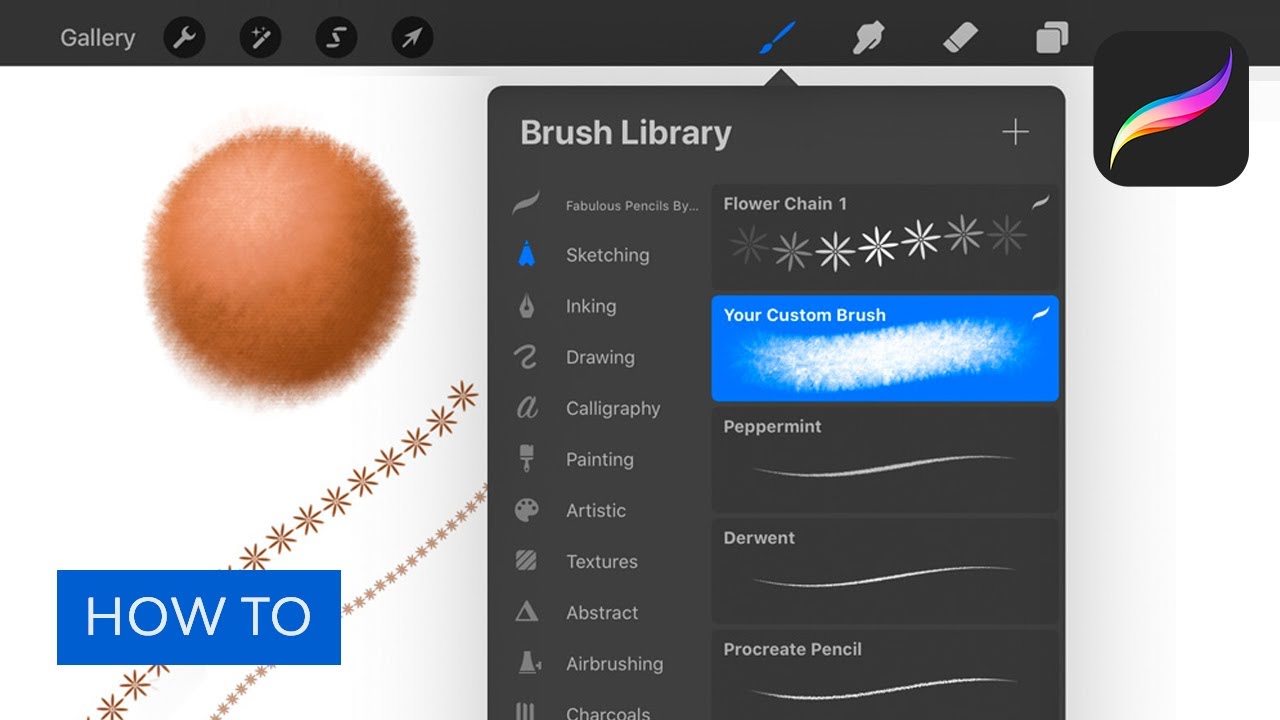
Let’s start by trying on the default Procreate brushes. First, change to Paint Mode and faucet on the paintbrush icon. This can open up your library of Procreate Brushes.
Your present Brush choices are indicated in blue, as seen beneath.


Step 4
Swipe via the checklist of brushes to browse them. Every class, referred to as a Brush Set, has various default brushes accessible for the person. For instance, Sketching is among the default Brush Units.
You’ll be able to rearrange each these units and the brushes inside them by tapping and dragging them inside the lists. Within the instance beneath, I tapped and held the 6B Pencil, so I can drag it wherever I would love within the checklist.


Step 5
Once I customise my Procreate brushes, I usually prefer to Create a Duplicate, so I can freely experiment but additionally retain the unique brush.
To Duplicate a Brush, swipe to the left and choose Duplicate. You may also Reset a Default Brush from this menu, in addition to Share or Delete, if it’s a Customized Brush.


Step 6
You may also arrange your brushes into your personal Customized Set. This may be helpful for issues like sorting your favourite brushes, grouping imported brushes, or storing your Customized Brushes multi functional place.
To create a Customized Set, swipe downwards when viewing the accessible Units. This reveals a plus icon. Faucet this to create and title your new set.


Step 7
To Delete a Customized Set, faucet on the title of the set after which select Delete. You will discover that your new Brush Set is empty till you add content material to it. Once more, faucet and drag, as famous in Step 4, to Add and Transfer Brushes amongst your Brush Units.


2. Find out how to Customise Brushes in Procreate
Step 1
Please word that this tutorial has been up to date for Procreate 5.
Procreate brushes have all kinds of settings. I extremely advocate freely experimenting with them—it is a nice solution to get a hands-on really feel for the way they work. As we undergo the Procreate Brush Settings, take a while to get to know them!
Faucet in your desired Brush to open the Procreate Brush Settings. That is the place we’ll make our customizations. There are ten classes with totally different settings we will modify.
You are welcome to customise any brush that you simply like, for this tutorial.
In Procreate 5, you may Reset a Default Brush at any time by going to About this brush within the Procreate Brush Settings, after which choosing Reset all settings.


Step 2
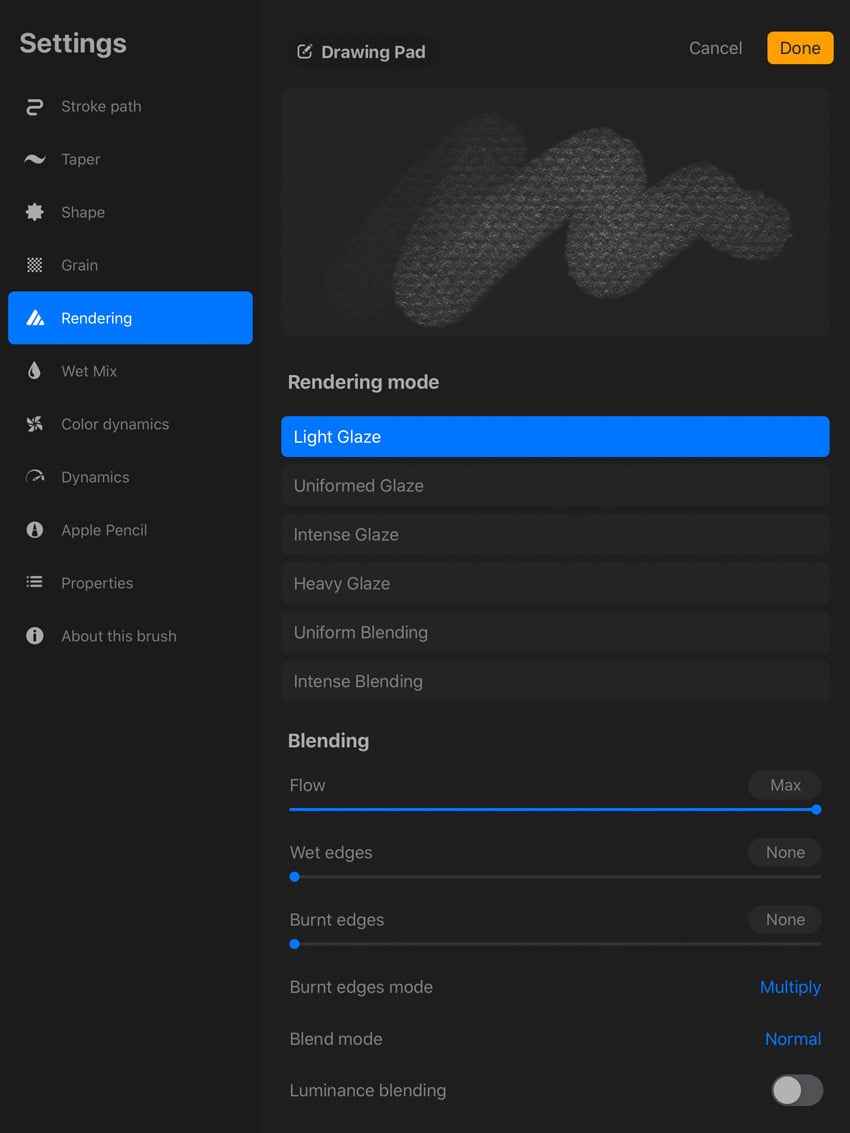
I would like to attract your consideration to the Drawing Pad, on the high of our Procreate Brush Settings. Right here, we will check out our settings whereas we experiment with them.
Faucet the icon and the phrase Drawing Pad to open the Drawing Pad Settings. Right here, you may clear your drawing pad, reset your settings, change the preview dimension, and choose a special shade.
I’d extremely advocate actively doodling on this house, so you may check out your settings as you modify them!


Step 3
Let’s begin with the Stroke Path, the primary possibility on the left-hand aspect. These sliders modify the next attributes associated to your brush:
Spacing refers back to the house between every form that makes up the Brush Stroke. If you happen to’re unfamiliar with digital drawing and portray, I would advocate fascinated about the stroke you draw as a repeated sequence of shapes. For instance, when the Spacing is turned up, you will really see these shapes spaced out. When the Spacing is low, you will see a strong, steady line.
StreamLine refers to line stabilization. Strive turning all of it the best way up, and you will discover that your strains are further smoothed out for you!
The Jitter is considerably like a special sort of Spacing. Discover how including extra Jitter spreads the form out, quite than retaining it “collectively”.
Fall Off impacts the size of your stroke. Leaving it as “None” retains the stroke steady.


Step 4
Subsequent, let’s check out the Taper Settings, a brand new part launched in Procreate 5. Beforehand, Taper was a slider positioned underneath our Stroke choices, however now we’ve got much more to work with right here.
The Stress Taper Settings seek advice from the taper that will probably be utilized when utilizing an Apple Pencil. You’ll be able to modify this to finest go well with the best way you like to attract. For instance, we will create and customise a synthetic taper, versus relying solely on the pencil’s sensitivity, if we discover that it isn’t fairly what we wish proper out the field.
The Contact Taper Settings are such a welcome addition, in my view! We won’t attract Procreate with our finger the identical manner we will with an Apple Pencil; we simply cannot use the strain sensitivity that manner. Nonetheless, the Contact Taper settings can apply a synthetic taper to strokes drawn with our finger! Cool, proper?
Want the basic taper from earlier variations of Procreate? You’ll be able to toggle that possibility on, as an alternative, on the very backside.


Step 5
Now, let us take a look at the Form Settings. Your Brush Stroke is actually a sequence of Shapes. Right here, we will make some changes to how this form behaves.
Form Supply is mainly the bottom of your brush. Consider your brush stroke as a sequence of shapes, and that is the constructing block of that! Faucet to pick out a brand new form, if you would like to. We’ll check this out later within the tutorial.
Scatter may be very a lot what it appears like: whether or not you want the form to scatter or stay extra uniform.
Rotation can also be a lot the way it sounds: the Brush Form’s course.
Rely and Rely Jitter seek advice from the variety of occasions the form itself makes an impression, and if you need that to be variable.
There are two Form Properties that may be toggled on and off: Randomized and Azimuth. With Randomized Off, your properties will probably be dependent in your stroke, but when toggled on, Procreate will add extra variation. Azimuth refers back to the angle of your pen and whether or not or not you want your brush to be affected by this.
Lastly, we’ve got Form Filtering, and three settings we will select right here: None, Traditional, and Improved. They’re totally different levels of anti-aliasing.


Step 6
The Grain is the second a part of your brush’s composition. As we have mentioned, the Brush is essentially composed of a Form. Nonetheless, the Form additionally has Grain, which is sort of a texture inside your Form.
Now, in Procreate 5, we’ve got Shifting and Texturized tabs to select from. Select Shifting if you would like your grain to the built-in into the general texture of the comb. Select Texturized if you would like the grain to be current as a extra repeated texture.
Motion helps decide how the Grain behaves. With Motion at 100%, you will see the feel fill and repeat inside the Stroke. Turned right down to 0%, nonetheless, the feel is not going to repeat. As a substitute, the aesthetic could have extra of a steady look.
Scale, because it sounds, refers back to the dimension of the relevant Grain, and Zoom determines if and the way your Grain will scale with the Brush.
I sometimes depart the Rotation set to Static (within the center), however these choices can be utilized to Rotate the Grain with the course of your Stroke, if desired.
The Depth Settings will dictate how seen the grain is. For instance, at minimal, we cannot see any texture.
Offset Jitter can assist maintain issues trying pure, until you need your grain to be a constant sample that doesn’t range whenever you make a brand new stroke.
The Mix Mode is much like what we would see in Layer Kinds, as are Brightness (how gentle or darkish you’d just like the grain to be) and Distinction (depth between gentle and darkish values).


Step 7
Subsequent, we’ve got our Rendering Choices, that are a brand new part added in Procreate 5. Select between six totally different rendering modes: Gentle Glaze, Uniformed Glaze, Intense Glaze, Heavy Glaze, Uniform Mixing, and Intense Mixing.
I like to recommend utilizing the Drawing Pad above these choices to check them out in actual time. Simply toggle between them and draw to see the distinction. In some, the distinction is quite delicate, however in others, it may well make an enormous distinction. For instance, Gentle Glaze, Procreate’s Default, is kind of a light-weight mixing mode, whereas Intense Mixing feels fairly harsh, in distinction, and Uniformed Glaze is extra like Photoshop’s default rendering.
The Circulate is mainly how a lot worth “comes out” when utilizing your brush.
Moist Edges will soften the perimeters of your brush.
Burnt Edges will darken the perimeters of your brush.
Burnt Edges Mode and Mix Mode ought to be acquainted, when it comes to their choices; select from customary mixing mode sorts to alter the appear and feel of your brush.


Step 8
Moist Combine is because it sounds. For instance, Dilution is how a lot “water” is in your brush, and Cost is how a lot paint has been “loaded”. Check out a brush with Excessive Dilution and Low Cost. Add lots of Pull—that is how a lot paint is “pulled” together with your Stroke. The outcome can be a brush with solely a little bit paint, however lots of water, so it pushes the colour round and dilutes it!
Do not be afraid to check out these Procreate Brush Settings as you undergo them! Personally, I feel that is one of the simplest ways to get comfy with them. Once more, use the Drawing Pad, above the settings, to check issues out whilst you’re experimenting with these settings.


Step 9
Coloration Dynamics are a more recent part, right here within the Procreate Brush Settings. You will see a number of sections right here:
Stamp Coloration Jitter impacts the colour of every occasion of the form used inside your stroke.
Stroke Coloration Jitter will add shade variation each time you make a stroke.
Coloration Stress will change the colour relying on the strain utilized to your pencil.
Coloration Tilt will change the colour relying on the lean utilized to your pencil.
You’ll be able to modify the Hue, Saturation, Brightness, and depth of the secondary shade for every of those settings. It would sound overwhelming, however once more, I strongly imagine among the best methods to be taught and get used to those settings is to attempt them out. Change the values and expertise how they work!
For instance, beneath, I turned up the Stamp Coloration Jitter’s hue and examined it out in my Drawing Pad. Fairly neat impact, proper?


Step 10
Dynamics are usually unbiased of the pencil. So, for instance, the Velocity settings will decide the looks of our brush based mostly on the pace at which it is drawn. A “sluggish” line, for instance, might have much less opacity than a quick one.
The Jitter is quite like a randomizer, on this case, as these values wouldn’t be affected by strain or pace.


Step 11
The Apple Pencil Settings are divided into two sections: Stress and Tilt.
The Stress Settings can be utilized to regulate the Opacity, Bleed, Measurement, and Softness based mostly on the strain utilized together with your pen.
The Tilt Settings will not be accessible for third-party pens, they usually can be utilized to customise how the lean of your pen impacts your brush.


Step 12
The Properties include lots of the brush’s fundamentals.
The Brush Behaviors included listed here are a little bit totally different from what the Basic Settings had been in earlier variations of Procreate (Mixing Modes, for instance, aren’t positioned right here anymore).
The Measurement Limits dictate the comb’s Most and Minimal accessible dimension. So, for instance, I usually like to boost the Brush Most on the default 6B Pencil, so I can get a a lot thicker stroke than the default permits.
I usually prefer to maintain the Opacity Limits as much as the complete Minimal and Most, however in some circumstances, you might wish to reduce these values—for instance, in a brush the place you understand you need the Most Opacity to be capped beneath 100%.


3. Find out how to Create a Brush in Procreate
Step 1
Now, let’s use the Procreate Brush Settings we have explored to create new Procreate brushes.
Begin by tapping the Plus Signal on the high of your opened Brushes.


Step 2
Now, we’ve got a brand new, Untitled Brush. Let’s begin by defining the comb’s Form, within the Form Settings.
Let’s create a easy brush. On this state of affairs, we’ll construct a brush that appears like a protracted chain brush in Procreate of flower shapes.
Faucet on Form Supply to alter the form. Then, faucet Import and select Supply Library. Subsequent, navigate to the supply picture referred to as Flower. Then, faucet on Achieved.
This is the outcome!


Step 3
Proper now, our brush seems like a tightly packed line of flower shapes—and that is not what we wish. We’ll make a bunch of adjustments right here, however first, let’s give our brush a reputation.
In About this Brush, let’s give our brush a reputation. Faucet on the title to edit it. I referred to as my brush “Flower Chain”. You’ll be able to put in your title and even your signature too, if you would like!


Step 4
Now, let’s go to our Stroke Path Settings. Regulate the Spacing till the flowers show in a row, as an alternative of on high of one another. Bear in mind, you need to use the Drawing Pad to check out your brush!


Step 5
Our brush is trying higher, however the flower shapes are all uniform proper now. I would like them to show and contact in a extra dynamic manner.
Let’s go to our Form Settings to alter how our Brush’s Form behaves. We are able to change the Rotation right here, to attain the impact we’re on the lookout for. Flip the Rotation all the best way up till it says Comply with Stroke. Discover, now, that the flowers rotate in a manner that dynamically turns each in response to the course of our Stroke.
If you happen to check out our brush, you will see it attracts a sequence of flowers.


Step 6
However as an example we wish to change our brush and do one thing totally different with it. Let’s make just a few changes that’ll utterly change its aesthetic. Be at liberty to Create a Duplicate of our Brush (as we lined earlier), if you would like to avoid wasting your work.
Let’s begin by altering the Brush’s Grain. Go to the Grain Settings and faucet on Grain Supply. Then faucet Import and choose Supply Library. Let’s check out the grain Oil Pastel.
Discover how choosing and making use of this grain has modified my brush’s look. We are able to see this up high, within the Drawing Pad.


Step 7
Now, let’s return to our Stroke Path Settings and decrease the Spacing to None. This makes our flowers appear like one steady line once more.


Step 8
Subsequent, go to your Form Settings and set the Scatter to 199%. Discover that it takes the flower form and mixes it up all through the comb.


Step 9
Let’s additionally go to the Rendering and alter some settings. I went with Uniform Mixing for my rendering mode. Check them out! Then, I set my Circulate to 50%.
Go forward and check out our brush—it quite seems like a fuzzy pipe cleaner now!


Superior Work Creating Your Procreate Customized Brushes!
You’ve got created and customised your personal Procreate brush, and we have give you two actually totally different outcomes that use the identical brush form too. Try how they differ, beneath. One seems like a sequence of flowers, and the opposite is a fuzzy brush.
As we have reviewed, there are a ton of settings to experiment with—and that is really one of the simplest ways to get to know them. Strive them out and experiment with them. Comfortable drawing!


10 Finest Procreate Brush Units From Envato Parts
Creating Procreate customized brushes is each helpful and actually enjoyable—however generally, it is helpful to have a financial institution of superior brushes in your toolkit, able to go.
Envato Parts gives limitless downloads of Procreate brushes for a low month-to-month payment. If you happen to’re a graphic designer or digital artist, Envato Parts is the most suitable choice for you—together with the brushes, you get a enormous vary of artistic property, with limitless downloads.
Try a few of these high-quality Procreate brush units which can be able to import and use in your subsequent artistic mission.
1. Graphic Beats: Brushes for Procreate (BRUSHSET)


This excellent brush pack incorporates over 300 high-resolution stamp brushes, in addition to high-resolution PNG stamps. A fantastic addition to any Procreate brush assortment, Graphic Beats is an expert, high quality Procreate texture brushes pack that may be welcome in all kinds of artistic tasks.
2. Flower Contact Procreate Brushes (BRUSHSET)


I completely love flowers—and I like this flower sample brush set for Procreate. It consists of over 100 Procreate sample brushes—a plethora to experiment with—however that is not all! There are additionally over 50 stamp brushes. If you happen to’re on the lookout for floral Procreate portray brushes, look no additional.
3. Procreate Patterns: Brushes Set (PNG, BRUSHSET)


Trying so as to add some oomph to your compositions? Add curiosity and whimsy to your work with this excellent assortment of Procreate sample brushes—there are 45 of them so that you can experiment with and luxuriate in. This Procreate brush pack additionally consists of high-resolution PNGs.
4. Hand-Drawn Brushes for Procreate (BRUSHSET)


Searching for lovely, hand-drawn Procreate brushes so as to add to your assortment? Effectively, right here they’re. These enjoyable Procreate sketch brushes can be utilized for such all kinds of drawing wants. It even comes with a cheat sheet that can assist you get began.
5. The Jungle: Procreate Brushes (BRUSHSET)


This Procreate brush set has so many potential purposes. Simply take a look at the preview beneath—lovely foliage, proper? These Procreate tree brushes—20 of them—are excellent for tasks like kids’s books, sequential artwork, illustrative work, and extra.
6. Hair Brush Procreate Package (BRUSHSET)


Procreate hair brushes are massively helpful. And in the event you’re on the lookout for the most effective Procreate hair brushes to make lovely illustrations, these are for you.
Doing hair might be tough and time-consuming in the event you’re new to digital illustration. This hair brush Procreate pack comes with ten wonderful brushes. These Procreate hair brushes are tremendous straightforward to make use of and have a pure look.
7. Inventive Brick Brush for Procreate (BRUSHSET, SWATCHES)


Drawing bricks might be tough since you should draw many alternative sizes and alignments of bricks to make them look practical. Skip that time-consuming course of with a cool hand-drawn brick brush for Procreate. This brick brush Procreate pack comes with three texture brushes and one shade swatch. Test it out!
8. Chain Brush for Procreate (BRUSHSET)


This is a really cool and helpful chain brush for Procreate. Go forward and use it for making logos, illustrations, posters, and backgrounds. Give your art work an attention-grabbing and trendy look with this chain brush for Procreate.
9. 3D Procreate Brushes for iPad (BRUSHSET, SWATCHES)


Do you wish to elevate your digital lettering? You want these 3D Procreate lettering brushes. You will get greater than 5 totally different brushes and one swatch with trendy shade palettes. These 3D Procreate brushes for iPad are on one other degree!
10. Spray & Hatch Procreate Brushes for iPad (PNG, BRUSHSET)


If you happen to like Procreate portray brushes, you will love this entire Procreate brush pack. You will get 20 Procreate hatch and spray brushes, plus ten grunge textures included.
Verify Out the Finest Procreate Customized Brushes for Newbie Illustrators
Do you wish to continue learning? This video will present you the best way to develop your Procreate brush library and create Procreate customized brushes. Discover ways to set up brushes downloaded from Envato Parts into Procreate. It is a detailed and free tutorial for starting illustrators or those that are simply getting began with Procreate.
Uncover Extra Procreate Brushes and Tutorials
Now you understand how to create brushes in Procreate and the best way to customise your brushes. I’ve proven you the place to get the most effective Procreate brushes. And, as a bonus, why not check out the collection of free vector illustrations at Reshot?
If you happen to loved this tutorial, listed here are some others that you may additionally get pleasure from!
