
Navigation is an especially essential side of net growth to contemplate once we wish to present a compelling consumer expertise — customers ought to be capable to know the place they’re and rapidly swap between pages with out getting misplaced.
With a purpose to guarantee easy looking, we are likely to gravitate in the direction of including a high or aspect navigation bar, however implementing this performance could be very time-consuming, and so a faster various could be helpful in these use circumstances.
Fortunately, we have now ready-made options for a lot of of our issues, together with this one!
On this tutorial, I’ll present you easy methods to use react-pro-sidebar so as to add an animated sidebar to your React software. We will even make use of Materials UI icons for a extra skilled aesthetic for the needs of a optimistic consumer expertise.
Bounce forward:
What are we constructing?
We will likely be constructing a easy software that consists of a sidebar and a primary web page.
The principle web page will solely have a title on it, whereas the sidebar could have a number of components with adjoining icons to reveal its performance.
When the consumer clicks the sidebar, it should collapse and solely broaden if clicked once more.
As famous of their docs, “react-pro-sidebar gives a set of elements for creating high-level and customizable aspect navigation.” Briefly, it makes creating sidebars in React a breeze — excellent news for us!
Whereas there are different rivals round, react-pro-sidebar is extraordinarily widespread inside the group and is the most secure wager for this specific use case for my part. For those who’d prefer to be taught extra concerning the package deal typically, you possibly can try the official docs whereas following this tutorial.
What are MUI icons?
Materials UI icons are the set of icons we’ll be utilizing right now. You don’t must do your styling with MUI or know a lot about it in any respect; the one factor it’s essential to do for this tutorial is to put in the related packages, which we’ll get to in a second.
In my expertise, MUI icons allow fast growth as a result of as an alternative of searching for completely different icons in varied locations, all the pieces we’d like could be discovered right here. Generally, I discover MUI very helpful in my tasks and extremely suggest its use.
Putting in dependencies
First off, let’s create our React software with the React CLI by getting into the npx create-react-app sidebar-project command in our terminal.
In fact, you possibly can select any identify you need for the undertaking, I‘m utilizing sidebar-project because the identify for this tutorial.
Now, we have to set up Materials UI, its icons, and react-pro-sidebar for this tutorial.
Let’s go into the sidebar-project software we’ve simply created and enter the next instructions on the terminal:
npm set up @mui/icons-material @mui/materials @emotion/styled @emotion/react react-pro-sidebar
Now, we’re good to go!
With a purpose to use the react-pro-sidebar, we have to wrap our elements inside a ProSidebarProvider element that we’ll import from the package deal.
Check out the index.js the place I’ve wrapped my software:
import React from "react";
import ReactDOM from "react-dom/consumer";
import "./index.css";
import App from "./App";
import { ProSidebarProvider } from "react-pro-sidebar";
const root = ReactDOM.createRoot(doc.getElementById("root"));
root.render(
  <React.StrictMode>
    <ProSidebarProvider>
      <App />
    </ProSidebarProvider>
  </React.StrictMode>
);
Including world types
Earlier than we begin constructing the logic, I wish to add some world CSS, so I’ll go to the index.css file and add two traces of code there.
Within the physique tag, I’ll add a peak of 100vh and a black background to the present traces.
That is the way it ought to look, as soon as full:
physique {
  margin: 0;
  font-family: -apple-system, BlinkMacSystemFont, "Segoe UI", "Roboto", "Oxygen",
    "Ubuntu", "Cantarell", "Fira Sans", "Droid Sans", "Helvetica Neue",
    sans-serif;
  -webkit-font-smoothing: antialiased;
  -moz-osx-font-smoothing: grayscale;
  /* additions right here*/
  peak: 100vh;
  background: black;
}
code {
  font-family: source-code-pro, Menlo, Monaco, Consolas, "Courier New",
    monospace;
}
Constructing the applying
Now that our software is wrapped and we have now our world styling, we will begin constructing our logic.
Extra nice articles from LogRocket:
Let’s go to our App.js file and begin by importing the next from the react-pro-sidebar package deal:
import { Sidebar, Menu, MenuItem, useProSidebar } from "react-pro-sidebar";
Whereas the primary three imports are associated to the UI, useProSidebar is a hook that lets us entry and handle sidebar state. Within the react-pro-sidebar documentation, it’s defined as such:
collapseSidebar: (collapsed?: boolean) => void: A operate that allows you to replace the sidebar’s collapsed state.
Now, we have to import the icons we’ll use for the sidebar. We don’t have to make use of these icons, however I like to make use of them as a result of they assist make the sidebar look somewhat bit extra skilled, as you may count on in a real-world use case.
So, just below our first import, let’s paste these traces:
import HomeOutlinedIcon from "@mui/icons-material/HomeOutlined";
import PeopleOutlinedIcon from "@mui/icons-material/PeopleOutlined";
import ContactsOutlinedIcon from "@mui/icons-material/ContactsOutlined";
import ReceiptOutlinedIcon from "@mui/icons-material/ReceiptOutlined";
import CalendarTodayOutlinedIcon from "@mui/icons-material/CalendarTodayOutlined";
import HelpOutlineOutlinedIcon from "@mui/icons-material/HelpOutlineOutlined";
import MenuOutlinedIcon from "@mui/icons-material/MenuOutlined";
Now that we’re completed with our imports, we will begin utilizing them.
We first have an empty practical element, as per standard. Then, we will begin including some types to the div, utilizing the ID of app, in order that the element will take the complete window peak and use flexbox — it’s because we wish to have the sidebar and a fundamental title subsequent to it.
We will additionally add a relentless of collapseSidebar that’s utilizing the useProSidebar hook coming from the react-pro-sidebar package deal. This hook, as talked about earlier than, will assist us implement the collapse performance.
operate App() {
const { collapseSidebar } = useProSidebar();
  return (
    <div id="app" fashion={({ peak: "100vh" }, { show: "flex" })}>
    </div>
  );
}

export default App;
Inside this div, I’ll add a Sidebar element that wraps a Menu element and a handful of MenuItem elements that we’ve imported from react-pro-sidebar.
We will even enter a peak of 100vh to the Sidebar, in order that it takes up the complete peak of the display.
Subsequent, we add the primary MenuItem contained in the Menu wrapper. Then, we add menuOutlinedIcon from Materials UI, after which add a method that aligns the textual content we’ll put inside it to the middle, earlier than lastly including an onClick occasion that fires the collapseSidebar hook outlined above.
We will even moreover add an h2 ingredient with the textual content Admin in it, therefore the rationale for the alignment fashion:
<Sidebar fashion={{ peak: "100vh" }}>
        <Menu>
          <MenuItem
            icon={<MenuOutlinedIcon />}
            onClick={() => {
              collapseSidebar();
            }}
            fashion={{ textAlign: "middle" }}
          >
            {" "}
            <h2>Admin</h2>
          </MenuItem>
        </Menu>
      </Sidebar>
Straightforward-peasy! Now, if we click on the Admin textual content, the sidebar ought to collapse; it’ll even handle eradicating the textual content and leaving solely the icon for us. How handy is that this?
![]()
Now, let’s add the remaining menu objects. Nonetheless contained in the Menu wrapper, below the final line we’ve written, enter the next:
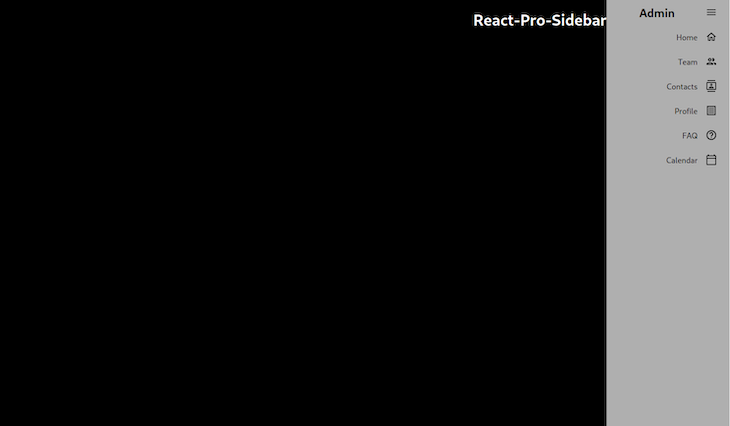
                    <MenuItem icon={<HomeOutlinedIcon />}>Residence</MenuItem>
          <MenuItem icon={<PeopleOutlinedIcon />}>Staff</MenuItem>
          <MenuItem icon={<ContactsOutlinedIcon />}>Contacts</MenuItem>
          <MenuItem icon={<ReceiptOutlinedIcon />}>Profile</MenuItem>
          <MenuItem icon={<HelpOutlineOutlinedIcon />}>FAQ</MenuItem>
          <MenuItem icon={<CalendarTodayOutlinedIcon />}>Calendar</MenuItem>
Then, shut the Menu tag and add a title; the rationale for our flex:
            <primary>
        <h1 fashion={{ coloration: "white", marginLeft: "5rem" }}>
          React-Professional-Sidebar
        </h1>
      </primary>
That is what our software ought to appear like now:
![]()
And that is what it appears like if we press the Admin textual content in order that the sidebar collapses:
![]()
That is the ultimate model of our element to date:
import { Sidebar, Menu, MenuItem, useProSidebar } from "react-pro-sidebar";
import HomeOutlinedIcon from "@mui/icons-material/HomeOutlined";
import PeopleOutlinedIcon from "@mui/icons-material/PeopleOutlined";
import ContactsOutlinedIcon from "@mui/icons-material/ContactsOutlined";
import ReceiptOutlinedIcon from "@mui/icons-material/ReceiptOutlined";
import CalendarTodayOutlinedIcon from "@mui/icons-material/CalendarTodayOutlined";
import HelpOutlineOutlinedIcon from "@mui/icons-material/HelpOutlineOutlined";
import MenuOutlinedIcon from "@mui/icons-material/MenuOutlined";

operate App() {
  const { collapseSidebar } = useProSidebar();

  return (
    <div id="app" fashion={({ peak: "100vh" }, { show: "flex" })}>
      <Sidebar fashion={{ peak: "100vh" }}>
        <Menu>
          <MenuItem
            icon={<MenuOutlinedIcon />}
            onClick={() => {
              collapseSidebar();
            }}
            fashion={{ textAlign: "middle" }}
          >
            {" "}
            <h2>Admin</h2>
          </MenuItem>

          <MenuItem icon={<HomeOutlinedIcon />}>Residence</MenuItem>
          <MenuItem icon={<PeopleOutlinedIcon />}>Staff</MenuItem>
          <MenuItem icon={<ContactsOutlinedIcon />}>Contacts</MenuItem>
          <MenuItem icon={<ReceiptOutlinedIcon />}>Profile</MenuItem>
          <MenuItem icon={<HelpOutlineOutlinedIcon />}>FAQ</MenuItem>
          <MenuItem icon={<CalendarTodayOutlinedIcon />}>Calendar</MenuItem>
        </Menu>
      </Sidebar>
      <primary>
        <h1 fashion={{ coloration: "white", marginLeft: "5rem" }}>
          React-Professional-Sidebar
        </h1>
      </primary>
    </div>
  );
}

export default App;
Now, let’s say we wish our sidebar to be on the precise aspect of the web page.
We will simply do this utilizing the rtl (proper to left) prop from react-pro-sidebar. To do that, we’ll make some small adjustments to the above code.
First, let’s import the rtl prop within the useProSidebar hook, together with the collapseSidebar prop: const { collapseSidebar, rtl } = useProSidebar();.
Then, let’s reverse the flexDirection of the web page as a result of, at current, it shows the sidebar first after which the primary physique.
Nonetheless, since we’ll quickly be reversing the sidebar, it should look unusual. So, we’ll reverse the web page after which set the rtl prop to true, which is false by default. Try the next snippet:
operate App() {
  const { collapseSidebar, rtl } = useProSidebar();
  return (
    <div
      id="app"
      fashion={
//add flexDirection: "row-reverse" right here
        ({ peak: "100vh" }, { show: "flex", flexDirection: "row-reverse" })
      }
    >
//add rtl={true}, which was false by default.
      <Sidebar rtl={true} fashion={{ peak: "100vh" }}>
        <Menu>
Now, the app ought to appear like this:
Toggling the sidebar and altering the background coloration
Now, let’s add some extra performance to our app.
We wish to change the background coloration of the sidebar and now have the power to break down it by toggling whereas conserving monitor of its toggle state.
To start, we’ll change the app to its unique state with the sidebar on the left. Then, change the background coloration by including the next to our Sidebar ingredient: backgroundColor="rgb(0, 249, 249, 0.7)".
Subsequent, add a toggle operate that may log true or false to the console, relying on whether or not the sidebar is toggled or not. Take away the collapseSidebar operate from the menu merchandise and add the toggle operate to an onClick occasion on the title.
Lastly, we’ll add some textual content on the display that specifies the toggle state to reveal what’s taking place.
Let’s check out it in motion. That is the toggle operate I wrote:
operate App() {
  const { collapseSidebar, toggleSidebar, collapsed, toggled, damaged, rtl } =
    useProSidebar();
  const toggle = () => {
    toggleSidebar();
    if (toggled) {
      console.log(true);
      collapseSidebar();
    } else {
      console.log(false);
      collapseSidebar();
    }
  };
 return (
    <div
      id="app"
      fashion={({ peak: "100vh" }, { show: "flex", flexDirection: "row" })}
    >
      <Sidebar
//change background coloration
        backgroundColor="rgb(0, 249, 249, 0.7)"
        rtl={false}
        fashion={{ peak: "100vh" }}
      >
...
And in the primary assertion, we will add the next:
      <primary>
        <h1
          onClick={() => {
            toggle();
          }}
          fashion={{ coloration: "white", marginLeft: "5rem" }}
        >
          React-Professional-Sidebar
        </h1>
        {toggled ? (
          <h1 fashion={{ coloration: "white", marginLeft: "5rem" }}>Toggled</h1>
        ) : (
          <h1 fashion={{ coloration: "white", marginLeft: "5rem" }}>Not Toggled</h1>
        )}
      </primary>
Now, at any time when we click on on the React-Professional-Sidebar title on the display, the title below it should change accordingly. Try the toggled and untoggled variations within the photographs under.
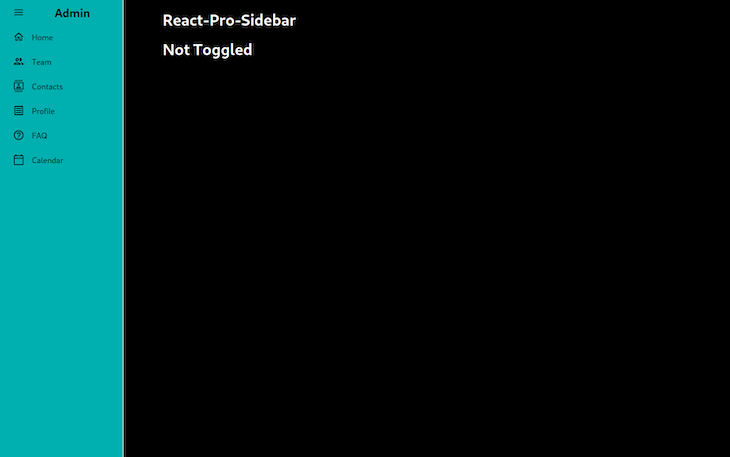
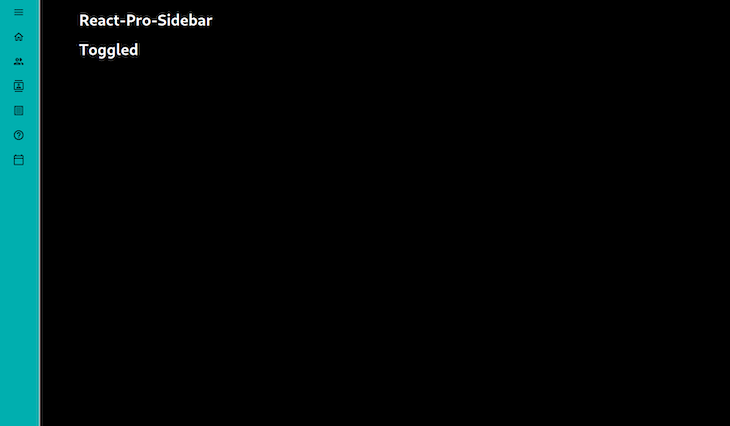
The sidebar’s background coloration has modified, and I can preserve monitor of the state of the sidebar with the toggle performance.
Breakpoints and transition period
If we wished, we may add much more performance to the app, similar to altering the transition period of the sidebar or including breakpoints to train completely different behaviors.
For instance, the default transition period of the sidebar is 300ms, however I wish to make it a bit slower, so we will set it to 800ms. I additionally wish to add some textual content saying “Small display” when the display is smaller; to do that, we must add two extra props to the sidebar, like this:
  <Sidebar
        breakPoint="sm"
        transitionDuration={800}
...
Now, to manage the breakpoints, we’ll use the damaged methodology:
...
        {damaged && (
          <h1 fashion={{ coloration: "white", marginLeft: "5rem" }}>Small display</h1>
        )}
      </primary>

The above textual content will solely present up on smaller screens.
It is usually value noting that utilizing breakpoints with react-pro-sidebar has the next conduct: when on a small display, at every “not toggled” state, the sidebar will disappear, and when toggled once more for the “toggled” state, the sidebar will present up as huge, after which slim on the subsequent cycle.
Let me present you the way it works.
We’ll make the display even smaller and produce again the “Toggled”/”Not Toggled” messages from the earlier instance for ease of understanding:
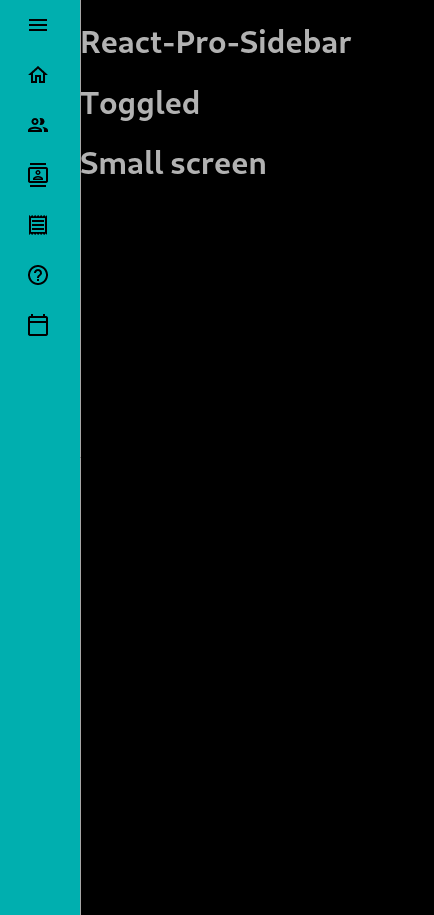
If we collapse the sidebar from the earlier instance, you possibly can see it should fully disappear. If we click on as soon as extra, it should present up as huge, however with much less opacity in order that the textual content beneath could be learn simply.
I’m fairly assured from my expertise that this conduct captures all attainable consumer inputs in utilizing sidebars on small screens.
Conclusion
On this tutorial, we’ve seen easy methods to add a responsive, dynamic sidebar utilizing the react-pro-sidebar package deal. We additionally confirmed how combining it with Materials UI icons permits us to rapidly create a easy sidebar whereas sustaining an expert feel and look that needs to be anticipated from a real-world undertaking.
If you want to try the completed model of this construct, be happy to take a look at the repo. Let me know what your experiences are utilizing react-pro-sidebar within the feedback.
Reduce by the noise of conventional React error reporting with LogRocket
LogRocket
is a React analytics answer that shields you from the tons of of false-positive errors alerts to just some actually essential objects. LogRocket tells you probably the most impactful bugs and UX points truly impacting customers in your React purposes.


LogRocket
mechanically aggregates consumer aspect errors, React error boundaries, Redux state, sluggish element load instances, JS exceptions, frontend efficiency metrics, and consumer interactions. Then LogRocket makes use of machine studying to inform you of probably the most impactful issues affecting probably the most customers and gives the context it’s essential to repair it.
Deal with the React bugs that matter —
strive LogRocket right now.
