
Radix is an open supply library that gives elements for constructing accessible, high-quality React internet purposes and design methods. Radix is a part of a brand new wave of headless elements being created within the frontend house, and this sample has been gaining a number of traction recently.
This information goals to offer you a deeper understanding of Radix and the way it may be used to construct out design methods and part libraries. The latter half of this text supplies an in-depth tutorial on constructing a pattern part library with Radix Primitives. 🎨
Contents
Radix overview
Radix consists of a collection of three merchandise: Primitives, Colours, and Icons. These instruments can be utilized to construct out design methods. Let’s take a better have a look at every particular person product and the way they can be utilized individually or collaboratively to fit your wants.
Primitives
Radix Primitives is the library’s flagship product. It’s described as a group of “unstyled, accessible elements for constructing excessive‑high quality design methods and internet apps in React.” As an alternative of reinventing the wheel, Radix Primitives deal with a number of the difficult components with regards to constructing out frequent part patterns.
Constructing out accessible widgets that meet the WAI-ARIA requirements and correctly deal with features like keyboard navigation generally is a massive enterprise. Libraries like Radix goal to simplify this typically tough course of for builders by offering a set of versatile and extensible elements which can be prebuilt with accessibility and developer expertise in thoughts.
Colours
Radix Colours is a fastidiously crafted shade system designed for constructing gorgeous internet apps. It supplies extra options like computerized darkish mode compatibility which makes switching to a darkish theme so simple as making use of a category to a container, the power to compose shade palettes to work along with your app’s model or theme, and accessibility issues which can be assured to go WCAG distinction ratio necessities.
Radix Colours supplies a set of scales which can be JavaScript objects meant to combine along with your most well-liked styling answer, starting from vanilla CSS to CSS-in-JS choices (e.g., styled-components).
Icons
Radix Icons touts itself as a “crisp set of 15×15 icons designed by the WorkOS workforce.” All of the icons can be found as particular person elements that may be put in by way of a single bundle.
Merely import the respective icons, and you’ll add them to your apps such as you would every other React part. Radix Icons are additionally obtainable in different kinds like downloadable SVGs, together with Figma and Sketch information.
Design methods vs. part libraries
I typically see the phrases design system and part library used interchangeably. Though these two ideas are associated, they pertain to completely different components of a bigger complete.
In an effort to diffuse any confusion, I’ll outline every time period to level out the excellence and variations between the 2 associated terminologies.
Design methods
The Nielsen Norman Group, a famend and trusted UX analysis and consulting agency, defines a design system as a “…set of requirements to handle design at scale by decreasing redundancy whereas making a shared language and visible consistency throughout completely different pages and channels.”
A typical design system might include the next three objects:
- Model information: An ordinary of how components ought to feel and appear throughout a collection of merchandise or web sites. The commonest kind of fashion information pertains to model design which entails components like fonts, typography, colours, and logos
- Sample library: Usually contains templates and structure constructions meant to offer common workflow patterns; the patterns established are supposed to be reused and tailored all through an software
- Element library: Generally known as UI libraries or UI kits
Some examples of in style design methods embrace Google’s Materials Design, the Atlassian Design System, and Carbon Design System by IBM.
Element libraries
A part library consists of a group of UI components (i.e., elements) that may be reused throughout an software. These elements implement the design requirements established all through the model information.
As a consequence of their composability, elements make it simpler to implement wireframes offered by a design workforce. Frequent elements present in a library vary from buttons and particular person kind components (e.g., inputs, checkboxes, and many others.) to extra complicated components like date pickers.
Some examples of in style part libraries embrace MUI (the artist previously referred to as Materials UI), Headless UI by Tailwind Labs, and naturally Radix UI.
As a result of a design system is a big entity that always entails a number of stakeholders throughout various fields, constructing one is kind of an arduous feat. In an effort to maintain this text digestible, we are going to construct out a part library as a subset of a design system. Nevertheless, it is very important word that Radix gives a full suite of instruments that offer you the assets to construct out full-fledged design methods.
Extra nice articles from LogRocket:
Putting in and establishing the pattern undertaking
Documentation inside a UI library is crucial as a result of it supplies a single location the place builders and designers alike can view an inventory of the elements inside a design system. Builders also can leverage this documentation as a sandbox setting the place they’ll check out elements in a number of states and browse up on the completely different properties that can be utilized to customise a person part.
As a result of documentation is so necessary, our pattern undertaking has been preconfigured with React Styleguidist, a growth setting for constructing React elements. We’ll use this instrument to doc the elements as we construct them out.
To clone the radix-component-library undertaking from GitHub, open your terminal and run the next command:
git clone https://github.com/Cool-Runningz/radix-component-library.git
Subsequent, cd into the radix-component-library folder:
cd radix-component-library
Set up the undertaking dependencies outlined within the bundle.json file:
npm set up
As soon as the set up is accomplished, begin the event server:
npm run library
Navigate to http://localhost:3020/ in your browser. You need to see the next display screen:
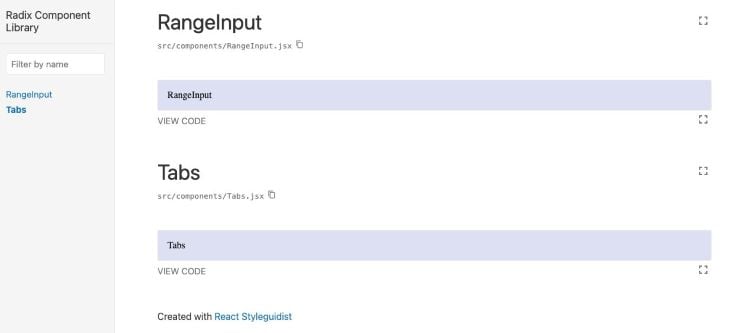
Now that we’ve got the undertaking up and working, we will start to include Radix into our part library.
Constructing a spread enter part with Radix
The primary part we are going to construct is a spread enter that adheres to the WAI-ARIA slider design sample.
Making a customized vary enter that has a constant look throughout browsers may be an arduous process. Nevertheless, Radix makes this course of easier by offering a Slider Primitive. The vary enter is usually known as a slider; all through the remainder of this text, I’ll use these phrases interchangeably.
In Radix, every Primitive may be put in individually so you possibly can undertake them incrementally. Primitives are additionally versioned independently, to additional facilitate incremental adoption. This results in much less bloat in your codebases, as you solely have to import the person elements that you just want.
Set up and boilerplate
To construct a spread enter part, begin by putting in the Slider Primitive:
npm set up @radix-ui/react-slider
Subsequent, open the RangeInput.jsx file, import the Radix Primitive, and add the boilerplate for the slider part. At this level, your file ought to embrace the next code:
import React from 'react'
import PropTypes from "prop-types"
import "./RangeInput.css"
import * as SliderPrimitive from '@radix-ui/react-slider';

const RangeInput = (props) => {
    return (
        <SliderPrimitive.Root className="rootSlider" worth={props.worth}>
            <SliderPrimitive.Monitor className="trackSlider">
                <SliderPrimitive.Vary className="rangeSlider" />
            </SliderPrimitive.Monitor>
            <SliderPrimitive.Thumb className="thumbSlider"  />
        </SliderPrimitive.Root>
    )
}
export default RangeInput
The anatomy of a Slider part in Radix consists of the next 4 components:
- Root: Accommodates all of the components of a slider
- Monitor: The observe that incorporates the
Slider.Vary - Vary: The vary half that should be contained inside
Slider.Monitor - Thumb: A draggable thumb
At this level, should you navigate to http://localhost:3020/#rangeinput you’ll discover that the UI is empty. It is because Radix elements don’t apply any types by default.
Subsequent, we’ll undergo the method of including CSS to the customized part.
Styling the part
Radix will not be opinionated about how you can model elements and it’s suitable with a wide range of CSS options, offering you with full management over styling.
Utilizing plain ol’ CSS, we’ll model to RangeInput part to match the one discovered within the “Estimate your value – Skilled” part of LogRocket’s Pricing web page:

Root
The Root incorporates all of the components of a slider and it’ll render an enter for every thumb.
Create a .rootSlider class in RangeInput.css and add the next code:
 .rootSlider {
    show: flex;
    align-items: middle;
    place: relative;
    top: 1.5rem;
    max-width: 30rem;
}
Monitor
The Monitor incorporates the Slider.Vary and is the a part of the slider that the thumb runs alongside.
Create a .trackSlider class in RangeInput.css and add the next code:
.trackSlider {
    background-color: #fafafa;
    border: 1px stable #d3d3d3;
    place: relative;
    flex-grow: 1;
    border-radius: 10px;
    top: 1rem;
}
Vary
The Vary should dwell inside Slider.Monitor and represents the vary of values that’s chosen.
Create a .rangeSlider class in RangeInput.css and add the next code:
.rangeSlider {
    place: absolute;
    background: linear-gradient(90deg,#252678,#764abc);
    top: 100%;
    border-radius: 10px;
}
Thumb
The Thumb is the component on the observe that the consumer can transfer round to pick out various vary values.
Create a .thumbSlider class in RangeInput.css and add the next code:
.thumbSlider {
    show: block;
    width: 20px;
    top: 20px;
    background-color: #764abc;
    border-radius: 30px;
    border: 1px stable #d9d9d9;
}

.thumbSlider:hover {
    cursor: pointer;
}

.thumbSlider:focus {
    define: 1px stable white;
}
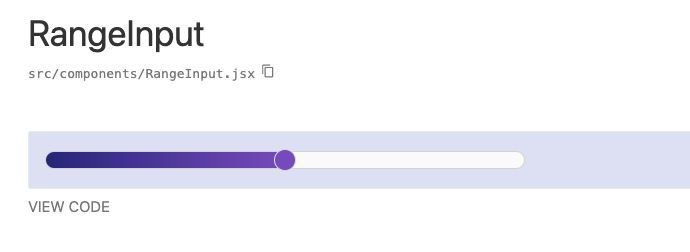
With all these types utilized, should you navigate again to http://localhost:3020/#rangeinput it’s best to see the next being rendered:
Including props
The final step of constructing the RangeInput part is to configure it to have the ability to settle for props, which in flip will make it extra reusable and customizable. For this instance, we‘ll add three props:
label: Utilized because the aria-label worth for the component with thesliderpositionworth: Represents the managed worth of the slider and should be used along sideonValueChangeonValueChange: The occasion handler that will get referred to as when the worth modifications
Radix elements may be managed or uncontrolled. Including the worth and onValueChange props will flip the RangeInput right into a managed part.
The markdown file that renders the RangeInput within the sandbox setting has been preconfigured to go in props. Now we have to replace the part to have the ability to deal with these props.
First, we have to add typechecking with PropTypes. The prop-types library has already been imported close to the highest of RangeInput.jsx so now you possibly can add the propTypes definition on the backside of the file, like so:
RangeInput.propTypes = {
    /** Utilized because the aria-label worth of the component with the "slider" position  */
    label: PropTypes.string.isRequired,
    /** The managed worth of the slider. */
    worth: PropTypes.arrayOf(PropTypes.quantity).isRequired,
    /** Occasion handler referred to as when the worth modifications. */
    onValueChange: PropTypes.func.isRequired
}
When propTypes are current, React Styleguidist will choose up the props from the thing’s declarations and show them in a desk. Now, anybody taking a look at this instance will know the precise props which can be wanted to correctly implement this part.

Subsequent, we need to replace the JSX inside RangeInput.jsx to have the ability to go the props to the RangeInput part. The worth and onValueChange props have to get utilized to the SliderPrimitive.Root component, whereas the label prop must get utilized to the SliderPrimitive.Thumb component.
With these updates, the RangeInput.jsx file ought to now include the next code:
import React from 'react'
import PropTypes from "prop-types"
import "./RangeInput.css"
import * as SliderPrimitive from '@radix-ui/react-slider';

const RangeInput = (props) => {
    return (
        <SliderPrimitive.Root className="rootSlider"
           worth={props.worth} onValueChange={props.onValueChange}>
            <SliderPrimitive.Monitor className="trackSlider">
                <SliderPrimitive.Vary className="rangeSlider" />
            </SliderPrimitive.Monitor>
            <SliderPrimitive.Thumb className="thumbSlider" aria-label={props.label}
            />
        </SliderPrimitive.Root>
    )
}
export default RangeInput

RangeInput.propTypes = {
    /** Utilized because the aria-label worth of the component with the "slider" position  */
    label: PropTypes.string.isRequired,
    /** The managed worth of the slider. */
    worth: PropTypes.arrayOf(PropTypes.quantity).isRequired,
    /** Occasion handler referred to as when the worth modifications. */
    onValueChange: PropTypes.func.isRequired
}
Voila!
With minimal code, we had been capable of leverage the Radix Slider to create an accessible and purposeful RangeInput part that’s styled to match the LogRocket theme.
Subsequent, we’ll exhibit how you can implement yet another part for our UI library.
Constructing a tabs part with Radix
The second part we are going to construct is a Tabs component that leverages the Radix Tabs Primitive. This part is constructed to stick to the WAI-ARIA Tabs design sample.
Set up and boilerplate
First, set up the Tabs Primitive:
npm set up @radix-ui/react-tabs
Subsequent, open the Tabs.jsx file, import the Radix Primitive, and add the boilerplate for the Tabs part.
Your file ought to embrace the next code:
import React from 'react'
import PropTypes from "prop-types"
import "./Tabs.css"

import * as TabsPrimitive from "@radix-ui/react-tabs";

const Tabs = (props) => {
    return (
        <TabsPrimitive.Root>
            <TabsPrimitive.Listing>
                <TabsPrimitive.Set off worth="tab1">Tab 1</TabsPrimitive.Set off>
                <TabsPrimitive.Set off worth="tab2">Tab 2</TabsPrimitive.Set off>
            </TabsPrimitive.Listing>
            <TabsPrimitive.Content material worth="tab1">
                Content material for Tab # 1
            </TabsPrimitive.Content material>
            <TabsPrimitive.Content material worth="tab2">
                Content material for Tab # 2
            </TabsPrimitive.Content material>
        </TabsPrimitive.Root>
    )
}

export default Tabs
The anatomy of a Radix Tabs part consists of the next 4 components:
- Root: Accommodates all of the
Tabspart components - Listing: Accommodates the triggers which can be aligned alongside the sting of the lively content material
- Set off: The button that prompts its related content material
- Content material: Accommodates the content material related to every set off
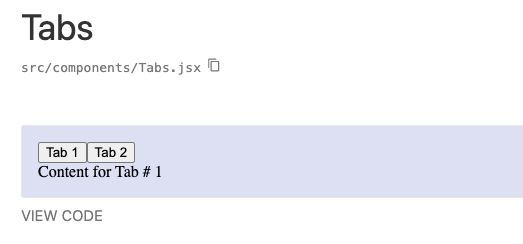
In case you navigate to http://localhost:3020/#tabs, the default model of the part ought to show like this:
Including props
Subsequent, we have to configure the Tabs part to have the ability to settle for props. For this instance, we’ll add three props:
tabsList: Array of tabs to be displayedworth: Managed worth of the tab to activate; this ought to be used along sideonValueChangeonValueChange: Occasion handler referred to as when the worth modifications
At the moment, the Tabs part solely shows a set variety of tabs with hardcoded values. In an effort to make the part extra versatile in order that it will possibly render an arbitrary variety of tabs, we are going to replace the JSX in Tabs.jsx with the next code:
import React from 'react'
import PropTypes from "prop-types"
import "./Tabs.css"
import * as TabsPrimitive from "@radix-ui/react-tabs";
const Tabs = (props) => {
return (
<TabsPrimitive.Root
className="rootTabs"
worth={props.worth}
onValueChange={props.onValueChange}
>
<TabsPrimitive.Listing className="listTabs">
{props.tabsList.map((tab) => {
return (
<TabsPrimitive.Set off className="triggerTabs"
key={tab.id || `${index}-${tab.worth}`}
worth={tab.worth}
>
{tab.label}
</TabsPrimitive.Set off>);
})}
</TabsPrimitive.Listing>
{props.tabsList.map((tab) => {
return (
<TabsPrimitive.Content material className="contentTabs"
key={tab.id || `${index}-${tab.worth}`}
worth={tab.worth}
>
{tab.content material}
</TabsPrimitive.Content material>
);
})}
</TabsPrimitive.Root>
)
}
export default Tabs
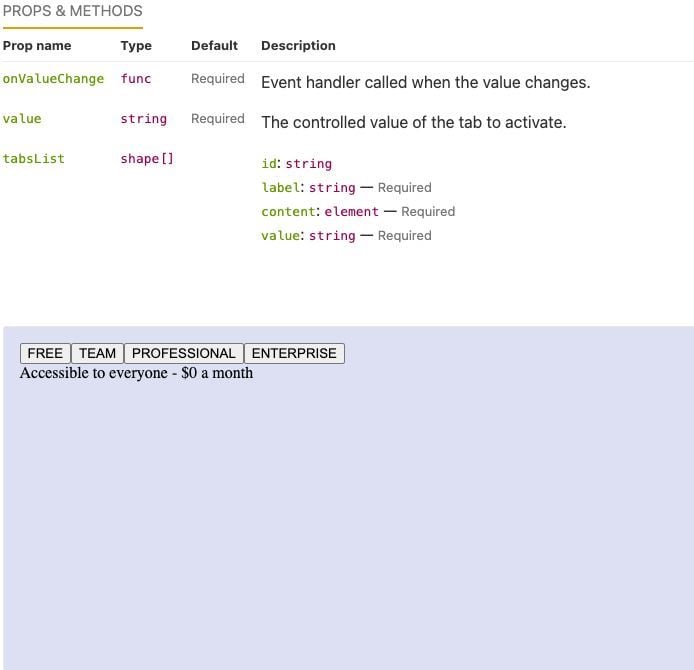
Tabs.propTypes = {
tabsList: PropTypes.arrayOf(
PropTypes.form({
id: PropTypes.string,
label: PropTypes.string.isRequired,
content material: PropTypes.component.isRequired,
worth: PropTypes.string.isRequired
})
),
/** The managed worth of the tab to activate. */
worth: PropTypes.string.isRequired,
/** Occasion handler referred to as when the worth modifications. */
onValueChange: PropTypes.func.isRequired
}
Tabs.md has been pre-configured to go in an array of things to the tabsList prop. Once we navigate to http://localhost:3020/#tabs, we should always see the next:
Styling the part
Much like the earlier part, we’ll use vanilla CSS to model the Tabs part to match the one discovered within the “Estimate your value” part of LogRocket’s Pricing web page:

Root
The Root incorporates all the weather which can be contained inside the tabs part.
Create a .rootTabs class in Tabs.css and add the next code:
.rootTabs {
  background-color: white;
}
Listing
The Listing incorporates all of the Set off components.
Create a .listTabs class in Tabs.css and add the next code:
.listTabs {
    align-items: middle;
    show: flex;
    justify-content: middle;
    margin: 0 auto;
    width: 85%;
}
Set off
The Set off is the button that controls displaying the chosen tabs content material.
Create a .triggerTabs class in Tabs.css and add the next code:
.triggerTabs {
    shade: #764abc;
    font-family: "Avenir";
    background: none;
    border: none;
    show: block;
    cursor: pointer;
    font-size: 20px;
    font-weight: 500;
    opacity: 0.5;
    padding: 30px;
    place: relative;
}

.triggerTabs[data-state="active"] {
    opacity: 1;
}

.triggerTabs[data-state="active"]::after {
    background-color: #764abc;
    border-radius: 12px;
    backside: -4px;
    content material: "";
    top: 6px;
    left: 0;
    place: absolute;
    width: 100%;
}
Content material
The Content material incorporates the content material that’s related to every tab.
Create a .contentTabs class in Tabs.css and add the next CSS:
.contentTabs {
   border-top: 3px stable hsla(0, 0%, 44%, 0.15);
   padding: 30px 55px;
}
With all these types utilized, should you navigate again to http://localhost:3020/#tabs it’s best to now see the next being rendered:
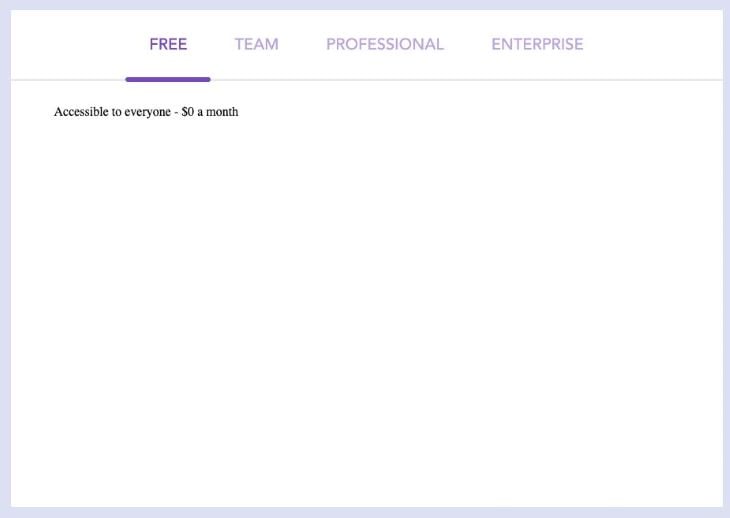
This completes the second instance and reveals how one can leverage the Radix Tabs Primitive to rapidly construct a purposeful and accessible Tabs part that’s styled to match the LogRocket theme.
Conclusion
On this article, we investigated Radix and mentioned how you should utilize its suite of merchandise to create design methods. Constructing incrementally, we used Radix Primitives to develop a primary React part library as a subset of a design system.
Growing customized elements may be difficult, and incorporating options like accessibility and keyboard navigation can exponentially improve complexity, additional validating the advantages of leveraging instruments like Radix that goal to simplify this course of.
The repository for the part library developed on this article may be discovered on my GitHub. As well as, you possibly can view a deployed model of the ultimate undertaking right here.
Thanks for studying, and completely satisfied coding!
