
Constructing an awesome person expertise is crucial to your app’s success. Regardless of how nice a product you promote, in case your app isn’t providing a constructive UX, you’re going to battle. On this tutorial, you’ll learn to construct an intuitive product photograph gallery with Flutter and supply a greater shopping for expertise.
We are going to construct an instance app that lists the merchandise in a fascinating manner — tapping on a product, we are going to animate a product particulars web page the place you possibly can set its amount and add it to the cart. On the high, additionally, you will see the variety of objects added to the cart, and if you click on on it, you possibly can see an inventory of all of the merchandise added to it.
By the tip of this tutorial, you’ll learn to construct for wider screens, permit seek for merchandise, toggle the view, handle the state of the buying cart, and add the fabric movement whereas navigating between screens for a easy person expertise.
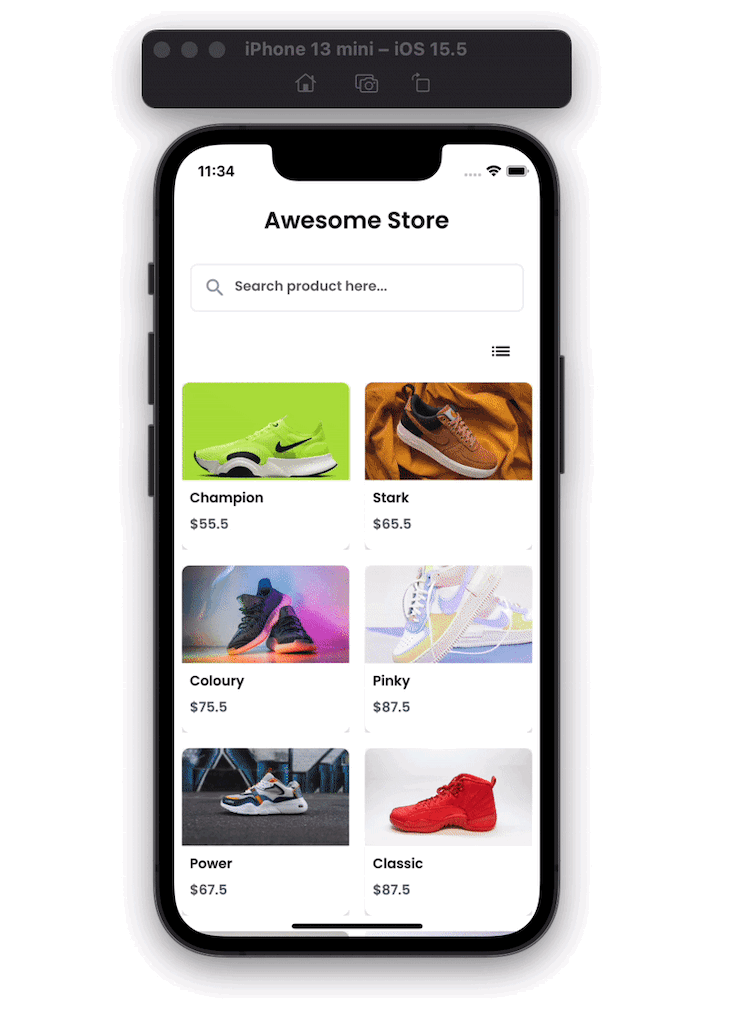
Right here’s how our Flutter ecommerce photograph gallery will look when accomplished:
Right here’s what we’re going to cowl on this tutorial:
Creating the mission
Earlier than you start, you need to set up the Flutter SDK and create a fundamental mission. Let’s see how to do this.
First, get the Flutter SDK from this hyperlink. As soon as put in, verify if all the pieces is okay by hitting the next command within the terminal:
flutter physician
(Be aware: If something is flagged with a purple mark, you need to tackle them earlier than you proceed additional)
Now, create a listing the place you want to create this mission and enter the next command. This may create a recent new mission within the specified listing.
flutter create ecomm_app
To open, edit the file contents and run/debug/take a look at the mission, you want to set up the IDE. You may select from any of the next editors:
Open the projectfolder/lib/principal.dart and run the starter app from IDE by hitting the play button. You may also run it from the command line by coming into the next command:
flutter run
// Tip: In case you are working a number of gadgets, you possibly can run the
// following:
flutter run -d "<device_name>"
Creating screens
The instance app consists of three screens: the product itemizing, product particulars, and cart web page.
Let’s see how these screens match into the move:
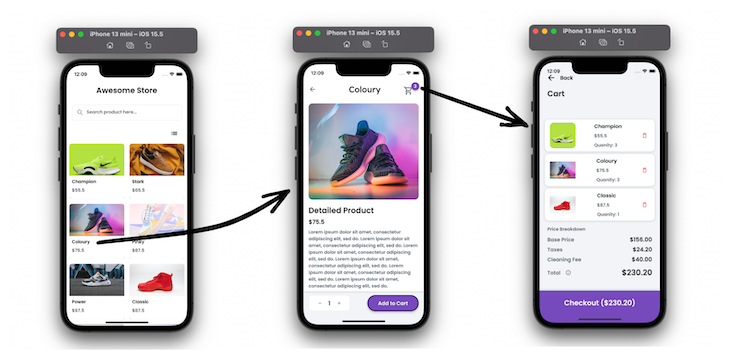
First, you will notice all of the merchandise. Tapping on any merchandise opens the main points web page. You may add objects to the cart and navigate to the cart web page.
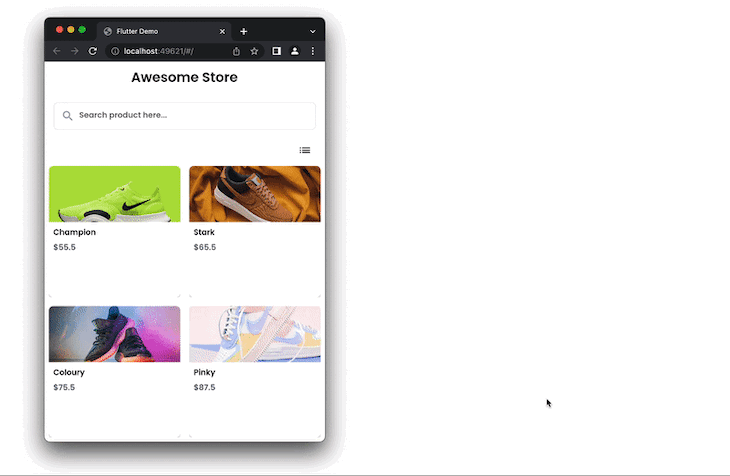
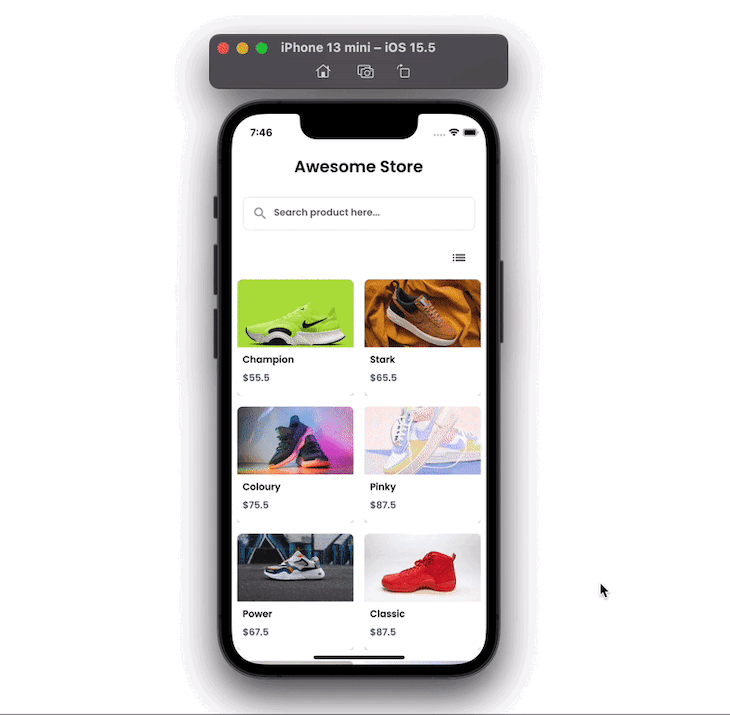
Product listings
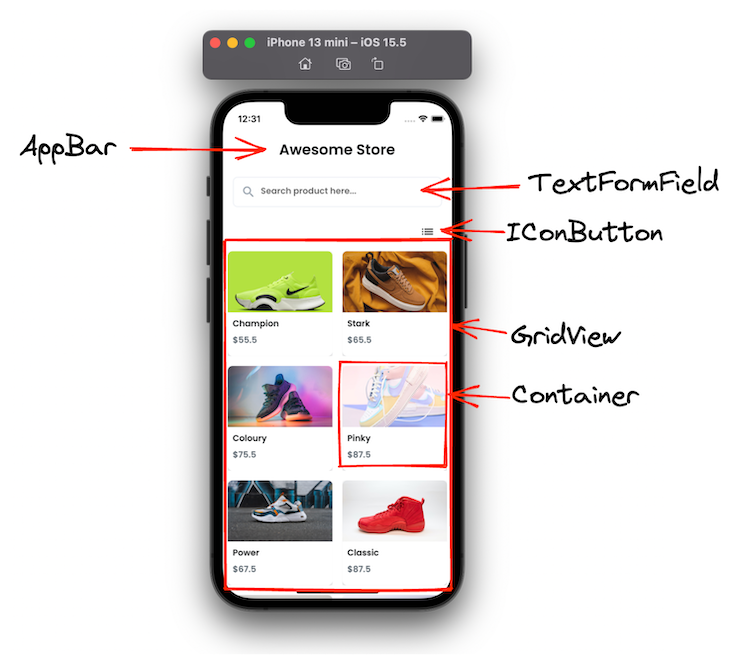
The primary display screen reveals all of the merchandise with their identify, picture, and value. Right here you possibly can seek for the merchandise and toggle the view between grid view and listing view. On tapping the merchandise, it opens the product particulars web page.
Extra nice articles from LogRocket:
Listed here are among the important widgets that you should use to construct the primary display screen:
Right here is the precise code for creating this container:
Container(
  //width: MediaQuery.of(context).measurement.width * 0.45,
  ornament: BoxDecoration(
    coloration: AppTheme.of(context).secondaryBackground,
    boxShadow: [
      BoxShadow(
        blurRadius: 4,
        color: Color(0x3600000F),
        offset: Offset(0, 2),
      )
    ],
    borderRadius: BorderRadius.round(8),
  ),
  little one: Padding(
    padding: EdgeInsetsDirectional.fromSTEB(0, 0, 0, 12),
    little one: Column(
      mainAxisSize: MainAxisSize.max,
      youngsters: [
        Row(
          mainAxisSize: MainAxisSize.max,
          children: [
            Expanded(
              child: ClipRRect(
                borderRadius: BorderRadius.only(
                  bottomLeft: Radius.circular(0),
                  bottomRight: Radius.circular(0),
                  topLeft: Radius.circular(8),
                  topRight: Radius.circular(8),
                ),
                child: Image.network(
                  product.image,
                  width: 100,
                  height: 100,
                  fit: BoxFit.cover,
                ),
              ),
            ),
          ],
        ),
        Padding(
          padding: EdgeInsetsDirectional.fromSTEB(0, 4, 0, 0),
          little one: Row(
            mainAxisSize: MainAxisSize.max,
            youngsters: [
              Padding(
                padding: EdgeInsetsDirectional.fromSTEB(8, 4, 0, 0),
                child: Text(
                  product.name,
                  style: AppTheme.of(context).bodyText1,
                ),
              ),
            ],
          ),
        ),
        Padding(
          padding: EdgeInsetsDirectional.fromSTEB(0, 2, 0, 0),
          little one: Row(
            mainAxisSize: MainAxisSize.max,
            youngsters: [
              Padding(
                padding: EdgeInsetsDirectional.fromSTEB(8, 4, 0, 0),
                child: Text(
                  '$${product.price}',
                  style: AppTheme.of(context).bodyText2,
                ),
              ),
            ],
          ),
        ),
      ],
    ),
  ),
);
Product particulars
The product particulars web page reveals the product info. It lets you set the amount of the product and add it to the cart. You may also open the buying cart from this web page.
Listed here are among the important widgets that you should use to construct the product particulars display screen:
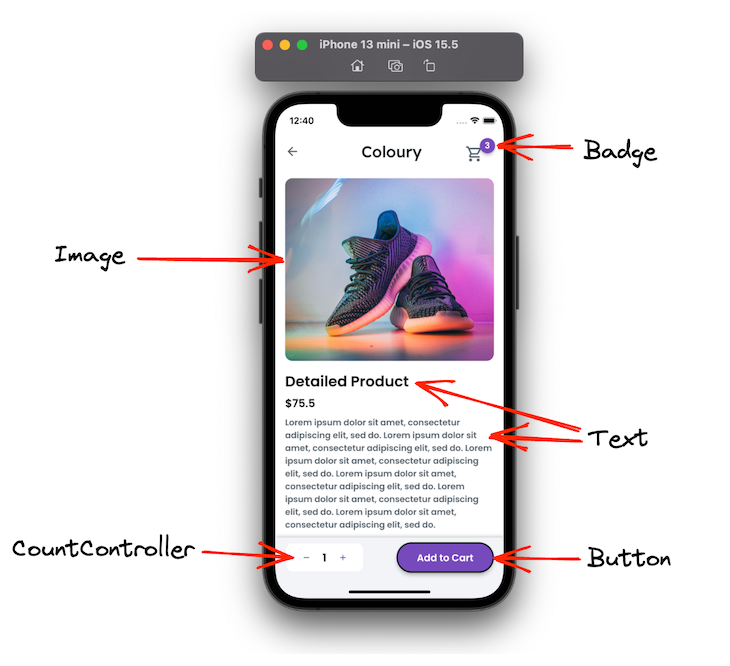
The badge widget just isn’t the usual widget; as a substitute, it’s added from a library known as Badges. This mechanically animates the badge when the worth is up to date.
Right here’s the code displaying the badge over the buying cart merchandise:
Badge(
  badgeContent: Textual content(
    '${cartItem.size}',
    model: AppTheme.of(context).bodyText1.override(
          fontFamily: 'Poppins',
          coloration: Colours.white,
        ),
  ),
  showBadge: true,
  form: BadgeShape.circle,
  badgeColor: AppTheme.of(context).primaryColor,
  elevation: 4,
  padding: EdgeInsetsDirectional.fromSTEB(8, 8, 8, 8),
  place: BadgePosition.topEnd(),
  animationType: BadgeAnimationType.scale,
  toAnimate: true,
  little one: IconButton(
    icon: Icon(
      Icons.shopping_cart_outlined,
      coloration: AppTheme.of(context).secondaryText,
      measurement: 30,
    ),
    onPressed: () {
      Navigator.push(
        context,
        MaterialPageRoute(
          builder: (context) => CheckoutWidget(),
        ),
      );
    },
  ),
)
Cart
This web page reveals the listing of all of the objects added to the cart with a capability to take away any merchandise from the cart. Right here you possibly can present all pricing summaries and a checkout possibility.
Listed here are among the vital widgets that you should use to construct the cart display screen:
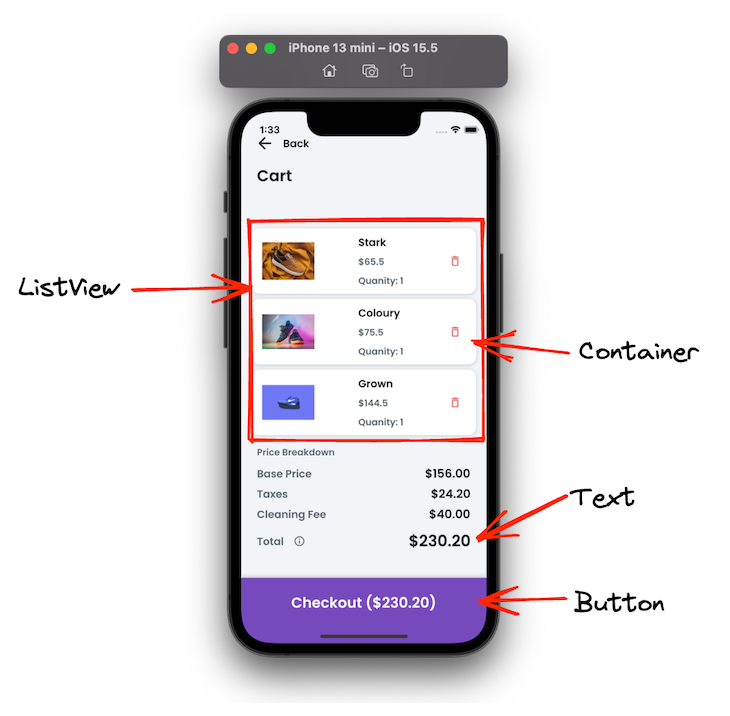
Right here’s how one can show an inventory of all objects in a cart:
ListView.builder(
    padding: EdgeInsets.zero,
    main: false,
    shrinkWrap: true,
    scrollDirection: Axis.vertical,
    itemCount: cartItems.size,
    itemBuilder: (BuildContext context, int index) {
      return Padding(
        padding: EdgeInsetsDirectional.fromSTEB(16, 8, 16, 0),
        little one: Container(
          width: double.infinity,
          top: 100,
          ornament: BoxDecoration(
            coloration: AppTheme.of(context).secondaryBackground,
            boxShadow: [
              BoxShadow(
                blurRadius: 4,
                color: Color(0x320E151B),
                offset: Offset(0, 1),
              )
            ],
            borderRadius: BorderRadius.round(12),
          ),
          little one: Padding(
            padding: EdgeInsetsDirectional.fromSTEB(16, 8, 8, 8),
            little one: Row(
              mainAxisSize: MainAxisSize.max,
              mainAxisAlignment: MainAxisAlignment.spaceBetween,
              youngsters: [
                Hero(
                  tag: 'ControllerImage',
                  transitionOnUserGestures: true,
                  child: ClipRRect(
                    borderRadius: BorderRadius.circular(12),
                    child: Image.network(
                      cartItems[index].picture,
                      width: 80,
                      top: 80,
                      match: BoxFit.fitWidth,
                    ),
                  ),
                ),
                Padding(
                  padding: EdgeInsetsDirectional.fromSTEB(12, 0, 0, 0),
                  little one: Column(
                    mainAxisSize: MainAxisSize.max,
                    mainAxisAlignment: MainAxisAlignment.middle,
                    crossAxisAlignment: CrossAxisAlignment.begin,
                    youngsters: [
                      Padding(
                        padding: EdgeInsetsDirectional.fromSTEB(0, 0, 0, 8),
                        child: Text(
                          cartItems[index].identify,
                          model: AppTheme.of(context).subtitle2.override(
                                fontFamily: 'Poppins',
                                coloration: AppTheme.of(context).primaryText,
                              ),
                        ),
                      ),
                      Textual content(
                        '$${cartItems[index].value}',
                        model: AppTheme.of(context).bodyText2,
                      ),
                      Padding(
                        padding: EdgeInsetsDirectional.fromSTEB(0, 8, 0, 0),
                        little one: Textual content(
                          'Quanity: ${cartItems[index].amount}',
                          model: AppTheme.of(context).bodyText2,
                        ),
                      ),
                    ],
                  ),
                ),
                IconButton(
                  icon: Icon(
                    Icons.delete_outline_rounded,
                    coloration: Coloration(0xFFE86969),
                    measurement: 20,
                  ),
                  onPressed: () {
                  // Take away merchandise
                  },
                ),
              ],
            ),
          ),
        ),
      );
    });
Including merchandise
As soon as the UI is prepared, you possibly can fill the product listing by including numerous merchandise. In a real-world state of affairs, you’d fill this listing with the objects retrieved out of your backend server, however we’ll add merchandise regionally in a variable for simplification functions.
First, create a product class that holds fields comparable to id, identify, picture, value, and amount.
class Product {
  last int id;
  last String identify;
  last String picture;
  last double value;
  int amount;

  Product({required this.id, required this.identify, required this.picture, required this.value, this.amount = 0});
}
Now, create an inventory of assorted merchandise by utilizing the category above. Like this:
last Record<Product> merchandise = [
  Product(
      id: 1,
      name: 'Champion',
      image:
          'https://images.unsplash.com/photo-1606107557195-0e29a4b5b4aa?ixlib=rb-1.2.1&ixid=MnwxMjA3fDB8MHxwaG90by1wYWdlfHx8fGVufDB8fHx8&auto=format&fit=crop&w=764&q=80',
      price: 55.5),
  Product(
      id: 2,
      name: 'Stark',
      image:
          'https://images.unsplash.com/photo-1549298916-b41d501d3772?ixlib=rb-1.2.1&ixid=MnwxMjA3fDB8MHxwaG90by1wYWdlfHx8fGVufDB8fHx8&auto=format&fit=crop&w=1624&q=80',
      price: 65.5),

];
Equally, you possibly can add extra merchandise in case you want to. As soon as this listing is prepared, its time to cross and use it to inflate the GridView widget, as proven under:
GridView.builder(
  itemCount: merchandise.size,
  itemBuilder: (context, index) => ProductTile(
    itemNo: index,
    product: merchandise[index],
  ),
  gridDelegate: SliverGridDelegateWithFixedCrossAxisCount(
    crossAxisCount: 2,
    childAspectRatio: 1,
  ),
)
Constructing the cart
The core function of any ecommerce app is the power so as to add merchandise to the cart for buying. To construct this function, you possibly can incorporate state administration in your app.
For this app, we are going to use the state administration method known as, Bloc, as a result of you possibly can separate the enterprise logic from the UI and it’s simpler to write down and reuse exams.
Right here, we now have lined find out how to use the Bloc design sample in a weblog put up.
Bloc state administration requires you so as to add three important lessons: bloc, occasion, and state. So as to add or take away objects to the cart, we are going to add the next lessons:
CartBloc
That is the place the enterprise logic (including and eradicating objects) resides.
class CartBloc extends Bloc<CartEvent, CartState> {
  CartBloc() : tremendous(ProductAdded(cartItem: []));

  last Record<Product> _cartItems = [];
  Record<Product> get objects => _cartItems;
  bool isGridView = true;

  @override
  Stream<CartState> mapEventToState(CartEvent occasion) async* {
    if (occasion is AddProduct) {
      _cartItems.add(occasion.productIndex);
      yield ProductAdded(cartItem: _cartItems);
    } else if (occasion is RemoveProduct) {
      _cartItems.take away(occasion.productIndex);
      yield ProductRemoved(cartItem: _cartItems);
    } else if (occasion is ChangeGallaryView) {
      isGridView = occasion.isGridView;
      yield ChangeGallaryViewState(isGridView: isGridView);
    }
  }
}
(Be aware: The _cartItems is a single supply of fact for managing cart objects)
CartEvent
That is used to ship objects to the cart bloc.
summary class CartEvent extends Equatable {
  const CartEvent();

  @override
  Record<Object> get props => [];
}

class AddProduct extends CartEvent {
  last Product productIndex;

  const AddProduct(this.productIndex);

  @override
  Record<Object> get props => [productIndex];

  @override
  String toString() => 'AddProduct { index: $productIndex }';
}

class RemoveProduct extends CartEvent {
  last Product productIndex;

  const RemoveProduct(this.productIndex);

  @override
  Record<Object> get props => [productIndex];

  @override
  String toString() => 'RemoveProduct { index: $productIndex }';
}
CartState
That is used to ship objects to the UI.
summary class CartState {
  last Record<Product> cartItem;
  last bool isGridView;
  const CartState({this.cartItem = const [], this.isGridView = true});

  @override
  Record<Object> get props => [];
}

class CartLoadInProgress extends CartState {
  CartLoadInProgress({required tremendous.cartItem});
}

class ProductAdded extends CartState {
  last Record<Product> cartItem;

  const ProductAdded({required this.cartItem}) : tremendous(cartItem: cartItem);

  @override
  Record<Object> get props => [cartItem];

  @override
  String toString() => 'ProductAdded { todos: $cartItem }';
}
From the UI (a button with “Add to Cart” textual content), you possibly can insert the next code so as to add the merchandise to the listing:
onPressed: () {
  Product p = widget.product;
  p.amount = countControllerValue!.toInt();
  BlocProvider.of<CartBloc>(context).add(AddProduct(p));
}
To take away the product from the cart, you possibly can merely hearth the occasion to take away the merchandise, as per the next:
onPressed: () {
  BlocProvider.of<CartBloc>(context).add(RemoveProduct(cartItems[index]));
}
To retrieve the cart objects, you possibly can wrap the GridView or ListView contained in the Bloc builder, and the listing is up to date every time the merchandise is added or eliminated.
BlocBuilder<CartBloc, CartState>(builder: (_, cartState) {
  return ListView.builder();
}),
Including responsiveness
Chances are you’ll need to accommodate the net model of your app, too. Meaning customers shouldn’t really feel like they’re utilizing a cellular app on a browser; reasonably, it ought to really feel prefer it’s a local net app.
For this app, we will present extra objects when the app is used on a wider display screen. Chances are you’ll be shocked to know that this may be achieved with only a minor change within the code.
Right here’s how you are able to do that:
return LayoutBuilder(builder: (context, constraints) {
  return GridView.builder(
    itemCount: merchandise.size,
    itemBuilder: (context, index) => ProductTileAnimation(
      itemNo: index,
      product: merchandise[index],
    ),
    gridDelegate: SliverGridDelegateWithFixedCrossAxisCount(
      crossAxisCount: constraints.maxWidth > 700 ? 4 : 2, //<-SEE HERE
      childAspectRatio: 1,
    ),
  );
});
You may wrap the GridView widget contained in the LayoutBuilder, which supplies the constraints, which are used to find out the width and top. Utilizing the constraints, we will construct numerous person interfaces.
For our instance, within the code above, every time the display screen decision adjustments to 700 or higher in width, we show 4 objects on the cross-axis.
Right here is the way it works:
Toggle product show view
Typically you would possibly need to permit customers to toggle the present view (i.e., GridView) and show it within the ListView.
To take action, you possibly can create one boolean variable (in all probability contained in the bloc) and toggle its worth. Based mostly on this variable, you possibly can outline two widgets — GridView and ListView — and alter the icon.
Right here’s the way you do it for altering the icon:
BlocBuilder<CartBloc, CartState>(builder: (_, cartState) {
  bool isGridView = cartState.isGridView;
  return IconButton(
      onPressed: () {
        BlocProvider.of<CartBloc>(context).add(ChangeGallaryView(!isGridView));
      },
      icon: !isGridView ? Icon(Icons.grid_on) : Icon(Icons.listing));
})
Right here’s the code to decide on which listing to show:
BlocBuilder<CartBloc, CartState>(builder: (_, cartState) {
  bool isGridView = cartState.isGridView;
  if (isGridView) {
    return LayoutBuilder(builder: (context, constraints) {
      return GridView.builder(
        itemCount: merchandise.size,
        itemBuilder: (context, index) => ProductTile(
          itemNo: index,
          product: merchandise[index],
        ),
        gridDelegate: SliverGridDelegateWithFixedCrossAxisCount(
          crossAxisCount: 2,
          childAspectRatio: 1,
        ),
      );
    });
  } else {
    return ListView.builder(
        itemCount: merchandise.size,
        itemBuilder: (BuildContext context, int index) {
          return ProductTile(
            itemNo: index,
            product: merchandise[index],
          );
        });
  }
});
Looking product
To permit customers to look from an inventory, you possibly can leverage the onChanged occasion of the TextFormField. This offers you the newest characters entered into TextFormField. You need to use it to filter the primary listing after which present the search lead to a brand new listing, as proven under:
TextFormField(
  controller: textController,
  obscureText: false,
  onChanged: (_) => EasyDebounce.debounce(
    'tFMemberController',
    Length(milliseconds: 0),
    () {
      isSearchStarted =
          textController!.textual content.isNotEmpty && textController!.textual content.trim().size > 0;
      if (isSearchStarted) {
        print('${textController!.textual content.trim()}');
        searchedProducts = merchandise
            .the place((merchandise) =>
                merchandise.identify.toLowerCase().accommodates(textController!.textual content.trim().toLowerCase()))
            .toList();
      }
      setState(() {});
    },
  ),
)
The isSearchStarted variable is used to point whether or not to indicate the search outcome or not.
ProductList(
  merchandise: isSearchStarted ? searchedProducts : merchandise,
)
Including animations (Materials movement system)
Including animations could also be desired to enhance person expertise. As an alternative of getting a default navigation transition, you possibly can add animation that easily opens the product particulars web page if you faucet on it.
You need to use the pre-built set of animations from the Materials movement system by including the animations library to your app.
To take action, wrap your widget contained in the OpenContainer and supply the web page you need to animate to contained in the openBuilder parameter.
Right here’s the code:
ContainerTransitionType _transitionType = ContainerTransitionType.fade;
OpenContainer<bool>(
  transitionType: _transitionType,
  openBuilder: (BuildContext _, VoidCallback openContainer) {
    return ProductDetailWidget(
      product: product,
    );
  },
  closedShape: const RoundedRectangleBorder(),
  closedElevation: 0.0,
  closedBuilder: (BuildContext _, VoidCallback openContainer) {
    return Container(
      // Product tile
    );
  },
)
Right here’s the way it seems:
The whole supply code for this Flutter ecommerce app may be discovered on GitHub right here.
Conclusion
Creating an intuitive person expertise is crucial for an ecommerce app. This tutorial confirmed you find out how to develop nice trying screens and show merchandise in a fascinating manner.
We additionally realized find out how to use the state administration strategies like Bloc to handle cart objects, and how one can improve the app by including options like toggling, search, and animations.
LogRocket: See the technical and UX causes for why customers don’t full a step in your ecommerce move.

LogRocket is sort of a DVR for net and cellular apps and web sites, recording actually all the pieces that occurs in your ecommerce app. As an alternative of guessing why customers don’t convert, LogRocket proactively surfaces the foundation reason behind points which are stopping conversion in your funnel, comparable to JavaScript errors or useless clicks. LogRocket additionally screens your app’s efficiency, reporting metrics like shopper CPU load, shopper reminiscence utilization, and extra.
Begin proactively monitoring your ecommerce apps — attempt without spending a dime.
