
Do it’s worthwhile to use the sophisticated technique when there’s a higher and less complicated different? Why at all times keep on with command-line interfaces when doing probably the most staple items?
Sure, understanding how issues work underneath the hood tends to have its advantages, however not at all times. You should not have to overcomplicate issues, and in addition to, even geeks are tending to favor utilizing a graphical person interface today.
On this tutorial, take a look at how you can use GraphiQL to assist GraphQL growth. Let’s bounce proper in!
What’s GraphQL?
Earlier than we speak about GraphiQL, let speak about what it helps — GraphQL.
GraphQL is an open-source information question and manipulation language for utility programming interfaces (API), and a runtime for fulfilling queries with current information.
GraphQL was developed internally by Fb in 2012 earlier than being launched to the general public in 2015.
Builders are likely to want it to the REpresentational State Switch (REST) strategy of interacting with APIs, however we will likely be cautious to not fall into making this text in regards to the execs and cons of the RESTful strategy and GraphQL — we’ll depart that for one more article.
What’s GraphiQL?
Now, if you’re acquainted with RESTful APIs, you’ll in all probability concentrate on instruments like Postman and Insomnia, as a result of not solely do they assist us with our API growth when it comes to visualizing issues shortly, however additionally they assist us get issues accomplished quicker.
Now, I would like you to consider GraphiQL as Postman or Insomnia. GraphiQL is the GraphQL built-in growth atmosphere (IDE).
It’s a strong instrument; a instrument that helps you construction GraphQL queries visually.
Conditions
Earlier than we go additional, it is necessary that we observe the data required to raised perceive this subject:
- A fundamental understanding of Node.js. This comes with node package deal supervisor (npm)
- Understanding of fundamental categorical server setup. We will likely be utilizing categorical.js to spin up a server for this tutorial
- A code editor (I exploit Visible Studio Code)
Establishing a mission
We’re constructing an categorical.js server, which is a Node.js utility — we’ll create a folder to accommodate our mission information.
As soon as you’re in your newly created or desired folder, run this in your command-line interface (CLI):
npm init -y
It will create a package deal.json file within the folder that you’re in.
The following factor to do is to put in the mandatory packages that we want for our mission. For that, run: npm set up graphql express-graphql categorical.
It is best to add "dev": "node app.js" to your script object in package deal.json file.
After they’re all put in, your package deal.json file ought to appear like this:
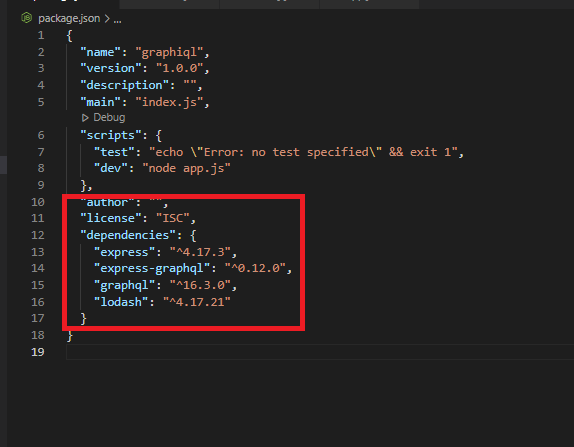
Now let me clarify what the next packages do.
We want graphql, as a result of that’s what we’re constructing on and this package deal in itself offers us with all of the strategies wanted — besides that we wish to run on an categorical.js server and, out of the field, categorical.js doesn’t know how you can talk with graphql.
Due to this, we want one other package deal; express-graphql.
Be aware that if you put in these packages, it created the node_modules folder, the place all the mandatory information and dependencies are being saved. At any time when we require a package deal, it appears at this folder.
In your folder, create a file known as “app.js” and paste the next code:
//js
const categorical = require('categorical');
const { graphqlHTTP } = require('express-graphql');
const schema = require('./schema/schema');
const app = categorical();
// bind categorical with graphql
app.use('/graphql', graphqlHTTP({
    schema,
    graphiql: true
}));
app.hear(2020, () => {
    console.log('now listening at port 2020');
});
That is our entry level. On line 2, we required categorical and put in a variable; categorical. On line 3, we did comparable factor for express-graphql; the one distinction being that we used destructuring to get a selected technique, graphqlHTTP — that could be a property in express-graphql.
On line 4, we required a customized path schema.js. It will quickly be created.
Then line 5 is the place we instantiated the categorical operate and put it in a variable; app.
From strains 7 to 10, we began by invoking the app.use(), which permits us to register middleware in categorical.js. At any time when we hit the route /graphql, we wish it to at all times invoke the graphqlHTTP() which will likely be including objects to (GraphiQL and schema).
We gave GraphiQL a price of “true”, as that’s the entire level of this tutorial — we wish to have the ability to see what is occurring graphically (visually ☺️ ).
Then from strains 11 to 13, if all the pieces goes effectively within the previous code, we’re going to hear at port 2020 and console log “now listening at port 2020”.
Now, create a folder in your mission’s folder. Name the folder schema, then contained in the simply created folder (schema), create a file known as “schema.js”. It is best to know that the folder and file names we determined to make use of for this mission are simply private alternative — you aren’t confined to them.
Paste the next code in your schema.js file:
//js
const graphql = require("graphql");
const _ = require("lodash");
const { international locations } = require("./nation");
const { GraphQLObjectType, GraphQLString, GraphQLSchema, GraphQLID } = graphql;
const CountryType = new GraphQLObjectType({
  title: "Nation",
  fields: () => ({
    id: { kind: GraphQLID },
    title: { kind: GraphQLString },
    capital: { kind: GraphQLString },
  }),
});
const RootQuery = new GraphQLObjectType({
  title: "RootQueryType",
  fields: {
    nation: {
      kind: CountryType,
      args: { id: { kind: GraphQLID } },
      resolve(dad or mum, args) {
        return _.discover(international locations, { id: args.id });
      },
    },
  },
});
module.exports = new GraphQLSchema({
  question: RootQuery,
});
One of many packages that I used right here which was not put in earlier than is Loadash, so simply go forward and run: npm intsall loadash.
Within the schema folder, create one other file known as nation.js and paste the next code:
var international locations = [
    { name: 'Portugal', capital: 'Libson', id: '1' },
    { name: 'Canada', capital: 'Ontario', id: '2' },
    { name: 'Nigeria', capital: 'Abuja', id: '3' },
];
module.exports = {international locations};
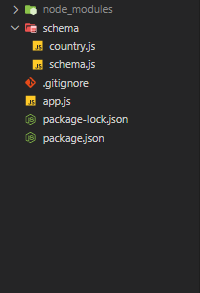
On the finish, your mission’s folder ought to appear like this:
Now, again to what’s taking place in schema/schema.js. From strains 2 to five, that is the place we require and import all the pieces that we have to efficiently create a GraphQL server that’s in accordance with the construction that’s in schema/nation.js.
From strains 6 to 13, the variable CountryType is instantiated by GraphQLObjectType() technique, which is coming from graphql. Inside it are two properties: title and fields.
title has a price of “Nation”, the place fields as a property can also be a way that implicitly returns an object (id; title capital).
From strains 14 to 25, now we have a brand new occasion of GraphQLObjectType(), which is put within the variable RootQuery. We see that we’re utilizing Loadash to return international locations by id.
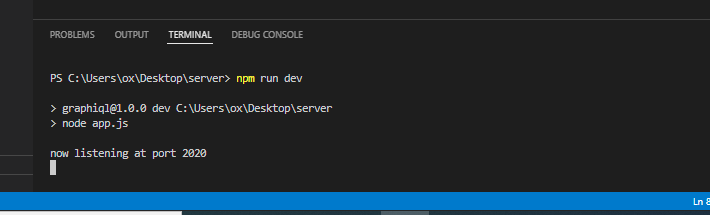
If all the pieces is completed accurately, it is best to be capable to run your GraphQL within the GraphiQL interface.
Run npm run dev:
Then, in your browser, go to http://localhost:2020/graphql, and it is best to see this:
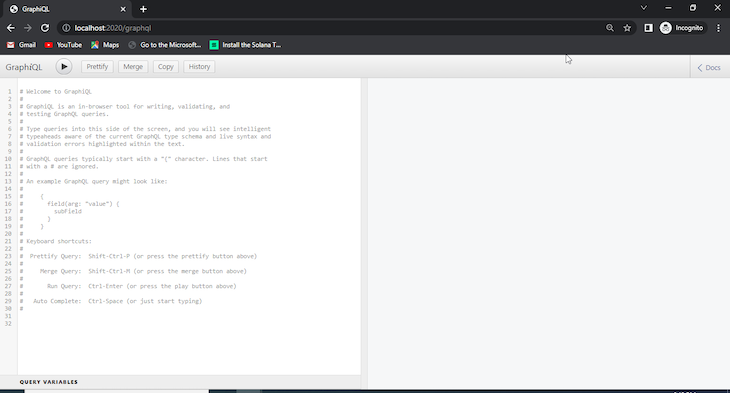
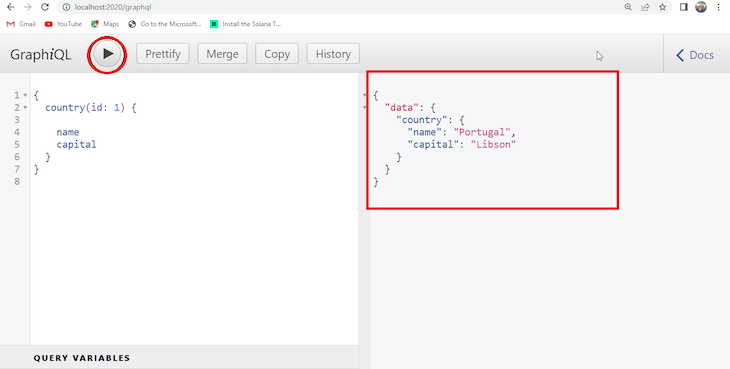
Sure, now you possibly can check your API utilizing the GraphiQL interface. You possibly can attempt to get the title and capital of the nation with the id of 1 in our nation.js by pasting this in your browser:
{
  nation(id: 1) {
    title
    capital
  }
}
After you do this, hit the “Play” icon, and it is best to see a response on the opposite facet of your display like so:
This mission is positioned at this github repository.
Conclusion
We have now completed this tutorial on how you can visualize your GraphQL schema with GraphiQL, the default visualizer for GraghQL.
We began by organising a brand new mission and putting in the mandatory packages, then explored the usefulness of every package deal.
We have now seen that GraphQL gives a pleasant option to question sure issues in an API and nonetheless reduce as few assets as potential — that’s, you possibly can goal a selected useful resource from a a lot larger useful resource.
Monitor failed and sluggish GraphQL requests in manufacturing
Whereas GraphQL has some options for debugging requests and responses, ensuring GraphQL reliably serves assets to your manufacturing app is the place issues get harder. For those who’re excited by making certain community requests to the backend or third occasion providers are profitable, attempt LogRocket.
 https://logrocket.com/signup/
LogRocket is sort of a DVR for net and cell apps, recording actually all the pieces that occurs in your web site. As an alternative of guessing why issues occur, you possibly can mixture and report on problematic GraphQL requests to shortly perceive the basis trigger. As well as, you possibly can observe Apollo consumer state and examine GraphQL queries’ key-value pairs.
LogRocket devices your app to report baseline efficiency timings akin to web page load time, time to first byte, sluggish community requests, and likewise logs Redux, NgRx, and Vuex actions/state. Begin monitoring at no cost.
