
NestJS is a comparatively new JavaScript internet framework that allows you to construct enterprise-grade, server-side purposes. It’s highly effective, enforces finest practices, and makes use of the most recent JavaScript options. It additionally has default assist for TypeScript and makes use of TypeORM, a robust object-relations-management library constructed with TypeScript.
With over 29.3k stars on GitHub, TypeORM is without doubt one of the hottest Node.js ORMs. Moreover being database agnostic, TypeORM has a novel API that permits you to entry knowledge in SQL databases, comparable to MYSQL and PostgreSQL, and NoSQL databases, like MongoDB, in several methods utilizing Energetic Report and Information Mapper patterns.
On this piece, we’ll learn to combine TypeORM with NestJS, add a database driver, and run fundamental queries with TypeORM QueryBuilder in NestJS.
To successfully comply with together with this text, it is best to have:
- Node.js v12 LTS or Node >v14 put in in your pc — NVM makes it a lot simpler to change between totally different variations of Node.js
- Primary working data of NestJS and JavaScript
Must brush up on some fundamentals? Take a look at this sensible article on constructing an ecommerce utility with NestJS.
Let’s get began!
Desk of contents
Establishing NestJS is easy, and there are a number of methods to take action, relying in your wants. Nonetheless, on this article, we’ll set up it with the CLI.
npx @nestjs/[email protected] new nest-app
This command will scaffold the NestJS “Good day, World!” boilerplate app, so you may dive proper in and begin coding.
Now that we now have NestJS put in, let’s combine TypeORM into our utility. Pay shut consideration to this part; you’ll must accurately combine TypeORM earlier than you can begin writing your queries.
Run this command in your terminal to put in TypeORM and SQLite3 driver — we’ll be utilizing SQLite on this tutorial to scale back the complexity of putting in and organising MySQL or PostgreSQL databases.
npm set up @nestjs/typeorm sqlite3
Generate fundamental app setup
Subsequent, let’s generate controllers and companies for the skeleton of our question utility utilizing the NestJS CLI. Run the next command to generate it and select the REST API transport layer.
npx @nestjs/[email protected] g useful resource posts
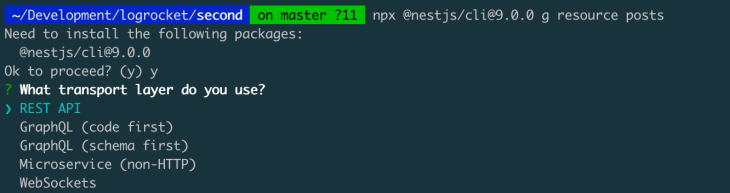
It should ask if you wish to generate CRUD entry factors. Choose Sure. It should take a short time to generate all the things for you, however that’s one of many useful facets of NestJS.
Your listing construction ought to now seem like this:
.
├── README.md
├── dist
├── nest-cli.json
├── package-lock.json
├── package deal.json
├── src
│   ├── app.controller.spec.ts
│   ├── app.controller.ts
│   ├── app.module.ts
│   ├── app.service.ts
│   ├── foremost.ts
│   └── posts
│       ├── dto
│       │   ├── create-post.dto.ts
│       │   └── update-post.dto.ts
│       ├── entities
│       │   └── publish.entity.ts
│       ├── posts.controller.spec.ts
│       ├── posts.controller.ts
│       ├── posts.module.ts
│       ├── posts.service.spec.ts
│       └── posts.service.ts
├── take a look at
├── tsconfig.construct.json
├── tsconfig.json
└── yarn.lock
Configure TypeORM with SQLite
Now, let’s configure TypeORM within the src/app.module.ts file.
Initially, it’ll seem like this:
// src/app.module.ts
import { Module } from '@nestjs/frequent';
import { AppController } from './app.controller';
import { AppService } from './app.service';
import { PostsModule } from './posts/posts.module';
@Module({
  imports: [PostsModule],
  controllers: [AppController],
  suppliers: [AppService],
})
export class AppModule {}
Import SQLite connection choices, the TypeORM module, and the publish entity, as proven within the code under:
Extra nice articles from LogRocket:
// src/app.module.ts
import { Module } from '@nestjs/frequent';
import { TypeOrmModule } from '@nestjs/typeorm';
import { SqliteConnectionOptions } from 'typeorm/driver/sqlite/SqliteConnectionOptions';
import { AppController } from './app.controller';
import { AppService } from './app.service';
import { Submit } from './posts/entities/publish.entity';
import { PostsModule } from './posts/posts.module';

const config: SqliteConnectionOptions = {
  sort: "sqlite",
  database: "../db",
  entities: [Post],
  synchronize: true
}

@Module({
  imports: [PostsModule, TypeOrmModule.forRoot(config)],
  controllers: [AppController],
  suppliers: [AppService],
})
export class AppModule {}
Now, let’s work via the replace we simply added. First, trying on the form of the config object, we added the database and the entities and synchronized the database. Nonetheless, it’s essential to keep in mind that synchronizing the database will not be one thing it is best to do in a manufacturing atmosphere, as it would lead to lack of knowledge.
// the config
const config: SqliteConnectionOptions = {
  sort: "sqlite",
  database: "../db",
  entities: [Post],
  synchronize: true // set to false on manufacturing
}
As a result of we’re utilizing the SQLite database, we will rapidly add the trail to the database with "../db",. If it doesn’t exist, it’s going to mechanically be created for you. For MySQL or PostgreSQL, the shapes are totally different, so take a look at the docs to be taught extra.
Create database entities
The entities are the database fashions and, in our case, our Submit entity has an ID and a title, as proven within the code under:
// src/publish/entities/publish.entity.ts
import { Column, Entity, PrimaryGeneratedColumn } from "typeorm";
@Entity()
export class Submit {
    @PrimaryGeneratedColumn()
    id: quantity;
    @Column()
    title: string;
}
Lastly, on the final app TypeORM setup, let’s hook the TypeORM config with NestJS. Be aware the .forRoot technique since you may see one thing related when organising the feature-level configuration.
imports: [PostsModule, TypeOrmModule.forRoot(config)],
Right here, we now have TypeORM hooked with NestJS. Subsequent, let’s combine our Submit characteristic with the ORM.
Navigate to the src/posts/posts.module.ts file and replace it with the next configuration:
// src/posts/posts.module.ts
import { Module } from '@nestjs/frequent';
import { PostsService } from './posts.service';
import { PostsController } from './posts.controller';
@Module({
  controllers: [PostsController],
  suppliers: [PostsService]
})
export class PostsModule {}
Subsequent, import TypeORM, the Submit entity, and replace the code by setting the worth of the module imports with [TypeOrmModule.forFeature([Post])]. Please word that we’re utilizing forFeature and passing in an array of entities versus the app-level module configuration.
import { Module } from '@nestjs/frequent';
import { PostsService } from './posts.service';
import { PostsController } from './posts.controller';
import { TypeOrmModule } from '@nestjs/typeorm';
import { Submit } from './entities/publish.entity';
@Module({
  imports: [TypeOrmModule.forFeature([Post])],
  controllers: [PostsController],
  suppliers: [PostsService]
})
export class PostsModule {}
Run fundamental queries with TypeORM QueryBuilder in NestJS
There are a number of methods to entry the database utilizing TypeORM and NestJS, together with utilizing the Repository API, the Entity Supervisor API, and through the use of the DataSource API.
Beneath is a fast instance of the best way to get an merchandise by ID utilizing the APIs talked about above. I’ve eliminated many of the code that isn’t related for this instance, however yow will discover the whole code on GitHub.
//src/posts/posts.service.ts

@Injectable()
export class PostsService {

  constructor(
    @InjectRepository(Submit) non-public postRepository: Repository<Submit>,
    @InjectEntityManager() non-public postManager: EntityManager,
    @InjectDataSource() non-public dataSource: DataSource
  ) { }

  async findOne(id: quantity) {

    const postWithRepository = await this.postRepository.findOneBy({ id });

    const postWithRepositoryQueryBuilder = await this.postRepository
      .createQueryBuilder("publish")
      .the place("publish.id= :postId", { postId: id })
      .getOne()

    const postWithEntityManager = await this.postManager
      .createQueryBuilder(Submit, "publish")
      .the place("publish.id= :postId", { postId: id })
      .getOne()

    const postWithDataSource = await this.dataSource
      .createQueryBuilder()
      .choose("publish")
      .from(Submit, "publish")
      .the place("publish.id= :postId", { postId: id })
      .getOne()

    return {
      postWithRepository,
      postWithRepositoryQueryBuilder,
      postWithEntityManager,
      postWithDataSource
    };
  }

}
As you may see, we initialized the info entry layers within the constructor after which used them contained in the strategies.
//src/posts/posts.service.ts
...
constructor(
    @InjectRepository(Submit) non-public postRepository: Repository<Submit>,
  ) { }
...
Apart from this, the remainder of the code is simply vanilla TypeORM queries; you may discover deeper into TypeORM by taking a look at their documentation.
All of the queries within the above code will return the identical consequence. So, there are a number of methods to attain one objective, however which technique is probably the most environment friendly?
When working with small datasets, the 2 strategies carry out equally. Nonetheless, I discovered that the QueryBuilder API was extra environment friendly than the repository queries when working with bigger datasets with a number of relations. I consider it is because the QueryBuilder API is comparatively nearer to the uncooked SQL queries than the Repository API.
Utilizing JOIN queries in TypeORM with NestJS
If you happen to’ve written an SQL Question that entails accessing knowledge from a number of tables with SQL, likelihood is that you just’ve written a JOIN question earlier than. JOIN queries help you question knowledge from a number of tables without delay. Let’s have a look at a LEFT JOIN operation in TypeORM. The sort of question will return all rows from a left desk and matching rows from a proper desk.
There are a number of methods to carry out a LEFT JOIN operation in TypeORM. Let’s study a few of them:
Regardless that our focus is on utilizing the QueryBuilder, I’ll present you an instance that makes use of each choices with the intention to see the variations between the 2.
Let’s have a look at this SQL LEFT JOIN operation under. We’ll convert it to make use of the discover choice and the QueryBuilder technique of TypeORM.
SELECT * FROM "consumer"
LEFT JOIN "programs" "course" ON "course"."id" = "consumer"."courseId"
WHERE "course"."title" = 'JavaScript Fundamentals' AND "course"."size" = '8 hours'
Utilizing discover in TypeORM
userRepository.discover({
    relations: { course: true },
    the place: {
        course: { title: "JavaScript Fundamentals", size: "8 hours" },
    },
})
The code above is a LEFT JOIN question utilizing the TypeORM discover choice. Thankfully, it’s easy as a result of TypeORM figures out the perfect JOIN for you and provides you the suitable consequence. Now, let’s implement the above question with the TypeORM QueryBuilder.
Utilizing the QueryBuilder for JOIN
const consumer = this.userManager
      .createQueryBuilder(Person, "consumer")
      .leftJoin("course"."id", "course")
      .the place("course.title = :title", { title: "JavaScript Fundamentals" })
      .andWhere("course.size = :size", { size: "8 hours" })
When utilizing the QueryBuilder, you even have choices for various kinds of JOINS, in contrast to the discover choice, which does all the things underneath the hood.
Listed here are some extra JOINS which might be out there in TypeORM.
Conclusion
If you happen to’re trying to construct a strong backend rapidly with out compromising high quality, think about using with TypeORM. On this article, we discovered the best way to combine and use TypeORM QueryBuilder with NestJS, however we’ve solely scratched the floor of what you are able to do with TypeORM. Take a look at the TypeORM documentation to be taught extra.
Glad hacking!
LogRocket proactively surfaces and diagnoses a very powerful points in your apps and web sites

Hundreds of engineering and product groups use LogRocket to scale back the time it takes to know the basis explanation for technical and usefulness points. With LogRocket, you’ll spend much less time on back-and-forth conversations with prospects and take away the infinite troubleshooting course of. LogRocket permits you to spend extra time constructing new issues and fewer time fixing bugs.
Be proactive – attempt LogRocket at this time.
