
The collapsible sticky header approach has develop into fairly frequent in trendy cellular apps. On this approach, the header stays fastened on the high, narrows because the consumer scrolls down, and expands because the consumer scrolls again to the highest.
On this tutorial, we’ll go over the underlying rules for constructing a collapsible sticky header utilizing React Native’s ScrollView element. You may then use these rules as the inspiration for making extra superior ones in your future tasks. See the complete demo on Expo Snack.
Feeling excited? Let’s go!
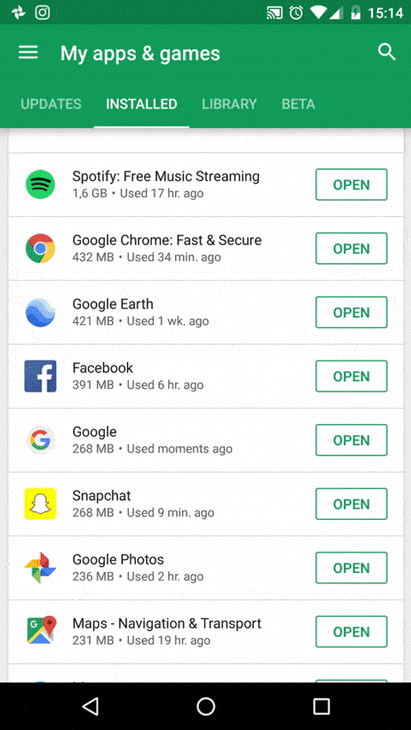
Sometimes, the collapsible header approach is used to cover the least-needed elements of the header to unencumber extra space for the scroll view, as seen within the Google Play cellular app instance beneath.
Using animation additionally provides a easy and pleasant expertise to the app.
Now let’s get began on implementing a collapsible header utilizing the React Native ScrollView element.
What you want to know for this React Native tutorial
This tutorial assumes that you’re aware of JavaScript ES6 and React, the language and library upon which React Native relies. We’ll use Expo Snack as our on-line code editor, which is able to allow us to develop our React Native app contained in the browser.
Utilizing Expo Snack is quicker than organising the dev atmosphere regionally, as you received’t want to put in something. Simply obtain the Expo shopper app in your gadget and hook it to your Expo Snack undertaking through a easy QR scan to get began.
When you’d nonetheless want to arrange the dev atmosphere regionally, observe the atmosphere setup directions within the React Native docs to information you on how to take action earlier than continuing with this tutorial.
Extra nice articles from LogRocket:
Step one is to create a brand new file known as DynamicHeader.js inside your parts listing. This file is on your collapsible header element.
Subsequent, contained in the DynamicHeader.js file, we’ll start by importing React and a few React Native UI parts. Then, we’ll create a really primary element that returns nothing for now.
import * as React from 'react';
import { Textual content, View, StyleSheet, Animated } from 'react-native';

const DynamicHeader = ({animHeaderValue}) => {
  return null;
};

export default DynamicHeader;
You may see that the perform above takes in animHeaderValue as an argument, however what does animHeaderValue imply? As a way to reply this, let’s briefly change from our DynamicHeader.js file to our App.js file.
At the beginning of our App.js file, we’ll import the React library, the useRef hook, the DynamicHeader which we simply created, and sure parts wanted to construct the UI.
import React, { useState, useRef } from 'react';
import AnimatedHeader from './parts/AnimatedHeader';
import { SafeAreaView, ScrollView, Textual content, View, Animated, StyleSheet } from 'react-native';
Beneath the imports, we now have the App() perform. Inside it, the very first thing we’ll do is use the useRef() hook from React to arrange a reference that can monitor scrollOffsetY, which represents the quantity of distance by which the scroll view offsets its preliminary place alongside the horizontal axis.
export default perform App() {
  const scrollOffsetY = useRef(new Animated.Worth(0)).present;

}
As a way to animate components in React Native, we want Animated.Worth from the Animated library.
Utilizing Animated.Worth, we set the preliminary worth of the scroll place to 0. scrollOffsetY might be up to date with the present place of the scroll view each time the consumer scrolls. It’s this worth that we then cross right down to <DynamicHeader> as a prop.
return (
      <SafeAreaView type={{ flex: 1 }} forceInset={{ high: 'at all times' }}>
        <DynamicHeader animHeaderValue={scrollOffsetY} />
        <View type={{ flex: 1, alignItems: 'heart' }}>
          <Textual content>Open up App.js to start out working in your app!</Textual content>
        </View>
      </SafeAreaView>
  );
Now that we perceive the place the argument animHeaderValue of DynamicHeader() comes from, it’s time to complete the header.
Again in element/DynamicHeader.js, we’ll proceed by defining three constants above the element perform:
// Imports

const Max_Header_Height = 200;
const Min_Header_Height = 70;
const Scroll_Distance = Max_Header_Height - Min_Header_Height

const Header = ({scrollOffsetY}) => {
  return null;
};
Max_Header_Height: The utmost peak of the headerMin_Header_Height: The minimal peak of the headerScroll_Distance: The distinction between the utmost and minimal header peak
Now that we now have these values saved in variables, we’ll use the interpolate() perform from Animated.Worth to animate the header’s peak towards the present worth of scrollOffsetY.
const animatedHeaderHeight =  animatedValue.interpolate({
    inputRange: [0, Scroll_Distance],
    outputRange: [Header_Max_Height , Header_Min_Height],
    extrapolate: 'clamp'
  })
What it will do is animate the header between a most and minimal peak on the identical price at which the inputRange worth goes from 0 to Scroll_Distance. We additionally set the extrapolate property to outline how the interpolation ought to function.
We will additional improve the consumer expertise by animating different properties in addition to the header peak, such because the background coloration, padding, and each different animatable CSS property.
To display this, let’s additionally animate the background coloration from blue to crimson, interpolating the in-between coloration values:
const animateHeaderBackgroundColor = animHeaderValue.interpolate({
    inputRange: [0, Header_Max_Height - Header_Min_Height],
    outputRange: ['blue', 'red'],
    extrapolate: 'clamp'
  })
Now, let’s apply these animations to Animated.View with the intention to animate our DynamicHeader element:
const AnimatedHeader = ({ animatedValue }) => {
  // ...
  return (
    <Animated.View
        type={[
          styles.header,
          {
            height: animateHeaderHeight,
            backgroundColor: animateHeaderBackgroundColor
          }

        ]}
      >
        <Textual content type={kinds.headerText}>
          A Record of Books
        </Textual content>
    </Animated.View>
  );
};
Right here we’re making use of some kinds to the header and its textual content — you may see the complete stylesheet beneath. Then, for each the peak and backgroundColor properties, we cross the 2 interpolation capabilities (animatedHeaderHeight and animateHeaderBackgroundColor) to use the animations.
To finish this part, right here’s the rest of the stylesheet for this element:
const kinds = StyleSheet.create({
  header: {
    justifyContent: 'heart',
    alignItems: 'heart',
    left: 0,
    proper: 0,
    paddingTop: 10
  },
  headerText: {
    coloration: '#fff',
    fontSize: 25,
    fontWeight: 'daring',
    textAlign: 'heart'
  },
});
To ensure that the animation to work, we’ll must create a <ScrollView> for the header to animate towards. <ScrollView> will render the next listing of programming books, which fits inside a information.js file in your root folder:
export const DATA = [
  {
    id: 1,
    title: 'Modern JS: A curated collection'
  },
  {
    id: 2,
    title: 'JavaScript notes for professionals'
  },
  {
    id: 3,
    title: 'JavaScript: The Good Parts'
  },
  {
    id: 4,
    title: 'JavaScript: The right way'
  },
  {
    id: 5,
    title: 'Exploring ES6'
  },
  {
    id: 6,
    title: 'JavaScript Enlightenment'
  },
  {
    id: 7,
    title: 'You dont know JS'
  },
  {
    id: 8,
    title: 'Learn JavaScript'
  },
  {
    id: 9,
    title: 'JavaScript succintly'
  },
  {
    id: 10,
    title: 'Human JavaScript'
  },
  {
    id: 11,
    title: 'JavaScript design patterns'
  },
  {
    id: 12,
    title: "JS50: 50 illustrations in JS"
  },
  {
    id: 13,
    title: 'Eloqent JavaScript'
  },
  {
    id: 14,
    title: 'Practical ES6'
  },
  {
    id: 15,
    title: 'Speaking JavaScript'
  }
];
Then again in App.js, we’ll proceed from the place we left off. First, we’ll import the books information on the high of the file, among the many different imports :
// Different imports
import { DATA } from './information';
After importing the information, we’ll modify the App() perform by including a <ScrollView> to our view, slightly below <DynamicHeader>.
As seen beneath, the <ScrollView> takes in a few crucial props to configure the scroll view. The primary and most necessary prop is the onScroll prop, which runs each time the consumer scrolls the <ScrollView>.
In response to the consumer scroll, we use the Animated.occasion perform to map the horizontal scroll offset worth along with scrollOffsetY.
export default perform App() {
  let scrollOffsetY = useRef(new Animated.Worth(0)).present;

  return (
    <SafeAreaView type={kinds.container}>
      <DynamicHeader animHeaderValue={scrollOffsetY} />
      <ScrollView
        scrollEventThrottle={16}
        onScroll={Animated.occasion(
          [{ nativeEvent: { contentOffset: { y: scrollOffsetY}}}],
          {useNativeDriver: false}
        )}
      >
            {DATA.map((guide, index) => {
              return (
                  <Textual content type={kinds.scrollText} key={guide.id}>{guide.title}</Textual content>
              )
            })}
      </ScrollView>
    </SafeAreaView>
  );
}
The opposite prop, scrollEventThrottle — which is a React Native prop particular to iOS apps — controls how typically the scroll occasion might be fired whereas scrolling (as a time interval in milliseconds). Any worth starting from 10 to 16 is perfect for efficiency.
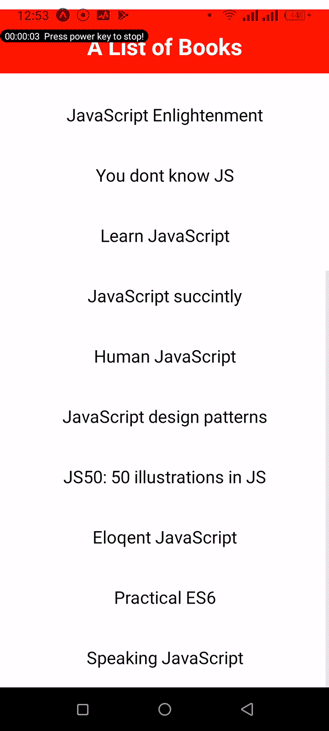
Right here’s the end result on an Android gadget:
See the complete demo on Expo Snack.
Conclusion
Utilizing a collapsible header on scroll drastically improves the consumer expertise for React Native apps, particularly for functions with a fancy header construction. Cellular apps ought to at all times be structured in such a approach that they’ll neatly alter to the customers’ wants.
Have a fantastic week.
LogRocket: Immediately recreate points in your React Native apps.

LogRocket is a React Native monitoring answer that helps you reproduce points immediately, prioritize bugs, and perceive efficiency in your React Native apps.
LogRocket additionally helps you enhance conversion charges and product utilization by exhibiting you precisely how customers are interacting along with your app. LogRocket’s product analytics options floor the the reason why customers do not full a selected movement or do not undertake a brand new characteristic.
Begin proactively monitoring your React Native apps — strive LogRocket without cost.
