FastAPI is an online framework for constructing APIs with Python ≥v3.6 that’s based mostly on commonplace Python-type hints. What makes FastAPI stand out is its concentrate on trendy Python, excessive efficiency, and ease of use. However, you could be questioning how Docker containers come into the FastAPI dialog.
Think about that you just’re constructing a REST API and it’s essential use PostgreSQL, Redis, Celery, RabbitMQ, and a bunch of different dependencies. The primary downside you’d run into is configuring all these dependencies in your machine. This setup course of could possibly be a trouble, nevertheless, there’s one other, extra urgent downside.
What for those who’re growing on Linux, however your colleague develops on Home windows? It’s important to take into account that some dependencies that work effectively on Linux don’t work effectively on Home windows. And even for those who one way or the other handle to get previous the event section, what in case your improvement atmosphere isn’t constant together with your deployment atmosphere? All these issues sum as much as one factor, portability.
To make your undertaking extra moveable, you may develop in an remoted atmosphere that has the undertaking code and all of the dependencies put in, which is precisely what Docker containers does.
Docker isn’t unique to FastAPI; we are able to use Docker to containerize most initiatives no matter what languages or frameworks are used. On this article, we’ll learn to containerize a FastAPI utility with Docker.
Conditions
- Familiarity with the fundamentals of Python and FastAPI
- Familiarity with the fundamentals of Docker
- Python ≥v3.7
- Python Pip, the bundle supervisor
- Docker put in in your machine
Desk of contents
Establishing our improvement atmosphere
Let’s create a rudimentary FastAPI utility with one endpoint that returns a listing of customers.
To create a digital atmosphere, run python3 -m venv env-name on Unix and macOS or python -m venv env-name on Home windows. Change env-name with the title you selected in your digital atmosphere.
To activate the digital atmosphere, run supply env-name/bin/activate on Unix and macOS or .env-nameScriptsactivate on Home windows.
Within the listing the place you wish to begin your undertaking, run mkdir demo_app, which can create a brand new folder referred to as demo_app in that listing:
- Run
cd demo_app - Run
pip set up fastapi[all] - Run
pip freeze > necessities.txtto create a necessities file within thedemo_appfolder with all of the put in dependencies
Including the Python code
Launch the demo_app folder within the IDE of your selection. Create a file referred to as demo_app/[main.py](<http://principal.py>) and add the snippet under into the principal.py file:
from fastapi import FastAPI

app = FastAPI()

@app.get("https://weblog.logrocket.com/")
async def root():
    return {"message": "Howdy World"}

@app.get("/customers")
async def customers():
    customers = [
        {
            "name": "Mars Kule",
            "age": 25,
            "city": "Lagos, Nigeria"
        },

        {
            "name": "Mercury Lume",
            "age": 23,
            "city": "Abuja, Nigeria"
        },

         {
            "name": "Jupiter Dume",
            "age": 30,
            "city": "Kaduna, Nigeria"
        }
    ]

    return customers
We created two endpoints, one returns “Howdy, World!” and the second, /customers, returns a dummy record of customers. Subsequent, run uvicorn principal:app --reload to begin your FastAPI utility.
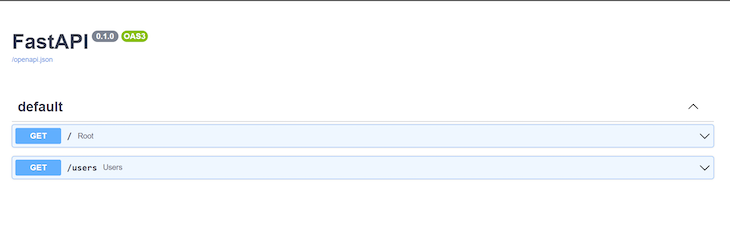
Level your browser to [http://127.0.0.1:8000](<http://127.0.0.1:8000/>)/docs. It’s best to see the 2 endpoints we simply added documented:
To check the endpoint, level your browser to [http://127.0.0.1:8000](<http://127.0.0.1:8000/>)/customers. It ought to return the dummy record of customers, as proven within the picture under:

Now, we now have a primary FastAPI utility, however to enhance the event expertise, we are able to remove the necessity to create a digital atmosphere and set up the undertaking dependencies manually. This optimization would deal with what dependencies to put in, the place to put in them, and learn how to set up them when porting our undertaking to different platforms. Let’s learn to do that with Docker.
Dockerizing our FastAPI utility
By operating the undertaking inside a Docker container, we are able to remove the necessity to create a digital atmosphere and having to put in undertaking dependencies manually.
Docker container
You’ll be able to consider a Docker container as a small pc that runs on one other pc. Basically, a Docker container is simply an remoted atmosphere on some machine that accommodates a undertaking’s code and its dependencies.
After we containerize or dockerize our FastAPI utility, we’re basically creating a light-weight digital field with our undertaking’s dependencies put in and our FastAPI code configured to run. Consequently, anybody with our digital field may run our utility with out having to take care of the low-level undertaking configuration logistics.
Most significantly, we may merely add this virtual-box to our staging or manufacturing server to make our utility go reside with out having so as to add a variety of configuration.
Docker picture
In our instance, what we share with different individuals or deploy to our servers isn’t the container or virtual-box itself, however the guide for creating the container. You most likely already know this guide because the Docker picture.
A Docker picture accommodates step-by-step directions for constructing a container. Containers are spun from pictures through the construct step. However, to create a Docker picture, we first want to jot down a Docker file.
To containerize our FastAPI utility, we have to observe three steps:
- Write a Dockerfile
- Construct a Docker picture from our Dockerfile
- Spin up a container from the Docker picture we constructed
Let’s discover every step additional.
Writing our Dockerfile
Create a demo_app/Dockerfile file and add the code snippet under:
FROM python:3-slim-buster

RUN mkdir /code

WORKDIR /code

COPY necessities.txt .

RUN pip set up -r necessities.txt

COPY . .

CMD ["uvicorn", "main:app", "--host=0.0.0.0", "--port=80"]
We populated our Dockerfile with a set of directions that the Docker daemon would observe chronologically to construct our picture when issued the command.
If you set up Docker, it mechanically installs the Docker shopper, which accepts Docker instructions in your terminal and the Docker daemon. Consider the Docker daemon as Docker’s backend, the primary entity that processes instructions obtained by the Docker shopper.
Let’s make sense of what every command in our Dockerfile above means. The FROM instruction units the official Python picture as the bottom. It instructs the Docker daemon to construct our picture on prime of an current picture. Docker adopts this layered strategy to boost reusability.
RUN mkdir /code creates a code listing within the picture when it’s constructed and ultimately the container when it’s created.
Extra nice articles from LogRocket:
The WORKDIR instruction units the default working listing to the newly created /code listing. This working listing shall be relevant to any subsequent COPY, ADD, RUN, and CMD directions.
The primary COPY instruction provides the necessities.txt file to the present working listing. The RUN instruction executes the pip set up -r necessities.txt command. This command would set up the dependencies listed within the necessities file in our container.
The second COPY instruction copies the remainder of the content material from the present listing . of the host filesystem to the working listing . contained in the picture and ultimately the container. Lastly, the CMD instruction units the command for operating our utility’s server revealed on port 8080.
Constructing the Docker picture from our Dockerfile
Go to your demo_app listing in your terminal after which run the next command:
docker picture construct --tag demo-app-image .
To construct our picture, the Docker daemon wants just a few items of knowledge. For one, it wants the title of the Dockerfile to make use of. If this isn’t handed, Docker appears for a file named Dockerfile within the working listing. When you title your file something aside from Dockerfile, then you should move the title of the file utilizing the --file possibility:
docker picture construct --file custom-docker-file-name --tag demo-app-image
Docker additionally wants the construct context. The construct context is the listing that’s accessible to Docker through the construct course of. In our case, we specified the present working listing because the construct context with ..
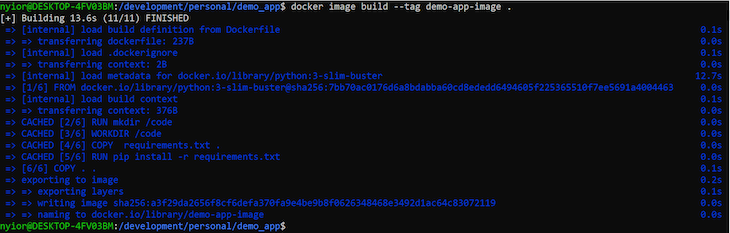
If the picture construct was profitable, you need to get an output much like the picture under:
At this level, you need to have a picture referred to as demo-app-image in your machine. You’ll be able to run the docker picture ls command to see a listing of all the photographs you’ve created or pulled to your native machine from the registry.
Operating the container from our Docker picture
Run the command under to spin up a container from our demo-app-image:
docker container run --publish 80:80 --name demo-app-container demo-app-image
The --name possibility creates a container with the title demo-app-container that’s based mostly on the demo-app-image. The --publish possibility forwards requests coming by way of port 8080 on our native machine to port 8080 in our container.
If the command works, you need to get the next output in your terminal:

You’ll be able to level your browser to [http://localhost:80/docs](http://localhost/docs) to go to the documentation web page. You may also take a look at the /customers endpoint. That’s it!
Subsequent steps
Docker containers make our initiatives extra moveable. Keep in mind that what we share with different individuals or push to our deployment atmosphere isn’t the container itself, however the picture. Normally, we share a picture by publishing it to a public registry just like the Docker Hub.
Nonetheless, it’s not at all times the case that we’d need our picture to be publicly accessible. In that case, we may push our Dockerfile together with the undertaking code and produce other members of the workforce construct the picture and run the container on their finish.
Conclusion
On this article, we’ve discovered learn how to simplify regionally organising a FastAPI undertaking or deploying to a staging or manufacturing atmosphere with Docker containers.
Basically, a Docker container creates a virtual-box-like remoted atmosphere that bundles our utility code with its dependencies. Consequently, it’s simpler to deploy our utility wherever with out having to fret about platform-specific inconsistencies.
To containerize a FastAPI utility or simply any utility with Docker, first, we have to add a Dockerfile to the undertaking, construct a picture from the Dockerfile, and run a container from the picture. Whereas Docker is the preferred containerization expertise on the market, it’s not the one one.
