
Replace notice: Ricardo Santos up to date this tutorial for Unreal Engine 5. Tommy Tran wrote the unique.
As of model 4, the Unreal Engine editor comes outfitted with the Blueprints visible scripting system along with conventional C++ help. This method’s important objective is to offer a friendlier programming interface than good ol’ C++, permitting the quick creation of prototypes and even permitting designers to customise sport ingredient habits.
The Blueprint scripting system’s important function is the flexibility to create code by creating bins that symbolize features and clicking and dragging wires to create habits and outline how the logic ought to work.
On this tutorial, you’ll use Blueprints to:
- Arrange a top-down digicam.
- Create a player-controlled actor with primary motion.
- Arrange participant inputs.
- Create an merchandise that disappears when the participant touches it.
This tutorial additionally makes primary use of vectors. Should you’re not accustomed to vectors, take a look at this article on vectors at gamedev.internet
Getting Began
Obtain the starter mission by clicking the Obtain Supplies button at both the highest or backside of this tutorial and unzip it. To open the mission, go to the starter mission folder and open BananaCollector.uproject.
Notice: Should you get a message saying the mission was created with an earlier model of the Unreal editor, that’s OK so long as it’s nonetheless an Unreal Engine 5 model (the engine is up to date ceaselessly). Select both to open a replica or to transform in place.
You’ll see the scene under. That is the place the participant will transfer round and accumulate the gadgets.

You’ll discover the mission information organized in folders:
- All/Content material/BananaCollector/Blueprints: Comprises the Blueprints of the tutorial.
- All/Content material/BananaCollector/Maps: Comprises the extent of the mission.
- All/Content material/BananaCollector/Supplies: Comprises the sport object shaders.
- All/Content material/BananaCollector/Meshes: Comprises the mesh information of all of the mission sport objects.
- All/Content material/BananaCollector/Textures: Comprises the textures of the mission sport objects.

Use the button highlighted in purple above to maintain the Content material Drawer fastened on the Editor window. If the button doesn’t seem, the Content material Drawer is already fastened.
Creating the Participant
Within the Content material Drawer, navigate to the Blueprints folder. Click on the Add button and choose Blueprint Class.
The actor should have the ability to obtain inputs from the participant, so choose the Pawn class from the pop-up window and title it BP_Player.

To know extra concerning the variations between the Character and the Pawn, learn this text by Epic Video games.
Attaching a Digicam
A digicam is the participant’s technique of wanting into the world. You’ll create a digicam that appears down towards the participant.
Within the Content material Drawer, double-click on BP_Player to open it within the Blueprint editor.
To create a digicam, go to the Elements panel. Click on Add Element and choose Digicam.

For the digicam to be in a top-down view, you should place it above the participant. With the digicam part chosen, go to the Viewport tab.
Activate the transfer manipulator by urgent the W key after which transfer it to (-1100, 0, 2000). Alternatively, sort the coordinates into the Location fields. They’re below the Rework part within the Particulars panel.

Should you’ve overpassed the digicam, press the F key to deal with it.
Subsequent, activate the rotation manipulator by urgent the E key. Rotate the digicam right down to -60 levels on the Y-axis.

The ultimate digicam properties must be as proven under.

Representing the Participant
A purple dice will symbolize the participant, so that you’ll want to make use of a Static Mesh part to show it.
First, deselect the Digicam part by left-clicking an empty house within the Elements panel. Should you don’t do that, the subsequent added part might be a baby of the Digicam part.
Click on Add and choose Static Mesh.

To show the purple dice, choose the Static Mesh part after which go to the Particulars tab. Click on the drop-down positioned to the best of Static Mesh and choose SM_Cube.

That is what you need to see (sort F contained in the Viewport to deal with this when you don’t see it):

Now, it’s time to spawn the participant Pawn. Click on Compile and return to the primary editor.

Implementing the Participant
Earlier than the participant can management the Pawn, you should specify two issues:
- The Pawn class the participant will management
- The place the Pawn will spawn
You accomplish the primary by creating a brand new Sport Mode class.
Making a Sport Mode
A Sport Mode is a category that controls how a participant enters the sport. For instance, in a multiplayer sport, you’ll use Sport Mode to find out the place every participant spawns. Extra importantly, the Sport Mode determines which Pawn the participant will use.
Go to the Content material Drawer and make sure you’re within the Blueprints folder. Click on the Add New button and choose Blueprint Class.
From the pop-up window, choose Sport Mode Base and title it GM_Tutorial.

Now, you should specify which Pawn class would be the default. Double-click on GM_Tutorial to open it.
Go to the Particulars panel and look below the Courses part. Click on the drop-down for Default Pawn Class and choose BP_Player.

Click on Compile and shut the Blueprint editor. Earlier than utilizing your new Sport Mode, the extent must know which Sport Mode to make use of. Specify this in World Settings.
World Settings
Every degree has its settings. Entry the settings by deciding on menu Window ▸ World Settings. Alternatively, go to the toolbar and choose Settings ▸ World Settings.

A brand new World Settings tab will open subsequent to the Particulars tab. From right here, click on the drop-down for GameMode Override and choose GM_Tutorial.

You’ll now see that the courses have modified to those chosen in GM_Tutorial.

Lastly, you should specify the place the participant will spawn. You do that by putting a Participant Begin actor into the extent.
Putting the Participant Begin
Whereas spawning a participant, the Sport Mode seems to be for a Participant Begin actor. If the Sport Mode finds one, it can try to spawn the participant there.
To put a Participant Begin, go to the Toolbar, click on the Add New button, and navigate to Fundamental ▸ Participant Begin. Left-click and drag Participant Begin from the Modes panel into the Viewport. Releasing left-click will place it.

Place this wherever you want. If you’re executed, go to the Toolbar and click on Play. You’ll spawn the place you positioned the Participant Begin.

To exit the sport, click on the Cease button within the Toolbar or press the Esc key. Should you can’t see your cursor, press Shift+F1.
It’s not a lot of a sport when you can’t transfer round, proper? Your subsequent process is to arrange the enter settings.
Setting Up Inputs
Earlier than organising the participant inputs, it’s good to know a bit about key bindings and the right way to use them to create participant enter flexibly and powerfully.
In Unreal, you possibly can arrange key bindings that set off an occasion if you press them. Occasions are nodes that execute when sure actions occur (on this case, if you press the certain key). When the occasion triggers, any nodes hooked as much as the occasion will execute.

This technique of binding keys is useful as a result of it means you don’t must laborious code keys.
For instance, you bind left-click and title it Shoot. Any actor that may shoot can use the Shoot occasion to know when the participant has pressed left-click. If you wish to change the important thing, change it within the enter settings.

Should you had hard-coded it, you would need to undergo every actor and alter the keys individually.
Axis Worth and Enter Scale
In Unreal, the enter is learn by means of axis values decided within the mission settings.
An axis worth is a numerical worth decided by the enter sort and the way you employ it. Buttons and keys output 1 when pressed. Thumbsticks output a price between -1 and 1 relying on the route and the way far you push it.

Use the axis worth to regulate a Pawn’s velocity. For instance, when you push the thumbstick to the sting, the axis worth might be 1. Should you push it midway, it is going to be 0.5.
Modify the velocity with the thumbstick by multiplying the axis worth with a velocity variable.

It’s also possible to use the axis worth to specify a route alongside an axis. Should you multiply a Pawn’s velocity by a constructive axis worth, you get a constructive offset. Utilizing a unfavourable axis worth will end in a unfavourable offset. Including this offset to the Pawn’s location determines its route.

As a result of keyboard keys can solely output an axis worth of 1 or 0, you should utilize scale to transform it to a unfavourable. It really works by taking the axis worth and multiplying it by the size.
Should you multiply a constructive (the axis worth) with a unfavourable (the size), you get a unfavourable.
Now, on to creating the mappings for this mission.
Axis and Motion Mappings
To view the enter settings, go to Edit ▸ Venture Settings. Or click on the Settings button on the highest left of the editor window.

On the left, choose Enter below the Engine part.

The Bindings part allows you to arrange your inputs.

Unreal offers two strategies to create key bindings:
- Motion Mapping: These can solely be in two states: pressed or not pressed. Motion occasions will solely set off when you press or launch the important thing. Use this for actions that don’t have an in-between state, comparable to firing a gun.
- Axis Mapping: These output a numerical worth known as an axis worth (extra on that later). Axis occasions will fireplace each body. You typically use this for actions requiring a thumbstick or mouse.
For this tutorial, you’ll use axis mappings.
Creating Motion Mappings
First, you’ll create two axis mapping teams. Teams assist you to bind a number of keys to 1 occasion.
To create a brand new axis mapping group, click on the + signal to the best of Axis Mappings. Create two teams and title them MoveForward and MoveRight.

MoveForward will deal with shifting ahead and backwards. MoveRight will deal with shifting left and proper.
You’ll map motion to 4 keys: W, A, S and D. Presently, there are solely two slots to map keys. Add one other axis mapping to every group by clicking the + signal subsequent to the group title discipline.

To map a key, click on the drop-down to deliver up a listing of keys. Map the W and S keys to MoveForward. Map the A and D keys to MoveRight.

Set the size of the S and A keys by clicking the Scale discipline and getting into -1.

Subsequent comes the enjoyable half: making the Pawn transfer! Shut the Venture Settings after which open up BP_Player within the Blueprints editor by double-clicking it.
Transferring the Participant
First, you should get the occasions to your motion mappings. Within the BP_Player blueprint, click on the Occasion Graph tab on the highest of the window.

Proper-click an empty house within the Occasion Graph to get a listing of nodes. From the menu, seek for MoveForward. Add the MoveForward node listed below Axis Occasions.

Repeat the method for MoveRight.

Now, you’ll arrange the nodes for MoveForward.
Utilizing Variables
To maneuver, you should specify how briskly the Pawn is shifting. A simple approach to specify the velocity is by storing it in a variable.
To create one, go to the My Blueprint tab and click on the + signal to the best of the Variables part.

After creating your new variable, Unreal means that you can give it a reputation. Set it to MaxSpeed. Afterward, within the Particulars tab, change the variable sort to Float. Do that by clicking the drop-down subsequent to Variable Sort and deciding on Float.

Subsequent, you should set the default worth. Earlier than setting it, although, you should click on Compile within the Toolbar to sync the default worth discipline’s sort with the newly chosen Float variable sort.
Together with your variable nonetheless chosen, return to the Particulars tab. Go to the Default Worth part and alter the default worth of MaxSpeed to 10.

Subsequent, drag-click the MaxSpeed variable from the My Blueprint tab into the Occasion Graph. Choose Get from the menu.

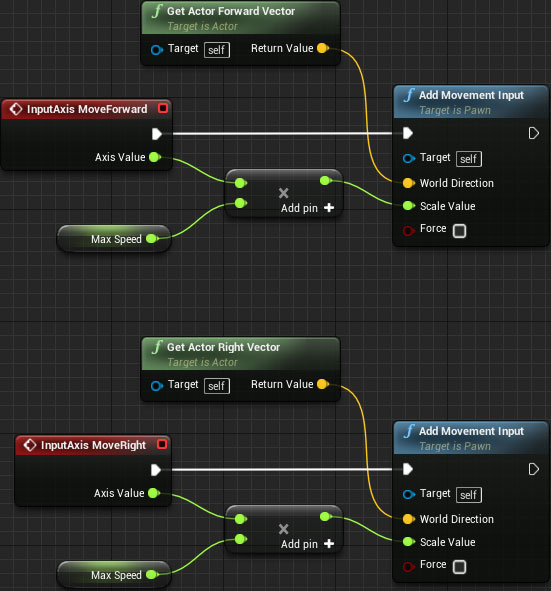
You’ll now multiply MaxSpeed and the axis worth to find out the ultimate velocity and route. Add a float * float node and join Axis Worth and MaxSpeed to it.

Getting the Participant Path
To maneuver ahead, you should know the place the Pawn is going through. Fortunately, Unreal has a node for that objective. Add a Get Actor Ahead Vector node.

Subsequent, add an Add Motion Enter node. This node will take a route and worth and convert it to a saved offset. Join the nodes like so:

The white line represents a sequence of execution. In different phrases, when the participant strikes the enter axis, an occasion will generate that may execute the InputAxis MoveForward node. The white line represents that after this occurs, you’ll execute the Add Motion Enter node.
The Add Motion Enter node takes the next inputs:
- Goal: Set to self, which on this case is the participant (the purple dice).
- World Path: The route to maneuver the goal, which on this case is the route the participant is going through.
- Scale Worth: How a lot to maneuver the participant, which on this case is the max velocity * the axis worth (which, bear in mind, is a price within the vary of -1 to 1).
Repeat the method for MoveRight however substitute Get Actor Ahead Vector with Get Actor Proper Vector. See how a lot you are able to do with out reviewing the directions above!
Including the Offset
To maneuver the Pawn, you should get the offset calculated by Add Motion Enter and add it to the Pawn’s location.
Your technique might be to maneuver the participant a small quantity every body of your sport, so that you’ll want so as to add the motion to an Occasion Tick occasion, which is generated each body.
Navigate to the Occasion Tick node in your Occasion Graph. It must be grayed out to the left, however create one when you don’t have it.

To get the offset, create a Devour Motion Enter Vector node. So as to add the offset, create an AddActorLocalOffset node. Afterward, hyperlink them like so:
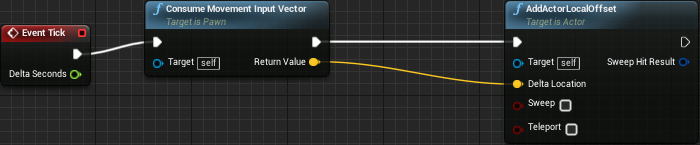
Because of this for every body of the sport, you’ll get any saved motion enter and add it to the actor’s present location.
Click on Compile and return to the primary editor and click on Play. You’ll now have the ability to transfer round! Should you discover there’s no response to urgent the keys, make sure that the cursor is inside the sport window and click on to pick out it.

There’s one small drawback: Excessive-end machines can render frames extra rapidly. As a result of Occasion Tick is named each body, the motion nodes will execute extra usually. This ends in the Pawn shifting quicker on high-end machines and vice versa.
To repair this, your motion must be body fee unbiased.
Body Fee Independence
Body fee independence means every little thing can have the identical outcome, no matter body fee. Fortunately, attaining body fee independence in Unreal is simple.
Exit the sport and open up BP_Player. Subsequent, navigate to your Occasion Tick node and check out Delta Seconds.

Delta Seconds is the period of time elapsed because the final Occasion Tick. By multiplying your offset with Delta Seconds, you make your motion body fee unbiased.
For instance, your Pawn has a most velocity of 100. If one second had handed because the final Occasion Tick, your Pawn would transfer the total 100 items. If half a second had handed, it might transfer 50 items.

If the motion is body fee dependent, the Pawn will transfer 100 items each body, whatever the time between frames.
To multiply your offset with Delta Seconds, add a multiplication node by right-clicking and looking for * within the dialog, as proven within the determine under. Discover the connectors initially are grayed out as a result of UE5 doesn’t know what you wish to multiply, and as you assign values, the connectors assume the enter information’s shade.

The ultimate outcome ought to appear like this:

As a result of the time between frames (Delta Seconds) could be very small, your Pawn will transfer a lot slower. Repair this by altering the default worth of MaxSpeed to 600.
![]()
Congratulations, you may have achieved body fee independence!

You might need observed the dice passes proper by means of every little thing. To repair that, you should find out about collisions.
Strap in your security helmet since you’re about to have a head-on collision with some concept!
Actor Collisions
If you consider a collision, you most likely consider automobiles crashing into one another. Fortunately, collisions in Unreal are a lot safer.
To collide, an actor wants a illustration of its collidable house (often known as collision). Use one of many following:
- Collision mesh: These are auto-generated (when you allow it) when a mesh will get imported. The person can even create a customized collision mesh utilizing 3D software program. The purple dice already has an auto-generated collision mesh.
- Collision part: These are available three shapes: field, capsule and sphere. Add them by means of the Elements panel. Typically used for easy collision.
Under is an instance of a personality and its collision.
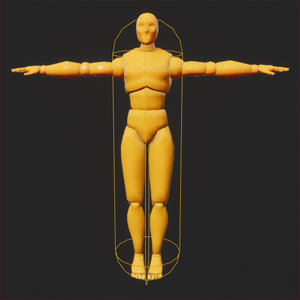
A collision happens when an actor’s collision touches one other actor’s collision.

Now, it’s time to allow collision.
Enabling Collision
You’re most likely questioning why the dice didn’t collide, although it has a collision mesh. If you transfer an actor, Unreal solely considers the root part for collisions. As a result of your Pawn’s root part has no collision, it passes by means of every little thing.
Notice: An actor that doesn’t have their collision as the basis can nonetheless block different actors. However when you transfer the actor, it received’t collide with something.
So, to make use of the collision mesh, StaticMesh must be the root. To do that, go to the Elements panel. Subsequent, left-click and drag StaticMesh to DefaultSceneRoot. Launch left-click to make StaticMesh the brand new root.

There’s yet another factor to do earlier than collisions will work. Change to the Occasion Graph and go to the AddActorLocalOffset node. Find the Sweep enter and set it to true by left-clicking the checkbox.
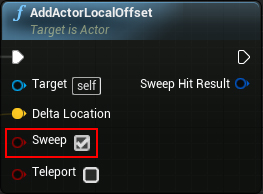
Mainly, AddActorLocalOffset teleports the actor to a brand new location. Sweep ensures the actor collides with something between the outdated and new places.
Go to the primary editor and click on Play. The dice will now collide with the extent!

The very last thing you’ll do is create an merchandise that disappears when the participant touches it.
Creating an Merchandise
Typically, an merchandise is something the participant can accumulate. You’ll use BP_Banana because the merchandise.
To detect when the dice touches the merchandise, you want an occasion node that triggers when there’s a collision. Use collision responses to generate such occasions.
A collision response additionally determines how an actor reacts when colliding with one other actor. There are three forms of collision responses: Ignore, Overlap and Block. Right here is how they work together with one another:
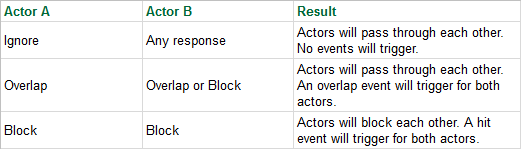
Though you should utilize both Overlap or Block, this tutorial will solely present you the right way to use Overlap on the gadgets.
Setting the Collision Response
Exit the sport and open BP_Banana. Choose the StaticMesh part after which go to the Particulars panel. The Collision part is the place you’ll set the collision response. Should you click on the arrow to broaden the menu, you’ll see that almost all settings are grayed out.

To make them editable, left-click the drop-down subsequent to Collision Presets. Choose Customized from the record.

It’s worthwhile to specify the collision response between the merchandise and the dice.
Elements have an attribute known as object sort. The thing sort is only a handy approach to group related actors. Learn extra about object sorts right here.
As a result of the dice’s sort is WorldDynamic, you wish to change the collision response to that sort. Underneath the Collision Responses part, change the collision response of WorldDynamic to Overlap. Do that by left-clicking the center checkbox to the best of WorldDynamic.

Dealing with Collision
To deal with collision, you should use an overlap occasion. Go to the Elements panel and right-click on StaticMesh. From the context menu, choose Add Occasion ▸ Add OnComponentBeginOverlap.

This provides the OnComponentBeginOverlap (StaticMesh) node to your Occasion Graph.

Lastly, create a DestroyActor node and hyperlink it to the OnComponentBeginOverlap (StaticMesh) node. As its title suggests, it can take away the focused actor from the sport. Nonetheless, as a result of there’s no goal, it can destroy the actor that known as it.

Putting the Merchandise
Shut the Blueprint editor and make sure you’re within the Blueprints folder.
Begin putting bananas into the extent by left-clicking and dragging BP_Banana into the Viewport.

Click on Play and begin amassing the bananas!
The place to Go From Right here?
You may obtain the finished mission information by clicking Obtain Supplies on the high or backside of the tutorial.
You’re now one step nearer to changing into an Unreal Engine professional. Hopefully this tutorial didn’t drive you bananas.
