
Desk of Contents
When constructing a sturdy and scalable API, it’s vital to implement correct validation inside your utility not solely when it comes to safety but in addition to maintain your database clear. In case you’re working with strong backend APIs, NestJS generally is a useful gizmo to make use of, and, you may add object validation with NestJS and Joi to make your utility safe.
This text will present you learn how to implement Joi object validation in NestJS through a primary CRUD instance.
What’s NestJS?
Closely impressed by Angular, NestJS is an particularly well-liked framework for constructing scalable and strong functions. It supplies a clear structure based mostly on modules, controllers, and suppliers that will help you get began. It helps TypeScript, however you too can write your functions with vanilla JavaScript.
NestJS doesn’t impose any programming paradigm on you. You’re free to make use of object-oriented, practical, or practical reactive programming. It additionally supplies a superb routing mechanism below the hood and natively helps the HTTP server framework Categorical. You can even configure your NestJS utility to make use of Fastify.
The constructing blocks of NestJS
NestJS has three major constructing blocks: modules, controllers, and suppliers.
- Modules: modules are used to modularize the codebase and cut up it into reusable elements. TypeScript information which might be grouped are described with the
@Moduledecorator to supply metadata. NestJS makes use of these information to prepare the applying construction - Controllers: controllers management the incoming requests and ship the suitable response to the shopper
- Suppliers: suppliers are the elemental idea of NestJS. Companies, factories, helpers, repositories, and so forth., are handled as suppliers in Nest. Suppliers may be injected as a dependency in Nest
Why use NestJS?
In recent times, Node.js has develop into a preferred programming language, and, as a result of builders need to write production-ready APIs quicker, the demand for a high quality backend framework has additionally elevated. Enter NestJS, which helps builders write environment friendly codes quicker.
Let’s talk about the advantages of utilizing NestJS.
- TypeScript: NestJS makes use of TypeScript by default, however you too can write your NestJS code with vanilla JavaScript
- Microservices: NestJS helps GraphQL, WebSockets, gRPC, and MQTT, together with REST APIs. The assist for these instruments helps to write down microservices
- CLI: Nest additionally has its personal CLI, which allows you to create, run, construct your functions, and extra
- Excessive-quality documentation: NestJS is properly documented and lets you perceive the ideas in depth. It even gives official programs created by NestJS workforce members
- Testing: NestJS supplies assist for testing your utility with Jest, or some other testing framework of your alternative. NestJS even supplies a testing bundle of its personal
What’s Joi?
All builders know that it’s important to validate information coming from purchasers. You probably have ever used MongoDB and mongoose in Node.js, you’re seemingly accustomed to mongoose schemas. Mongoose schemas assist describe the info and simply add validators for the info. Joi is similar to schemas.
Joi is a extensively used Node.js information validation library that gives a easy, intuitive, and readable API to explain information. It’s primarily used to validate information despatched from API endpoints and means that you can create blueprints of the info sort you need to settle for.
Right here is a straightforward instance of describing schema with Joi:
 const schema = Joi.object().keys({
     identify: Joi.string().alphanum().min(3).max(30).required(),
     birthyear: Joi.quantity().integer().min(1970).max(2013),
});
Constructing a primary API with NestJS
NestJS supplies many choices to scaffold code in accordance with your wants, such because the CRUD recipe. This lets you scaffold a CRUD with endpoints inside just a few seconds from the Nest CLI.
To put in the Nest CLI in your pc, run the next command:
npm i -g @nestjs/cli
The subsequent step is to generate a Nest utility. The Nest CLI makes use of the next command:
nest new project-name
Right here, project-name is the identify of the undertaking. After the command completes, run the next command to scaffold the CRUD endpoints:
nest g useful resource customers
It’ll ask you just a few questions, similar to which transport layer to make use of. When you select the choices in accordance with your choice, Nest will scaffold the CRUD API. For instance, an API with the customers endpoint can be generated from the above command. You’ll be able to see the brand new customers folder.
Now, if you happen to run the applying with npm run begin:dev, you’ll see the endpoints logged within the console. Your server can be began at port 3000.
You’ll be able to both examine the endpoints by visiting them or opening the customers.controllers.ts file. This file accommodates the routes for the CRUD API. The providers for every API are outlined within the customers.service.ts file, and all these information are below the customers folder.
The significance of object validation
In case you take a look at the GET technique for locating a single merchandise within the customers.controllers.ts file, you’ll discover that there isn’t a validation arrange. You should use something as an ID, and Nest won’t throw a validation error.
The OWASP high ten record of safety dangers mentions that injection assault remains to be one of the crucial well-liked safety dangers. OWASP additionally mentions that an utility is susceptible to injection assaults when “user-supplied information will not be validated, filtered, or sanitized by the applying.”
This clearly exhibits that information validation is a vital safety concern to remember when constructing functions. There are built-in pipes that may confirm or modify the enter. NestJS has eight built-in pipes. In order for you the ID to be solely of integer sort, you should utilize the ParseIntPipe pipe. Right here’s an instance:
@Get(':id')
findOne(@Param('id', ParseIntPipe) id: string) {
  return this.usersService.findOne(+id);
}
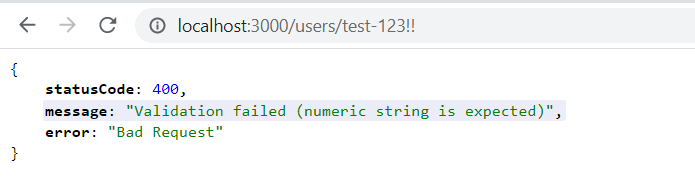
In case you attempt to hit the endpoint with any ID apart from a numeric worth, you’ll obtain the next error.
Utilizing a built-in pipe is easy, however utilizing it for a big schema is difficult. Joi makes it simpler to design schemas and implement validation in NestJS. Let’s implement Joi for the NestJS undertaking.
Implementing Joi in NestJS
Typically, any script that may be injected into NestJS is the Pipe class. Pipes primarily have two use circumstances:
- Reworking enter information
- Validating enter information
You’ll be able to learn extra about pipes within the official documentation.
Step one is to put in the required packages. Right here, solely the Joi bundle is required. Run the next command to put in the bundle.
npm i joi
Now, create a brand new file referred to as validation.pipe.ts contained in the customers listing. Making a customized pipe to implement validation is fairly simple. Right here’s a code snippet that will help you perceive.
import {
  PipeTransform,
  BadRequestException,
    ArgumentMetadata
} from '@nestjs/widespread';

export class ValidationPipe implements PipeTransform {
  rework(worth: any, metadata: ArgumentMetadata) {
    return worth;
  }
}
Any schema handed into this pipe constructor can be checked for the configured Joi validation schema. To make the above validator work, open the create-user.dto.ts file contained in the dto folder.
Right here, outline a schema sort that the API will use when saving the info. For simplicity, assume that the schema despatched by the consumer and held by the database have the identical construction.
Let’s assume the API takes firstname, lastname, e-mail, isVerified, and phoneNumber as enter. The DTO will appear to be this:
export class CreateUserDto {
  public firstname: string;
  public lastname: string;
  public isVerified: boolean;
  public e-mail: string;
  public phoneNumber: quantity;
}
Now, outline the Joi schema contained in the consumer.dto.js file. You can even use separate information to retailer the schemas. The Joi consumer schema is easy for this instance.
import Joi from 'joi';

export const UserSchema = Joi.object({
  firstname: Joi.string().required(),
  lastname: Joi.string().required(),
  e-mail: Joi.string().e-mail().required(),
  isVerified: Joi.boolean().required(),
  phoneNumber: Joi.quantity(),
}).choices({
  abortEarly: false,
});
The schema is fairly self-explanatory. The string() technique ensures that the enter is of sort string, and the required() technique makes sure the fields are contained in the enter. Equally, boolean and quantity be certain the kinds are boolean or quantity.
The choices technique takes different choices inside an object. The abortEarly technique, when set to true, stops the validation when it finds the primary error. In any other case, it returns all of the errors.
Now that the schemas are prepared, it’s time to replace the validation pipe accordingly.
Right here is the whole validation.pipe.ts file.
import { PipeTransform, BadRequestException } from '@nestjs/widespread';

import { CreateUserDto } from './dto/create-user.dto';

import { UserSchema } from './dto/consumer.dto';

export class CreateUserValidatorPipe implements PipeTransform<CreateUserDto> {
  public rework(worth: CreateUserDto): CreateUserDto {
    const outcome = UserSchema.validate(worth);
    if (outcome.error) {
      const errorMessages = outcome.error.particulars.map((d) => d.message).be a part of();
      throw new BadRequestException(errorMessages);
    }
    return worth;
  }
}
The customized validator class accepts and returns the CreateUserDto class. The const outcome = UserSchema.validate(worth); validates the outcome in accordance with the outlined Joi schema. If the outcome has any errors, the outcomes are mapped utilizing the map technique. The error messages are joined collectively. Lastly, the error messages are despatched to the shopper. In any other case, it returns the enter worth.
If the enter passes the validation, it’ll present the message, “This motion provides a brand new consumer,” in accordance with the strategy outlined contained in the consumer.service.ts file.
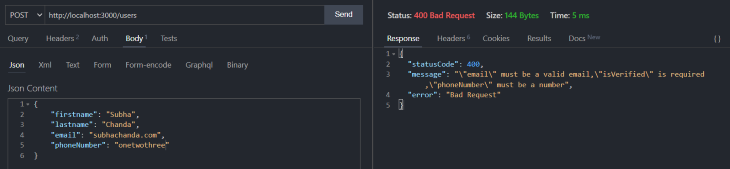
We’ve now applied Joi into NestJS. You’ll be able to see if the validation is working by sending the JSON payload to the endpoint http://localhost:3000/customers.
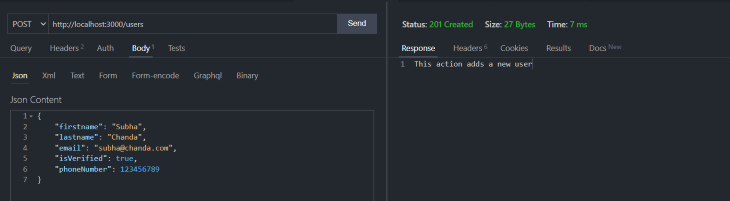
The above picture exhibits what it seems like when the payload passes the validation. Equally, the picture under exhibits totally different errors based mostly on the validation.
Conclusion
This text offered an outline of NestJS and Joi and the significance of validation in our apps, then walked you thru implementing validation inside a NestJS utility. I hope you discovered it helpful.
Keep in mind: it’s important to implement correct validation strategies to construct a sturdy utility. You’ll be able to try the Joi and NestJS documentation to raised perceive the library and frameworks.
LogRocket: Full visibility into your internet apps

LogRocket is a frontend utility monitoring resolution that permits you to replay issues as in the event that they occurred in your individual browser. As an alternative of guessing why errors occur, or asking customers for screenshots and log dumps, LogRocket helps you to replay the session to rapidly perceive what went unsuitable. It really works completely with any app, no matter framework, and has plugins to log extra context from Redux, Vuex, and @ngrx/retailer.
Along with logging Redux actions and state, LogRocket information console logs, JavaScript errors, stacktraces, community requests/responses with headers + our bodies, browser metadata, and customized logs. It additionally devices the DOM to document the HTML and CSS on the web page, recreating pixel-perfect movies of even probably the most advanced single-page apps.
