
On this article, we’ll display how you can implement reCAPTCHA v2 in a React software and how you can confirm consumer tokens in a Node.js backend.
Bounce forward:
Conditions
To comply with together with the examples within the tutorial portion of this text, it is best to have a foundational information of:
- React and its ideas
- Creating servers with Node.js and Specific.js
- HTTP requests
What’s CAPTCHA?
CAPTCHA (Fully Automated Public Turing check to inform Computer systems and People Aside) is a sort of challenge-response safety measure designed to distinguish between actual web site customers and automatic customers, akin to bots.
Many internet providers use CAPTCHAs to assist stop unwarranted and illicit actions akin to spamming and password decryptions. CAPTCHAs require customers to finish a easy check to display they’re human and never a bot earlier than giving them entry to delicate info.
What’s reCAPTCHA?
There are a number of sorts of CAPTCHA methods, however essentially the most extensively used system is reCAPTCHA, a instrument from Google. Luis von Ahn, the co-founder of Duolingo, created the instrument again in 2007 and is being utilized by greater than six million web sites, together with BBC, Bloomberg, and Fb.
The primary model of reCAPTCHA was made up of randomly generated sequences of distorted alphabetic and numeric characters and a textual content field.
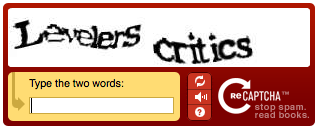
To go the check, a consumer must decypher the distorted characters and sort them into the textual content field. Though computer systems are able to creating photographs and producing responses, they will’t learn or interpret info in the identical manner an individual can to go the check.
reCAPTCHA generates a response token for every request a consumer makes and sends it to Google’s API for verification. The API returns a rating that determines if the consumer is human or an automatic program.
reCAPTCHA presently has two working variations: v2 and v3. Though v3 is the latest model of reCAPTCHA (launched in 2018), most web sites nonetheless use reCAPTCHA v2, which was launched in 2014.
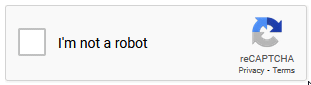
reCAPTCHA v2 has two variants: checkbox and invisible. The checkbox variant, which is also referred to as “I’m not a robotic”, is the preferred. one choice for this variant shows a checkbox widget that customers can work together with to confirm their identification.
The invisible variant shows a reCAPTCHA badge, indicating that the service is working within the background.
In some instances the place a consumer’s habits triggers suspicion, reCAPTCHA v2 will serve up a problem that the consumer should go to show they’re not a bot.
Implementing reCAPTCHA in React
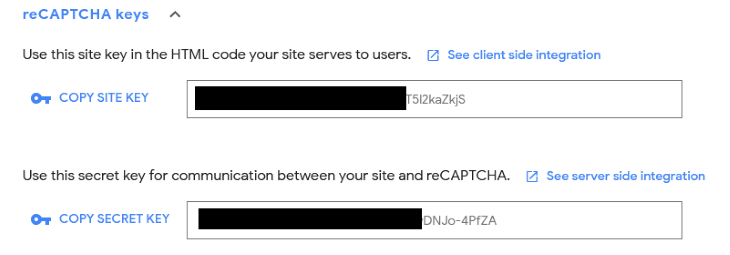
Now that we perceive what reCAPTCHA is, let’s see how we are able to implement it in a React app. However first, we have to signal our app up for an API key within the Google reCAPTCHA console. The important thing pair consists of two keys: website key and secret key.
The location key invokes the reCAPTCHA service in our app. The key key verifies the consumer’s response. It does this by authorizing the communication between our app’s backend and the reCAPTCHA server.
Go forward and create your key pair right here.
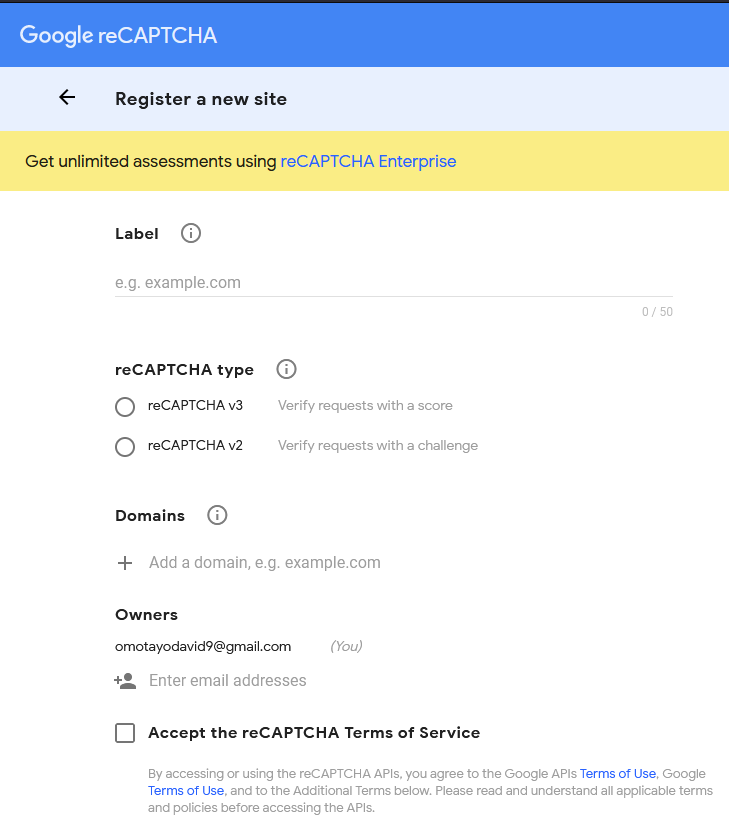
First, you’ll have to check in along with your Google account. Then, you’ll be redirected to the admin console. Subsequent, you’ll fill out the registration type on the web page to generate your website’s key pair.
The registration is pretty easy, however for readability, I’ll clarify what every type discipline means and how you can fill every discipline.
Key pair registration
Label
For the label discipline, present a reputation that will help you acknowledge the aim of the important thing pair that you just’re creating. In case you have a couple of key pair arrange in your account, the labels will assist you to distinguish between them.
Kind
The sort selector refers back to the model of reCAPTCHA that you just need to use in your website. You possibly can select both v3 or v2. Since this tutorial will solely cowl v2 implementation, go forward and select v2 and the “I’m not a robotic” variant.
Domains
The domains discipline is the place you’ll set the domains that may work along with your reCAPTCHA. You possibly can enter a legitimate area title or “localhost” in case your challenge remains to be in improvement, and click on + so as to add the area.
Proprietor
The proprietor discipline is the place you possibly can provision entry to your app’s reCAPTCHA to others. By default, you’ll be the proprietor, however you possibly can add extra people by offering their Google emails.
When you’ve accomplished the shape fields, verify the required bins and click on Submit.
Now it is best to be capable to see your website key and secret key. They are going to look just like those proven right here:
Subsequent, we‘ll arrange a React pattern challenge and implement reCAPTCHA utilizing the important thing pairs we simply created.
Establishing a pattern React challenge
To confirm a consumer’s enter with reCAPTCHA we require a server that’ll talk with Google’s API. So we‘ll have to hold that in thoughts when organising the challenge.
First, create a folder. For this pattern challenge, I’ll title the folder react-node-app, however you need to use a unique title of your selecting.
Subsequent, open the folder in your most well-liked IDE and run the next command:
npm init -y
This may create a bundle.json file that may assist us handle our dependencies and hold observe of our scripts.
Go forward and bootstrap a React app with create-react-app by typing the next command in your terminal:
npx create-react-app my-app
This command will create a my-app folder contained in the react-node-app folder and can set up React contained in the my-app folder.
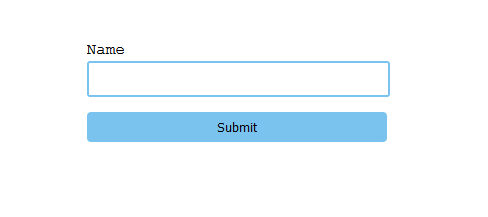
After set up, open the my-app folder and clear up the pointless boilerplate codes and recordsdata within the challenge folder, then create a Kind.js element inside the src folder.
Subsequent, add the next code into the shape element and import it contained in the App.js principal element.
const Kind = () =>{

    return(
        <type>
            <label htmlFor="title">Title</label>
                <enter kind="textual content" id="title" className="enter"/>
            <button>Submit</button>
        </type>
    )
}

export default Kind
The above code is a straightforward login type with an enter ingredient and a Submit button.
Styling the shape element isn’t crucial, however in the event you’d like so as to add slightly aptitude, add the next CSS code contained in the App.css file within the challenge folder.
.enter{
  width: 295px;
  peak: 30px;
  border: rgb(122, 195, 238) 2px strong;
  show: block;
  margin-bottom: 10px;
  border-radius: 3px;
}

.enter:focus{
  border: none;
}

label{
  show: block;
  margin-bottom: 2px;
  font-family: 'Courier New', Courier, monospace;
}

button{
  padding: 7px;
  margin-top: 5px;
  width: 300px;
  background-color: rgb(122, 195, 238);
  border: none;
  border-radius: 4px;
}
Now, begin the event server with the command npm begin within the terminal.
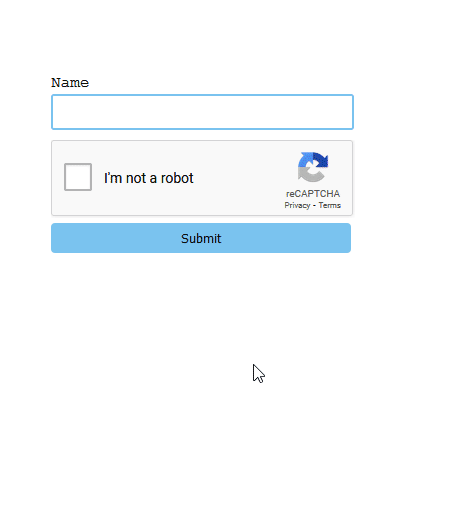
You must see a type just like this displayed in your browser:
N.B., It’s endorsed to make use of a framework that has assist for SSR (server-side-rendering), like Subsequent.js or Remix, when creating one thing comparable for manufacturing.
Putting in react-google-recaptcha
The react-google-recaptcha library allows the combination of Google reCAPTCHA v2 in React. The bundle offers a element that simplifies the method of dealing with and rendering reCAPTCHA in React with the assistance of helpful props.
To put in react-google-recaptcha, kind and run the next command:
npm set up --save react-google-recaptcha
Including reCAPTCHA
After putting in react-google-recaptcha, head over to the type.js element file and import it, like so:
import reCAPTCHA from "react-google-recaptcha"
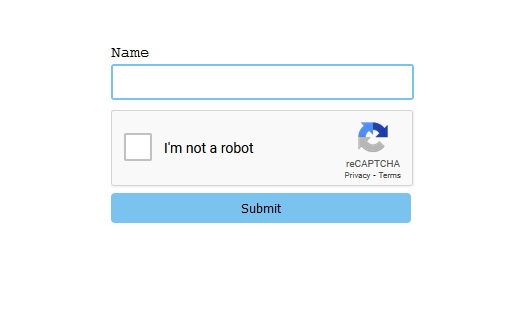
Now add the reCAPTCHA element to the shape, simply earlier than or after the Submit button. Your placement of the element is elective, the reCAPTCHA widget will seem wherever the reCAPTCHA element is positioned within the type when rendered.
<type >
            <label htmlFor="title">Title</label>
                <enter kind="textual content" id="title" className="enter"/>
                <reCAPTCHA />
            <button>Submit</button>
</type>
As talked about beforehand, the reCAPTCHA element accepts a number of props. Nevertheless, the sitekey prop is the one prop we have to render the element. This prop facilitates the connection between the location key we generated earlier from the reCAPTCHA key pair and the reCAPTCHA element.
Listed below are different elective props of the reCAPTCHA element:
theme: adjustments the widget’s theme togentleordarkishmeasurement: adjustments the dimensions or kind of CAPTCHAonErrored: fires a callback operate if the check returns an errorbadge: adjustments the place of the reCAPTCHA badge (bottomright,bottomleft, orinline)
<reCAPTCHA
sitekey={course of.env.REACT_APP_SITE_KEY}
/>
Right here we add a sitekey prop to the reCAPTCHA element and go it an surroundings variable with the reCAPTCHA website key.
To do the identical in your challenge, create a .env file within the root folder of your challenge. Subsequent, add the next code to the file:
/*.env*/
REACT_APP_SECRET_KEY = "Your secret key"
REACT_APP_SITE_KEY = "your website key"
This fashion, you need to use your secret keys safely in your app by referencing the variable names the place they’re wanted.
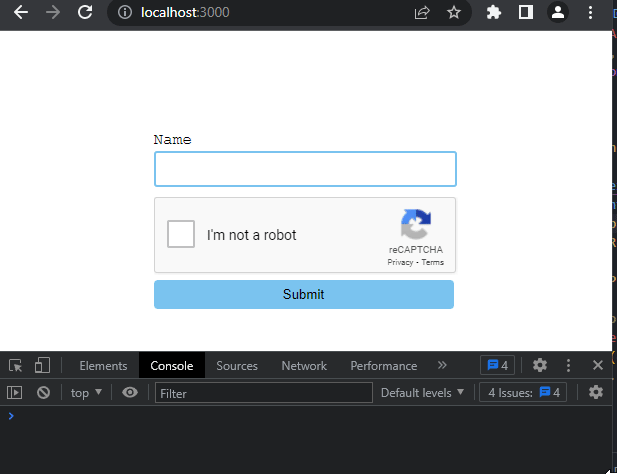
Now, if save your code and go to the browser, a reCAPTCHA field ought to seem the place the reCAPTCHA element is positioned in your code. On this instance, it seems earlier than the submit button.
After every verification, we have to reset the reCAPTCHA for subsequent checks. To perform this, we have to add a ref prop to the reCAPTCHA element.
To make use of the ref prop, first, import the useRef hook from React:
import React, { useRef } from 'react';
Subsequent, retailer the ref worth in a variable, like so:
const captchaRef = useRef(null)
Then, add the ref prop to the reCAPTCHA element and go it the captchaRef variable:
<reCAPTCHA
sitekey={course of.env.REACT_APP_SITE_KEY}
ref={captchaRef}
/>
Right here’s all the code in our Kind element up so far:
import reCAPTCHA from "react-google-recaptcha"

const Kind = () =>{
    return(
            <type>
                <label htmlFor="title">Title</label>
                    <enter kind="textual content" id="title" className="enter"/>
                    <reCAPTCHA
                    sitekey={course of.env.REACT_APP_SITE_KEY}
                    ref={captchaRef}
                    />
                <button>Submit</button>
            </type>
    )
}
export default Kind
Now that now we have a working widget, we simply want to finish three steps to get reCAPTCHA functioning:
- Get the response token from the
reCAPTCHAelement - Reset the
reCAPTCHAelement for subsequent checks - Confirm the response token within the backend
Getting the response token
We are able to additionally use the ref prop to get the generated token from our reCAPTCHA. All now we have to do is get the worth of the ref with the next code:
const token = captchaRef.present.getValue();
Resetting reCAPTCHA for subsequent checks
If we add the above code to the shape element, it should truly trigger an error. It is because the worth of the ref remains to be null, because the reCAPTCHA is in an unchecked state. To resolve this concern, we we’ll add an onSubmit occasion handler to the shape with a operate that encapsulates the code:
const handleSubmit = (e) =>{
        e.preventDefault();
        const token = captchaRef.present.getValue();
        captchaRef.present.reset();
    }

return(
        <type onSubmit={handleSubmit} >
            …
        </type>
    )
Within the above code, we created a handleSubmit operate. Inside this operate, we added the token variable for getting the response token from reCAPTCHA, in addition to a code that resets the reCAPTCHA every time the shape is submitted.
This fashion, the getValue() methodology will solely try to get the ref’s worth, which is the response token, when the submit button is clicked.
Now in the event you log the token variable to the console, verify the reCAPTCHA field, and submit the shape, it is best to see a generated response token just like the one under in your console:
Verifying the token within the Node.js backend
The token we generated within the earlier part is simply legitimate for 2 minutes, which suggests we have to confirm it earlier than it expires. To take action, we’ll have to arrange our app’s backend and ship the token to Google’s API to verify the consumer’s rating.
Establishing the Node.js backend
To arrange a Node.js server, navigate again to the react-node-app folder, create a brand new folder, and title it server. Contained in the server folder, create a brand new file and title it index.js. This file will function the entry level for our Node app.
Subsequent, cd into the server folder and run the next command to put in Specific.js and Axios:
npm i specific axios dotenv --save
Now, add the next code contained in the index.js file:
const specific = require("specific");
const router = specific.Router();
const app = specific();
const cors = require('cors');
const axios = require('axios');
const dotenv = require('dotenv').config()
const port = course of.env.PORT || 2000;

//enabling cors
app.use(cors());

//Parse information
app.use(specific.json());
app.use(specific.urlencoded({prolonged: true}));

//add router in specific
app.use("https://weblog.logrocket.com/", router);

//POST route
router.put up("/put up", async (req, res) => {
//Destructuring response token from request physique
    const {token} = req.physique;

//sends secret key and response token to google
    await axios.put up(
      `https://www.google.com/recaptcha/api/siteverify?secret=${course of.env.SECRET_KEY}&response=${token}`
      );

//verify response standing and ship again to the client-side
      if (res.standing(200)) {
        res.ship("Human 👨 👩");
    }else{
      res.ship("Robotic 🤖");
    }
});

app.hear(port, () =>{
    console.log(`server is working on ${port}`);
});
Within the above code, we arrange an Specific server and created a POST API endpoint for the /put up route. Contained in the endpoint operate, we destructured the request physique to get the token information that will probably be despatched from the shopper facet.
Then we created an axios.put up request to Google’s API with our SECRET_KEY handed in as an surroundings variable, in addition to the token from the shopper facet.
To arrange an surroundings variable in Node.js, cd again to the react-node-app folder and run the next command:
npm set up dotenv --save
After set up, create a .env file inside the react-node-app folder, open the file, then add your website’s secret key.
Beneath the axios.put up request is an if assertion that checks the standing of the response returned by the API and sends it to the shopper facet.
Okay, let’s transfer on. Navigate again to the react-node-app folder, open the bundle.json file, and exchange the script command with the next:
…
"scripts": {
  "begin": "node server/index.js"
},
…
The above code will allow us to begin our server utilizing the npm begin command after we run it within the terminal.
Save the challenge. Then, go to your terminal, open a brand new terminal tab, cd into the server folder, and begin the server by working npm begin.
Checking the consumer’s rating
Subsequent, we’ll ship an axios.put up request from the shopper facet (React app) to our server, with the generated token as the information.
To do that, navigate again to your React app and paste the next code contained in the handleSubmit operate we created earlier:
 const handleSubmit = async (e) =>{
        e.preventDefault();

        const token = captchaRef.present.getValue();
        captchaRef.present.reset();

        await axios.put up(course of.env.REACT_APP_API_URL, {token})
        .then(res =>  console.log(res))
        .catch((error) => {
        console.log(error);
        })
    }
This code is an axios.put up request that sends the generated token from reCAPTCHA to the Node.js backend.
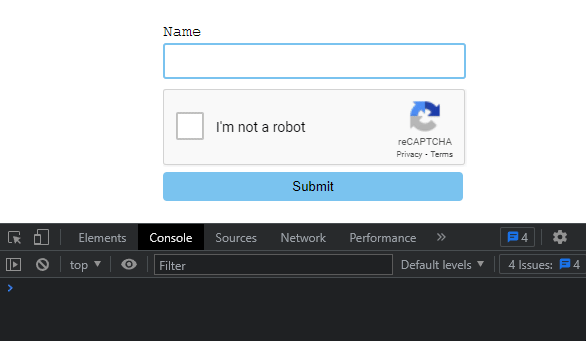
If you happen to save your code and run the app, it is best to see a reCAPTCHA type just like this:
That’s it! You’ve efficiently applied a working Google reCAPTCHA and a backend server that verifies customers’ responses in React.
Conclusion
On this article, we examined what reCAPTCHA is and the way it works. We additionally walked by a tutorial to display how you can implement reCAPTCHA in a React software and how you can confirm a consumer’s response token with a Node.js backend server.
I hope this text will assist you to construct safe and bot-free React purposes.
Full visibility into manufacturing React apps
Debugging React purposes might be troublesome, particularly when customers expertise points which might be laborious to breed. If you happen to’re serious about monitoring and monitoring Redux state, mechanically surfacing JavaScript errors, and monitoring sluggish community requests and element load time, attempt LogRocket. 

LogRocket is sort of a DVR for internet and cellular apps, recording actually the whole lot that occurs in your React app. As a substitute of guessing why issues occur, you possibly can combination and report on what state your software was in when a difficulty occurred. LogRocket additionally screens your app’s efficiency, reporting with metrics like shopper CPU load, shopper reminiscence utilization, and extra.
The LogRocket Redux middleware bundle provides an additional layer of visibility into your consumer classes. LogRocket logs all actions and state out of your Redux shops.
Modernize the way you debug your React apps — begin monitoring without cost.
