
On this tutorial, you’ll learn to construct a chatroom app in React utilizing Cloud Firestore and Firebase Authentication.
We’ll use a Firestore database to retailer chatroom messages and permit customers to sign up utilizing Google sign-in from Firebase Authentication. We’ll even enable customers to select from a number of chatroom matters to talk about no matter subject they’re enthusiastic about.
Our completed undertaking will appear to be the next gif:
The ultimate undertaking code could be discovered on GitHub. On the finish of this tutorial, I’ll provide you with some strategies for extending this software to additional your React and Firebase expertise.
To comply with together with this text, you’ll want intermediate JavaScript, React, and CSS information. You’ll additionally want a Google account to entry Firebase. For those who don’t have a Google account, you possibly can create one right here.
Moreover, we’ll use React Router, a library for routing in React. Information of React Router isn’t needed, however it’s possible you’ll wish to try the documentation. Let’s get began!
What’s Firebase Cloud Firestore?
Firebase is a platform constructed by Google for creating functions. Firebase gives merchandise that assist builders by rushing up growth time, scaling shortly, and creating easy options for frequent growth wants. The 2 Firebase merchandise that we’ll use on this software are Cloud Firestore and Firebase Authentication.
Cloud Firestore is a cloud-hosted NoSQL database. Knowledge is saved in paperwork as key-value pairs, and paperwork are organized into collections. Knowledge is versatile and could be nested inside paperwork containing subcollections. Firestore databases scale routinely and synchronize information throughout listeners. As well as, they’ve a free tier, so that they’re simple to make use of for experimentation and studying.
What’s Firebase Authentication?
Authenticating customers is non-trivial and one thing that you just wish to be performed appropriately. Fortunately, Firebase has performed many of the onerous work for us and applied backend and sign-in options to make authentication simple. We’ll use Firebase Authentication’s easy SDK for authenticating customers with sign-in strategies like e mail and password, Google sign-in, and telephone quantity.
Now that you just’re conversant in Firebase, let’s begin the undertaking!
Arrange the Firebase undertaking and React app
So as to add Firebase to an software, we first have to create a Firebase undertaking and register our Firebase app.
A Firebase undertaking is a container for Firebase apps and its assets and companies, like Firestore databases and Authentication suppliers. A Firebase app (i.e., the net app or iOS app) belongs to a undertaking; a undertaking can have many apps, and all of its apps share the identical assets and companies.
To create a Firebase undertaking, navigate to the Firebase console and comply with the steps under:
- Click on Create a undertaking or Add undertaking should you’ve used Firebase earlier than
- Enter
Chat Roombecause the undertaking title, then click on Proceed - Toggle
Allow Google Analytics for this undertakingon or off; I selected to disable Google Analytics for simplicity - Click on Create undertaking
The ultimate step will create your Firebase Chat Room undertaking and provision its assets. As soon as the assets are provisioned, click on Proceed to navigate to the undertaking’s overview web page.
Subsequent, let’s create the Firebase app. Since we’re including Firebase to a React app, we’ll have to create an internet app.
- Head to the overview web page and click on the net icon below Get began by including Firebase to your app
- Enter
Chat Roomwithin theApp nicknamesubject - Click on Register app
After the app is registered, you need to see directions for including the Firebase SDK to your undertaking below Add Firebase SDK:
Maintain this web page open; we’ll come again to it within the subsequent part to seize our Firebase configuration.
Subsequent, let’s arrange the React software and add the required dependencies. For simplicity, we’ll bootstrap our app with Create React App:
npx create-react-app chat-room && cd chat-room
Subsequent, set up the Firebase SDK, which provides us entry to capabilities for Firebase Authentication, Cloud Firestore, and React Router:
npm i firebase react-router-dom
Initialize Firebase
With the React undertaking arrange and our Firebase app registered, we will now initialize Firebase in our undertaking. Earlier than going additional, it’ll assist to have an outline of how we’ll use the Firebase SDK inside our software.
First, we’ll create a login operate that makes use of Firebase Authentication to signal a person in by way of Google sign-in. We’ll retailer the authenticated person in state and make this data and the login operate obtainable to elements by means of the Context API. We’ll additionally use Firestore SDK capabilities to learn from and write to our database. A customized Hook that reads database messages will enable elements to get the most recent synchronized information.
With that in thoughts, the purpose of this part is to initialize our Firebase app inside React and arrange the module to export our aforementioned capabilities that use the SDK.
First, create the listing and module file that initializes Firebase and exports our capabilities:
mkdir src/companies && contact src/companies/firebase.js
Subsequent, we’ll add our Firebase configuration and initialize the appliance. The firebaseConfig object comes from the data that’s proven after you register your app below Add Firebase SDK:
import { initializeApp } from "firebase/app";
const firebaseConfig = {
    // TODO: Add your Firebase configuration right here
};
const app = initializeApp(firebaseConfig);
initializeApp returns a Firebase App occasion, which permits our software to make use of frequent configuration and authentication throughout Firebase companies. We’ll use this later once we arrange Firestore.
That’s all we have to do to initialize Firebase inside our software! Let’s transfer on to including Firebase Authentication and our first React code.
Add Firebase Authentication
On this part, we’ll add Firebase Authentication to our app, create a operate to log in as a person with Google, and arrange the authentication context that we briefly mentioned within the earlier part. We’ll create an <AuthProvider> element that passes down a person object and a login operate. login wraps the SDK’s Google sign-in operate after which units the authenticated person within the state.
First, we have to allow Google as a sign-in methodology within the Firebase console. First, navigate to the console.
- Click on Authentication within the sidebar
- Click on Get Began
- Click on the Signal-in methodology tab on the prime
- Underneath Signal-in suppliers, click on Google
- Toggle Allow
- Choose a Challenge help e mail
- Click on Save
Subsequent, we’ll add Firebase Authentication to our app. In src/companies/firebase.js, add the next code:
// ...

import { GoogleAuthProvider, signInWithPopup, getAuth } from 'firebase/auth';

// ...

async operate loginWithGoogle() {
    strive {
        const supplier = new GoogleAuthProvider();
        const auth = getAuth();

        const { person } = await signInWithPopup(auth, supplier);

        return { uid: person.uid, displayName: person.displayName };
    } catch (error) {
        if (error.code !== 'auth/cancelled-popup-request') {
            console.error(error);
        }

        return null;
    }
}

export { loginWithGoogle };
Inside the strive block, we create a GoogleAuthProvider, which generates a credential for Google, and name getAuth, which returns a Firebase Authentication occasion. We cross these two objects to signInWithPopup, which handles the sign-in circulation in a popup and returns the authenticated person’s data as soon as they’re authenticated. As you possibly can see, this API makes a posh course of pretty easy.
Firebase Authentication helps many different authentication strategies; you possibly can find out about them within the Firebase documentation.
Subsequent, let’s create the authentication context and supplier. Create a brand new listing for the context and a file to retailer it:
mkdir src/context && contact src/context/auth.js
Inside src/context/auth.js, add the code under:
import React from 'react';
import { loginWithGoogle } from '../companies/firebase';

const AuthContext = React.createContext();

const AuthProvider = (props) => {
    const [user, setUser] = React.useState(null);

    const login = async () => {
        const person = await loginWithGoogle();

        if (!person) {
            // TODO: Deal with failed login
        }

        setUser(person);
    };

    const worth = { person, login };

    return <AuthContext.Supplier worth={worth} {...props} />;
};

export { AuthContext, AuthProvider };
We first create an AuthContext object after which an <AuthProvider> element to return the context’s supplier. Inside AuthProvider, we create our person state and a login operate that calls our loginWithGoogle operate and units the person state as soon as the person has signed in efficiently. Lastly, we make the person and login capabilities obtainable to context subscribers.
Subsequent, we’ll create a customized useAuth Hook to devour this context. We’ll use it inside our root <App> element to verify if now we have a logged-in person in state. If we don’t, we will render a login web page and have that web page name the login operate, which can be acquired by way of context. If we do, we’ll use the person data for sending and receiving messages.
Create a listing for our Hooks and a file to retailer the brand new Hook with the code under:
mkdir src/hooks && contact src/hooks/useAuth.js
Inside src/hooks/useAuth.js, we’ll implement a easy Hook that calls useContext to devour the context worth that we created in src/context/auth.js:
import React from 'react';
import { AuthContext } from '../context/auth';

operate useAuth() {
    const worth = React.useContext(AuthContext);

    if (!worth) {
        throw new Error("AuthContext's worth is undefined.");
    }

    return worth;
}

export { useAuth };
Lastly, let’s make our context worth obtainable to your complete element tree by wrapping the <App> element with our <AuthProvider>. Add the next code to src/index.js:
// ...

import { AuthProvider } from './context/auth';

// ...

root.render(
    <AuthProvider>
        <App />
    </AuthProvider>
);

// ...
With the <AuthProvider> in place and our useAuth Hook created, we’re able to log in a person and obtain their authenticated data all through our software.
Add <UnauthenticatedApp> and <AuthenticatedApp> elements
Beforehand, I discussed that we’ll use our useAuth Hook to find out if we must always present a login display screen or not. Inside our <App> element, we’ll verify if now we have a person. If we do, we’ll render an <AuthenticatedApp>, which is the principle app that customers can chat in. If we don’t, we’ll render an <UnauthenticatedApp>, which is a web page with a login button.
The core of this logic appears like the next:
operate App() {
    const { person } = useAuth();
    return person ? <AuthenticatedApp /> : <UnauthenticatedApp />;
}
Let’s begin by creating these two elements with a placeholder implementation. First, let’s create a elements listing to retailer all of our elements and directories and information for our two new elements:
mkdir src/elements src/elements/AuthenticatedApp src/elements/UnauthenticatedApp
contact src/elements/AuthenticatedApp/index.jsx
contact src/elements/UnauthenticatedApp/index.jsx src/elements/UnauthenticatedApp/kinds.css
In src/elements/AuthenticatedApp/index.jsx, add a placeholder element:
operate AuthenticatedApp() {
    return <div>I am authenticated!</div>
}

export { AuthenticatedApp };
Do the identical in src/elements/UnauthenticatedApp/index.jsx:
operate UnauthenticatedApp() {
    return <div>I am unauthenticated!</div>
}

export { UnauthenticatedApp };
Now, in src/elements/App.js, let’s carry out the authentication verify described earlier, add a header, and eventually, arrange our structure. Change the default code with the next:
import { AuthenticatedApp } from './elements/AuthenticatedApp';
import { UnauthenticatedApp } from './elements/UnauthenticatedApp';
import { useAuth } from './hooks/useAuth';
import './App.css';

operate App() {
    const { person } = useAuth();

    return (
        <div className="container">
            <h1>💬 Chat Room</h1>
            {person ? <AuthenticatedApp /> : <UnauthenticatedApp />}
        </div>
    );
}

export default App;
In src/App.css, change the default kinds with these world kinds:
* {
    box-sizing: border-box;
}

html {
    --color-background: hsl(216, 8%, 12%);
    --color-blue: hsl(208, 100%, 50%);
    --color-gray: hsl(210, 3%, 25%);
    --color-white: white;
    --border-radius: 5px;
    background-color: var(--color-background);
    colour: var(--color-white);
}

html,
physique,
#root {
    top: 100%;
}

h1,
h2,
h3,
h4,
ul {
    margin: 0;
}

a {
    colour: inherit;
    text-decoration: none;
}

ul {
    padding: 0;
    list-style: none;
}

button {
    cursor: pointer;
}

enter,
button {
    font-size: 1rem;
    colour: inherit;
    border: none;
    border-radius: var(--border-radius);
}

.container {
    top: 100%;
    max-width: 600px;
    margin-left: auto;
    margin-right: auto;
    padding: 32px;
    show: flex;
    flex-direction: column;
    align-items: middle;
    hole: 32px;
}
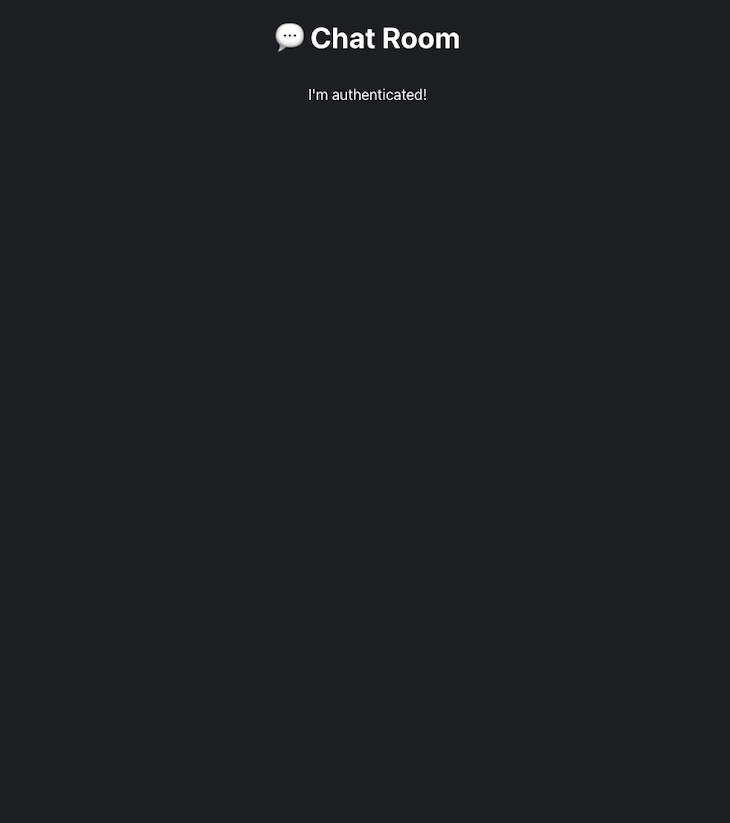
Lastly, run yarn begin and navigate to http://localhost:3000. Since person is initialized as null in our <AuthProvider>, you need to see textual content studying I am unauthenticated!:

Implement <UnauthenticatedApp>
Now, it’s time to wire all the pieces collectively and add the login button to <UnauthenticatedApp>. We’ve already performed the onerous a part of writing the login operate and passing it by means of context. Now, we will merely devour our AuthContext by way of useAuth to get the login operate and render a button that calls it.
When the person clicks the login button, login is known as, which reveals the Google sign-in pop-up. As soon as the login is accomplished, the person will likely be saved in state, displaying the <AuthenticatedApp>.
In src/elements/UnauthenticatedApp/index.jsx, add the next code:
import { useAuth } from '../../hooks/useAuth';
import './kinds.css';

operate UnauthenticatedApp() {
    const { login } = useAuth();

    return (
        <>
            <h2>Log in to hitch a chat room!</h2>
            <div>
                <button onClick={login} className="login">
                    Login with Google
                </button>
            </div>
        </>
    );
}

export { UnauthenticatedApp };
Add the next kinds to src/elements/UnauthenticatedApp/kinds.css:
.login {
    background: var(--color-blue);
    padding: 16px;
}
Now, you possibly can navigate to your software within the browser and take a look at logging in. When you’re authenticated, you need to see the textual content I am authenticated!:
Now, now we have fundamental authentication in our software. Let’s proceed by implementing the <AuthenticatedApp> element.
Add chat rooms and routing
Being able to talk with others is nice, however it might be extra enjoyable to talk with individuals about totally different matters. We’ll enable this by creating hardcoded chat room matters; on this part, we’ll create hardcoded chat rooms and arrange routing in order that we will have totally different routes for every room, i.e., /room/{roomId}.
First, create a file for our chatrooms:
mkdir src/information && contact src/information/chatRooms.js
In src/information/chatRooms.js, we’ll simply export a chatRooms object with an id and title for every room:
const chatRooms = [
    { id: 'dogs', title: '🐶 Dogs 🐶' },
    { id: 'food', title: '🍔 Food 🍔' },
    { id: 'general', title: '💬 General 💬' },
    { id: 'news', title: '🗞 News 🗞' },
    { id: 'music', title: '🎹 Music 🎹' },
    { id: 'sports', title: '🏈 Sports 🏈' },
];

export { chatRooms };
These are the primary matters that got here to my thoughts, however that is your undertaking, so be at liberty so as to add no matter chat room matters curiosity you.
Subsequent, let’s arrange the router. <AuthenticatedApp> will render a router that accommodates two routes: one with a path / that takes us to a <Touchdown> element, and one other with the trail /room/:id that renders a <ChatRoom> element.
Let’s create information for our two new elements and put placeholder elements in them:
mkdir src/elements/Touchdown src/elements/ChatRoom
contact src/elements/Touchdown/index.jsx src/elements/Touchdown/kinds.css
contact src/elements/ChatRoom/index.jsx src/elements/ChatRoom/kinds.css
<Touchdown> will likely be accountable for itemizing all of our chatrooms. Clicking on considered one of them will navigate to /room/:id. Add a placeholder element in src/elements/Touchdown/index.jsx:
operate Touchdown() {
    return <div>Touchdown</div>;
}

export { Touchdown };
<ChatRoom> will record the messages of a room and render an enter and button to ship one other message. In src/elements/ChatRoom.index.jsx, add the code under:
operate ChatRoom() {
    return <div>Chat room</div>;
}

export { ChatRoom };
Now, let’s arrange the router in <AuthenticatedApp> and render the routes with our new elements. Change our placeholder implementation in src/elements/AuthenticatedApp/index.jsx with the next code:
import { BrowserRouter, Routes, Route } from 'react-router-dom';
import { Touchdown } from '../Touchdown';
import { ChatRoom } from '../ChatRoom';

operate AuthenticatedApp() {
    return (
        <BrowserRouter>
            <Routes>
                <Route path="https://weblog.logrocket.com/" ingredient={<Touchdown />} />
                <Route path="/room/:id" ingredient={<ChatRoom />} />
            </Routes>
        </BrowserRouter>
    );
}

export { AuthenticatedApp };
Discussing navigation with React Router is considerably out of the scope of this text; should you’re enthusiastic about studying extra about React Router, try their documentation.
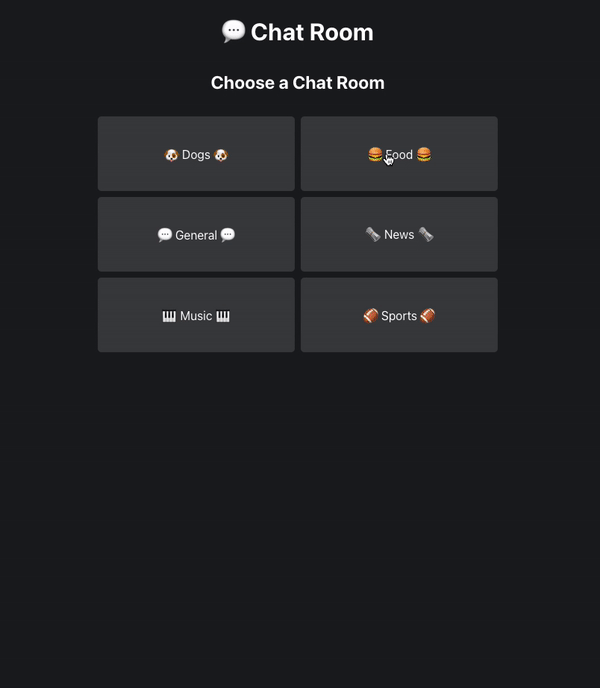
Let’s check our router by implementing <Touchdown> in order that we will choose a chat room. In <Touchdown>, we’ll merely create a React Router <Hyperlink> for every of our hardcoded chatRooms:
import { Hyperlink } from 'react-router-dom';
import { chatRooms } from '../../information/chatRooms';
import './kinds.css';

operate Touchdown() {
    return (
        <>
            <h2>Select a Chat Room</h2>
            <ul className="chat-room-list">
                {chatRooms.map((room) => (
                    <li key={room.id}>
                        <Hyperlink to={`/room/${room.id}`}>{room.title}</Hyperlink>
                    </li>
                ))}
            </ul>
        </>
    );
}

export { Touchdown };
To make issues look good, let’s add some kinds to src/elements/Touchdown/kinds.css:
.chat-room-list {
    show: flex;
    flex-wrap: wrap;
    hole: 8px;
}

.chat-room-list li {
    top: 100px;
    background: var(--color-gray);
    flex: 1 1 calc(50% - 4px);
    border-radius: var(--border-radius);
    show: flex;
    justify-content: middle;
    align-items: middle;
}
While you navigate to http://localhost:3000 and sign up, the router ought to take you to the up to date <Touchdown> element:

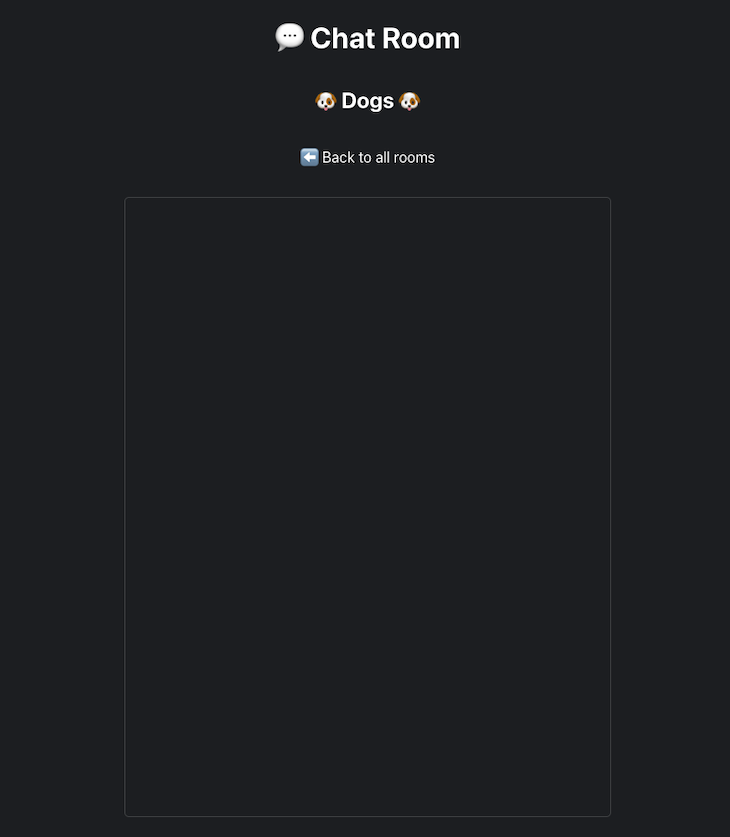
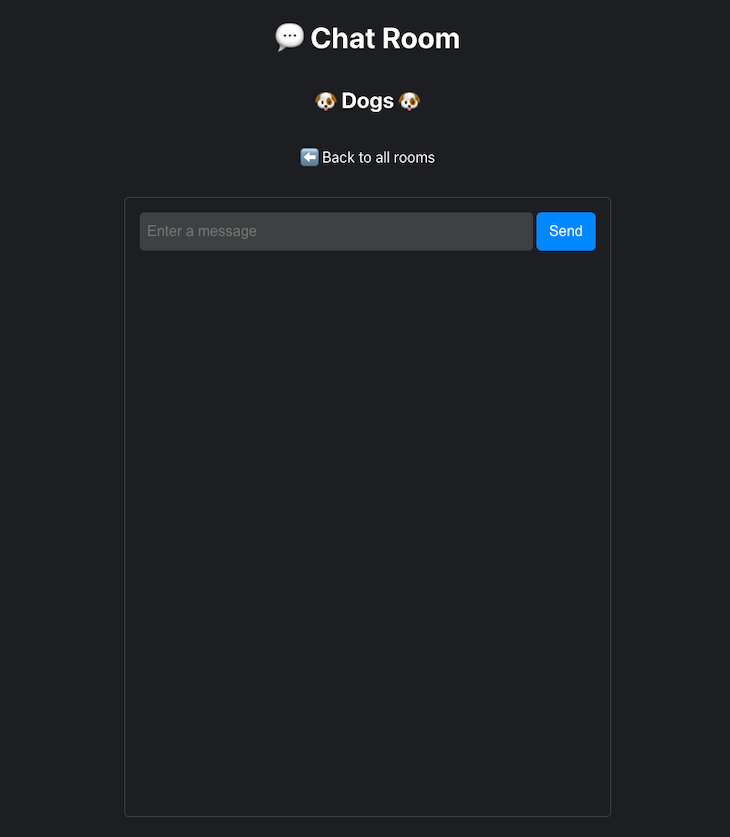
For those who click on on 🐶 Canines 🐶, as an illustration, you need to be taken to http://localhost:3000/room/canines and see the textual content Chat room.
Lastly, let’s arrange our <ChatRoom> element, which we’ll end implementing later. For now, let’s show the chatroom data and supply a hyperlink again to the touchdown web page:
import { Hyperlink, useParams } from 'react-router-dom';
import { chatRooms } from '../../information/chatRooms';
import './kinds.css';

operate ChatRoom() {
    const params = useParams();

    const room = chatRooms.discover((x) => x.id === params.id);
    if (!room) {
        // TODO: 404
    }

    return (
        <>
            <h2>{room.title}</h2>
            <div>
                <Hyperlink to="https://weblog.logrocket.com/">⬅️ Again to all rooms</Hyperlink>
            </div>
            <div className="messages-container">
                                {/* TODO */}
            </div>
        </>
    );
}

export { ChatRoom };
Recall that this element is rendered for the trail /room/:id. With React Router’s useParams Hook, we will retrieve the ID within the URL and discover the corresponding hardcoded chatroom.
Add the next kinds to src/elements/ChatRoom/kinds.css:
.messages-container {
    width: 100%;
    padding: 16px;
    flex-grow: 1;
    border: 1px stable var(--color-gray);
    border-radius: var(--border-radius);
    overflow: hidden;
    show: flex;
    flex-direction: column;
}
For those who navigate again to http://localhost:3000/room/canines, you need to see our up to date element:
Write chat room messages
Now that now we have pages for every of our chatrooms, let’s add the power to ship messages to a room. First, we have to create a Firestore Database within the console:
- Within the Firebase console, click on the Chat Room undertaking to go to its undertaking overview web page
- Within the navigation menu, click on Firestore Database
- Click on Create database
- Within the modal, below
Safe guidelines for Cloud Firestore, click on Begin in check mode - Click on Subsequent and choose a Cloud Firestore location close to to you
- Click on Allow
Beginning Cloud Firestore in check mode permits us to get began shortly with out instantly worrying about organising safety guidelines. In check mode, anybody can learn and overwrite our information, however in manufacturing, you’d wish to safe your database.
After the Cloud Firestore database is provisioned, you need to be taken to a web page with the database information viewer:

As soon as we add information, the info viewer will show the construction of our information and permit us to view, add, edit, and delete them.
Recall that Firestore information is saved in key-value paperwork, that are grouped into collections. Each doc should belong to a set. Paperwork are much like JSON; for instance, a doc for a canines chatroom may very well be structured as follows:
[dogs]
title : "🐶 Canines 🐶"
description : "A spot to talk about canines."
dateCreated : 2022-01-01
We may create a number of chatroom paperwork and retailer them in a chat-rooms assortment:
[chat-rooms]

    [dogs]
    title : "🐶 Canines 🐶"
    description : "A spot to talk about canines."
    dateCreated : 2022-01-01

    [general]
    title : "🍔 Meals 🍔"
    description : "All issues meals."
    dateCreated : 2022-01-01

    ...
For our software, although, we’ll create a chat-rooms assortment and a nested doc for every room ID. As an alternative of storing the messages in every doc as key-value pairs, we’ll create a messages subcollection for every doc. A subcollection is a set related to a doc. Every messages subcollection will include a number of message paperwork, and the construction will look one thing like the next:
[chat-rooms]

    [dogs]
        [messages]
            [documentID]
            textual content : "..."
            timestamp : ...

    [general]
        [messages]
            [documentId]
            textual content : "..."
            timestamp : ...

    ...
To reference a doc in our messages subcollection, as an illustration, we’d use the trail chat-rooms/{roomId}/messages/{documentId}.
Word that we gained’t use the info viewer to explicitly create these collections and paperwork. After we write to the database, Firestore will create a set or doc if it doesn’t exist already.
With this in thoughts, let’s create a sendMessage operate that provides a doc to a room’s messages subcollection. First, we have to initialize a Firestore occasion in our app with getFirestore, which returns a reference to the Firestore service that we will use to carry out reads and writes:
// ...

import { getFirestore } from 'firebase/firestore';

// ...

const app = initializeApp(firebaseConfig);
const db = getFirestore(app);

// ...
Subsequent, we’ll use the addDoc and assortment SDK capabilities so as to add paperwork. addDoc accepts a set, which we get hold of a reference to utilizing assortment, and a doc object. assortment takes the Firestore occasion and arguments that type the trail to the gathering, which in our case is the messages subcollection.
Once more, Firestore will create any collections and paperwork that don’t exist, so we will merely specify our desired path. addDoc may even create an ID for us:
// ...

import { getFirestore, assortment, addDoc, serverTimestamp } from 'firebase/firestore';

// ...

async operate sendMessage(roomId, person, textual content) {
    strive {
        await addDoc(assortment(db, 'chat-rooms', roomId, 'messages'), {
            uid: person.uid,
            displayName: person.displayName,
            textual content: textual content.trim(),
            timestamp: serverTimestamp(),
        });
    } catch (error) {
        console.error(error);
    }
}

export { loginWithGoogle, sendMessage };
Our sendMessage operate takes within the roomId, the present person, which is the article saved in context that we get hold of utilizing Authentication, and the message textual content. We use this information to type the doc object handed because the second argument to addDoc.
We’re additionally utilizing the serverTimestamp operate for our timestamp property in order that we will kind by message date once we retrieve messages. You may learn extra about this operate within the documentation.
Now that now we have a operate that writes message information, we want an enter element that calls it. We’ll create a <MessageInput> element that will get rendered on the backside of our <ChatRoom> element. Create the element listing and information:
mkdir src/elements/MessageInput
contact src/elements/MessageInput/index.jsx src/elements/MessageInput/kinds.css
<MessageInput> will return a easy type with a textual content enter and a submit button. We’ll get the roomId from props and the person from context. When the shape is submitted, we’ll name our sendMessage operate with all of the required data.
Add the next code to src/elements/MessageInput/index.jsx:
import React from 'react';
import { useAuth } from '../../hooks/useAuth';
import { sendMessage } from '../../companies/firebase';
import './kinds.css';

operate MessageInput({ roomId }) {
    const { person } = useAuth();
    const [value, setValue] = React.useState('');

    const handleChange = (occasion) => {
        setValue(occasion.goal.worth);
    };

    const handleSubmit = (occasion) => {
        occasion.preventDefault();
        sendMessage(roomId, person, worth);
        setValue('');
    };

    return (
        <type onSubmit={handleSubmit} className="message-input-container">
            <enter
                kind="textual content"
                placeholder="Enter a message"
                worth={worth}
                onChange={handleChange}
                className="message-input"
                required
                minLength={1}
            />
            <button kind="submit" disabled={worth < 1} className="send-message">
                Ship
            </button>
        </type>
    );
}
export { MessageInput };
Add the kinds to src/elements/MessageInput/kinds.css:
.message-input-container {
    show: flex;
    hole: 4px;
}

.message-input {
    padding: 12px 8px;
    flex: 1;
    background: var(--color-gray);
    border-radius: var(--border-radius);
}

.send-message {
    padding: 12px 14px;
    background: var(--color-blue);
    border-radius: var(--border-radius);
    cursor: pointer;
}
Now, we will render the element in <ChatRoom>:
// ...

import { MessageInput } from '../MessageInput';

// ...

operate ChatRoom() {
    // ...
        return (
        <>
            <h2>{room.title}</h2>
            <div>
                <Hyperlink to="https://weblog.logrocket.com/">⬅️ Again to all rooms</Hyperlink>
            </div>
            <div className="messages-container">
                <MessageInput roomId={room.id} />
            </div>
        </>
    );
}

// ...
For those who return to http://localhost:3000/room/canines, you need to see the message enter:
Attempt coming into a number of messages after which return to the info viewer within the Firebase console. It is best to see {that a} chat-rooms assortment was created with the next construction:
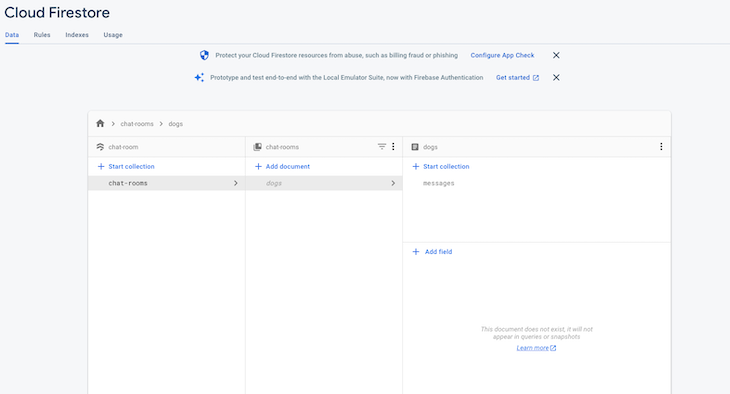
For those who click on into the messages subcollection, you’ll see paperwork for the messages you simply created. Attempt including messages in several chat rooms and see how new paperwork are created for every room.
Learn chat room messages
Now that we will write information to Firestore, the very last thing we have to do is retrieve the entire chatroom’s messages. We’ll create a <MessageList> element that will get rendered inside <ChatRoom> and lists the entire messages for a room. We’ll create a getMessages operate for fetching room messages and a useMessages Hook that shops them in state.
Let’s begin by creating getMessages. Replace src/companies/firebase.js with the code under:
// ...

import {
    getFirestore,
    assortment,
    addDoc,
    serverTimestamp,
    onSnapshot,
    question,
    orderBy,
} from 'firebase/firestore';

// ...

operate getMessages(roomId, callback) {
    return onSnapshot(
        question(
            assortment(db, 'chat-rooms', roomId, 'messages'),
            orderBy('timestamp', 'asc')
        ),
        (querySnapshot) => {
            const messages = querySnapshot.docs.map((doc) => ({
                id: doc.id,
                ...doc.information(),
            }));
            callback(messages);
        }
    );
}

export { loginWithGoogle, sendMessage, getMessages };
The onSnapshot SDK operate lets us benefit from Firestore’s real-time updates. It listens to the results of a question and receives updates when a change is made.
We cross it a question that we assemble utilizing the question operate. In our case, we wish to take heed to modifications to a room’s messages subcollection and order the paperwork in ascending order by their timestamp.
The second argument we give it’s a callback, which will get referred to as when it receives the preliminary question and any subsequent updates, like when new paperwork are added. We type an array of messages by mapping every doc, after which name the callback with the formatted messages. After we name getMessages in our Hook, we’ll cross a callback in order that we will retailer the messages in state.
onSnapshot returns an unsubscribe operate to detach the listener in order that our callback isn’t referred to as when it’s not wanted; we’ll use this to scrub up our Hook.
First, create the useMessages Hook file:
contact src/hooks/useMessages.js
useMessages will settle for a roomId, retailer messages in state, and return the messages. It’ll use an impact to fetch messages with getMessages, and unsubscribe the listener when the impact cleans up:
import React from 'react';
import { getMessages } from '../companies/firebase';

operate useMessages(roomId) {
    const [messages, setMessages] = React.useState([]);

    React.useEffect(() => {
        const unsubscribe = getMessages(roomId, setMessages);
        return unsubscribe;
    }, [roomId]);

    return messages;
}

export { useMessages };
Subsequent, we’ll create the <MessageList> element to fetch and render messages for a room. Create a brand new element file for this element:
mkdir src/elements/MessageList
contact src/elements/MessageList/index.jsx src/elements/MessageList/kinds.css
<MessageList> will take the roomId as a prop, cross that to useMessages, then render the messages. Add the next code to src/elements/MessageList/index.jsx:
import React from 'react';
import { useAuth } from '../../hooks/useAuth';
import { useMessages } from '../../hooks/useMessages';
import './kinds.css';

operate MessageList({ roomId }) {
    const containerRef = React.useRef(null);
    const { person } = useAuth();
    const messages = useMessages(roomId);

    React.useLayoutEffect(() => {
        if (containerRef.present) {
            containerRef.present.scrollTop = containerRef.present.scrollHeight;
        }
    });

    return (
        <div className="message-list-container" ref={containerRef}>
            <ul className="message-list">
                {messages.map((x) => (
                    <Message
                        key={x.id}
                        message={x}
                        isOwnMessage={x.uid === person.uid}
                    />
                ))}
            </ul>
        </div>
    );
}

operate Message({ message, isOwnMessage }) {
    const { displayName, textual content } = message;
    return (
        <li className={['message', isOwnMessage && 'own-message'].be part of(' ')}>
            <h4 className="sender">{isOwnMessage ? 'You' : displayName}</h4>
            <div>{textual content}</div>
        </li>
    );
}

export { MessageList };
The logic within the structure impact causes the container to scroll to the underside in order that we’re all the time seeing the latest message.
Now, we’ll add kinds to src/elements/MessageList/kinds.css:
.message-list-container {
    margin-bottom: 16px;
    flex: 1;
    overflow: scroll;
}

.message-list {
    top: 100%;
    show: flex;
    flex-direction: column;
    align-items: flex-start;
}

.message {
    padding: 8px 16px;
    margin-bottom: 8px;
    background: var(--color-gray);
    border-radius: var(--border-radius);
    text-align: left;
}

.own-message {
    background: var(--color-blue);
    align-self: flex-end;
    text-align: proper;
}

.sender {
    margin-bottom: 8px;
}
Lastly, render the element in <ChatRoom> above the <MessageInput> we added earlier:
// ...

import { MessageList } from '../MessageList';

// ...

operate ChatRoom() {
    // ...
    return (
        <>
            <h2>{room.title}</h2>
            <div>
                <Hyperlink to="https://weblog.logrocket.com/">⬅️ Again to all rooms</Hyperlink>
            </div>
            <div className="messages-container">
                <MessageList roomId={room.id} />
                <MessageInput roomId={room.id} />
            </div>
        </>
    );
}

// ...
Congrats, you now have a working chatroom app constructed with React and Firebase! You may view the ultimate code on GitHub.
Subsequent steps
An effective way to study is to take a undertaking and modify it or add extra options. Listed here are a number of concepts of the way you possibly can prolong this undertaking:
- Safe the Firestore database
- Add help for various authentication strategies
- Retailer chat rooms in Firestore as a substitute of in code
- Enable customers so as to add their very own chat rooms
- Let customers signal out
- Solely present chat messages from the final minute when coming into a chat room
- Present a message when a person enters or leaves a chat room
- Show person avatars
- Present all customers in a chatroom
- Randomly assign message colours to customers
Conclusion
On this tutorial, you realized the way to construct a easy chatroom app with Firebase. You realized the way to create a Firebase undertaking and add it to a React software, and authenticate customers utilizing Firebase Authentication’s Google sign-in methodology.
You then realized the way to use the addDoc API to write down to a Firestore database and the onSnapshot API to take heed to real-time updates.
For those who’re enthusiastic about studying extra about Firebase, you possibly can try the documentation. In case you have questions or wish to join with me, be sure you depart a remark or attain out to me on LinkedIn or Twitter!
Full visibility into manufacturing React apps
Debugging React functions could be tough, particularly when customers expertise points which are onerous to breed. For those who’re enthusiastic about monitoring and monitoring Redux state, routinely surfacing JavaScript errors, and monitoring gradual community requests and element load time, strive LogRocket. 

LogRocket is sort of a DVR for internet and cellular apps, recording actually all the pieces that occurs in your React app. As an alternative of guessing why issues occur, you possibly can combination and report on what state your software was in when a difficulty occurred. LogRocket additionally screens your app’s efficiency, reporting with metrics like shopper CPU load, shopper reminiscence utilization, and extra.
The LogRocket Redux middleware bundle provides an additional layer of visibility into your person classes. LogRocket logs all actions and state out of your Redux shops.
Modernize the way you debug your React apps — begin monitoring without cost.
