Would you want so as to add a slide panel menu to your WordPress web site?
Including a responsive menu will make it simpler for customers to navigate your web site when utilizing cellular units. Once they faucet your menu icon, a panel menu will slide onto the display screen utilizing a gorgeous animation.
On this article, we’ll present you tips on how to add a slide panel menu in WordPress themes with out writing any code.

Why Add a Slide Panel Menu in WordPress Themes?
Effectively-designed menus assist your guests discover their means round your WordPress web site. Lots of your guests shall be utilizing cellular units, so it’s essential to preview the cellular model of your WordPress web site to see how your navigation menu seems to be on smaller screens.
Fortunately, many WordPress themes include built-in types that can robotically present mobile-friendly menus when seen on a small display screen.
Nonetheless, you could wish to customise your cellular navigation much more and add a fullscreen responsive menu or animated slide panel menu.
With that in thoughts, let’s check out tips on how to add a slide panel menu in WordPress themes.
The right way to Add a Slide Panel Menu in WordPress Themes
The very first thing you’ll want to do is set up and activate the Responsive Menu plugin. For extra particulars, see our step-by-step information on tips on how to set up a WordPress plugin.
There’s a premium model of Responsive Menu with additional themes and extra options comparable to conditional logic, however for this tutorial, we’ll use the free plugin.
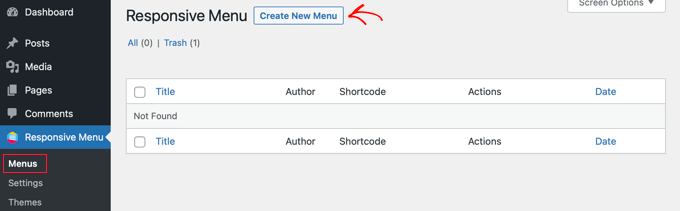
Upon activation, navigate to the Responsive Menu » Menus web page. As soon as there, you must click on the ‘Create New Menu’ button on the prime of the display screen.
You’ll then see 4 themes that you should use to your new responsive menu. Further themes can be found for buy.
For this tutorial, we’ll use the robotically chosen theme. You may then click on the ‘Subsequent’ button.

This can take you to the Menu Settings web page. Right here you’ll be able to enter a reputation to your responsive menu, after which choose which WordPress menu you’d wish to be displayed within the panel.
For the sake of this tutorial, we selected the ‘Navigation’ menu. If you’ll want to create a brand new menu, then you’ll be able to find out how by following our information on tips on how to add a navigation menu in WordPress.
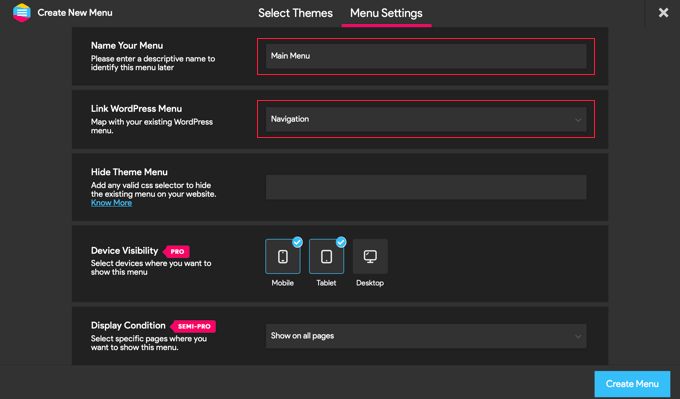
You may as well cover the conventional menu that comes together with your WordPress theme in order that your customers will solely see the brand new slide panel menu. You do that by getting into CSS code into the ‘Disguise Theme Menu’ subject.
The code you’ll want to enter right here varies from theme to theme, and you may be taught extra particulars by clicking the ‘Know Extra’ hyperlink.
Customers with the Professional model have a couple of extra settings. For instance, Professional customers can choose the units and pages the place the menu ought to be proven.
When you’re proud of the settings, you must click on the ‘Create Menu’ button on the backside of the web page. This can take you to a web page the place you’ll be able to end customizing your menu.
You will note a preview of your web site on the correct of the display screen, and there are buttons on the backside to change between telephone, pill, and desktop view. You’ll additionally discover customization choices on the left.
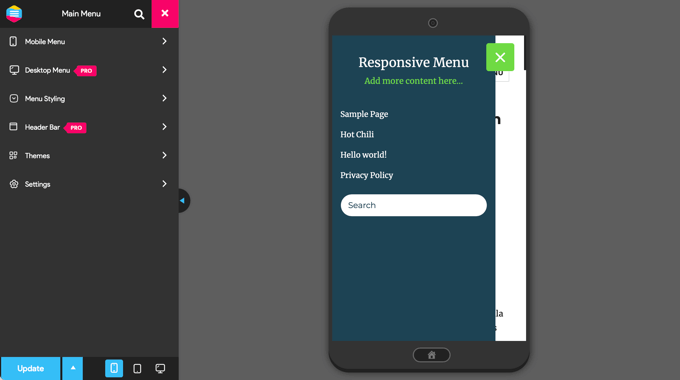
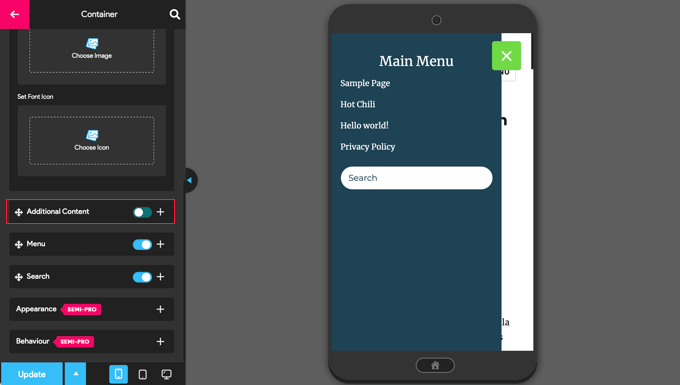
Discover that there’s some textual content displayed above the menu. That is the menu’s title textual content and a line of textual content that the plugin calls ‘extra content material’.
You may edit or cover the textual content by clicking on ‘Cell Menu’ after which ‘Container’ within the menu on the left of the web page.
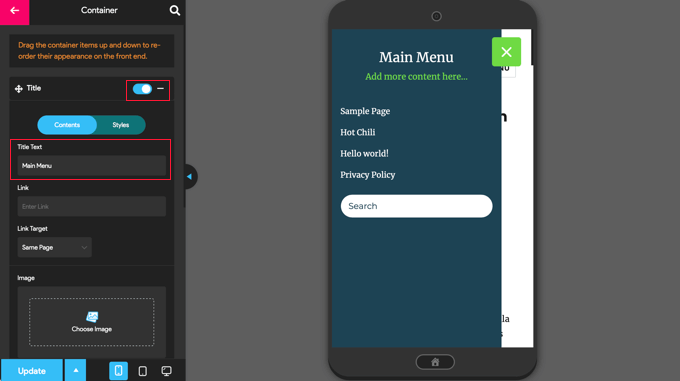
You may sort something you want into the ‘Title Textual content’ subject, comparable to ‘Primary Menu’ or ‘Navigation.’ In case you don’t wish to show a title, then merely slide the ‘Title’ change to the off place.
After that, you’ll want to scroll all the way down to the ‘Further Content material’ setting. You may toggle this setting off or sort alternate content material. Within the screenshot beneath, you’ll discover that the change has been toggled off so the phrases ‘Add extra content material right here…’ are actually hidden.
When you’re proud of the menu settings, be sure to click on the ‘Replace’ button on the backside of the web page to retailer your settings.
The Responsive Menu plugin comes with many different choices that permit you to change the conduct and look of your slide panel menu. You may discover these choices on the plugin’s settings web page and modify them as wanted.
Now you’ll be able to go to your web site to see the menu in motion. Right here’s the way it seems to be on our demo web site. Notice that if the present web page is within the menu, then it’s highlighted with a coloration band.

We hope this tutorial helped you learn to add a slide panel menu in WordPress themes. You might also wish to be taught tips on how to observe guests to your WordPress web site, or try our record of must-have plugins to develop your web site.
In case you preferred this text, then please subscribe to our YouTube Channel for WordPress video tutorials. You may as well discover us on Twitter and Fb.
The submit The right way to Add a Slide Panel Menu in WordPress Themes first appeared on WPBeginner.
