

On this mini-project, a wise residence answer from scratch constructed. AI-powered gesture recognition (Android) app can open or shut a (distant) door. This mini-project includes applied sciences corresponding to AI, Knowledge Science, IoT, Android, Cloud computing and so forth.
Summary
Sensible residence options contain AI and IoT applied sciences to manage doorways with a view to guarantee security and safety of the house. AI is used to coach pictures of human gestures corresponding to palm and fist. An Android utility acknowledges the gestures through the use of this skilled mannequin. This app sends gesture data as MQTT message by way of MQTT server. An IoT app subscribes to those messages and receives. This IoT app controls a servo motor to open or shut the door primarily based on the obtained MQTT message. This challenge includes applied sciences corresponding to AI, Knowledge Science, IoT, Android, Cloud computing and so forth.
The next growth environments are required:
- Net utility to coach human gestures (HTML)
- Google Colab to transform internet mannequin to TFLite mannequin (Python)
- Android Studio to develop Gesture utility (Java)
- Arduino to develop IOT app working on Node MCU (Arduino Sketch)
- Google Cloud VM for MQTT server (Java Script)
Knowledge Preparation and coaching
Step 1: Put together index.html file:
Obtain index.html file from Github
Add code for open as follows
<div class=”control-button-wrapper”>
<div class=”control-inner-wrapper” id=”open-button”>
<div class=”control-button” id=”open”>
<div class=”control-icon heart” id=”open-icon”><div><img src=”property/open.svg”/></div>OPEN</div>
<div class=”add-icon invisible” id=”open-add-icon”>
<img class=”heart” src=”property/icon.svg”/>
</div>
<canvas width=”224″ peak=”224″ class=”thumb disguise” id=”open-thumb”></canvas>
</div>
</div>
<div class=”sample-count” id=”open-total”><img src=”property/invalid-name.svg”/></div>
</div>
Equally add code for shut and none
Step 2: Put together ui.js file
Obtain ui.js file from Github
Add or replace code for the labels – open, shut and none
Add or replace the next code
const CONTROLS = [
‘up’, ‘down’, ‘left’, ‘right’, ‘leftclick’, ‘rightclick’, ‘scrollup’,
‘scrolldown’, ‘open’, ‘close’, ‘none’
];
const totals = [0, 0, 0, 0, 0, 0, 0, 0, 0, 0, 0];
const openButton = doc.getElementById(‘open’);
const closeButton = doc.getElementById(‘shut’);
const noneButton = doc.getElementById(‘none’);
openButton.addEventListener(‘mousedown’, () => ui.handler(8));
openButton.addEventListener(‘mouseup’, () => mouseDown = false);
closeButton.addEventListener(‘mousedown’, () => ui.handler(9));
closeButton.addEventListener(‘mouseup’, () => mouseDown = false);
noneButton.addEventListener(‘mousedown’, () => ui.handler(10));
noneButton.addEventListener(‘mouseup’, () => mouseDown = false);
Step3: Seize pictures
Open index.html in your Chrome browser.
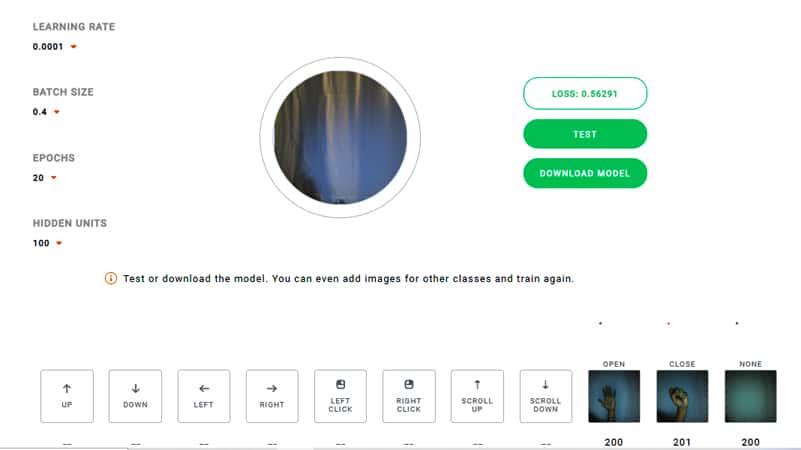
Set the parameters:
Studying fee = 0.0001, Batch measurement = 0.4, Epochs = 20 and Hidden Items = 100
Seize pictures for open, shut and none by clicking their icons
(200 pictures for every with completely different lighting circumstances)
Step4: Practice the photographs
Click on Practice button
Await coaching to finish
Click on Take a look at button
Take a look at open, shut and none operations
Obtain the mannequin by clicking ‘DOWNLOAD MODEL’ button
The next recordsdata are downloaded
labels.txt, mannequin.json, mannequin.weights.bin
Convert tensorflowjs mannequin to tflite mannequin
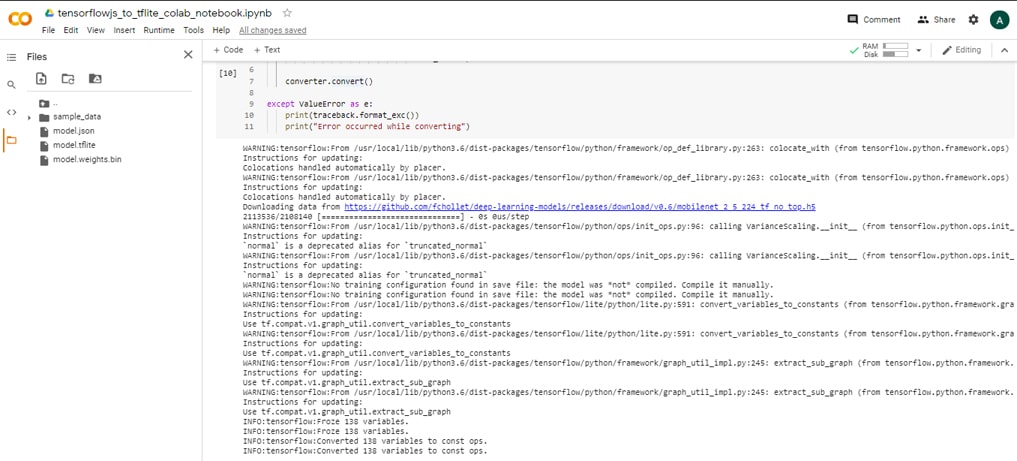
Step1: Add Pocket book
Add pocket book – tensorflowjs_to_tflite_colab_notebook.ipynb from Github Hyperlink
Step2: Setup the Setting
In colab, set up the next
tensorflow>=1.13.1
tensorflowjs==0.8.6
keras==2.2.4
Add the next recordsdata to Colab:
mannequin.json, mannequin.weights.bin
Step3: Execute Pocket book
Execute the cells within the pocket book
This may generate transformed mannequin file -> mannequin.tflite
Notice: Switch studying from MobileNet is used to create the ultimate mannequin
The online mannequin is prime mannequin
The MobileNet is the bottom mannequin
High mannequin is merged with the bottom mannequin to create a merged keras mannequin
Then merged keras mannequin is transformed to TFLite mannequin, which can be utilized in cellular
Step4: Obtain the mannequin file
Obtain mannequin.tflite file from Colab

Create Android utility for Gesture recognition
Step1: Change code or obtain code from Github
I. Adjustments within the code (ImageClassifier.java)
from
labelProbArray = new float[1][8];
to
labelProbArray = new float[1][3];
II. XML structure adjustments:
Change up -> open, down -> shut, left -> none
and
remark out different structure components corresponding to proper, left_click, right_click, scroll_up, scroll_down in
res->layout->layout_bottom_sheet.xml
res->layout->layout_direction.xml
III. adjustments in Camera2BasicFragment.java
Change up -> open, down -> shut, left -> none
and remark out different structure components corresponding to proper, left_click, right_click, scroll_up, scroll_down
IV. Remark out code associated to
// rightLayout,
// leftClickLayout,
// rightClickLayout,
// scrollUpLayout,
// scrollDownLayout;
V. Test likelihood to alter the state:
String probabilityStr = textToShow.toString().substring(textToShow.toString().indexOf(“:”)+1,
textToShow.toString().indexOf(“:”)+7);
double likelihood=0.0;
attempt {
likelihood = Double.parseDouble(probabilityStr.trim());
} catch (NumberFormatException e) {
Log.e(“amlan”, “numberStr just isn’t a quantity”);
}
String finalToken = token;
if(likelihood<0.8){
finalToken = “NONE”;
}
Step2: Combine MQTT code
a. Replace Construct.gradle
implementation ‘org.eclipse.paho:org.eclipse.paho.shopper.mqttv3:1.2.4’
implementation ‘org.eclipse.paho:org.eclipse.paho.android.service:1.1.1’
b. Replace the code for Camera2BasicFragment.java or obtain from Github
c. Replace Manifest
<uses-permission android:identify=”android.permission.WAKE_LOCK” />
<uses-permission android:identify=”android.permission.INTERNET” />
<uses-permission android:identify=”android.permission.ACCESS_NETWORK_STATE” />
<uses-permission android:identify=”android.permission.READ_PHONE_STATE” />
<uses-permission android:identify=”android.permission.RECORD_AUDIO” />
<service android:identify=”org.eclipse.paho.android.service.MqttService” />
d. publish the gesture state
if(validMQTT==true) {
publish(shopper, finalToken);
}
Step3: Test with Mosquitto
Run the Android app
Open a command window
Subscribe to the subject – ‘gesture’
mosquitto_sub -h digitran-mqtt.tk -t gesture -p 1883

Create Arduino utility to open/shut door
Step1: Join Servo motor to NodeMCU Blynk board Connection:
Orange wire connects to Digital pin D4.
Brown wire connects to GND pin
Crimson wire connects to 3V3 pin
Step2: Create Arduino utility (gesture.ino) file or obtain from GitHub: Hyperlink
Step3: Add code for opening and shutting the door.
Subscribe to matter – ‘gesture’
To open the door, flip servo motor to 90degree.
To shut the door, flip servo motor to 0degree.
shopper.subscribe(“gesture”);
if ( msgString == “open” )
{
servo.write(90);
Serial.print(“gesture: “);
Serial.println(“open”);
}
else if ( msgString == “shut”)
{
servo.write(0);
Serial.print(“gesture: “);
Serial.println(“shut”);
}

MQTT server setup
MQTT server: digitran-mqtt.tk
MQTT port: 1883
Refer the next hyperlink for the steps to setup MQTT server in GCP VM:
Demo
The demo of this challenge is given on this Hyperlink
References
- TensorFlow Lite Gesture Classification Android Instance Hyperlink
- Movement Gestures Detection utilizing Convolutional Neural Networks and Tensorflow on Android Hyperlink
- Movement Gesture Detection Utilizing Tensorflow on Android Hyperlink
- Coaching a Neural Community to Detect Gestures with OpenCV in Python Hyperlink
- Interfacing Servo Motor With NodeMCUs Hyperlink
- Make Automated Door Opening and Closing System utilizing IR sensor & Servo Motor | Challenge for Inexperienced persons Hyperlink
