
Easy CRUD-based modules, a standard requirement of any enterprise, needs to be easy to construct and keep. Remult is a complete framework that enables builders to construct full-stack, type-safe apps utilizing solely TypeScript code.
This text will introduce Remult’s fundamental ideas and can reveal how Remult can be utilized to simplify and pace up your net app improvement course of!
On this information, we’ll create a easy reserving kind and we’ll retailer the shape submissions in a MongoDB assortment. We’ll construct the UI utilizing React after which add styling with Spectre.css.
Bounce forward
Get to know the Remult framework
Remult is a CRUD framework that makes use of TypeScript entities for CRUD operations. It additionally supplies a type-safe API shopper and an ORM for backend database operations.
This framework abstracts away and reduces the boilerplate code in your utility. It makes it simple to construct full-stack functions utilizing TypeScript and in addition permits builders to combine with different frameworks equivalent to Categorical.js and Angular.
Remult is a middle-ground. It doesn’t power you to work in a sure approach; as an alternative, it supplies many choices in your tasks.
Arrange the React undertaking with Remult
Let’s begin by making a React undertaking utilizing Create React App and choosing the TypeScript template:
> npx create-react-app remult-react-booking-app --template typescript
> cd remult-react-booking-app
Subsequent, we’ll set up the required dependencies.
> npm i axios specific remult dotenv
> npm i -D @sorts/specific ts-node-dev concurrently
Within the above code, we’re utilizing the concurrently package deal. This package deal is required as a result of we’ll be serving the shopper and server code concurrently from the basis of React undertaking.
Now, create a tsconfig file for the server, like so:
// tsconfig.server.json
{
  "extends": "./tsconfig.json",
  "compilerOptions": {
    "module": "commonjs",
    "emitDecoratorMetadata": true
  }
}
Then, in the primary tsconfig.json file, add the experimentalDecorators choice to allow the usage of decorators.
// tsconfig.json

{
  "compilerOptions": {
    // ...
    "experimentalDecorators": true
  },
}
Replace the package deal.json file, like so:
// package deal.json

{
  "proxy": "http://localhost:3002",
  // ...
  "scripts": {
  // ...
    "begin:dev": "concurrently -k -n "SERVER,WEB" -c "bgBlue.daring,bgGreen.daring" "ts-node-dev -P tsconfig.server.json src/server/" "react-scripts begin""
  },
}
Right here, we add the proxy choice to let the webpack dev server know to proxy API requests on ports 3000 to 3002 whereas the app is operating on the native surroundings. We additionally add an npm script to provoke the frontend and API dev server concurrently.
Initialize the remultExpress middleware
Now, let’s create a server folder contained in the src folder created by Create React App and create an api.ts file that may initialize the remultExpress middleware.
// src/server/api.ts

import { remultExpress } from "remult/remult-express";

export const api = remultExpress();
Subsequent, create a .env file for the server and specify the API port quantity.
// src/server/.env

API_PORT=3002
Subsequent, create an index.ts file that may function the basis file for the server, initialize specific, load the surroundings variables, and register the remultExpress middleware.
Extra nice articles from LogRocket:
// src/server/index.ts

import { config } from "dotenv";
config({ path: __dirname + "/.env" });

import specific from "specific";
import { api } from "./api";

const app = specific();
app.use(api);

app.hear(course of.env.API_PORT || 3002, () => console.log("Server began"));
Initialize Remult on the frontend
We’ll use the worldwide Remult object within the React app to speak with the API server by way of the axios HTTP shopper.
// src/frequent.ts

import axios from "axios";
import { Remult } from "remult";

export const remult = new Remult(axios);
At this level, the first undertaking setup is full and able to run on the native server.
Use the next command:
> npm run begin:dev
Add the database connection
On this information, we’ll use MongoDB to retailer our kind submissions. To arrange the MongoDB connection pool for Remult, use the remultExpress middleware’s dataProvider choice.
First, you need to set up mongodb as a dependency in your undertaking, like so:
> npm i mongodb
The dataProvider choice can settle for an async() operate that connects to MongoDB and returns the MongoDataProvider object, which acts as a connector for Remult.
// src/server/api.ts

import { MongoDataProvider } from "remult/remult-mongo";

export const api = remultExpress({
  dataProvider: async () =>  "");
    await shopper.join();
    console.log("Database linked");
    return new MongoDataProvider(shopper.db("remult-booking"), shopper);
  ,
});
Generate the API endpoints with Remult entities
Entities are utilized by Remult for producing API endpoints, API queries, and database instructions. entity is used as a mannequin class for each frontend and backend code.
We would require two entities to be able to outline the reserving object and the obtainable each day slots.
Create a shared folder inside src, and it’ll embody code shared between the frontend and backend. Then, create one other subfolder for storing entities within the shared folder, and create the entity class information: Reserving.entity.ts and Slot.entity.ts.
To create an entity, outline a category with the required properties, and use the @Entity decorator. The @Entity decorator accepts a necessary argument used to find out the API route, the default database assortment or desk identify, and an choices argument used to outline entity-related properties and operations.
For this information, the Slot entity will be outlined as follows:
// src/shared/entities/Slot.entity.ts

import { Entity, Fields, IdEntity } from "remult";

@Entity("slots")
export class Slot extends IdEntity {
  @Fields.string()
  startTime: String;

  @Fields.string()
  endTime: String;
}
The @Fields.string decorator defines an entity information subject of kind String. This decorator can be used to explain field-related properties like validation guidelines and operations.
// src/shared/entities/Reserving.entity.ts

import { Entity, Fields, IdEntity, Validators } from "remult";

@Entity("bookings", {
  allowApiCrud: true
})
export class Reserving extends IdEntity {
  @Fields.string({
    validate: Validators.required,
  })
  identify: String;

  @Fields.string({
    validate: Validators.required,
  })
  e-mail: String;

  @Fields.string({ validate: Validators.required })
  description: String;

  @Fields.string({
    validate: Validators.required,
  })
  date: String;

  @Fields.string({
    validate: Validators.required,
  })
  slotId: string;
}
Now that each entities are outlined, let’s add them to theremultExpress middleware’s entities property. We will additionally seed preliminary information to the slots assortment utilizing the initApi property.
// src/server/api.ts

import { Slot } from "../shared/entities/Slot.entity";
import { Reserving } from "../shared/entities/Reserving.entity";

export const api = remultExpress({
  entities: [Slot, Booking],
  initApi: async (remult) => {
    const slotRepo = remult.repo(Slot);
    const shouldAddAvailablSlots = (await slotRepo.depend()) === 0;

    if (shouldAddAvailablSlots) {
      const availableSlots = [10, 11, 12, 13, 14, 15, 16, 17].map((time) => ({
        startTime: `${time}:00`,
        endTime: `${time}:45`,
      }));

      await slotRepo.insert(availableSlots);
    }
  },
  dataProvider: async () => {
    // ...
  },
});
Construct and elegance the frontend
Let’s start engaged on the app’s frontend by constructing the shape UI.
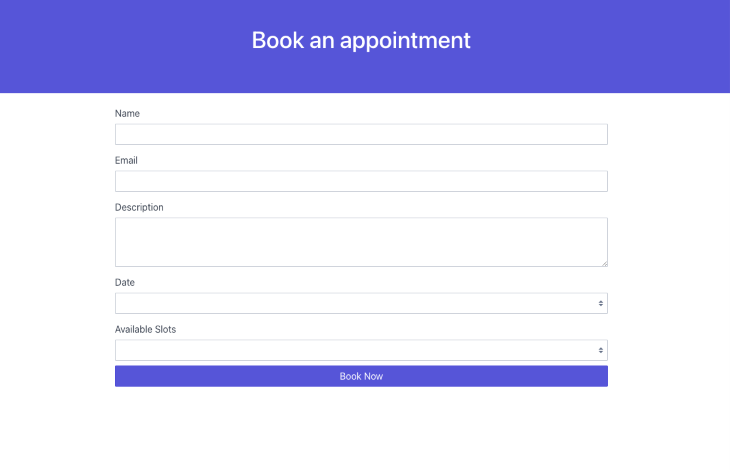
To start out, substitute the default boilerplate code within the src/App.tsx file with the next code:
// src/App.tsx

import "./App.css";
import { BookingForm } from "./parts/BookingForm";

operate App() {
  return (
    <div className="App">
      <header className="hero hero-sm bg-primary ">
        <div className="hero-body text-center">
          <div className="container grid-md">
            <h1>Guide an appointment</h1>
          </div>
        </div>
      </header>
      <BookingForm />
    </div>
  );
}

export default App;
Now, let’s add the Spectre.css library to make the consumer interface look presentable.
> npm i spectre.css
You’ll be able to discuss with the next code for the BookingForm element:
// src/parts/BookingForm.tsx

import { useEffect, useState } from "react";
import { useForm } from "react-hook-form";
import { remult } from "../frequent";
import { Reserving } from "../shared/entities/Reserving.entity";
import { Slot } from "../shared/entities/Slot.entity";

const bookingRepo = remult.repo(Reserving);

export const BookingForm = () => {
  const {
    register,
    handleSubmit,
    setValue,
    watch,
    setError,
    clearErrors,
    reset,
    formState: { errors },
  } = useForm();

  const [availableDates, setAvailableDates] = useState<string[]>([]);
  const [availableSlots, setAvailableSlots] = useState<Slot[]>([]);

  const [isSubmitting, setSubmitting] = useState<boolean>(false);

  const bookingDate = watch("date");

  const onSubmit = async (values: Report<string, any>) => {
    attempt {
      setSubmitting(true);
      const information = await bookingRepo.save(values);
      console.log({ information });
      reset();
    } catch (error: any) {
      setError("formError", {
        message: error?.message,
      });
    } lastly {
      setSubmitting(false);
    }
  };

  // JSX code
  return (
    <kind onSubmit={handleSubmit(onSubmit)}>
      <>...</>
    </kind>
  );
};
Right here, we use the react-hook-form library to handle the shape state and enter values.
To save lots of the submitted values within the bookings assortment, we have to create a repository object for the Reserving entity.
const bookingRepo = remult.repo(Reserving);
Remult repository objects present strategies to carry out CRUD operations on the entity. On this case, we’re utilizing the save() repository methodology to insert information into the gathering.
await bookingRepo.save(values);
Add backend-only strategies
At occasions, you may wish to create customized APIs with further logic, like sending an e-mail, performing a number of database operations, or finishing different sequential duties.
A number of DB operations have to be solely carried out on the backend as a result of having varied entity-level capabilities on the frontend might influence the app efficiency.
One approach to implement backend-only strategies in Remult is to create a controller class and use the @BackendMethod decorator.
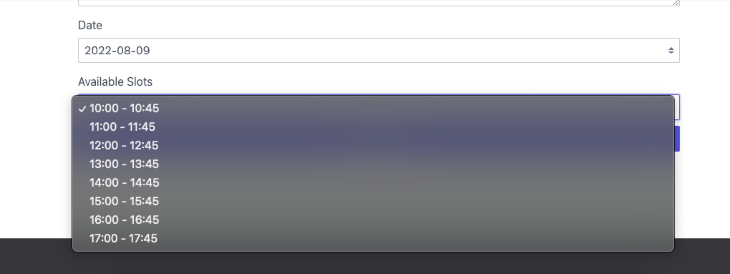
For our undertaking’s reserving kind, let’s create two backend strategies. The primary methodology, getAvailableDates(), will get the subsequent 5 obtainable working days. The second methodology, getAvailableSlots(), will get the obtainable reserving slots by date.
// src/shared/controllers/Reserving.controller.ts

import { BackendMethod, Remult } from "remult";
import { Reserving } from "../entities/Reserving.entity";
import { Slot } from "../entities/Slot.entity";
import { addWeekDays, formattedDate } from "../utils/date";

export class BookingsController {
  @BackendMethod({ allowed: true })
  static async getAvailableDates() {
    const addDates = (date: Date, depend = 0) =>
      formattedDate(addWeekDays(date, depend));

    return Array.from({ size: 5 }).map((v, idx) => addDates(new Date(), idx));
  }

  @BackendMethod({ allowed: true })
  static async getAvailableSlots(date: string, remult?: Remult) {
    if (!remult) return [];
    const unavailableSlotIds = (
      await remult.repo(Reserving).discover({ the place: { date } })
    ).map((reserving) => reserving.slotId);

    const availableSlots = await remult
      .repo(Slot)
      .discover({ the place: { id: { $ne: unavailableSlotIds } } });

    return availableSlots;
  }
}
The allowed property within the @BackendMethod decorator defines whether or not the requesting consumer has entry to the API. On this case, it’s true as a result of we wish the API to be public.
You’ll be able to have authorization guidelines that management the worth of the allowed property. Backend strategies even have entry to the remult object to be able to execute DB operations.
To make use of the backend strategies, you don’t need to make any API calls manually. Simply import the controller in your frontend code and name the strategies instantly as you’d for another module.
Internally, Remult makes the API name for you utilizing the HTTP shopper that was outlined within the frontend code once you initialized Remult. This manner, you’re assured that the APIs are type-safe and simpler to take care of.
// src/parts/BookingForm.tsx

import { BookingsController } from "../shared/controllers/Reserving.controller";

export const BookingForm = () => {
   // ...
  useEffect(() => {
    BookingsController.getAvailableDates().then(setAvailableDates);
  }, []);

  useEffect(() => {
    if (!availableDates.size) return;
    setValue("date", availableDates[0]);
    BookingsController.getAvailableSlots(availableDates[0]).then(
      setAvailableSlots
    );
  }, [availableDates]);

  useEffect(() => {
    BookingsController.getAvailableSlots(bookingDate).then(setAvailableSlots);
  }, [bookingDate]);

  useEffect(() => {
    setValue("slotId", availableSlots[0]?.id);
  }, [availableSlots]);
 // ...
}
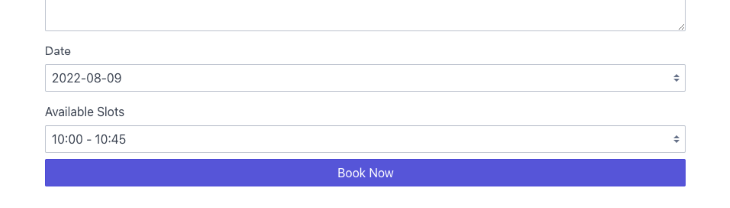
As proven beneath, the Date and Out there dropdown kind fields at the moment are pre-filled by default.
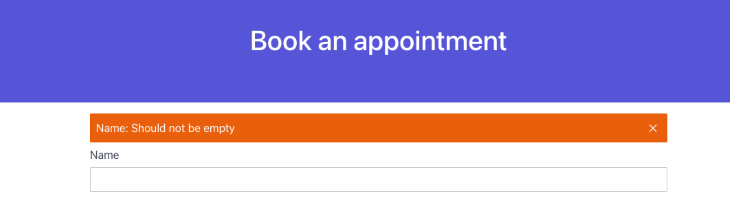
If we attempt to submit the shape with incomplete values, the validation guidelines added within the Reserving entity will fail and return an error.
To take a look at the whole code from this text, see the GitHub repo.
Conclusion
Remult is a good framework that means that you can construct type-safe, full-stack apps shortly and simply. Its easy syntax makes Remult the proper instrument for any developer seeking to begin type-safe programming. You’ll be able to take a look at the official documentation for extra in-depth explanations of the strategies coated on this information.
So what are you ready for? Give Remult a attempt right now!
LogRocket proactively surfaces and diagnoses an important points in your TypeScript apps

1000’s of engineering and product groups use LogRocket to cut back the time it takes to know the basis reason for technical and usefulness points of their TypeScript apps. With LogRocket, you will spend much less time on back-and-forth conversations with prospects and take away the limitless troubleshooting course of. LogRocket means that you can spend extra time constructing new issues and fewer time fixing bugs.
Proactively repair your TypeScript apps — attempt LogRocket right now.
