
Oftentimes, web site backgrounds have plain colours — only a large bland house. In CSS, you should use the background property and all its variations to create a background. Backgrounds are there to boost the looks of a web site, so it’s vital you get it proper.
A very cool possibility is to make use of a video as a background with CSS, however it may be a bit tough to get it to work seamlessly. On this article, you’ll learn to add a video because the background of an internet site utilizing CSS and JavaScript, in addition to make it responsive and interactive with out taking a efficiency hit.
The main target shall be on an internet site’s header part, however video backgrounds can go on different sections of the location. You may have full-screen or partial backgrounds. Let’s get began!
Find out how to create video backgrounds
Utilizing the video HTML factor, we will set a video as our web site’s background. There are two choices right here: utilizing the video as it’s, or including an overlay. We are able to then add some textual content or different parts over it utilizing the place property.
Utilizing the video as it’s
That is merely having the video play in its unique visible state, then having your textual content, or any factor positioned immediately over it.
First issues first, you want a pleasant video, ideally one that matches into the general theme of the web site. Right here’s one from Pexels:

Let’s get began with creating the video background. The way in which you arrange the HTML is as much as you. You may have whichever parts you need on the web page, however an important factor is that the video is in there someplace:
 <physique>
    <part id="#important">
      <video src="https://weblog.logrocket.com/optimizing-video-backgrounds-css-javascript/strolling on the moon.mp4" muted autoplay loop></video>
    </part>
</physique>
I added the video utilizing the HTML5 video tag, and there are three attributes you may embody. The primary attribute, muted, removes the sound from the video. The autoplay attribute will make the video play mechanically, and the video will run in a steady loop with the loop attribute.
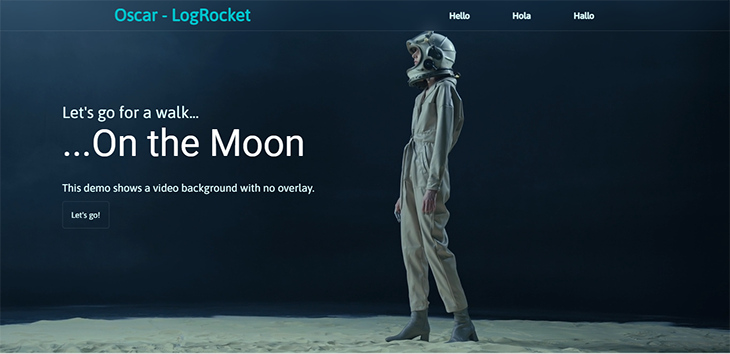
For this tutorial, right here’s an entire syntax so you may observe alongside:
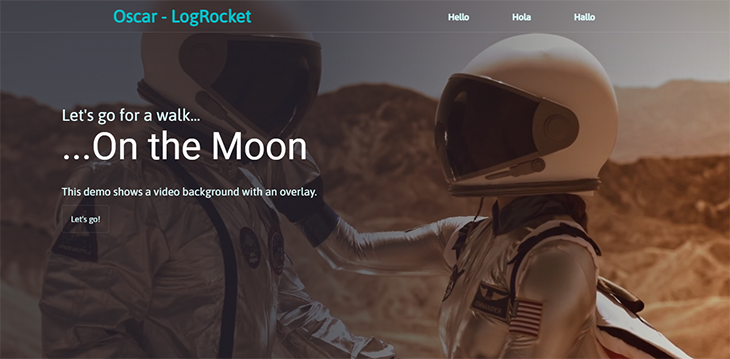
<physique>
  <part id="important">
    <nav>
     <div class="brand">
        <a href="#">Oscar - LogRocket</a>
     </div>
        <ul class="menu">
          <li><a href="#">Hey</a></li>
          <li><a href="#">Hola</a></li>
          <li><a href="#">Hallo</a></li>
        </ul>
    </nav>
      <video src="https://weblog.logrocket.com/optimizing-video-backgrounds-css-javascript/strolling on the moon.mp4" muted autoplay loop></video>
      <div class="main-text">
        <h2>Let's go for a stroll...</h2>
        <h1>...On the Moon</h1>
        <p>
          This demo exhibits a video background with no overlay.
        </p>
        <a href="#" class="btn">Let's go!</a>
      </div>
  </part>
</physique>
It’s the identical with CSS, you may fashion each factor to your style. Beneath is my styling for the video background:
#important video{
  place: absolute;
  high: 0;
  left: 0;
  width: 100%;
  top: 100%;
  object-fit: cowl;
}
Let’s go over every of the above attributes. First issues first, the place. It’s set to absolute, which means it’s relative to the highest and aspect of the net web page. The remainder of the syntax is to take away any house across the video (high and left) and to make sure the video suits completely into the web page (since we’re going for a full-screen background).
Right here’s a screenshot of the web page:
And right here’s one thing higher than a screenshot, a reside demo! The perfect view is 0.5x:
See the Pen
Video background with out overlay by Oscar-Jite (@oscar-jite)
on CodePen.
It’s vital that there’s a great distinction between the textual content and the video. As you may see from the demo, the textual content is completely legible.
Including an overlay to a video background
Including an overlay to the background could be notably helpful when the textual content on the video is illegible. Or perhaps if the video is distracting and also you wish to tone it down.
Right here you may have some enjoyable! Overlays can both be plain, clear colours, or they are often gradients. With gradients, you should use a color-to-color gradient or color-to-transparent overlay.
Coloration-to-color gradients have two distinct colours mixing into one another. With color-to-transparent gradients, the video can progressively fade into the colour of the following part.
Extra nice articles from LogRocket:
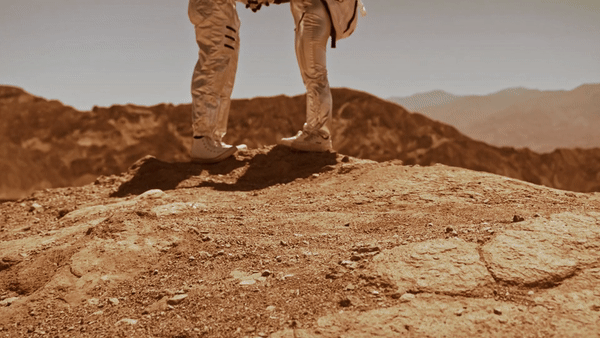
We’re going to work with a brighter video this time so the overlay can actually come out. Right here’s one, additionally from Pexels:
Let’s see the way it appears to be like with no overlay:
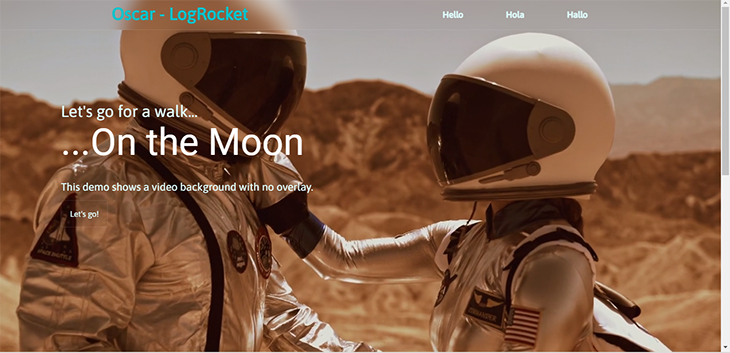
Right here, the textual content type of will get misplaced due to the video background. An overlay can enhance the distinction and make the textual content extra seen.
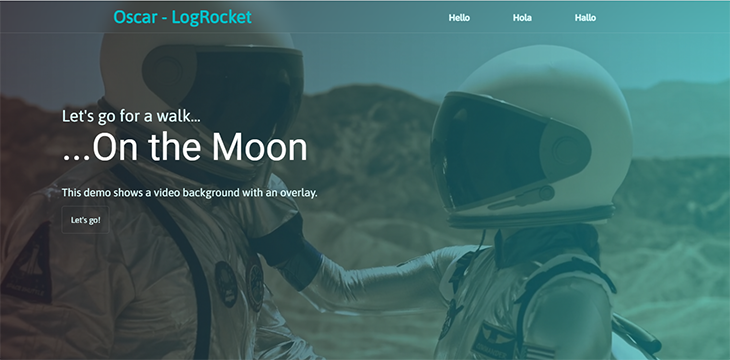
Plain colour overlays
Let’s get began, we’re utilizing the identical setup as earlier than. This time we’re utilizing an empty div within the HTML code to function the overlay:
<physique>
    <part id="#important">
      <div class="overlay"></div>
      <video src="https://weblog.logrocket.com/optimizing-video-backgrounds-css-javascript/video.mp4" muted autoplay loop></video>
    </part>
</physique>
Within the CSS code, begin by positioning it precisely just like the video background. It’s because it’s additionally going to be the identical dimension. Then, give it a colour with the background property:
.overlay{
  place: absolute;
  high: 0;
  left: 0;
  width: 100%;
  top: 100%;
  background: rgba(48,25,52,0.75);
}
And right here’s the consequence:

Significantly better.
Gradient overlays
Since we’re coping with gradients, we’ll use the background-image property. Particularly, that is going to be a linear-gradient. The path is as much as you, however it’s finest to go along with horizontal or vertical instructions to keep up consistency:
.overlay{
  background-image: linear-gradient(to proper, rgba(34,35,46,0.75),
  rgba(0,194,203,0.5));
}
Be certain that the a part of the gradient that overlaps with the textual content isn’t affecting its readability.
Subsequent up, we now have the color-to-transparent gradients, that’s, one colour fading to nothing. You may set the purpose when the colour transition begins:
background-image: linear-gradient(to proper, rgba(34,35,46,0.75) 40%,
rgba(0,0,0,0));
Right here, the overlay transitions from a darkish blue on the left to the unique state of the video background on the precise.
You can too have the transition occur vertically. The gradient blends into the following part simply after the video background:
background-image: linear-gradient(to backside, rgba(34,35,46,0.75) 50%, rgba(34,35,46));
See the Pen
Video background with gradient overlay by Oscar-Jite (@oscar-jite)
on CodePen.
Making video backgrounds responsive
The video background is normally static when resizing the window, the facet ratio is not going to change. It’ll have some degree of responsiveness, however it received’t scale because the viewport turns into smaller.
The commonest (or universally accepted) facet ratio is 16:9. It’s the default for nearly all trendy units with a display screen. We’re going to set our video background to keep up this facet ratio utilizing media queries:
@media (min-aspect-ratio: 16/9) {
  video {
    width: 100%;
    top: auto;
  }
}
@media (max-aspect-ratio: 16/9) {
  video {
    width: auto;
    top: 100%;
  }
}
Right here, we’re saying that on any viewport wider than 16:9, the width needs to be fastened and the peak scaled accordingly. It’s the alternative with smaller viewports.
We are able to’t be involved about responsiveness and never discuss cell units. You may disable the video and simply show a picture for smaller screens to assist efficiency. It is best to use a screenshot from the video because the picture for consistency:
@media (max-width: 768px) {
    video {
    show: none;
  }
  #important{
    background: url(/snapshot.png);
    background-size: cowl;
  }
}
Now the video received’t be proven on any system with a display screen width lower than 768px. As a substitute, they’ll see a static picture.
Making video backgrounds performant
You’ve simply discovered make the video background responsive, now let’s make it performant.
Selecting when to play and pause the video
A video background doesn’t cease enjoying when it’s out of view. This will trigger efficiency points as a result of your CPU goes to be working nonstop. You want a option to cease the video from enjoying when it’s out of view, and you are able to do this utilizing the Intersection Observer API out there in JavaScript.
This lets code register a callback operate, executed every time a component you want to monitor enters or exits the viewport.
First, give the video an id, after which create an intersection observer:
let choices = {
        root: null,
        rootMargin: '0px',
        threshold:1.0
      };
The choices object accommodates the situations for the callback. The root, set to null, is the browser’s viewport, or guardian factor. It’ll assist in checking the visibility of the goal factor, the video background.
rootMargin is the margin across the root. You may select to shrink the world across the viewport. It could actually maintain as much as 4 values, just like the CSS margin property.
The threshold is what share of the factor needs to be within the viewport earlier than the callback is triggered. For this instance, it’s set to 1.0, which signifies that one hundred pc of the video’s space needs to be within the viewport earlier than it performs.
Subsequent, you goal the factor that’s going to be noticed. That is if you’ll want the id. The id we’re utilizing is video-bg:
let observer = new IntersectionObserver(callback, choices);
observer.observe(doc.querySelector('#video-bg'));
Now, let’s create the callback operate. It’ll maintain two arguments: entries and observer:
let callback = (entries, observer)=>{
        entries.forEach(entry => {
          if(entry.isIntersecting){
            entry.goal.play();
          }
          else{
            entry.goal.pause();
          }
        });
      }
For every entry, the video intersects with the viewport. When it’s in view, the video, goal, will play, and when it leaves the viewport, it’ll pause.
Right here’s the entire JavaScript code:
      let choices = {
        root: null,
        rootMargin: '0px',
        threshold:1.0
      };
      let callback = (entries, observer)=>{
        entries.forEach(entry => {
          if(entry.isIntersecting){
            entry.goal.play();
          }
          else{
            entry.goal.pause();
          }
        });
      }
      let observer = new IntersectionObserver(callback, choices);
      observer.observe(doc.querySelector('#video-bg'));
Now, the video background will solely play when it’s fully contained in the viewport.
Eradicating the video’s sound
Having a mute video shall be much less distracting, and that’s one much less factor for the CPU to fret about. For those who do need the sound, you may select to not embody the mute attribute within the HTML video tag from the beginning.
Utilizing the precise video codecs
Some video codecs are usually not appropriate with HTML. Solely three video codecs are supported on HTML5, and they’re MP4, WEBM, and Ogg. So that you’ll must convert your video to any of those codecs earlier than utilizing it as a background.
Size and dimension
Preserve the video quick and small so it doesn’t take an excessive amount of time to load earlier than it performs. Compress the video if it’s too giant.
The pause and play capabilities
Usually the video is about to autoplay, however you may add pause and play performance. You’ve already seen pause the video based mostly on visibility, however now you don’t have to attend till it exits the viewport.
First, you may pause the video when the mouse isn’t hovering on it. That’s, the video background is lively so long as the mouse is sitting over it:
const video = doc.querySelectorAll('#video-bg');
      for (let i = 0; i<video.size; i++){
        video[i].addEventListener('mouseenter', operate(e){
          video[i].play()
        })
        video[i].addEventListener('mouseout', operate(e){
          video[i].pause()
        })
      }
Right here, we goal the video background utilizing its id after which have occasion listeners play the video when the cursor is over it (mouseenter) and pause when the cursor leaves (mouseout). This works when there’s no overlay, so you may hover immediately over the video.
If you wish to preserve the overlay, then a play/pause button is your finest wager. You’ll must create a button for this:
<button kind="button" class="play-btn" id="play-btn">
          <span><i class="fas fa-play"></i></span>
  </button>

.play-btn{
  background: none;
  border: 1px strong rgba(255, 255, 255, 0.1);
  font-size: 22px;
  padding: 1rem;
  border-radius: 50%;
  width: 50px;
  top: 50px;
  show: inline-flex;
  justify-content: middle;
  align-items: middle;
  define: none;
  colour: #e0ffff;
}
This needs to be positioned in an simply accessible space of the web page, ideally near the header textual content. We’re utilizing a play icon from Font Superior:
![]()
Subsequent up, including the performance, we’re going to make use of jQuery. You’ll must hyperlink this to your HTML file:
<script src="https://code.jquery.com/jquery-3.6.1.min.js"></script>
Right here’s the entire operate:
 const video = $('#video-bg');
      let enjoying = false;
      $('#play-btn').click on(operate(){
        if(enjoying = false){
          video.set off("play");
          enjoying = true;
          $(this).html("<span><i class="fas fa-pause"></i></span>");
        } else {
          video.set off("pause");
          enjoying = false;
          $(this).html("<span><i class="fas fa-play"></i></span>");
        }
      }
      )
Now you may pause and play the video background at will.
Different methods to make use of video backgrounds
Now we’ll focus on another fascinating methods to make use of video backgrounds in your web site.
As a background video for textual content
You may add a textual content overlay over the video background utilizing the mix-blend-mode CSS property. This property units how a component ought to mix with the content material of the guardian factor:
  <part>
    <video src="https://weblog.logrocket.com/optimizing-video-backgrounds-css-javascript/video.mp4" autoplay muted loop></video>
    <h1>AMONG THE STARS</h1>
  </part>
part h1{
  place: absolute;
  high: 0;
  left: 0;
  width: 100%;
  top: 100%;
  show: flex;
  justify-content: middle;
  align-items: middle;
  flex-direction: column;
  text-transform: uppercase;
  font-size: 7rem;
  colour: #e0ffff;
  background: #22232e;
  mix-blend-mode: multiply;
}
See the Pen Video background with Textual content overlay by Oscar-Jite (@oscar-jite) on CodePen.
There are a number of values you should use with the mix-blend-mode property, however multiply is the one which lets you see clear via the textual content. It provides an overlay to the remainder of the web page since you set the h1 factor, holding the textual content, to take up one hundred pc of its guardian factor.
As a video background slider
You may have a number of video backgrounds in a slider setup, which could be managed. Go forward and add different movies into the HTML:
<video class="video-bg lively" src="https://weblog.logrocket.com/optimizing-video-backgrounds-css-javascript/video.mp4" muted autoplay loop></video>
    <video class="video-bg" src="video2.mp4" muted autoplay loop></video>
    <video class="video-bg" src="video3.mp4" muted autoplay loop></video>
Subsequent, you create the slider management. This needs to be within the header part of the webpage:
<div class="slider-btns">
        <div class="slide-btn"></div>
        <div class="slide-btn"></div>
        <div class="slide-btn"></div>
</div>
.slider-btns{
  place: relative;
  show: flex;
  justify-content: middle;
  align-items: middle;
  remodel: translateY(50px);
  z-index: 100;
}
.slide-btn{
  width: 10px;
  top: 10px;
  background: #e0ffff;
  border-radius: 50%;
  cursor: pointer;
}
.slide-btn.lively{
  background: #00c2cb;
}
.slide-btn:not(:last-child){
  margin-right: 20px;
}
.slide-btn:hover{
  remodel: scale(1.2);
}
The .lively class is for when the slider is purposeful. Now, it’s time for JavaScript. You’re creating an identical statements for the slider buttons altering colour, and the video background altering.
Begin by concentrating on the weather:
const btns =doc.querySelectorAll(".slide-btn");
const slider =doc.querySelectorAll(".video-bg");
Then the principle operate:
var slideVideo = operate(index) {
      btns.forEach((btn) => {
        btn.classList.take away('lively');
      });
      slider.forEach((slide) => {
        slide.classList.take away('lively');
      });
      btns[index].classList.add('lively');
      slider[index].classList.add('lively');
    }
    btns.forEach((btn,i) => {
      btn.addEventListener('click on', () => {
        slideVideo(i);
      });
    });
You may have a pleasant transition impact with clip-part:
.video-bg{
  place: absolute;
  width: 100%;
  clip-path: circle(0% at 0 50%);
}
.video-bg.lively{
  clip-path: circle(150% at 0 50%);
  transition: 1s ease;
  transition-property: clip-path;
}
And right here’s the consequence:
See the Pen
A number of Video Background Slider by Oscar-Jite (@oscar-jite)
on CodePen.
And there you go, now you can use movies as a background in your web site.
Browser compatibility
We used a couple of parts and attributes, and we wish to make certain they work on any system.
The principle factor, the video tag, is appropriate with all trendy browsers, nevertheless, it’s not supported on Safari 3.1–3.2, Firefox 2–3, Opera 10.1, and IE 6–8. Firefox 3.5–19 helps the video factor however not the loop attribute.
The mix-blend-loop property isn’t supported on any model of Web Explorer, in addition to Chrome 4–40, Edge 12–18, Safari 3.1–7.1, Firefox 2–31, or Opera 10–27.
clip-path is a bit advanced, as there are a variety of shapes that you should use with this property. You could find an in depth evaluation on CanIUse.
Conclusion
Video backgrounds are distinctive and crowd pleasing. Keep in mind to make use of movies that match the general theme of your web site and take the customers on a journey.
Video backgrounds can look nice of their unique state, however including an overlay received’t trigger any hurt when carried out proper. You can also make the overlay a plain colour or a gradient. Gradients open the door to a variety of potentialities so do check out completely different colour combos.
The opposite nice issues you are able to do with a video background are having a textual content overlay or a number of backgrounds. The selection is yours!
Is your frontend hogging your customers’ CPU?
As net frontends get more and more advanced, resource-greedy options demand increasingly more from the browser. For those who’re fascinated by monitoring and monitoring client-side CPU utilization, reminiscence utilization, and extra for your whole customers in manufacturing, strive LogRocket. https://logrocket.com/signup/
LogRocket is sort of a DVR for net and cell apps, recording all the pieces that occurs in your net app or web site. As a substitute of guessing why issues occur, you may mixture and report on key frontend efficiency metrics, replay person periods together with software state, log community requests, and mechanically floor all errors.
Modernize the way you debug net and cell apps — Begin monitoring without spending a dime.
