
Ant Design is an open supply library that permits you to create interesting, responsive web sites. It’s a wonderful alternative in your subsequent undertaking if you wish to use a framework that’s each well-tested and simple to study.
Vue.js, then again, is a progressive framework for creating person interfaces. It’s supposed to be easy to study whereas being versatile and customizable. Utilizing these two collectively permits you to create responsive web sites sooner than ever earlier than.
Ant Design and the inclusion of the Composition API in Vue 3 make it easy to create stunning, responsive, and scalable functions whereas writing restricted code.
On this brief information, we’ll have a look at tips on how to use the ant-design-vue package deal in a Vue 3 software in addition to tips on how to use the Ant icon system.
Getting began
It’s additionally price mentioning that all the strategies described right here would work with Vue 3 tasks generated with each the Vue CLI and Vite.
Create a brand new Vue 3 app
Let’s get began by operating the next command to create a brand new Vue 3 software:
vue create my-app
# OR Vite
npm init [email protected]
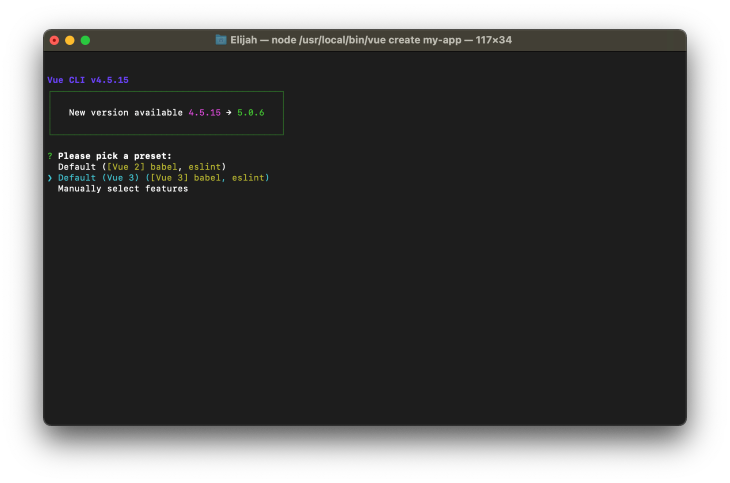
When you’re utilizing the Vue CLI, you should definitely select Vue 3 as your most well-liked preset, as proven within the screenshot beneath:
Set up ant-design-vue
You could possibly simply add the ant-design-vue package deal to your Vue 3 undertaking with the command beneath:
npm set up ant-design-vue
# OR
yarn add ant-design-vue
And as soon as the set up is accomplished, we will get began with registering it in our undertaking.
Extra nice articles from LogRocket:
One strategy is to globally register the package deal in our undertaking, in order that we could check with its parts from anyplace. That is potential by updating the entry src/essential.js file with the code beneath:
import { createApp } from "vue";
import App from "./App.vue";

import Antd from "ant-design-vue";
import "ant-design-vue/dist/antd.css";

const app = createApp(App);
app.use(Antd).mount("#app");
This fashion, we will start utilizing its parts in our software with out having to do any additional importing:
<!-- parts/Pattern.vue -->
<template>
  <a-button sort="main">Main Button</a-button>
  <a-button>Default Button</a-button>
  <a-button sort="dashed">Dashed Button</a-button>
</template>
You could possibly additionally import particular person parts on demand:
<!-- parts/Pattern.vue -->
<template>
  <div>
    <Button sort="main">Main Button</Button>
    <Button>Default Button</Button>
    <Button sort="dashed">Dashed Button</Button>
  </div>
</template>

<script setup>
import { Button } from "ant-design-vue";
import "ant-design-vue/dist/antd.css";
</script>
As you might need observed, we additionally imported the Ant Design CSS file into this single file part, and it wouldn’t make sense to do the identical for all our part information transferring ahead. To handle this, merely import the Ant Design CSS file into the src/essential.js file as an alternative, such that the file content material appears like this:
import { createApp } from "vue";
import App from "./App.vue";

import "ant-design-vue/dist/antd.css";

createApp(App).mount("#app");
To keep away from having to do the additional imports, we’ll assume that ant-design-vue has been registered globally within the previous code samples on this article.
Ant Design parts
The Ant Design part equipment contains a number of parts like buttons, lists, playing cards, and lots of extra, that are all accessible in numerous colours and sizes. Icons may also be utilized on the principle interface in addition to inside different parts. Nevertheless, let’s get began by exploring the fundamentals whereas attaching customized Vue strategies and reactive knowledge to them:
<template>
  <div>
    <a-row>
      <a-col span="12">
        <div v-for="(alert, i) in alerts" :key="i">
          <a-alert
            :message="alert + ' message'"
            description="Lorem ipsum dolor sit amet."
            :sort="alert"
          />
        </div>
      </a-col>
      <a-col span="12">
        <a-button sort="main" @click on="message="Hey!"">
          {{ message }}
        </a-button>
        <a-skeleton avatar :paragraph="{ rows: 4 }" />
      </a-col>
    </a-row>
  </div>
</template>

<script setup>
import { ref } from "vue";

const alerts = ref(["success", "info", "warning", "error"]);
const message = ref("Click on Me!");
</script>
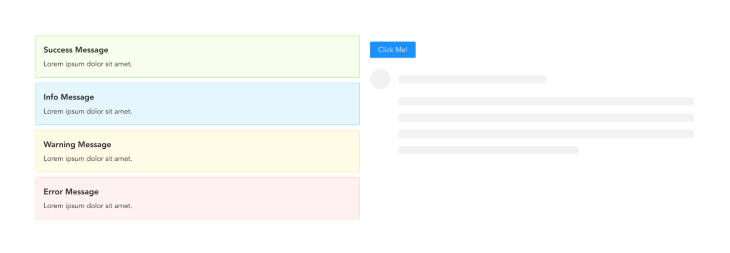
The code instance above demonstrates tips on how to use Vue 3 setup sugar syntax to do a easy iteration in addition to connect customized occasions to ant-design-vue parts. We had developed a two-column grid system the place the primary column displayed a button and a skeleton loader part, whereas the second column principally iterated by way of our array of alerts and used their knowledge to render customized alert parts.
We’ll get the next outcome if we run our software:
Type dealing with
Dealing with kind knowledge is an important operation in any software. Right here’s an instance of tips on how to use ant-design-vue to create a primary kind part and course of its knowledge:
<template>
  <div>
    <a-form
      :mannequin="formData"
      identify="primary"
      autocomplete="off"
      @end="onSubmit"
      @finishFailed="onError"
    >
      <a-form-item
        label="Username"
        identify="username"
        :guidelines="[{ required: true, message: 'Please input your username!' }]"
      >
        <a-input v-model:worth="formData.username" />
      </a-form-item>

      <a-form-item
        label="Password"
        identify="password"
        :guidelines="[{ required: true, message: 'Please input your password!' }]"
      >
        <a-input-password v-model:worth="formData.password" />
      </a-form-item>

      <a-form-item identify="keep in mind" :wrapper-col="{ offset: 8, span: 16 }">
        <a-checkbox v-model:checked="formData.keep in mind">
          Keep in mind me
        </a-checkbox>
      </a-form-item>

      <a-form-item :wrapper-col="{ offset: 8, span: 16 }">
        <a-button sort="main" html-type="submit">Proceed</a-button>
      </a-form-item>
    </a-form>
  </div>
</template>

<script setup>
import { ref } from "vue";

const formData = ref({
  username: "",
  password: "",
  keep in mind: true,
});

const onSubmit = async (_formData) => {
  console.log("Type Submitted!:", _formData);
  const response = await fetch("https://some.api/process-form", {
    methodology: "POST",
    physique: _formData,
  });
};

const onError = (errorInfo) => {
  console.log("Failed:", errorInfo);
};
</script>
Within the code above, we outlined a reactive object, formData, with some default empty strings, and we additionally used the v-model kind binding to tie this knowledge to our ant-design-vue kind enter parts. We additionally created a customized operate onSubmit and connected it to our ant-design-vue kind part to submit our formData to some imaginary API for processing, in addition to an onError operate to deal with any errors that occurred whereas validating our kind.
Moreover, this code pattern exhibits how the customized properties included within the ant-design-vue parts simplify the method of validating kinds in addition to making them accessible.
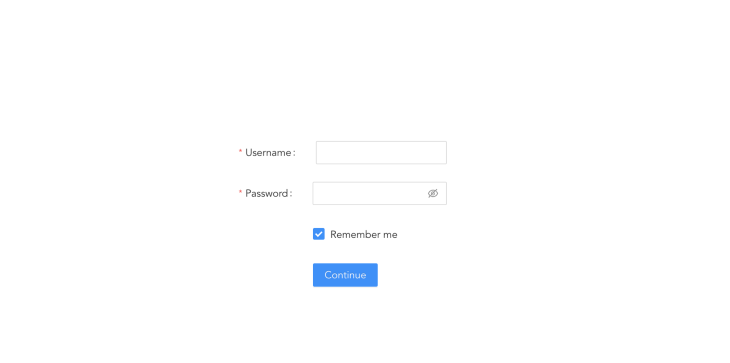
And right here’s what our kind’s output would seem like after we run the app:
If you wish to create advanced kinds in Vue 3, you must also learn this text on v-model.
Ant Design icons
Icons play an essential half in making software design extra wealthy and engaging. And Ant Design system is conscious.
The Ant design crew additionally developed an exterior package deal that permits you to quickly add wealthy icons to your software, together with outlined, stable, and even two-tone icons.
You possibly can simply set up the icon package deal in your Vue undertaking with:
npm set up @ant-design/icons-vue
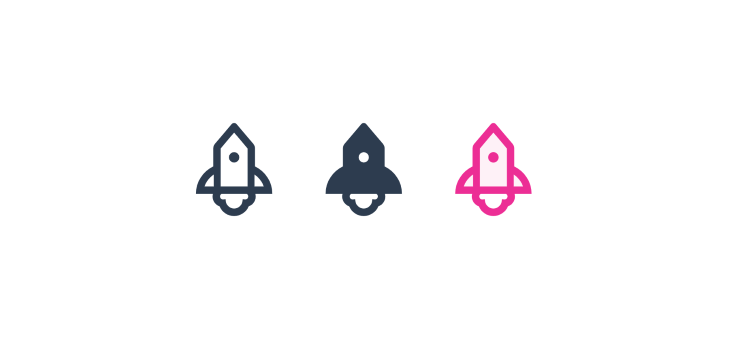
Right here’s an instance of how we imported the three totally different rocket icon stylings:
<template>
  <div>
    <rocket-outlined />
    <rocket-filled />
    <rocket-two-tone two-tone-color="#eb2f96" />
  </div>
</template>

<script setup>
import {
  RocketOutlined,
  RocketFilled,
  RocketTwoTone,
} from "@ant-design/icons-vue";
</script>
And operating this code produces the next outcomes:
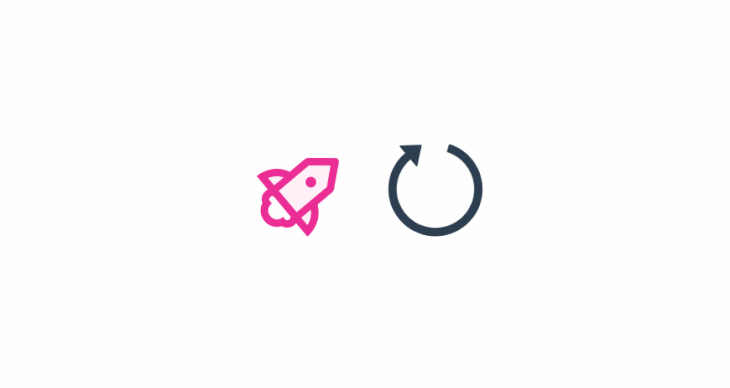
So as to add additional interplay, we will additionally apply a customized spin and rotation property to any icon.
<template>
  <div class="middle">
    <rocket-two-tone two-tone-color="#eb2f96" :rotate="50" />
    <reload-outlined spin />
  </div>
</template>

<script setup>
import { RocketTwoTone, ReloadOutlined } from "@ant-design/icons-vue";
</script>
Which ends up in the next output:
Conclusion
Ant Design is a wonderful instrument for creating a web site with minimal effort. It’s a very adaptable framework that permits you to create easy web sites with lots of flexibility. And all through this text, we checked out tips on how to use the ant-design-vue package deal with Vue 3. We additionally went over tips on how to use ant-icon in addition to tips on how to deal with primary kind submissions.
The documentation web page for the ant-design-vue package deal is a superb place to begin for studying about all of the parts which might be supplied.
Expertise your Vue apps precisely how a person does
Debugging Vue.js functions may be tough, particularly when there are dozens, if not a whole lot of mutations throughout a person session. When you’re excited about monitoring and monitoring Vue mutations for all your customers in manufacturing, attempt LogRocket. 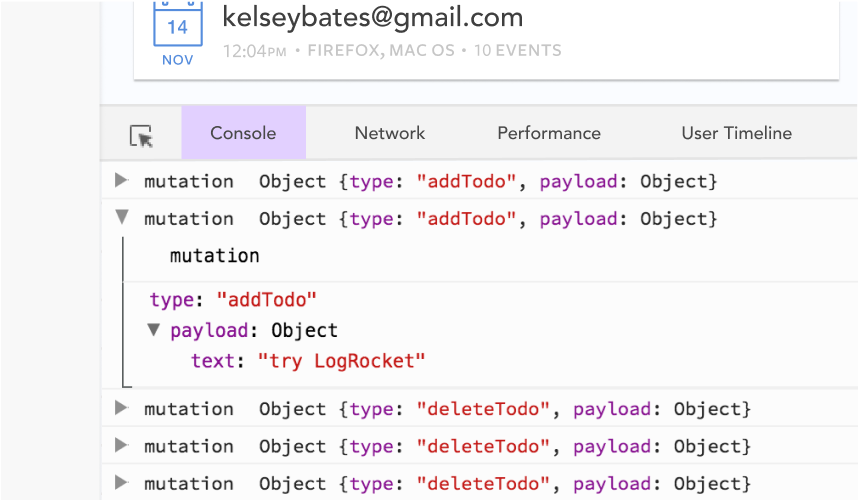 https://logrocket.com/signup/
LogRocket is sort of a DVR for internet and cell apps, recording actually all the pieces that occurs in your Vue apps together with community requests, JavaScript errors, efficiency issues, and way more. As an alternative of guessing why issues occur, you’ll be able to combination and report on what state your software was in when a difficulty occurred.
The LogRocket Vuex plugin logs Vuex mutations to the LogRocket console, providing you with context round what led to an error, and what state the applying was in when a difficulty occurred.
Modernize the way you debug your Vue apps – Begin monitoring at no cost.
