
Tags are regularly utilized in apps and web sites to filter and show information. For instance, you may choose a Direct tag in a journey app to keep away from displaying flights with a number of stops or layovers. Or, in an expense app, you possibly can use tags to higher perceive how a lot you spent on Netflix over the previous couple of years. Or, in a job portal, you possibly can filter on a specific language tag to solely show job listings particularly requiring expertise with a sure language akin to Swift, JavaScript, Rust, or Dart.
There are a lot of use circumstances through which tags could also be helpful to your iOS apps. This information demonstrates create a easy view for working with tags in SwiftUI. We’ll illustrate a sensible use case for tags utilizing SwiftUI by making a tag view in a citation viewer app. The tags might be fetched from an API, and customers will be capable of add customized tags. We’ll create the logic for the app to disregard duplicate tags and reject tags that don’t comply with a specific format.
So, let’s get began including some tags!
Bounce forward:
What’s a tag?
A tag is used to differentiate between differing types or classes. For instance, completely different genres of flicks or the assorted classes of apps within the App Retailer. Tags assist the person filter a group of content material utilizing predetermined standards.
For instance, you possibly can add completely different tags to quotations in order that comparable quotes are categorized or grouped by a specific subject (or tag), akin to philosophy, motivation, and many others.
Every tag needs to be uniquely recognized by itself, because it serves the aim of separating content material into completely different distinctive containers of information. Due to this fact, you’ll want to make sure that there aren’t any duplicate tags, as this may confuse the person. For instance, “Happiness” and “happiness” needs to be put beneath a single class.
Additionally, if the person has the ability so as to add their very own tags, you could need to implement circumstances to just accept a specific format and reject the remaining. Chances are you’ll need to restrict tags to the alphabet solely, reject any that embrace numbers or particular characters, or set some standards round capitalization.
Now, let’s get began on our venture.
Open supply SwiftUI tag view libraries
There are a lot of tag view libraries created utilizing SwiftUI on GitHub that you may benefit from, as a substitute of making one from scratch. You should use these open supply libraries to create a easy view for working with tags in SwiftUI. Of the numerous tag view libraries accessible, listed below are three that you possibly can think about using in your venture:
On this article, relatively than use the third-party library, we are going to reveal create a tag view in SwiftUI from scratch. By creating your personal customized tag view, you’ll be capable of modify it in accordance with your wants, including highly effective customization as your venture grows.
Getting began with a SwiftUI venture
To start out implementing tags utilizing SwiftUI, we’ll work on a pattern venture referred to as Quotex, containing a group of quotes categorized by tags. This venture makes use of Quotable, a free, open supply quotations API. You’ll find the pattern venture right here.
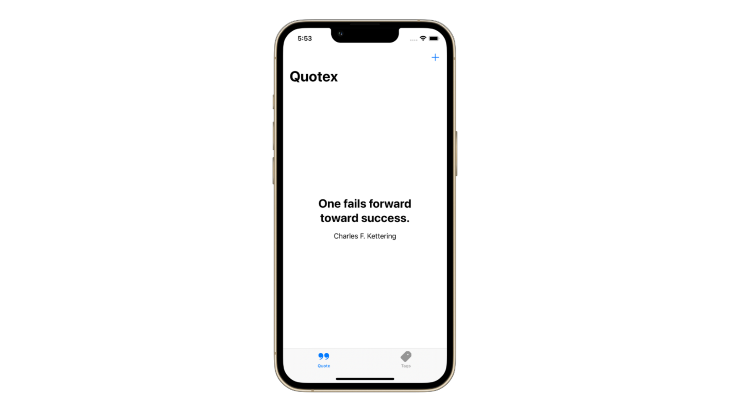
The pattern app already has some primary screens arrange that fetch and show random quotes:
We’ll add performance to checklist the tags and create a view for customers to create their very own tags.
Making a tag view in SwiftUI
Let’s create a customized view to wrap the pattern tags used on this article into a number of rows. This can forestall tags from flowing on the display screen. The answer supplied under was impressed by this query on StackOverflow: SwiftUI HStack with wrap and dynamic peak.
We’ll begin with a customized view containing information that conforms to the RandomAccessCollection protocol the place every component conforms to the Identifiable and Hashable protocol. It additionally has a RowContent view conforming to the View protocol, representing a single tag within the assortment of tags:
struct FlowLayout<Knowledge, RowContent>: View the place Knowledge: RandomAccessCollection, RowContent: View, Knowledge.Factor: Identifiable, Knowledge.Factor: Hashable {
  @State non-public var peak: CGFloat = .zero

  non-public var information: Knowledge
  non-public var spacing: CGFloat
  non-public var rowContent: (Knowledge.Factor) -> RowContent

  public init(_ information: Knowledge, spacing: CGFloat = 4, @ViewBuilder rowContent: @escaping (Knowledge.Factor) -> RowContent) {
    self.information = information
    self.spacing = spacing
    self.rowContent = rowContent
  }

  // implementation
}
Then, we’ll add a system to calculate the dimension and width of every tag in order that these with longer titles will robotically wrap to the following line:
non-public func content material(in geometry: GeometryProxy) -> some View {
  var bounds = CGSize.zero

  return ZStack {
    ForEach(information) { merchandise in
      rowContent(merchandise)
        .padding(.all, spacing)
        .alignmentGuide(VerticalAlignment.heart) { dimension in
          let end result = bounds.peak

          if let firstItem = information.first, merchandise == firstItem {
            bounds.peak = 0
          }
          return end result
        }
        .alignmentGuide(HorizontalAlignment.heart) { dimension in
          if abs(bounds.width - dimension.width) > geometry.dimension.width {
            bounds.width = 0
            bounds.peak -= dimension.peak
          }

          let end result = bounds.width

          if let firstItem = information.first, merchandise == firstItem {
            bounds.width = 0
          } else {
            bounds.width -= dimension.width
          }
          return end result
        }
    }
  }
}
To make sure that the utmost peak doesn’t exceed the view, we’ll calculate the peak utilizing the body regionally:
var physique: some View {
  GeometryReader { geometry in
    content material(in: geometry)
      .background(viewHeight(for: $peak))
  }
  .body(peak: peak)
}

non-public func viewHeight(for binding: Binding<CGFloat>) -> some View {
  GeometryReader { geometry -> Coloration in
    let rect = geometry.body(in: .native)

    DispatchQueue.important.async {
      binding.wrappedValue = rect.dimension.peak
    }
    return .clear
  }
}
The ultimate implementation will appear like this:
import SwiftUI

struct FlowLayout<Knowledge, RowContent>: View the place Knowledge: RandomAccessCollection, RowContent: View, Knowledge.Factor: Identifiable, Knowledge.Factor: Hashable {
  @State non-public var peak: CGFloat = .zero

  non-public var information: Knowledge
  non-public var spacing: CGFloat
  non-public var rowContent: (Knowledge.Factor) -> RowContent

  public init(_ information: Knowledge, spacing: CGFloat = 4, @ViewBuilder rowContent: @escaping (Knowledge.Factor) -> RowContent) {
    self.information = information
    self.spacing = spacing
    self.rowContent = rowContent
  }

  var physique: some View {
    GeometryReader { geometry in
      content material(in: geometry)
        .background(viewHeight(for: $peak))
    }
    .body(peak: peak)
  }

  non-public func content material(in geometry: GeometryProxy) -> some View {
    var bounds = CGSize.zero

    return ZStack {
      ForEach(information) { merchandise in
        rowContent(merchandise)
          .padding(.all, spacing)
          .alignmentGuide(VerticalAlignment.heart) { dimension in
            let end result = bounds.peak

            if let firstItem = information.first, merchandise == firstItem {
              bounds.peak = 0
            }
            return end result
          }
          .alignmentGuide(HorizontalAlignment.heart) { dimension in
            if abs(bounds.width - dimension.width) > geometry.dimension.width {
              bounds.width = 0
              bounds.peak -= dimension.peak
            }

            let end result = bounds.width

            if let firstItem = information.first, merchandise == firstItem {
              bounds.width = 0
            } else {
              bounds.width -= dimension.width
            }
            return end result
          }
      }
    }
  }

  non-public func viewHeight(for binding: Binding<CGFloat>) -> some View {
    GeometryReader { geometry -> Coloration in
      let rect = geometry.body(in: .native)

      DispatchQueue.important.async {
        binding.wrappedValue = rect.dimension.peak
      }
      return .clear
    }
  }
}
We’ll use FlowLayout within the Quotex app within the tag view by offering it with the gathering of tags, like so:
ScrollView {
  FlowLayout(viewModel.tags) { tag in
    Button(motion: {
      viewModel.selectTag(for: tag)
    }, label: {
      Textual content(tag.identify)
        .daring()
        .foregroundColor(.black)
        .padding()
        .overlay(RoundedRectangle(cornerRadius: 8).stroke(.grey, lineWidth: 1.5))
    })
  }
  .padding()
}
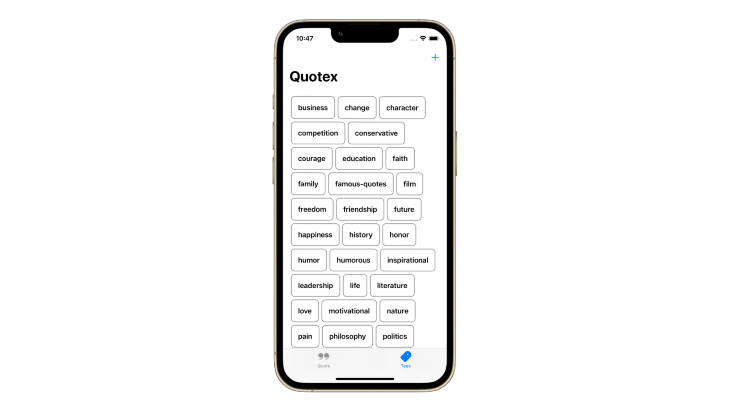
Working the FlowLayout within the Quotex app, creates an ideal tag view that you may immediately use in your app!
Avoiding duplication
Since customers could attempt to create tags with comparable characters, like “Unhappy” or “SaD”, we’ll must implement the logic to keep away from duplication, no matter the character’s case. For instance, we might add a situation that the tag should start with a capital letter, adopted by lowercase letters. Nevertheless, it offers a greater expertise to let the person specify the tag and capitalize the primary letter later.
A easy strategy to clear up the duplication downside is to make use of Set in order that the duplicate tag is robotically eliminated. Moreover, we might set all characters to lowercase after which test for duplication.
Avoiding undesirable characters
Chances are you’ll not need customers to create tags with alternate characters. For instance, “L$v€” as a substitute of “Love” or “GR8ness” as a substitute of “Greatness”. To keep away from undesirable characters, we will put circumstances in place to disallow tags that meet sure circumstances and present an error alert and set off error haptic suggestions.
The easiest way to work with circumstances is to make use of regex expressions. Think about this situation that solely accepts alphabetical characters and areas:
.*[^A-Za-z ].*
Right here’s the tactic to validate the tag identify and throw an error if the situation shouldn’t be met:
enum ValidationError: Error {
  case containsNumbersOrSpecialCharacters(String)
}

public func validateTag(for identify: String) throws {
  let vary = NSRange(location: 0, size: identify.utf16.depend)
  let regex = strive NSRegularExpression(sample: ".*[^A-Za-z ].*")

  let match = regex.firstMatch(in: identify, choices: [], vary: vary)

  if match != nil {
    // Situation not met for the tag. Present an error.
    let errorMessage = "(identify) comprises numbers or particular characters. Use solely alphabets for the identify of the tag."
    throw ValidationError.containsNumbersOrSpecialCharacters(errorMessage)
  }
}
You may also use the newest RegexBuilder launched in iOS 16+ so as to add logic for rejecting tags that don’t comply with a specific format.
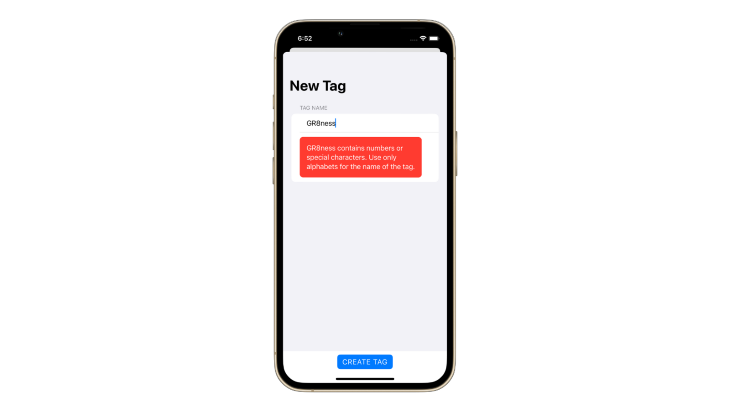
Here’s what this seems like in motion within the Quotex app when a person tries to create a tag with the identify “GR8ness” as a substitute of “Greatness”:
Now that you’ve an understanding of create circumstances for tags, you’re prepared so as to add completely different tag circumstances in your tag views!
Creating tag views with the iOS 16 Format protocol
Throughout WWDC 2022, the SwiftUI crew launched a brand new protocol, Format, that defines the geometry of a group of views.
For extra complicated format conduct, like creating tag views that robotically wrap to the following row, you outline a customized format container. This construction ought to conform to the Format protocol and implement its required strategies:
sizeThatFits(proposal:subviews:cache:)studies the dimensions of the composite format viewplaceSubviews(in:proposal:subviews:cache:)assigns positions to the container’s subviews
For instance, a primary format kind seems like this:
struct BasicHStack: Format {
  func sizeThatFits(
    proposal: ProposedViewSize,
    subviews: Subviews,
    cache: inout ()
  ) -> CGSize {
    // Calculate and return the dimensions of the format container.
  }

  func placeSubviews(
    in bounds: CGRect,
    proposal: ProposedViewSize,
    subviews: Subviews,
    cache: inout ()
  ) {
    // Inform every subview the place to look.
  }
}
You utilize this new view by offering a ViewBuilder and the subviews inside it:
BasicHStack {
  Textual content("A Subview")
  Textual content("One other Subview")
}
Apple launched a pattern app, referred to as the FoodTruck app, that has a FlowLayout which may be immediately used to implement tags and tags view utilizing SwiftUI:
import SwiftUI

@accessible(iOS 16.0, *)
struct NewFlowLayout: Format {
  var alignment: Alignment = .heart
  var spacing: CGFloat?

  func sizeThatFits(proposal: ProposedViewSize, subviews: Subviews, cache: inout Void) -> CGSize {
    let end result = FlowResult(
      in: proposal.replacingUnspecifiedDimensions().width,
      subviews: subviews,
      alignment: alignment,
      spacing: spacing
    )
    return end result.bounds
  }

  func placeSubviews(in bounds: CGRect, proposal: ProposedViewSize, subviews: Subviews, cache: inout Void) {
    let end result = FlowResult(
      in: proposal.replacingUnspecifiedDimensions().width,
      subviews: subviews,
      alignment: alignment,
      spacing: spacing
    )
    for row in end result.rows {
      let rowXOffset = (bounds.width - row.body.width) * alignment.horizontal.%
      for index in row.vary {
        let xPos = rowXOffset + row.body.minX + row.xOffsets[index - row.range.lowerBound] + bounds.minX
        let rowYAlignment = (row.body.peak - subviews[index].sizeThatFits(.unspecified).peak) *
        alignment.vertical.%
        let yPos = row.body.minY + rowYAlignment + bounds.minY
        subviews[index].place(at: CGPoint(x: xPos, y: yPos), anchor: .topLeading, proposal: .unspecified)
      }
    }
  }

  struct FlowResult {
    var bounds = CGSize.zero
    var rows = [Row]()

    struct Row {
      var vary: Vary<Int>
      var xOffsets: [Double]
      var body: CGRect
    }

    init(in maxPossibleWidth: Double, subviews: Subviews, alignment: Alignment, spacing: CGFloat?) {
      var itemsInRow = 0
      var remainingWidth = maxPossibleWidth.isFinite ? maxPossibleWidth : .greatestFiniteMagnitude
      var rowMinY = 0.0
      var rowHeight = 0.0
      var xOffsets: [Double] = []
      for (index, subview) in zip(subviews.indices, subviews) {
        let idealSize = subview.sizeThatFits(.unspecified)
        if index != 0 && widthInRow(index: index, idealWidth: idealSize.width) > remainingWidth {
          // End the present row with out this subview.
          finalizeRow(index: max(index - 1, 0), idealSize: idealSize)
        }
        addToRow(index: index, idealSize: idealSize)

        if index == subviews.depend - 1 {
          // End this row; it is both full or we're on the final view anyway.
          finalizeRow(index: index, idealSize: idealSize)
        }
      }

      func spacingBefore(index: Int) -> Double {
        guard itemsInRow > 0 else { return 0 }
        return spacing ?? subviews[index - 1].spacing.distance(to: subviews[index].spacing, alongside: .horizontal)
      }

      func widthInRow(index: Int, idealWidth: Double) -> Double {
        idealWidth + spacingBefore(index: index)
      }

      func addToRow(index: Int, idealSize: CGSize) {
        let width = widthInRow(index: index, idealWidth: idealSize.width)

        xOffsets.append(maxPossibleWidth - remainingWidth + spacingBefore(index: index))
        // Allocate width to this merchandise (and spacing).
        remainingWidth -= width
        // Make sure the row peak is as tall because the tallest merchandise.
        rowHeight = max(rowHeight, idealSize.peak)
        // Can match on this row, add it.
        itemsInRow += 1
      }

      func finalizeRow(index: Int, idealSize: CGSize) {
        let rowWidth = maxPossibleWidth - remainingWidth
        rows.append(
          Row(
            vary: index - max(itemsInRow - 1, 0) ..< index + 1,
            xOffsets: xOffsets,
            body: CGRect(x: 0, y: rowMinY, width: rowWidth, peak: rowHeight)
          )
        )
        bounds.width = max(bounds.width, rowWidth)
        let ySpacing = spacing ?? ViewSpacing().distance(to: ViewSpacing(), alongside: .vertical)
        bounds.peak += rowHeight + (rows.depend > 1 ? ySpacing : 0)
        rowMinY += rowHeight + ySpacing
        itemsInRow = 0
        rowHeight = 0
        xOffsets.removeAll()
        remainingWidth = maxPossibleWidth
      }
    }
  }
}

non-public extension HorizontalAlignment {
  var %: Double {
    change self {
      case .main: return 0
      case .trailing: return 1
      default: return 0.5
    }
  }
}

non-public extension VerticalAlignment {
  var %: Double {
    change self {
      case .prime: return 0
      case .backside: return 1
      default: return 0.5
    }
  }
}
We’ll use it within the Quotex app by creating the NewFlowLayout and offering it with the gathering of tags:
NewFlowLayout(alignment: .main) {
  ForEach(viewModel.tags) { tag in
    Button(motion: {
      viewModel.selectTag(for: tag)
    }, label: {
      Textual content(tag.identify)
    })
  }
}
Working the NewFlowLayout within the Quotex app, creates an ideal tag view that you may immediately use in your app!
Extra nice articles from LogRocket:

Conclusion
Tags are useful for categorizing objects and filtering in accordance with your wants. SwiftUI helps create such customized views with ease and also will robotically resize the view in accordance with its contents, by making a small, useful FlowLayout view just like the one we created on this article.
You’ll find the ultimate pattern venture showcased on this article on GitHub.
With only a few circumstances and regex expressions, you may create the right tag in SwiftUI that can meet your circumstances and aid you keep away from duplications.
I hope you discovered this text useful and can strive utilizing tags in your iOS apps!
LogRocket: Full visibility into your net and cellular apps

LogRocket is a frontend software monitoring resolution that allows you to replay issues as in the event that they occurred in your personal browser. As an alternative of guessing why errors occur, or asking customers for screenshots and log dumps, LogRocket permits you to replay the session to shortly perceive what went unsuitable. It really works completely with any app, no matter framework, and has plugins to log extra context from Redux, Vuex, and @ngrx/retailer.
Along with logging Redux actions and state, LogRocket data console logs, JavaScript errors, stacktraces, community requests/responses with headers + our bodies, browser metadata, and customized logs. It additionally devices the DOM to document the HTML and CSS on the web page, recreating pixel-perfect movies of even probably the most complicated single-page and cellular apps.
