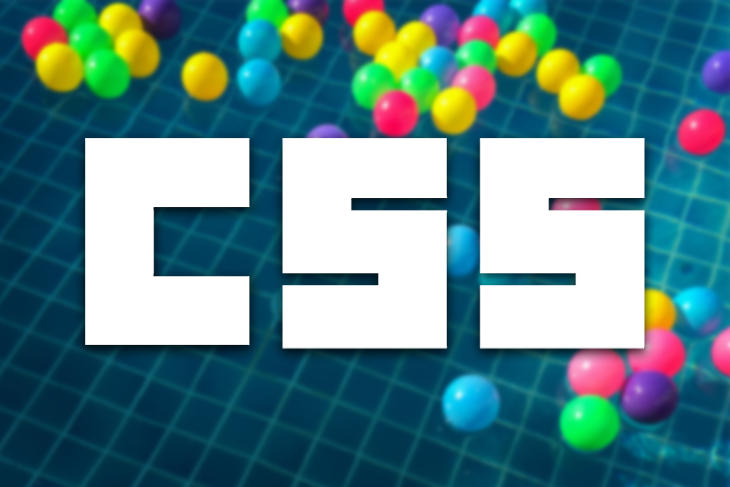
Claymorphism is a design idea that revolves round clay-like UIs. Its user-friendly attraction is gaining recognition within the UI design world, particularly in Web3.
An important ability for a frontend developer is to concentrate on standard UI design developments and have the ability to convert these designs into sensible layouts.
This tutorial will show you how to study the implementation of claymorphism UIs with CSS. By the top of the article, it is possible for you to to create claymorphic design parts with Figma, CSS, and Tailwind CSS.
Contents
Claymorphism examples
Because the identify already suggests, claymorphism incorporates creative, clay-like aesthetics into the digital house to characterize the UI.

Inventive 3D has turn out to be extra standard due to NFTs and the metaverse, which regularly use these pleasant graphics of their design.
NFT artworks that implement claymorphism promote for ridiculous quantities today. The perfect instance of the recognition of claymorphism on the planet of Web3 is that this NFT assortment by Amrit Pal Singh.
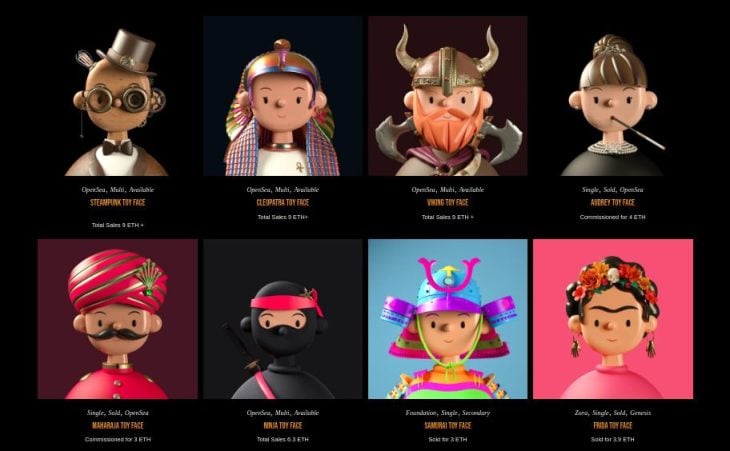
The kid-like vibe of those avatars signifies a pleasant, heat, and completely happy feeling general.
Claymorphism can be about molding the format parts in accordance with the graphics. Right here’s a greater instance that reveals precisely that.
Claymorphism follows rules much like neumorphism, however is extra accessible and prettier. In distinction to concave parts in neumorphism, claymorphic UI parts are tender and straightforward on the attention, therefore extra interesting, accessible, and pleasant.
Claymorphism properties
You’ll be able to skip on to the coding half, but it surely’s all the time an incredible concept to grasp the core properties of any design idea earlier than implementing it via code.
So earlier than getting our palms soiled, let’s take a look at the important thing options and properties of claymorphism UIs.
Brilliant, pastel colours
Step one to implementing claymorphism is selecting the best colours. It’s best to maintain the background and foreground of claymorphic parts in brighter pastel colours, as a result of the drop shadow tends to be ineffective on darker variations.
Clean corners
Rounded corners give a claymorphic aspect the character it wants. Its softness is extremely depending on the radius of the corners and inside/outer shadows.
3D look
Claymorphic parts ought to appear as if a 3D clay object, which is feasible with inside shadows.
A claymorphic object has two inside shadows basically; one on the top-left and the opposite on the backside proper. The primary shadow represents the glowing edges that present up when the thing has an opaque background. The second shadow enhances the primary and provides a darkish embossed impact to the thing.
Interior shadows additionally contribute to the depth of the aspect and may be tinted the identical shade as the primary background.
Depth
Together with inside shadows, the outer or drop shadow makes the thing extra accessible and identifiable on the primary background. It controls the depth of the aspect and ought to be barely darker than the background shade.
Clay-like graphics
We’ve got already seen some examples above that illustrate using fluffy, clay-like 3D graphics in claymorphism. It’s no shock that graphics with a clay-like feel and appear work properly with claymorphism interfaces. Their addition makes UI parts look trendy and extra pleasant and interactive.
Claymorphism with Figma
Let’s create a claymorphic card in Figma in six easy steps. We’ll be referring to this part later in our CSS implementation as properly.
First, let’s add a 1366x768 desktop body in our new Figma doc that acts as the bottom for our claymorphic object. Now, add some shade to our base desktop body. I’m selecting two tints of inexperienced so as to add a gradient to the bottom body.
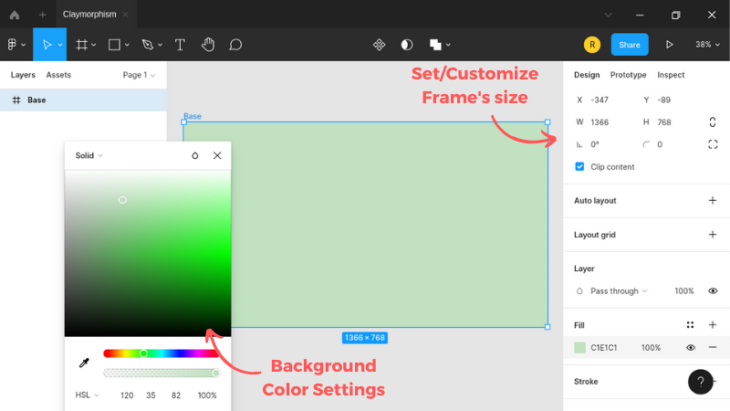
Then let’s draw a 550x350 body in the midst of our base. This rectangular body represents our claymorphic card within the UI.
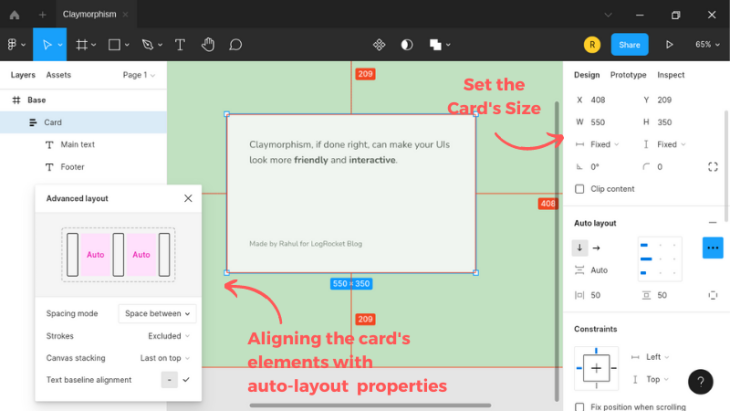
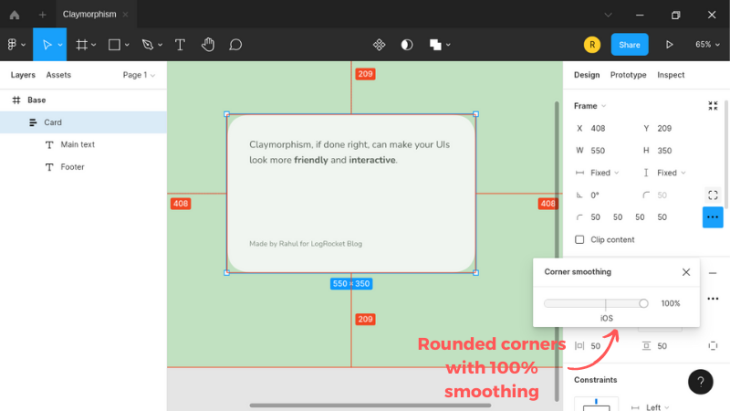
Subsequent, add some roundness to the corners of this card aspect. A fifty pixel radius seems to be adequate. Additionally, add a 100% of nook smoothing to offer it the tender edges of a rounded sq..
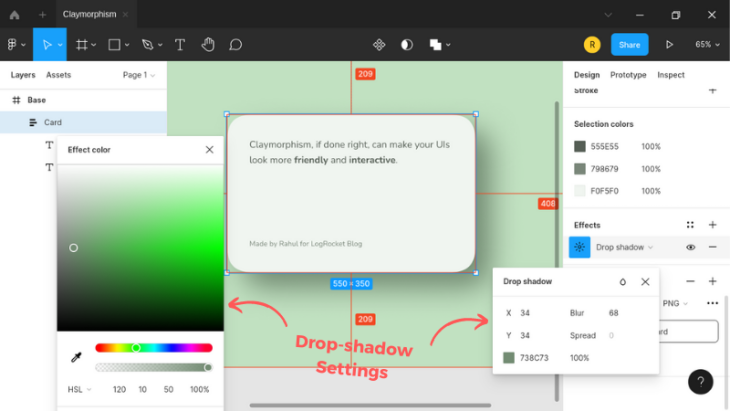
Subsequent, present a drop shadow and maintain the shade a little bit darker than the primary background shade. The trick with the shadows right here is to maintain the x and y offset the identical, and set the blur quantity to twice this worth.
Including an inside shadow to the cardboard will convey out an embossed impact. It will add some shadow to the highest left of the cardboard.
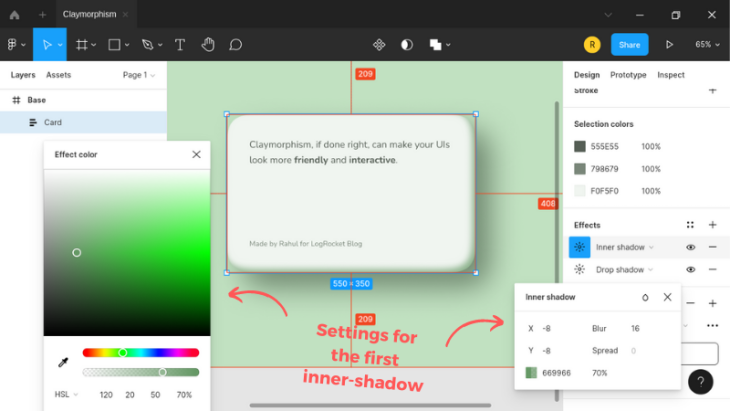
Equally, add an inside shadow to the highest left aspect that acts extra like an “inside glow” than a shadow.
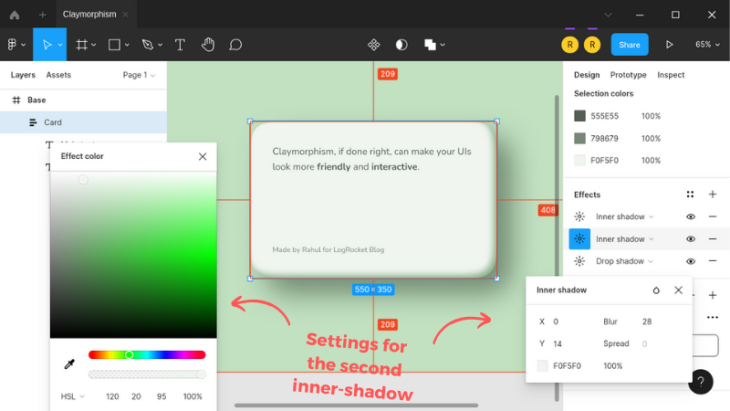
And there you’ve it, a normal claymorphic aspect made in Figma you can prolong additional by experimenting your self. Try the completed file right here.
Claymorphism with CSS
It turns into straightforward to implement claymorphism in CSS if you know the way to make use of field shadows intelligently.
As we observed in Figma, our claymorphic object will take a number of (three) shadows general, two inside, and one drop shadow.
Beginning with the markup, let’s first add a format container and a card aspect inside it with some paragraph tags:
<div class="container">
  <div class="card">
    <p>...</p>
    <p>...</p>
  </div>
As you may see, the markup is fairly easy.
Let’s leap into the CSS half and add some naked bone styling. I’m utilizing the normalize CSS reset to maintain issues an identical on all of the browsers. I’m additionally utilizing the standard box-sizing reset to maintain the spacing wise and hassle-free.
The Nunito Google Font has a tender look that may look nice on our UI. In case you observed, it’s utilized in our Figma instance as properly:
/* Field sizing reset */
:root {
  box-sizing: border-box;
}

* {
  &,
  &:earlier than,
  &:after {
    box-sizing: inherit;
  }
}

physique {
  font: 1em/1.618 Nunito, sans-serif;
}
We’re going to fashion the cardboard aspect as a claymorphic object. Let’s apply the identical colours to the weather that we used within the Figma tutorial.
I’m utilizing the HSL shade operate for simple shade modifications, which isn’t doable with RGB:
physique {
  font: 1em/1.618 Nunito, sans-serif;

  shade: hsl(120deg 5% 35%);
  background-color: hsl(120deg 35% 82%);
}
As you may see, modifying the saturation or lightness (or each) with HSL may give us a shade or tint of the identical shade with out problem.
Subsequent, let’s outline some alignment settings for our container aspect to align its little one parts to absolutely the middle:
physique { ... }

.container {
  show: flex;
  flex-direction: column;
  align-items: middle;
  justify-content: middle;

  min-height: 100vh;
  padding: 2em;
}
Subsequent, let’s add some dimension, padding, corner-radius and alignment values to the cardboard aspect:
physique { ... }
.container { ... }

.card {
  show: flex;
  flex-direction: column;
  justify-content: space-between;

  max-width: 550px;
  min-height: 350px;
  padding: 50px;
  border-radius: 50px;
}
We must always now add the inside and outer shadows to the cardboard. It’s doable with the a number of box-shadow values, as proven beneath:
physique { ... }
.container { ... }

.card {
  ...

  background-color: hsl(120deg 20% 95%);
  box-shadow:
    34px 34px 68px hsl(120deg 10% 50%),
    inset -8px -8px 16px hsl(120deg 20% 50% / 70%),
    inset 0px 14px 28px hsl(120deg 20% 95%);
}
And we’re achieved with the overall CSS implementation of claymorphism!
Claymorphism Card UI / Common Model
No Description
Protecting the outer shadow large will present the aspect with extra depth. You’ll be able to change the path of the shadows by modifying the x and y values. Try these shadow variations for the backside and left sides.
We’ve skipped the unfold parameter of box-shadow within the code above, because it doesn’t apply to this use case. In case you discover carefully, the perimeters aren’t as tender as we made them within the Figma demo. We’ll deal with this situation within the subsequent part.
Smoothing the corners
We are able to’t obtain a rounded sq. by smoothing corners with the CSS border-radius property. There are methods to get that achieved with SVG, however every implementation would require a unique SVG, which isn’t versatile.
We are able to, nonetheless, use CSS Houdini APIs, which expose the CSS engine to create CSS extensions conveniently. These extensions may be polyfills to unavailable browser options or experiments like offering {smooth}, rounded corners to a given HTML aspect.
Let’s experiment with the CSS Paintworklet and a CSS Houdini extension and see what this mixture fetches us.
The precise solution to start with the CSS Paintworklet is by checking for its help after which loading the extension via the paintworklet module technique:
<script>
if ("paintWorklet" in CSS) {
  CSS.paintWorklet.addModule(
    "https://www.unpkg.com/[email protected]/squircle.min.js"
  );
}
</script>
Within the code above, we’re loading a CSS Houdini extension that smooths the corners of any given aspect. Behind the scenes, this extension provides a mask-image property help for our net doc to use the impact, which we will configure additional with some customized properties.
Subsequent, add the mask-image property and supply some customized properties for nook smoothing. 1 denotes 100% of nook smoothing:
physique { ... }
.container { ... }

.card {
  ...

  /* Squircle settings */
  --squircle-radius: 50px;
  --squircle-smooth: 1;
  -webkit-mask-image: paint(squircle);
  mask-image: paint(squircle);
}
As you may see within the demo, the drop shadow of our card will get lower as a result of masking. To repair this situation, we have now to wrap our card aspect inside a division after which present this wrapper division with the shadow:
<div class="container">
  <div class="card-wrapper">
    <div class="card">
      <p>...</p>
      <p>...</p>
    </div>
Let’s additionally add a drop shadow to this wrapper aspect with the filter CSS property. We’re utilizing the drop-shadow filter as an alternative of the box-shadow property, because it attracts the shadow as supposed, whatever the box-model irregularities:
.card-wrapper {
  border-radius: 50px;
  filter: drop-shadow(34px 34px 34px hsl(120deg 10% 50%));
}
The blur quantity of the CSS drop-shadow filter doesn’t work precisely like that of the box-shadow property. It nearly doubles the quantity of blurring we see with the box-shadow property. I’ve adjusted the blur quantity to counter that situation.
Claymorphism Card UI / Squircle Model
No Description
Caveats
Utilizing the CSS Portray API to realize a rounded sq. impact is pricey and time-consuming.
It’s an experimental know-how supported solely on Chromium-based browsers for now. It additionally requires including a wrapper aspect to deal with the drop-shadow, which additionally requires a bit of additional work.
Claymorphism with Tailwind CSS
Attaining the claymorphism results with Tailwind is a bit difficult. Let’s rapidly arrange Tailwind in CodePen and see the best way to accomplish that.
Go to CodePen and create a brand new pen. Click on on JS after which add cdn.tailwindcss.com as an exterior script.
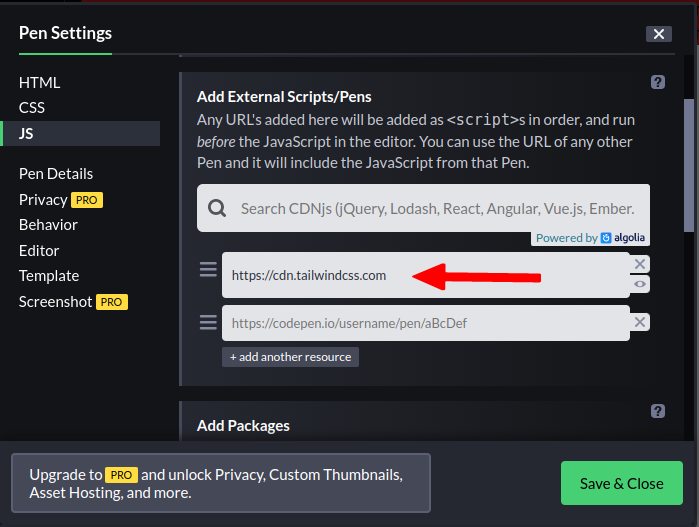
Save your modifications, and also you’re good to go.
Let’s add some customized utilities to our Tailwind setup. Doing so will maintain us from repeating many customized values for the inside and drop shadows:
tailwind.config = {
  theme: {
    prolong: {
      fontFamily: {
        nunito: ["Nunito", "sans-serif"]
      },
      boxShadow: {
        "clay-card":
          "inset -10px -10px 20px hsl(302deg 25% 50% / 70%), inset 0 16px 32px hsl(302deg 25% 95%)",
        "clay-btn":
          "16px 16px 32px 0 hsl(277deg 50% 65% / 50%), inset -16px -16px 32px 0 hsl(277deg 50% 65%), inset 8px 8px 16px 0 hsl(227deg 65% 75% / 45%)"
      },
      dropShadow: {
        'clay': '35px 35px 35px hsl(302deg 25% 50%)',
      }
    }
  }
};
Within the above configuration, we added a font utility to make use of the Nunito font, box-shadow utilities for our card and button parts, and a drop-shadow utility for the cardboard wrapper.
We now have so as to add the CSS Houdini module as we did within the instance above for the rounded sq. impact. We then have so as to add the CSS to load the online font and outline settings and masking for the rounded sq.:
<div class="[ p-8 w-full h-screen ]
            [ flex justify-center items-center ]
            [ bg-gradient-to-b from-[hsl(302,33%,70%)] to-[hsl(302,33%,95%)] ]
            [ text-[hsl(302,20%,30%)] font-nunito ]">
  <div class="drop-shadow-clay">
    <div class="card
                [ p-[50px] max-w-lg rounded-[50px] ]
                [ bg-white shadow-clay-card ]
                [ flex items-center gap-5 flex-col md:flex-row lg:flex-row ]">
      <img
        class="object-scale-down max-w-[150px]"
        src="https://weblog.logrocket.com/implementing-claymorphism-css/path/to/picture.src" alt="..."><!-- Product picture -->
      <div class="text-center md:text-left lg:text-left">
        <h3 class="text-xl font-bold mb-5">...</h3><!-- Product title -->
        <p class="text-sm mb-10">...</p><!-- Product description -->
        <a href="#" class="[ py-4 px-6 rounded-[50px] in-flex ]
                           [ font-bold text-white ]
                           [ bg-gradient-to-r from-[hsl(227,65%,75%)]
                             to-[hsl(277,50%,65%)]
                             hover:bg-gradient-to-r
                             hover:from-[hsl(277,50%,65%)]
                             hover:to-[hsl(227,65%,75%)] ]
                           [ shadow-clay-btn ]">...</a><!-- Order button -->
      </div><!-- Card content material -->
    </div><!-- Card -->
  </div><!-- Card wrapper -->
</div><!-- The container -->
Claymorphism with Tailwind CSS / Squircle model
No Description
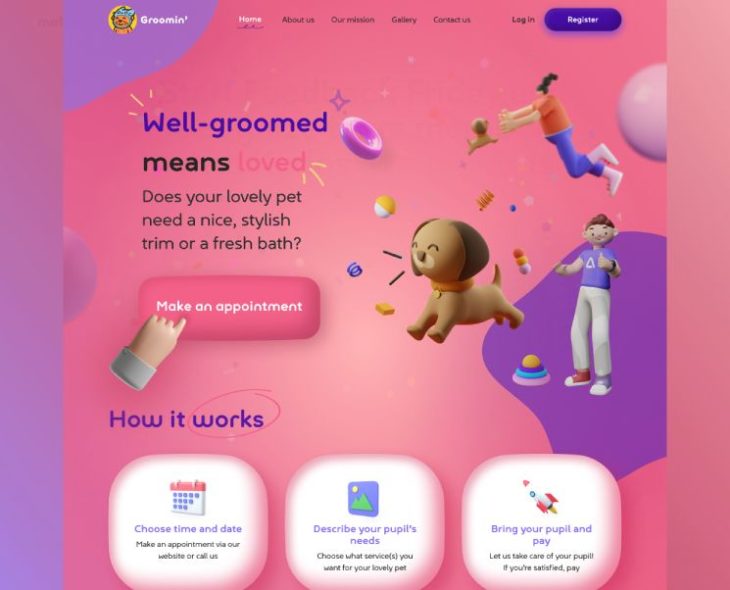
Did you discover how including a fluffy 3D graphic enhanced the impact? You’ll be able to modify pictures and alignment additional to create extra impactful variations. Right here’s one other instance.
Claymorphism and glassmorphism
We are able to take claymorphism a step additional by mixing it with glassmorphism. Earlier than transferring forward, I’d such as you to undergo the fundamentals of glassmorphism first after which come again right here and observe the demo beneath.
Claymorphism x Glassmorphism
No Description
Accessibility notes
Making these results accessible hinges on just one side: selecting the best colours. Guarantee there may be sufficient distinction between the thing and the floor or predominant background.
The identical applies to the darker variations of claymorphic objects. The article ought to all the time be lighter in shade than the background, and the inside shadows ought to be seen for higher noticeability and accessibility.
Claymorphism / Darkish mode model
No Description
You must also examine this coloured implementation of the darkish model.
On the identical be aware, when mixing claymorphism with glassmorphism, guarantee that the photographs used for the background aren’t cluttered, too darkish, or too vivid.
Conclusion
On this article, we explored the claymorphism design pattern and its properties. We additionally checked out examples illustrating completely different functions of the idea.
We then created a claymorphism impact in Figma, which we later replicated in CSS. We mentioned its implementation with Tailwind CSS with mild and darkish modes.
We additionally blended glassmorphism and claymorphism and took notes on holding claymorphic parts extra accessible.
All of the demos used on this tutorial can be found in this CodePen assortment. I hope you create unbelievable UIs with all this new data!
Is your frontend hogging your customers’ CPU?
As net frontends get more and more complicated, resource-greedy options demand an increasing number of from the browser. In case you’re enthusiastic about monitoring and monitoring client-side CPU utilization, reminiscence utilization, and extra for your whole customers in manufacturing, attempt LogRocket. https://logrocket.com/signup/
LogRocket is sort of a DVR for net and cellular apps, recording every part that occurs in your net app or website. As a substitute of guessing why issues occur, you may combination and report on key frontend efficiency metrics, replay person classes together with utility state, log community requests, and robotically floor all errors.
Modernize the way you debug net and cellular apps — Begin monitoring without cost.
