This screenshot tutorial will present you the way to attract or create a Cupcake emblem, picture or icon utilizing Adobe illustrator in your Home windows PC. With the ability to create distinctive objects utilizing graphic software program can come in useful. Making a emblem or different artwork for a enterprise requires it to be distinctive to keep away from copyright infringement. This cupcake that shall be created could be a main a part of a emblem or an addition to a emblem.
How you can make a Cupcake in Adobe Illustrator
Creating distinctive graphic objects for logos, playing cards, bookmarkers, magazines or e book covers could be necessary as a result of creating distinctive objects might help keep away from copyright infringement. These distinctive creations will also be cost-effective as a result of you may create your individual artwork for a mission. We are going to talk about the next steps:
- Plan the look of the Cupcake
- Create the Cupcake
- Full Cupcake
- Put it aside for Use
Logos are alleged to be like a abstract of a enterprise. Logos are to inform individuals who view it a bit a couple of enterprise. Relying on how effectively a emblem is completed and the way effectively an organization advertises and the picture they preserve, the brand can turn out to be a model. Many corporations begin with a emblem and the title of the enterprise, ultimately, the brand shall be only a image or artwork however everybody is aware of the corporate by the artwork or image.
Companies will spend hundreds of thousands of {dollars} on design, shade scheme, and format for his or her emblem as a result of they perceive the significance of a emblem. A emblem will converse volumes about a corporation each day, it is among the issues that individuals will see each day, and the design, shade selections, and format will inform an excellent or unhealthy story.
1] Plan the look of the Cupcake
Earlier than making an attempt to create any artwork it’s good to do a number of drawings/illustrations. Contemplate the colours, designs, and format that may be appropriate for you or a consumer. Draw by hand on paper if attainable, to get an concept of the appear and feel. You may create a number of concepts on the pc and get an concept of how they may look on display.
2] Creating the Cupcake in Adobe Illustrator

Open Adobe Illustrator go to file and click on New and select the scale of the doc. Select the colour choice (RGB or CMYK). Select the decision, the unit of measurement, and different choices that you really want for the doc. The scale would be the dimension of the drawing space and the form and dimension rely on the form and dimension of the picture you need.

Click on and maintain the rectangle device to disclose the opposite instruments and choose the polygon device.

Click on on the polygon device then go to the work space and maintain the left mouse button and drag to the specified dimension. The polygon form will wish to be barely tilted to 1 aspect so simply rotate the mouse whereas dragging till it’s sitting on certainly one of its flat sides.

In case your form doesn’t have a border (stroke), you may simply choose the form and go to the left panel and click on stroke or press “X” on the keyboard then select a stroke shade from the colour picker on the proper. That is what the polygon ought to appear like on the work space. You might make it to the scale that shall be appropriate for the sheet dimension however understand that different issues shall be added, and changes could be made later.

Go to the Instruments Panel on the left, click on and maintain the pen device and select Delete anchor level device.

Go to the polygon device and delete the highest anchor factors utilizing the Delete anchor level device.

When the anchor factors are deleted, the polygon device will appear like the image above.

Click on on the polygon device to pick it, go to Impact, then Stylize, then click on Spherical corners.
 The rounded nook dialogue field lets you select to what radius you wish to around the corners. Click on preview to get a preview of the corners being rounded as you enhance or lower the numbers within the rounded nook field. Click on okay whenever you attain the specified roundness of the sides. Select the rounded look that most closely fits your design.

Click on and maintain the polygon device till there’s displayed an inventory of the opposite instruments then choose the ellipse. The keyboard shortcut for the ellipse device is “L.” Maintain Shift + Alt + Left mouse button whereas dragging to create a small circle. Holding shift + alt whereas dragging will trigger the circle or every other factor you might be dragging or resizing to be elevated or decreased on the similar fee throughout. On this case, the circle shall be completely spherical.
One other choice to create the ellipse is to click on the ellipse device then click on a spot on the display then a dialogue field will seem, and also you enter the specified dimension, and it’ll create the form based mostly on the size entered.
 Transfer the circle to the highest of the form that was created from the polygon device and make the road of the form cross by the circle. Make certain that the circle and the opposite form have a stroke however no fill. This can make it simpler to see the crossing of the strains. Maintain alt and click on on the primary circle and drag it to the proper to create a second circle. The second circle should contact the primary circle carefully with out overlapping. When the second circle is created, maintain Ctrl and press D to duplicate the motion. Do that till the circles fill out the highest of the form.

Choose all of the shapes (circles and shapes made out of the polygon device) and click on Minus entrance on the pathfinder window. In case you do not need the pathfinder window opened, simply add it by going to the highest of the Illustrator window and click on the window then search for pathfinder and ensure to click on it. You may also carry up the pathfinder window through the use of the shortcut Shift + Ctrl +F9.
After clicking Minus entrance, the device will take away elements of each units of shapes and mix them to present one new form. You might have one thing barely completely different, however you may alter the circles till the form seems to be prefer it ought to. The shortcut for Undo (Ctrl + Z) will come in useful as you could have to undo a number of occasions till the form is ideal.
Choose the ellipse device and draw an ellipse form that may go excessive of the form. The necessary half is that it ought to go from one finish to the opposite. It’s best to have one thing like this.

Proper-click on the brand new ellipse device, scroll all the way down to Prepare and click on Ship to again. This can ship the ellipse device behind the opposite form which you’ll be able to see within the backside of the cupcake. The keyboard shortcut for sending to again is Shift+ Ctrl + [.
Click on the ellipse and give it a color that you would like to be the color of your cupcake. Remember that the ellipse is the top of the cupcake that is shown above the paper that is wrapped around the bottom of the cupcake. Remove the stroke color from the ellipse that is the top of the cupcake but that depends on the design you have in mind.
Select the shape that is representing the bottom of the cupcake and give it a fill color of your choosing. Remember that this is not the actual cupcake but the paper that holds it so you can be creative with the color choice. However, choose a color that goes with your theme or logo.
 To make the icing on the cupcake we can use the rectangle tool and curve the edges. Draw a rectangle and copy it using Alt + click and drag, make them different sizes, and put them on each other causing an overlap. Make sure there is no fill color but add stroke so that the shapes can be seen.
Click on the rectangles then go to effect then stylize and choose round edges. A radius of .25 should be enough, but you can choose what suits your needs. You can preview to see the outcome. Place a triangle on top of the rounded rectangles and warp it. That warped triangle will serve as the tip of the icing. You can use the warp tool, pen tool, or mesh tool to warp.

Select the three rounded rectangles and the warped star/shape then go to the left pane and click the Shape building tool. Hold the left mouse button while dragging the Shape building tool straight through all four shapes. The Shape building tool will merge the shapes into one.
 This is what the shapes will look like when merged, they will flow into one and then color and other things can be added to it to get it to look like frosting/icing on a cupcake.
Read: How to open RAW image in Adobe Photoshop
3] Accomplished Cupcake

- Icing/frosting – Coloration added and was duplicated with one behind the opposite, the one within the again is in a darker shade to present a raised 3D look.
- Strains on the icing – 3 strains that got a stroke of two and have been warped with the Warp device. Variable line width is achieved through the use of the Variable width profile.
- Cupcake wrapper – The polygon device is coloured and given a skinny stroke.
- The Cupcake paper strains are from the road instruments and given shade and stroke and opacity turned all the way down to 50%.
The finished cupcake can be utilized as an addition to logos, or it may be a standalone emblem, meals photos, and as many different makes use of as you may think about. Creating your individual paintings might help you keep away from copyright infringements; it will also be cheaper than having to pay knowledgeable to create paintings for your corporation.
Learn: How you can create Instagram Carousels in Photoshop
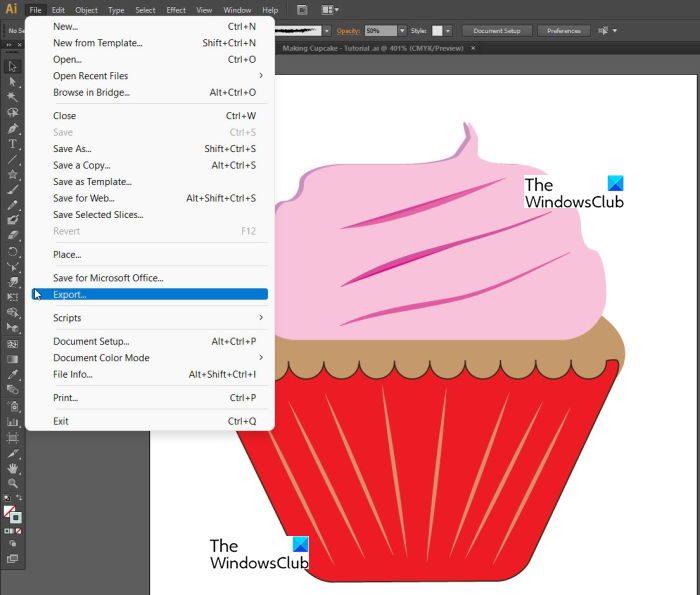
4] Saving for Use

Adobe Illustrator permits the export of the completed file to completely different codecs that may come in useful later.

When saving go to File, then Export then selected the suitable file format, then choose Use artboards after which click on All. When all that’s finished you click on Save.
- The PNG format permits for the saving of the file with out the background. That is helpful for occasions when you’ll want to use the file, however you don’t want any background current.
- The JPG permits for smaller recordsdata, however it’s going to normally have the background current.
Saving in several shade modes helps when the file shall be used for various functions. CMYK format is finest for printing whereas RGB is finest for displaying on screens.
Completely different file resolutions 75, 150, and 300 are the usual sizes which are used, and they’re going to give completely different file sizes and picture high quality. The higher the standard, the larger the file and the extra bodily house that’s wanted to reserve it.
Attempt to know as a lot about the usage of the file and begin with the matching decision and save within the matching file kind and dimension.
How do you make a 3D Cup in Illustrator?
To create a 3D Espresso Cup in Adobe Illustrator, you’ll have to make use of the 3D Revolve Impact, and the process is comparable to what’s defined on this submit.
How do you draw a cup in Illustrator?
The steps to make a Cup in Adobe Illustrator are briefly:
- Launch Adobe Illustrator
- Draw an Oval utilizing Ellipse Software
- Draw a Triangle midway down the Oval utilizing Facet Anchors
- Spherical the underside edges of the Triangle
- Subsequent, create the within of the Cup as per your alternative
- Fill the Cup with a Coloration
- Draw the Cups’ deal with
- Save the Cup picture.
Learn subsequent: How you can create posters or banners with Writer.
