
You could need to arrange a file server like FileRun for any variety of causes. The primary purpose, I’d suppose, could be so you’ll be able to have your personal Google Drive different that’s beneath your management as a substitute of Google’s.
FileRun claims to be “In all probability the very best File Supervisor on this planet with desktop Sync and File Sharing,” however I feel you may must be the decide of that for your self.
Simply to be utterly clear right here, I like FileRun, however there’s a shortcoming that I hope they are going to finally repair. That shortcoming is that there are some, for my part, essential settings which can be locked away behind an Enterprise Licence requirement.
That apart, I actually just like the ease-of-use and suppleness of FileRun. So let’s check out it.
Stipulations for FileRun in Docker
First issues first, you’ll want a Docker server arrange. Linode has made that course of quite simple and you may set one up for only a few bucks a month and might add a personal IP tackle (without cost) and backups for only a couple bucks extra per 30 days.
One other factor you’ll want is a site identify, which you should buy from nearly anyplace on-line for a variety of costs relying on the place you make your buy. Remember to level the domains DNS settings to level to Linode. You will discover extra details about that right here: https://www.linode.com/docs/guides/dns-manager/
You’ll additionally need a reverse proxy arrange in your Docker Server to be able to do issues like route visitors and handle SSLs in your server. I made a video concerning the means of organising a Docker server with Portainer and a reverse proxy referred to as Nginx Proxy Supervisor that you would be able to take a look at right here: https://www.youtube.com/watch?v=7oUjfsaR0NU
When you’ve bought your Docker server arrange, you’ll be able to start the method of organising your VaultWarden password supervisor on that server.
There are 2 major methods you are able to do this:
- Within the command line by way of SSH.
- In Portainer by way of the Portainer dashboard.
We’re going to check out how to do that in Portainer in order that we are able to have a consumer interface to work with.
Head over to http://your-server-ip-address:9000 and get logged into Portainer with the credentials we setup in our earlier put up/video.
On the left aspect of the display screen, we will click on the “Stacks” hyperlink after which, on the following web page, click on the “+ Add stack” buton.
This may convey up a web page the place you may enter the identify of the stack. Under that that you would be able to then copy and paste the next:
model: "2"<br></br>providers:<br></br> db:<br></br> picture: mariadb:10.1<br></br> atmosphere:<br></br> MYSQL_ROOT_PASSWORD: uAWNCGKSwor7fi<br></br> MYSQL_USER: linodefilerunuser<br></br> MYSQL_PASSWORD: fEpwC92osi3FTW<br></br> MYSQL_DATABASE: linodefilerundatabase<br></br> volumes:<br></br> - /residence/docker/filerun/db:/var/lib/mysql<br></br> networks:<br></br> nginxproxymanager_default:<br></br><br></br> internet:<br></br> picture: filerun/filerun<br></br> atmosphere:<br></br> FR_DB_HOST: db<br></br> FR_DB_PORT: 3306<br></br> FR_DB_NAME: linodefilerundatabase<br></br> FR_DB_USER: linodefilerunuser<br></br> FR_DB_PASS: fEpwC92osi3FTW<br></br> APACHE_RUN_USER: www-data<br></br> APACHE_RUN_USER_ID: 33<br></br> APACHE_RUN_GROUP: www-data<br></br> APACHE_RUN_GROUP_ID: 33<br></br> depends_on:<br></br> - db<br></br> hyperlinks:<br></br> - db:db<br></br> ports:<br></br> - "8200:80"<br></br> volumes:<br></br> - /residence/docker/filerun/html:/var/www/html<br></br> - /residence/docker/filerun/user-files:/user-files<br></br> networks:<br></br> nginxproxymanager_default:<br></br><br></br>networks:<br></br> nginxproxymanager_default:<br></br> exterior: true
This Docker compose file / stack tells the system to obtain the newest filerun/filerun picture to the Docker server, connect it to the “nginxproxymanager_default” community, mount it to the listing “residence/docker/filerun”, and make it obtainable on the docker server’s port 8200. The identical common precept applies to the mariadb container that we’ll use because the database, simply with completely different information and volumes.
You’ll be able to change the trail of the place you’d wish to retailer the filerun information if you would like. Simply ensure that the folder has the right permissions to be written to.
When you’re pleased with the settings right here, we are able to deploy the container by clicking the button that claims “Deploy the stack”.
This may begin the method of downloading and deploying FileRun in your server. You will know that the container has been deployed as soon as the web page reloads and also you see all of your operating containers.
Now you’ll be able to go to http://your-server-ip-address:8200 and it is best to be capable of see the setup display screen for FileRun.
STOP.
So as so that you can really be capable of use FileRun successfully, it wants a site identify and SSL.
Establishing a site and SSL
Head again over to your Linode dasboard and go to “Domains”. Then discover the area that you simply added to your account. Click on it after which search for the CNAME part of the area administration.
Add a CNAME to your area by getting into a hostname entry for what you need your subdomain to be. Within the instance video, I entered “pw” (with out the quotes). Under that, I entered the @ image within the “Alias to” field after which clicked “Save”.
Now that you’ve got that completed, we are able to head over to Nginx Proxy Supervisor and setup our SSL and area.
Now you’ll be able to go to http://your-server-ip-address:81 and it is best to be capable of see the login display screen for Nginx Proxy Supervisor.
The default credentials for Nginx Proxy Supervisor are:
E-mail:    [email protected]
Password: changeme
Enter these credentials (or yours if you happen to’ve up to date them) to login to you Nginx Proxy Supervisor occasion.
Click on on the tab on the prime of the web page that claims “SSL Certificates” after which click on on the “Add SSL Certificates” button close to the highest proper of the web page.
Subsequent, click on the “Let’s Encrypt” choice.
On the pop-up window that seems, enter the complete URL of the area you need safe and press the “Enter” key in your keyboard. On this instance, you’d enter https://information.yourdomain.com.
As soon as you have entered your URL, click on the “Take a look at Server Reachability” button proper beneath that. In the event you get an error message, make sure to appropriate the difficulty and check out once more. If no errors are returned, be sure the e-mail tackle on on the web page is appropriate, then learn and conform to the Let’s Encrypt Phrases of Service and click on the “Save” button.
It could take a minute or two for the system to generate and set up the important thing, however when it is completed, the web page will reload and you’ll see all the obtainable SSLs in Nginx Proxy Supervisor.
Now that now we have our SSL arrange on our system, we are able to click on the “Hosts” tab throughout the highest of the web page. Then click on the “Proxy Hosts” choice that exhibits up within the sub-menu.
Find the “Add Proxy Host” button close to the highest proper of the web page and click on it.
A brand new window will pop up and we will fill in some choices to configure our area.
Enter the area or subdomain you simply created the SSL for.
Go away the Scheme as http.
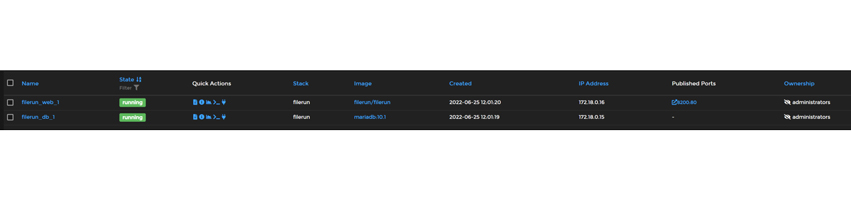
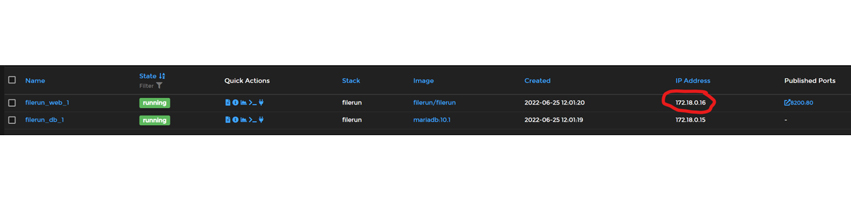
Enter the IP tackle of your container. This may be present in Portainer:
For the “Ahead Port” textbox, enter the container port. On this case it is 80. The 8200 that we see within the “Printed Ports” part of the picture above is what we’ll name the Docker port. We would like the port on the container aspect of issues so we’ll use the quantity on the precise aspect of the semi-colon.
Click on the choices for “Cache Belongings,” “Block Frequent Exploits,” and “Websocket Assist.”
Now click on the “SSL” tab on the highest of the pop up window.
You will see a dropdown that claims “SSL Certificates” and, beneath that, “None.”
Click on “None” after which choose the SSL you created within the earlier steps.
Now verify the 4 choices which can be beneath that, then learn and conform to the Let’s Encrypt TOS after which click on Save.
After a second, the web page will reload and it is best to see your new entry within the Proxy Hosts web page of Nginx Proxy Supervisor.
Configuring FileRun
Now it is best to be capable of go to https://information.yourdomain.com and it is best to see the identical arrange immediate that we noticed earlier. The method is straightforward sufficient as you may simply must click on by means of every display screen and ensure that all of the settings look the identical as what you arrange in your docker-compose/stack earlier.
As soon as you have gone by means of all of the steps you may be given a username and password. Retailer these for later so we are able to use them to login. Don’t be concerned, although. You’ll be able to change the default credentials as soon as you have logged in.
Now you can create customers and add information and do (nearly) all of the stuff you’d count on to do with your personal semi-self-hosted file server resolution.
You’ll be able to watch the tutorial right here:
