Static code inspection, or static supply code evaluation, as it’s fondly referred to as, is a debugging approach adopted throughout code opinions the place this system being debugged just isn’t executed.
There are a number of code evaluation instruments obtainable to software program engineers, similar to SonarQube, Coverity, and Codacy.
On this article, we’ll focus on the way to arrange SonarQube inside Docker, present the way to configure it on your language of alternative, and produce studies on code high quality. We’ll additionally introduce the complete SonarQube toolchain and show the way to use SonarQube on Docker to construct and take a look at a Go software.
Contents
Stipulations
To comply with the tutorial portion of this text, you’ll want the next:
- Working information of a programming language (we’ll use Go on this article)
- Improvement surroundings on your most popular programming language
- Docker put in in your machine
- Ample disk house for putting in SonarQube.
What’s SonarQube?
SonarQube is a well-liked steady inspection device for code high quality and code safety that goals to assist growth groups ship higher software program. It features as an computerized code evaluate device with assist for greater than 30 programming languages.
SonarQube simply interfaces with CI pipelines and DevOps builds to make code inspection swift and environment friendly for engineers. Additionally it is self managed, satisfying the necessity for builders to ship high quality and maintainable code at a quick tempo.
Understanding the Sonar ecosystem
SonarQube is a core ingredient of the Sonar ecosystem, together with SonarLint and SonarCloud. The complete Sonar ecosystem is concentrated on serving to builders write clear code that’s extremely maintainable.
The ecosystem includes options for particular person builders, groups, and enterprises. There may be additionally an lively neighborhood during which open supply contributors can contribute to enhancing the instruments.
The SonarLint resolution could be put in to research code in real-time and acquire stay suggestions on the go. SonarCloud permits builders to evaluate and report adjustments to code on model management software program, in addition to consider code for manufacturing. SonarQube, which we’ve seen, has the identical options as SonarCloud, with the distinction being enterprise options as towards self-managed ones.
Understanding how SonarQube features
SonarQube presents instruments for static code evaluation in detecting bugs, eliminating safety vulnerabilities, automating code evaluate, and code high quality assurance. SonarQube depends on a terminal and its CLI device, named SonarScanner, to run and report take a look at outcomes.
Technically, you first obtain the SonarQube picture from the Docker Hub. After, you need to set up SonarScanner CLI on your working system.
Tasks are created and examined on the SonarQube dashboard. To entry the dashboard, you should unlock a port to behave as a server and level the SonarQube docker container to that port, accessible by way of the localhost IP handle.
SonarQube may have entry to check a undertaking solely when added to the undertaking’s take a look at folder. The SonarScanner device, which studies to SonarQube, will need to have a corresponding port quantity.
Code evaluation with SonarQube
Now that we’ve a greater understanding of what SonarQube is and the way it features, let’s see the way to use SonarQube on Docker for code protection, scanning vulnerabilities, and code evaluation.
Putting in SonarQube on Docker
Getting SonarQube on Docker merely includes grabbing the picture from Docker Hub. If you happen to use a Linux machine, you’ll have to set the really useful base configurations utilizing the instructions supplied by Docker beneath “Docker Host Necessities”.
Subsequent, launch the Docker daemon in a separate terminal. On the terminal, run the under command to start out a server:
docker run -d --name sonarqube -p 8000:8000 sonarqube
You may entry the SonarQube occasion with the host IP handle and the desired port (localhost:8000, in our instance).
When the SonarQube portal homepage seems, go forward and log in; use the default username and password (“admin”). Subsequent, you’ll be requested to replace your password:
Viola! You’re prepared to start utilizing SonarQube on Docker.
Putting in SonarScanner
SonarScanner is a CLI device that’s used to run SonarQube assessments. To view the take a look at outcomes, SonarScanner sends suggestions from the take a look at to the SonarQube server so that you can evaluate. You may obtain SonarScanner right here.
Choose your working system and obtain the file.
After extracting the contents of the zip file, navigate to conf/sonar-scanner.properties and make sure the default server port is similar as your SonarQube port. This may permit SonarScanner to ship evaluation outcomes to SonarQube.
Now, add SonarScanner’s bin folder to your machine’s surroundings $PATH. On Home windows, the process includes following these steps:
- Obtain the Home windows zip file
- Rename the file
sonar-scanner - Transfer the file to your most popular listing
- Add that listing as a brand new surroundings variable within the $PATH
- Confirm your set up with a brand new terminal and execute the next command:
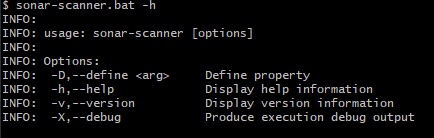
If you happen to require extra details about debugging within the SonarScanner CLI, use both of those flags along with your instructions: -X, --verbose, or -Dsonar.verbose=true.
Alternatively, you possibly can run SonarScanner from the Docker picture with the under command:
docker run
    --rm
    -e SONAR_HOST_URL="<http://$>{SONARQUBE_URL}"
    -e SONAR_LOGIN="myAuthenticationToken"
    -v "${YOUR_REPO}:/usr/src"
    sonarsource/sonar-scanner-cli
Constructing and testing a program with SonarQube
Up to now, we’ve put in two Sonar companies on Docker. Now, let’s see the way to use them in precise eventualities.
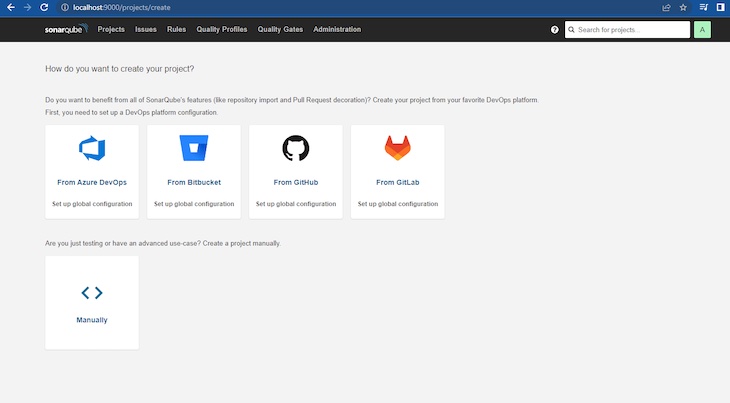
Creating a brand new SonarQube undertaking
To create a brand new SonarQube undertaking, run the SonarQube container on Docker and navigate to the homepage by way of localhost.
Subsequent, click on the Tasks bar on the homepage, and resolve the way you need to create a brand new undertaking. Add a undertaking key and show identify for the demo.
For this demo, we’ll use the handbook mode. After clicking Handbook, you’ll see fields displayed for the Undertaking show identify and Undertaking key:
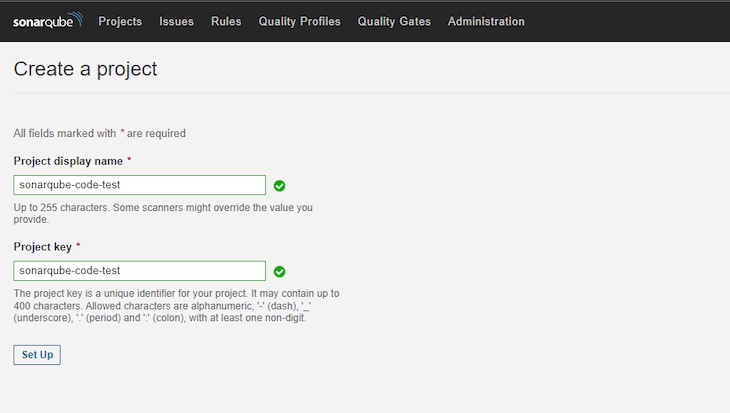
After finishing these fields, click on Set Up. Within the subsequent window, choose Regionally. Within the window after that, click on Generate to generate a token on your undertaking. Then, click on Proceed to complete up with the tokenization.
Extra nice articles from LogRocket:
Subsequent, choose your most popular language. For this undertaking, we’ll use Go, so we’ll choose the Different possibility.
Now, choose your OS and comply with the stipulated directions.
Producing a SonarQube token
Tokens are utilized in each undertaking. To generate a token, click on on the Person icon to the fitting of the search bar. Then, click on on the Safety tab and generate a brand new token.
The token required for our undertaking is already obtainable within the undertaking’s web page beneath Run evaluation in your undertaking.
Testing a pattern software
As talked about above, we’ll use a pattern program constructed with Go to show the usage of SonarQube for static code evaluation. In an present undertaking use case, you solely have to navigate to the take a look at folder in your codebase to make use of SonarScanner.
Create a program supply file and write this system you want to examine, together with this system’s take a look at file.
Our addition program is solely the next:
package deal adder

func AddNumbers(x, y int) int {
    return x + y
}
We’ll use the next take a look at for this system:
package deal adder_test

import (
    "testing"

    "github.com/username/sonarqube-code-test/adder"
)
func TestAddNumbers(t *testing.T) {
    resolution := adder.AddNumbers(6, 5)
    anticipated := 11
    if resolution != anticipated {
        t.Error("result's incorrect: anticipated 5, obtained", resolution)
    }
}
Analyzing the code
Now, we’ll make use of the SonarScanner we downloaded for analyzing the code. Begin by configuring the SonarScanner CLI device with an entry token for the admin account:
sonar-scanner -Dsonar.login=myAuthenticationToken
Out of your terminal, navigate to the folder the place your code’s take a look at file is saved and run the command supplied for the undertaking:

If you happen to generated the token your self for a specific undertaking, simply edit and use the next code:
sonar-scanner -D sonar.host.url=http://localhost:9000 -D sonar.projectKey=<Your-Undertaking-Key> -D sonar.projectName="Your Undertaking Title" -D sonar.projectVersion=<SemVer> -D sonar.login=<Your-Token-Right here> -D sonar.take a look at.exclusions=assessments/**/*.cs
After working the above command, the take a look at outcomes will present on the terminal’s display screen, with an EXECUTION SUCCESS message, like so:

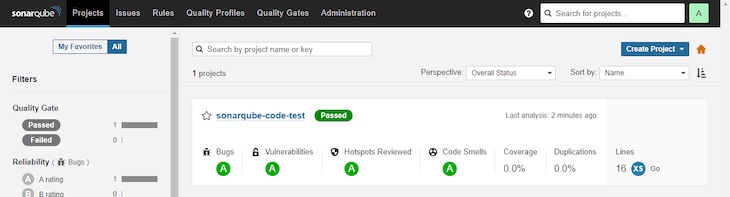
Now, go to the SonarQube dashboard and navigate to Tasks. You’ll discover the take a look at outcomes there:
Congratulations, you’ve efficiently run a take a look at with SonarQube on Docker!
Conclusion
On this article, we supplied an outline of the Sonar ecosystem and the way SonarQube features. We additionally demonstrated the way to set up SonarQube on Docker after which use it to construct and take a look at a Go software.
Whereas this text makes use of SonarQube regionally, it may well ideally be run on a Kubernetes cluster deployed to any variety of environments. SonarQube will act as a security floor for builders within the growth surroundings. It will also be used within the manufacturing surroundings to verify clear code. Builders and QA might discover SonarQube’s SonarLint helpful for debugging code.
LogRocket: Full visibility into your net and cellular apps

LogRocket is a frontend software monitoring resolution that allows you to replay issues as in the event that they occurred in your personal browser. As an alternative of guessing why errors occur, or asking customers for screenshots and log dumps, LogRocket permits you to replay the session to shortly perceive what went incorrect. It really works completely with any app, no matter framework, and has plugins to log extra context from Redux, Vuex, and @ngrx/retailer.
Along with logging Redux actions and state, LogRocket data console logs, JavaScript errors, stacktraces, community requests/responses with headers + our bodies, browser metadata, and customized logs. It additionally devices the DOM to file the HTML and CSS on the web page, recreating pixel-perfect movies of even essentially the most complicated single-page and cellular apps.
