Home windows computer systems have lengthy been geared up with the power to take screenshots. Nevertheless, evidently Microsoft desires to broaden our choices. Now, we’ve got some ways to take screenshots on Home windows computer systems. We’ll discover them one after the other under.
Take a Screenshot of Your Complete Display screen
To take a screenshot of your display screen, you’ve gotten the next choices:
1. The Snipping Software
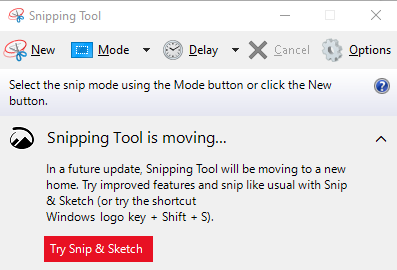
You’ve in all probability used this software earlier than. The Snipping Software utility is the preferred strategy to take a screenshot of your display screen. To make use of it, enter Snipping Software into the search field. From the search outcomes, click on on Snipping Software to open the utility. Take a snapshot of your display screen by clicking New. Drag the cursor to the realm you need to seize. Lastly, save the screenshot.
2. Home windows Key + Print Display screen Button
By urgent the Home windows key and the Print Display screen button collectively, you may take a screenshot of your display screen and reserve it to the clipboard. It would additionally save a screenshot file within the Screenshots folder.
3. Print Display screen Button
Urgent the Print Display screen button in your keyboard will save a shot of your present display screen to the clipboard. To see it, use the paste shortcut (CTRL + V) on Microsoft Paint or Microsoft Phrase.
Take a Screenshot of an Energetic Window
In case you want to take a screenshot of an energetic window, attempt any of those strategies:
1. ALT + Print Display screen
Urgent the ALT and Print Display screen buttons collectively will save a screenshot of an energetic window to the clipboard. To view this screenshot, use the paste shortcut (CTRL + V) on Microsoft Paint or Microsoft Phrase.
2. The Snipping Software
The Snipping Software utility may also be used to take a screenshot of an energetic window. To take action, enter Snipping Software into the search field. Click on on Snipping Software from the search outcomes. Hit New to take a snapshot of an energetic window. Drag the cursor to the realm of the energetic window. Save the screenshot.
It’s value noting, although, that the Snipping Software can solely seize the energetic window on the forefront. It can not take a screenshot of a window that’s absolutely or partially hidden.
For Home windows 11 customers, the older Snipping Software is mixed with the wonderful Snip & Sketch software from Home windows 10, eliminating the confusion surrounding the earlier screenshot software in Home windows. The mixed screen-shooter for Home windows 11 might be accessed by urgent Home windows Key+Shift+S. This keyboard shortcut provides you the choice to take a screenshot utilizing an oblong choice, freehand choice, window, or full-screen seize.
3. Utilizing the Sport Bar
The Sport bar might be accessed by urgent the Home windows Key+G buttons. From there, a digicam icon might be discovered within the Seize window. In a considerably counterintuitive method, by tapping that, your screenshot is saved to the Movies/Captures folder underneath your primary consumer folder. Within the major Home windows Settings app, you may modify the goal folder. (Alternatively, to keep away from opening the Sport bar, press the Home windows Key+Alt+PrtScn shortcut.)
4. Use the Quantity Buttons on Floor Tablets
Except you’ve gotten a keyboard hooked up, taking screenshots on Floor tablets differs from doing so on a PC. There isn’t a PrtSc key on the on-screen contact keyboard.
To take a screenshot on the Floor Professional 8 and nearly all of its predecessors, concurrently press the Quantity Up and Energy buttons. You danger turning off the display screen when you don’t press the buttons on the similar time.
The identical factor occurs once you take an image on this method: the picture is saved to your Photos>Screenshots folder.
Older Floor tablets required you to concurrently press the facility button and a {hardware} Home windows button, and a few used the Fn+Home windows Key+Spacebar mixture on their hooked up keyboards. If in case you have a much less well-known pill mannequin, you may must experiment or search for the documentation. On the Dell Latitude pill, you press the Energy button and Quantity Down buttons concurrently. Moreover, opening the Snipping Software on a Floor Pen requires double-tapping the Again button.
Take a Screenshot with a Mouse Pointer on Home windows 11
Do you need to seize your display screen with a mouse cursor? Sadly, the screenshot strategies above gained’t permit you to take action. Even the brand new Snipping Software isn’t able to getting that mouse cursor within the picture. So, we listed just a few choices you may attempt under:
1. Steps Recorder
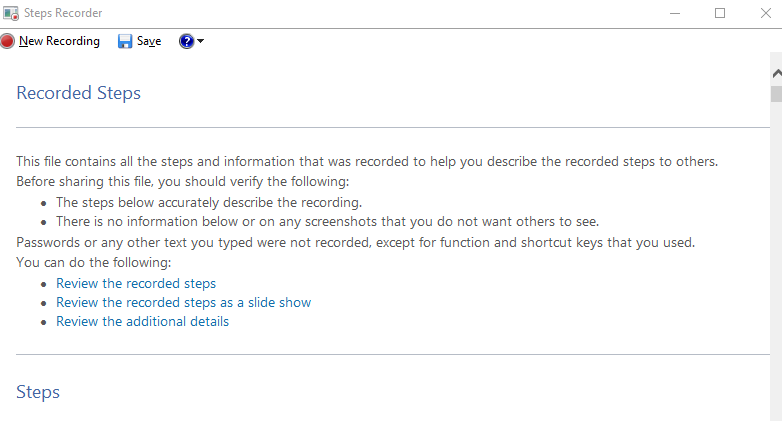
In case you’re utilizing Home windows 11, you should utilize Home windows 11’s Steps Recorder app. With Steps Recorder, a built-in Home windows app, in addition to many different third-party apps, you may take glorious screenshots that embody the mouse cursor. Any of the apps requires just a few additional steps past what an ordinary screenshot would require as a way to take a screenshot that additionally contains the mouse cursor. Let’s take a look at how Steps Recorder can take screenshots.
Home windows 11’s Steps Recorder allows you to take screenshots of the actions you are taking and ship them to Microsoft or one other technician to explain any issues (if any) your PC is presently experiencing. It could actually assist us get the screenshots we wish with the mouse cursor included.
- To start, click on the Begin button and kind “Steps Recorder” into the search bar. Launch it. You will notice a tiny Steps Recorder window. To begin taking screenshots, click on Begin Report.
- Click on on Cease Report upon getting completed taking the specified screenshot.
- The listing of screenshots will seem as Recorded Steps. To avoid wasting them right into a file, click on the Save button and select a location.
- The screenshots or recorded steps will now be saved within the location you specified as a zipper folder. After the folder has been unzipped, double-click the .mht file to begin it up. Web Explorer will open the file.
- Browse the web page, right-click the specified screenshot, after which select Save image as from the menu. Choose a location for the file to be saved, then achieve this.
- The placement you choose will likely be used to retailer the screenshot with the mouse cursor you need to save.
2. Third-Occasion Apps
In case you don’t really feel like utilizing the built-in display screen recording app of Home windows, you may set up third-party display screen recording apps to take a screenshot of your display screen together with your mouse cursor.
IrfanView
One of the standard apps in the present day which you should utilize to seize a picture of your display screen together with your mouse cursor is IrfanView. This app works as a picture viewer, organizer, editor, and converter program for Home windows computer systems. It additionally performs audio and video information, in addition to taking screenshots.
To make use of it to take screenshots, be sure to have it put in in your laptop first. After that, launch the app and go to Choices. Go to the menu bar and click on Screenshot or Seize. A brand new window will now open. Choose the Desktop Space – Present Monitor (Mouse) choice. By default, CTRL + 11 are the hotkeys related to display screen seize. Hit Begin to begin capturing the display screen together with your mouse cursor. Hit the hotkeys to seize a screenshot.
Greenshot
Apart from IrfanView, there are different apps you should utilize to seize the mouse cursor in a screenshot. However they’re principally designed to indicate solely the default look of a cursor. If that’s tremendous with you, attempt Greenshot.
This app works the identical method as IrfanView. Its solely benefit is that it permits you to transfer the cursor within the screenshot earlier than you reserve it.
Share X
One of many well-liked decisions for taking a screenshot of the mouse cursor on Home windows is ShareX. You possibly can schedule and edit screenshots utilizing ShareX, a free and open-source display screen seize program that comes with a wealth of sensible instruments.
Apart from the instruments included for taking screenshots, ShareX additionally comes with helpful instruments like a coloration picker, a ruler, and even a decoder/encoder for QR codes. In distinction to the opposite apps on this listing, ShareX additionally has a display screen recording characteristic.
It’s also possible to embody the mouse cursor in your captures with ShareX. In truth, this perform is turned on by default. To switch ShareX’s mouse cursor settings:
- Launch ShareX, then choose Process settings.
- Make it possible for the primary choice, Present cursor in screenshots, is enabled by clicking on Seize.
Subsequent, you’ve gotten just a few decisions for taking a screenshot with ShareX. After launching ShareX, choose Seize. Relying on the area and methodology of seize, there are lots of choices right here. Choose the choice that most accurately fits your wants, after which begin taking screenshots. The ShareX keyboard shortcuts may also be used to take a screenshot.
Prior to installing any third-party app in your Home windows 10/11 laptop, we recommend that you just obtain and set up a dependable PC Restore software to get your laptop operating quick and easy, even when taking a great deal of screenshots. This software can be utilized to find pointless information, eliminate them, and create extra room for brand new screenshots.
Abstract
There are various other ways to take a screenshot of your display screen. However amongst all, the Snipping Software is, by far, the preferred. Not solely does it seize energetic home windows and full screens, nevertheless it may also be used to take photographs in freeform shapes.
Then once more, even with its recognition, it nonetheless isn’t good. It doesn’t have the power to seize your display screen together with your mouse cursor on it. That is the place third-party apps are available in. Though these apps principally require paid subscriptions, they really include a great deal of attention-grabbing options and features, that are all value making an attempt. So, if in case you have some {dollars} to spare, then third-party apps could also be your greatest and most dependable choices.
Which of those screenshot strategies do you discover straightforward to make use of? We’d love to listen to your ideas within the feedback.

Vic is a search engine marketing professional, serving to to optimize web sites to make them extra user-friendly. He’s been within the business for greater than 10 years, and his work speaks lots about his expertise and experience within the IT and digital advertising fields.
Vic is the one answerable for conserving our web site operating easily and effectively, to be sure that our readers have a beautiful expertise whereas visiting the web site. He’s good at troubleshooting errors and fixing Home windows points that come up both when enjoying video games or engaged on the pc.
Vic is a licensed gadget freak who feels the necessity to encompass himself with cutting-edge expertise. And this ardour has helped him lots in creating content material that informs and guides customers on utilizing and troubleshooting the most recent expertise. He’s an avid researcher who’s at all times hungry for the most recent information and updates on essentially the most cutting-edge expertise.
