

DATA SCIENCE
Get Your Proof of Idea Up in Minutes
Apache Superset is a strong open-source software for dashboarding. However, setup may be cumbersome. I’ll take you thru it step-by-step.
Introduction
This information is determined by an accompanying GitHub repository which may be discovered right here.
In broad strokes, we are going to use this repository to:
- Arrange Superset in a neighborhood VS Code improvement container.
- Fairly than creating the Superset configuration database regionally, we’ll level our improvement container to the SQL database inside Google Cloud Platform that we’ll use to help the ultimate deployment.
- Use our native deployment to configure the GCP SQL database.
- As soon as the Google Cloud database is configured we’ll stage a container picture in Google Artifact Registry.
- Create the Google Cloud Run service from the Artifact Registry Container.
The repository comprises:
.devcontainer: folder containing the information that can create a VS Code improvement container.setup-scripts: folder that comprises a set of shell scripts to arrange and configure Google Cloud Platform (GCP) providers. These scripts may be personalized on your wants however they shouldn’t require any customization as they depend on surroundings variables from the VS Code improvement container which you’ll set in.env.template.src: folder that comprises the information to construct the Google Cloud Run Service..env.templateto mean you can set surroundings variables with the values on your deployment.
Stipulations
Performing the above steps would require:
It’s essential that the entire shell instructions/scripts outlined under be executed from the terminal inside the VS Code improvement container.
Set up every of the above stipulations within the order offered. Visible Studio Code, the Distant Containers extension, and the Google Cloud CLI are all simple to put in. Comply with the Docker set up directions explicitly! Docker itself has numerous prerequisite steps. Should you don’t have already got Docker put in be very conscious of the set up steps.
Should you encounter an error within the under steps it’s seemingly since you didn’t execute the prerequisite set up steps appropriately.
Getting Began
1. When you’ve accomplished the prerequisite installations, clone the repository to your machine. Don’t rename the repository root folder from superset-on-gcp-cloud-run.
2. Rename the file ./.env.template to ./.env and open this file in Notepad or one other textual content editor. Maintain it open till instructed to save lots of and shut it. We’ll be populating some wanted values within the subsequent part.
Configuring Google Cloud
Mission Creation
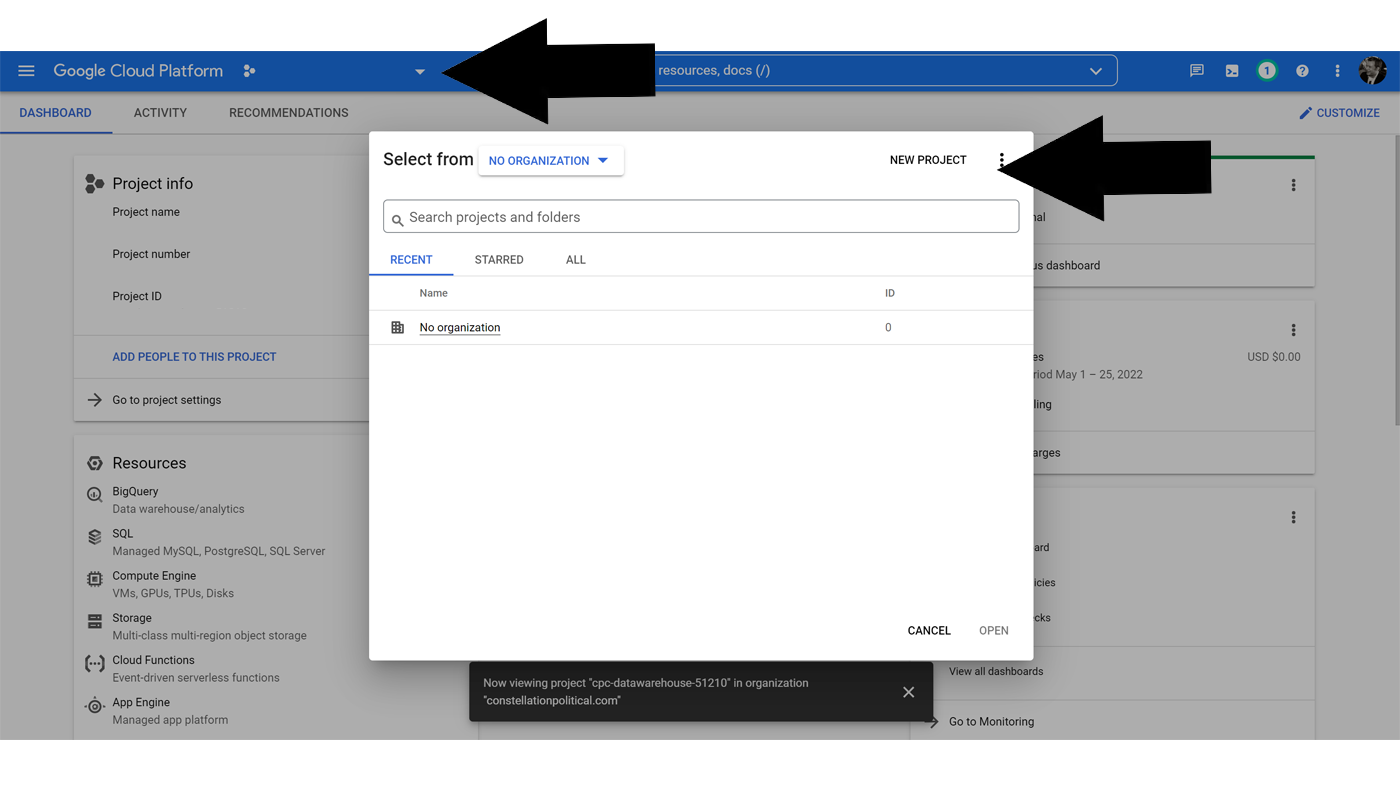
Should you don’t have already got a Google Cloud challenge arrange for this, you’ll have to create one. So, take a jaunt over to the Google Cloud Platform net interface — Google Cloud Console.
Choosing or making a challenge is definitely completed from the drop-down on the top-left subsequent to the ‘Google Cloud Platform’ textual content. When you’ve created your challenge be sure to’re working in it by making certain the right challenge identify seems subsequent to the drop-down you simply chosen.
You should definitely allow billing on the challenge that you just’ve created.
- Sort ‘Billing’ within the high search bar and select that choice.
- You have to be greeted by a notification saying that the challenge has no billing account. Select Hyperlink a Billing Account.
- Select (or create) your billing account.
Be sure the GOOGLE_CLOUD_PROJECT variable in ./.env is ready to match no matter you’ve chosen on your challenge identify. Notice that this worth must be used within the SUPERSET_CONNECTION_NAME and SUPERSET_CONECTION_SECRET variables as properly, so substitute that portion of these strings as properly now.
Configure Google Consent Display screen
Our deployment is designed to permit any consumer out of your Google-based group to entry Superset. In different phrases, if their e-mail comprises ‘@yourorganization.com’ they’ll have the ability to check in. To do that we’ll have to configure a number of issues within the Google Cloud Console earlier than continuing.
- From Google Console Residence kind ‘APIs & Providers’ and select that part.
- Select ‘OAuth Consent Display screen’ from the left-hand menu.
- Choose ‘Inner’ and click on Create.
- Set the under fields. All may be at your discretion however observe that ‘Licensed domains’ will decide entry so make sure that’s your group’s appropriate, top-level area.
- App identify
- Consumer help e-mail
- Licensed domains
- Developer contact info
5. Click on Save and Proceed.
6. Click on the Add or Take away Scopes button.
7. Choose the ‘openid’ scope and click on Replace.
8. Click on Save and Proceed.
9. Click on the Again To Dashboard button.
Create credentials
- Choose Credentials from the left-hand menu of the ‘APIs & Providers’ display screen.
- Click on +Create Credentials > OAuth Shopper ID.
- Set the Software kind drop-down to ‘Internet utility’ and select a ‘Identify’ of your liking.
- Click on Create.
- ‘Your Shopper ID’ and ‘Your Shopper Secret’ might be displayed in a pop-up. Notice these values and duplicate them into their respective variables within the
./.envfile:GOOGLE_CLIENT_IDandGOOGLE_CLIENT_SECRET. Be conscious of main/trailing white area. It’d be clever to Obtain JSON as properly. You shouldn’t want it, however simply in case.
Atmosphere Variables
Be sure that the entire variables within the ./.env file accompanying this repository now have values assigned to them. Save and shut the ./.env file.
Open the Native Growth Container
- Be sure that Docker is operating and open in your machine after which open VS Code.
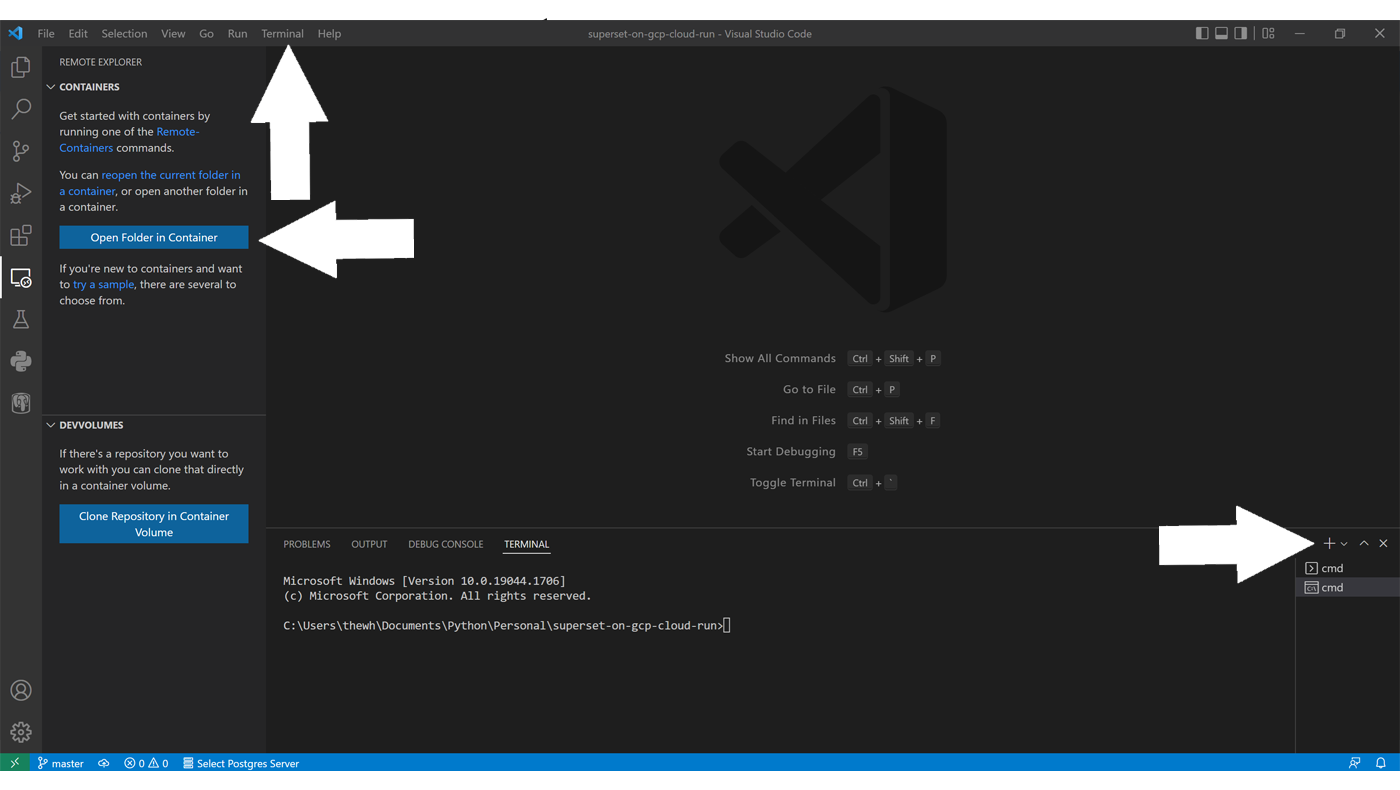
- Inside VS Code choose the Distant Explorer icon from the left navigation bar to open the ‘Distant Containers’ extension.
- Select the Open Folder in Container button and choose the folder containing everything of the repository:
superset-on-gcp-cloud-run. This step can take 5–10 minutes whereas the dependencies obtain and the container is constructed. When the container is absolutely constructed the file tree ought to show within the left pane. - From the highest VS Code menu select Terminal > New Terminal to open a terminal pane.
- Enter the command
printenvwithin the terminal and press return. This may print a listing of all of the surroundings variables in your container. Scan by this to ensure these variables outlined in./.envare displaying the right values. In the event that they aren’t double-check that file, put it aside, and rebuild the container. You received’t have the ability to proceed if there are inaccuracies.
Configure Google Cloud Platform Infrastructure
- Log in to Google cloud by way of the terminal by coming into the command
gcloud auth login. As a result of the container isn’t linked to the skin world, it would generate a command that you just’ll want to repeat into your Google Cloud SDK operating exterior the container. So, open the Google Cloud SDK Shell in your machine and paste within the command from the VS Code Terminal. This could open a browser window in search of your authorization to proceed. Grant it entry utilizing your Google account of the identical area that you just’re deploying Superset on. - Copy and paste the outcomes from the Google Cloud SDK again into the VS Code terminal. If profitable you need to get a message saying ‘You at the moment are logged in as…’
- Change to the Google Cloud Mission you arrange earlier by coming into the command
gcloud config set challenge $GOOGLE_CLOUD_PROJECTit will make the most of the surroundings variable defining the identify of your Google Cloud Mission that you need to have set earlier. If profitable the terminal ought to return ‘Up to date property [core/project].’ - Allow the assorted Google Cloud providers we’ll want inside the challenge by typing
setup-scripts/enable_gcp_services.shinto the VS Code terminal.
Some customers have reported getting a ‘Permission denied’ error when trying to run these shell scripts. If that occurs to you, merely give your self permission to execute the script by typing
chmod u+x setup-scripts/enable_gcp_services.shfor instance. This gives you execute permission on the script you designate.
Create the Superset Configuration SQL Database
- Create the Superset SQL database in Google Cloud by operating the
setup_sql.shscript from this repository by typingsetup-scripts/setup_sql.shinto the VS Code Terminal.
Set Secrets and techniques & Service Accounts
Your Cloud Run service will pull secrets and techniques from GCP Secret Supervisor. These secrets and techniques will all be created primarily based on the values you set within the ./.env file.
- Run the
create_gcp_secrets.shscript bycoming into setup-scripts/create_gcp_secrets.shinto the VS Code terminal. - We’ll additionally have to create a service account for Superset to make use of and grant it entry to the secrets and techniques we simply created in addition to the assorted providers we’ll depend on. Run
setup-scripts/create_gcp_service_account.shwithin the VS Code terminal to create a service account named ‘superset’ in your challenge that may do that.
Construct Superset Configuration SQL Database
- Join the VS Code improvement container to the GCP database we created by operating this command within the terminal:
/cloud_sql_proxy -instances=$SUPERSET_CONNECTION_NAME=tcp:5432. If it’s profitable you need to see the quantity subsequent to the ‘PORTS’ heading on the high of the terminal enhance by one and a pop-up might show informing you that ‘Your utility is now operating on port 5432’. - This proxy connection will monopolize the terminal window you had been simply working in. Open a brand new terminal window by clicking + on the top-right of the terminal window you had been simply working in.
- Within the new terminal window you’ve simply opened kind
superset db improve. This may increasingly take a while to execute however this command is essential because it populates your Google Cloud hosted SQL database with the entire tables wanted for Superset to run.
Construct & Deploy the Apache Superset Container
Subsequent, we are going to push a Docker picture to a Google Artifact Registry inside the Google Cloud challenge. A Cloud Run service will then be created to deploy that picture.
- Create a Google Artifact Registry container by typing the command
setup-scripts/create_gcp_artifact.shinto the VS Code terminal. - Add the contents of the repository’s
srcfolder to the repository you simply created as a Docker picture by typingsetup-scripts/create_gcp_image.shinto the VS Code terminal. - Flip the picture you’ve uploaded into an lively Google Cloud Run Service by typing the command
setup-scripts/create_gcp_cloud_run.shinto the VS Code terminal
Replace Service Credential
After operating the script above, you’ll obtain a Google Cloud Run service URL.
- Return to Google Cloud Console.
- Seek for and choose APIs & Providers within the high search bar.
- Choose Credentials from the left navigation bar.
- Select the pencil icon to edit your OAuth credential, and replace the Licensed redirect URIs to
<CLOUD-RUN-URL>/oauth-authorized/google, changing<CLOUD-RUN-URL>with the worth the VS Code terminal returned. Wait a couple of minutes earlier than continuing. - Navigate to the Cloud Run service URL displayed by the VS Terminal (*with out the additional textual content you added in Step 4.). This may authenticate you as an admin of the Superset deployment.
When you’ve completed that, you’ll need to run the steps under to make sure future customers will not be granted admin entry.
Refresh Superset Roles
- Replace
AUTH_USER_REGISTRATION_ROLEinsuperset_config.pyto ‘Public’. Save and shut that file. All new accounts transferring ahead will default to Public and now not Admin. - Replace the container picture by once more typing
setup-scripts/create_gcp_image.shinto the VS Code terminal. - Deploy your new container model by once more typing
setup-scripts/create_gcp_cloud_run.shinto the VS Code terminal.
Initialize Superset
- Be sure to’re nonetheless linked by way of the Google cloud sql proxy and sort
superset initinto the VS Code Terminal. This may take a number of minutes to finish.
Congratulations
Every little thing ought to now be operating efficiently and you need to have the ability to entry your deployment by visiting the URL returned when operating setup-scripts/create_gcp_cloud_run.sh.
