
Svelte Commerce is a brand new Svelte template by Vercel that lets you launch a totally practical ecommerce retailer with Shopify, shockingly quick. Though it may be thought-about a starter equipment, it’s absolutely practical and has all of the options wanted in an ecommerce retailer with excessive efficiency. As well as, it was constructed with the quick and environment friendly Svelte Internet framework.
On this piece, I’ll present you step-by-step methods to arrange an ecommerce retailer with Svelte Commerce and deploy it to Vercel and Netlify.
Leap forward:
Svelte Commerce ecommerce setup
Step one in establishing your retailer with Svelte Commerce is to make sure you have Node.js put in in your laptop. Should you don’t have Node.js put in, examine the official documentation to obtain and set up it.
Svelte Commerce set up
Svelte Commerce is an open supply template created and hosted by Vercel of their GitHub repository.
Putting in it simply means cloning it from the GitHub repository. You’ll be able to clone it by working git clone https://github.com/vercel/sveltekit-commerce. Then, navigate into the cloned mission and set up the dependencies utilizing cd sveltekit-commerce && npm set up.
Do not forget that the default bundle supervisor utilized in Svelte Commerce is pnpm. When you have pnpm put in, then go forward and sort pnpm set up. In any other case, you should use yarn or npm set up — in that case; you’ll have to delete the pnpm-lock.yml file from the mission root.
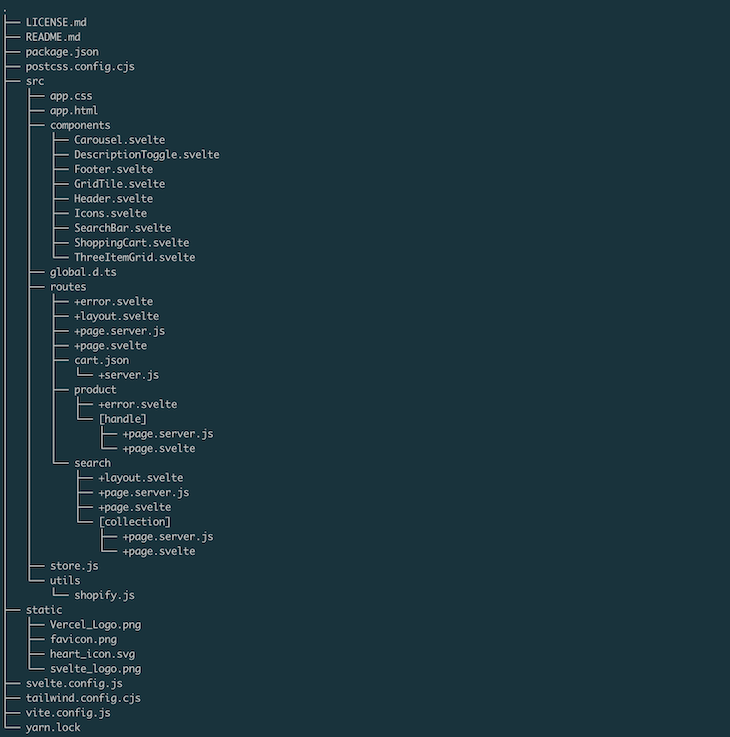
Your file construction ought to appear like so:
To confirm that you’ve every part so as, run npm run dev in your Terminal and go to the URL that may show in your display screen. You must see one thing just like the web page beneath:
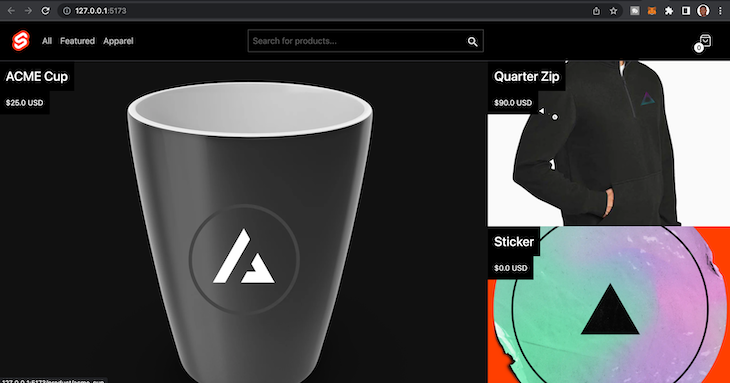
This confirms that we’ve efficiently cloned the default model of Svelte Commerce, and we’re able to make it our personal.
Integrating Shopify
So, Svelte Commerce helps you with the presentation layer of your ecommerce retailer. It, nonetheless, is dependent upon the datastore that you simply’ll present. By default, Svelte Commerce makes use of knowledge out of your Shopify retailer by way of the Shopify storefront API.
While you clone the mission, you’ll see that it has some default Shopify credentials within the shopify.js file. This credential is a pattern credential added by the Vercel staff to allow the instance template to work:
├── src
│   ├── retailer.js
│   └── utils
│       └── shopify.js
Let’s edit it so as to add our personal customized Shopify retailer credentials. The shopify.js file will comprise the code beneath:
// src/utils/shopify.js
export async operate shopifyFetch({ question, variables }) {
  const endpoint =
    import.meta.env.VITE_SHOPIFY_API_ENDPOINT ||
    'https://next-js-store.myshopify.com/api/2021-10/graphql.json';
  const key =
    'ef7d41c7bf7e1c214074d0d3047bcd7b';

  attempt {
    const outcome = await fetch(endpoint, {
      methodology: 'POST',
      headers: {
        'Content material-Kind': 'utility/json',
        'X-Shopify-Storefront-Entry-Token': key
      },
      physique: { question, variables } && JSON.stringify({ question, variables }),
      duplex: 'half'
    });


    return {
      standing: outcome.standing,
      physique: await outcome.json()
    };
  } catch (error) {
    console.error('Error:', error);
    return {
      standing: 500,
      error: 'Error receiving knowledge'
    };
  }
}
Discover that the credentials are proven in plaintext. We’ll want so as to add it to the .env file and delete the default credentials. So, our up to date code will appear like the one beneath:
// src/utils/shopify.js
...
const endpoint = import.meta.env.VITE_SHOPIFY_API_ENDPOINT;
const key = import.meta.env.VITE_SHOPIFY_API_ACCESS_TOKEN;
...
Now, create a .env file within the root listing of your mission and add the next variables:
//.env
VITE_SHOPIFY_API_ENDPOINT=
VITE_SHOPIFY_API_ACCESS_TOKEN=
To get these credentials, we’d like a Shopify account and a storefront. Should you don’t have an account but, create an account after which create a retailer.
When you might have a retailer all setup, your SHOPIFY_API_ENDPOINT can be on this sample https://{shopname}.myshopify.com/admin/api/2022-10/graphql.json. So, substitute the store identify along with your store identify. Then, you’ll be able to replace your .env variable to have that now:
//.env
VITE_SHOPIFY_API_ENDPOINT=https://{shopname}.myshopify.com/admin/api/2022-10/graphql.json
VITE_SHOPIFY_API_ACCESS_TOKEN=
Subsequent, let’s get the Shopify entry token out of your dashboard.
Accessing Shopify out of your dashboard
Your Shopify backend is the place every part occurs, from producing your entry tokens and creating the merchandise that can be displayed in your ecommerce retailer, to viewing your stock and analytics, and extra.
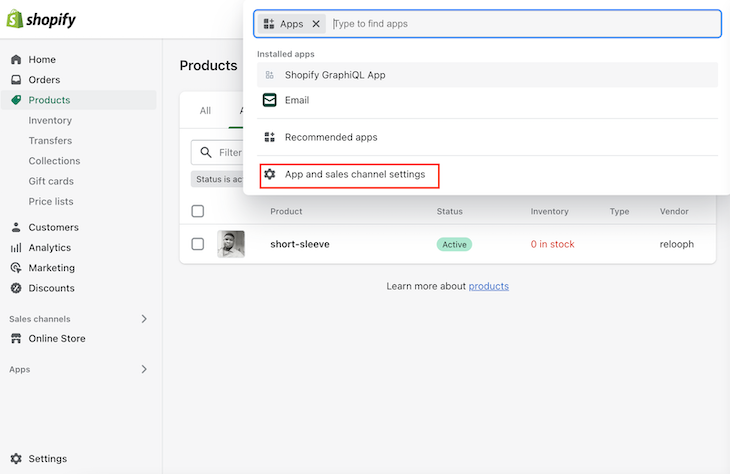
Let’s full the essential setup within the backend that may permit us to generate the storefront entry token for Svelte Commerce. Out of your Shopify admin dashboard, click on the Apps hyperlink on the sidebar. It will return a pop-up. Then, click on the App and gross sales channel settings within the pop-up:
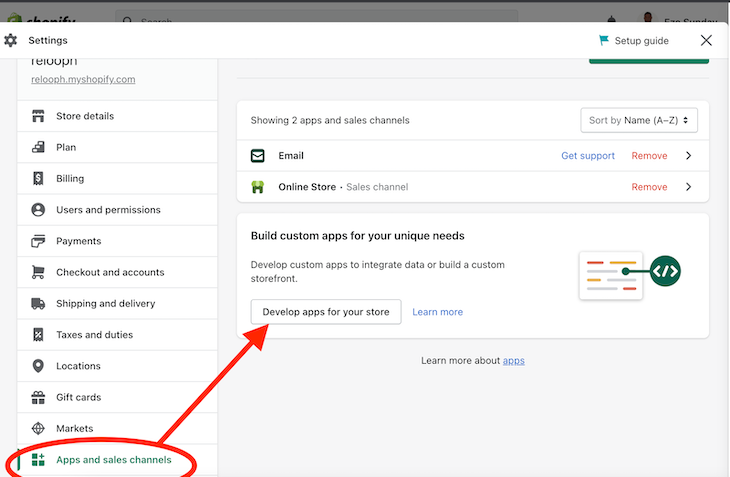
You’ll be taken to a display screen the place you will notice Develop apps in your retailer button, as proven beneath. Click on it:
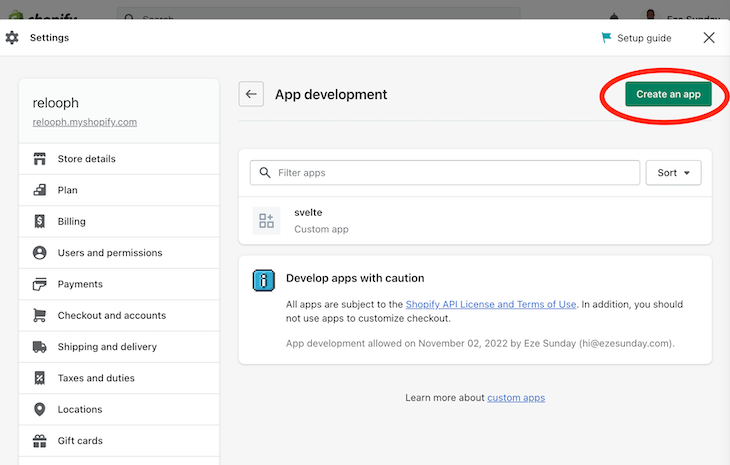
Then, you’ll be taken to a different display screen that lets you seek for your apps or create a brand new one. Choose the Create an app button as proven beneath:
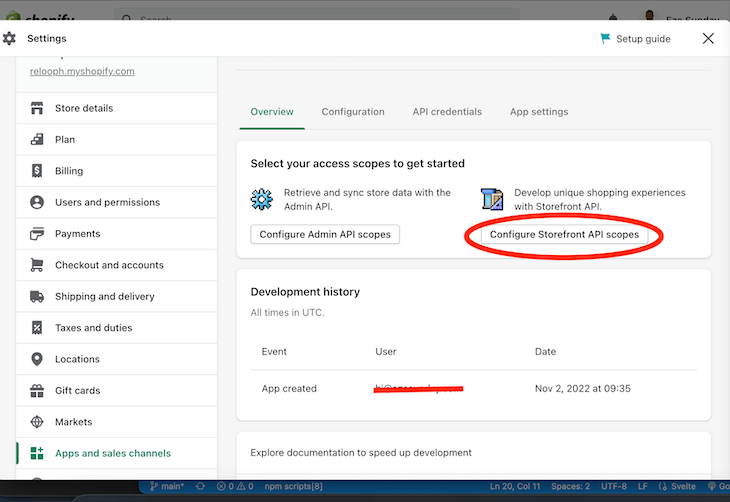
When the app is created, you’ll need to configure the Storefront API scopes as proven beneath on the following web page:
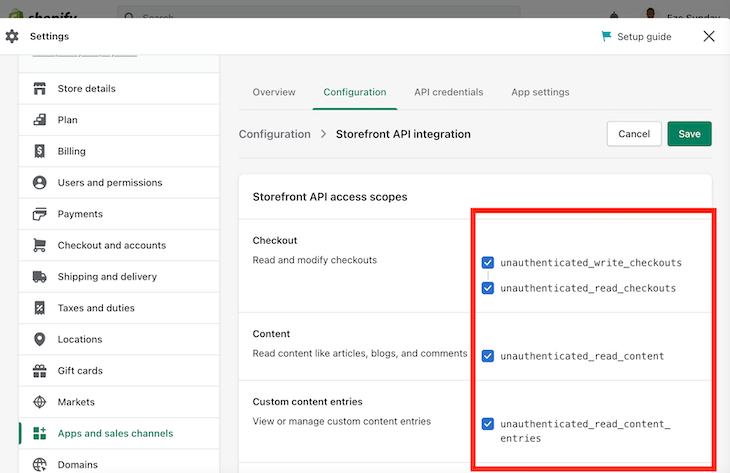
From there, choose all of the Storefront API entry scopes and choose Save:
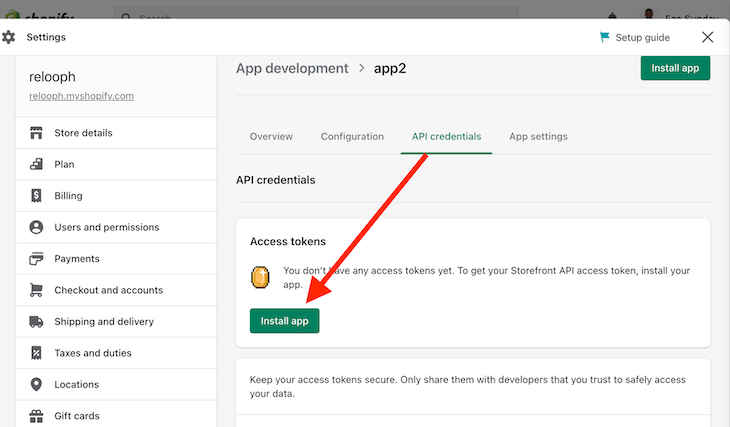
Lastly, navigate to the Credentials part and click on the Set up App button:
When the set up course of is full, you’ll be proven your Storefront API entry token as proven beneath:
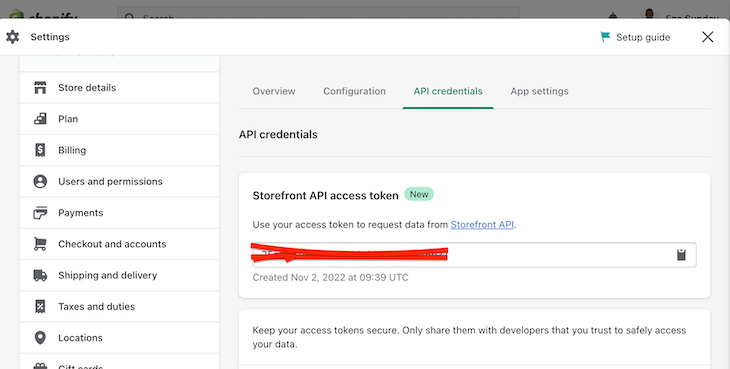
Copy the token, head over to your .env file, and add the entry token there:
//.env
VITE_SHOPIFY_API_ENDPOINT=https://{shopname}.myshopify.com/admin/api/2022-10/graphql.json
VITE_SHOPIFY_API_ACCESS_TOKEN=kjbabfjkhfkjhjbkvhjvfiofguhfy
Congrats! Your Svelte Commerce-powered ecommerce retailer is prepared. You’ll be able to tweak the design as you need or any extra functionalities. All of the merchandise you create in your Shopify Retailer will seem in your customized store. One of the best half is that you simply don’t must pay a Shopify month-to-month price as a result of the API is free to make use of.
Now that we have now our ecommerce retailer prepared, let’s deploy it for the world to see.
Deploy your ecommerce retailer to Vercel
One of many causes builders love to make use of Vercel is that it’s extremely straightforward for anybody to deploy supported purposes to their server inside minutes. You don’t have to fret about any sophisticated setup. All you really want to do is push your code to GitHub and join it to Vercel as soon as, and every time you push a brand new replace to GitHub, it will likely be robotically deployed.
So, let’s begin with creating an account on the Vercel web site and logging in.
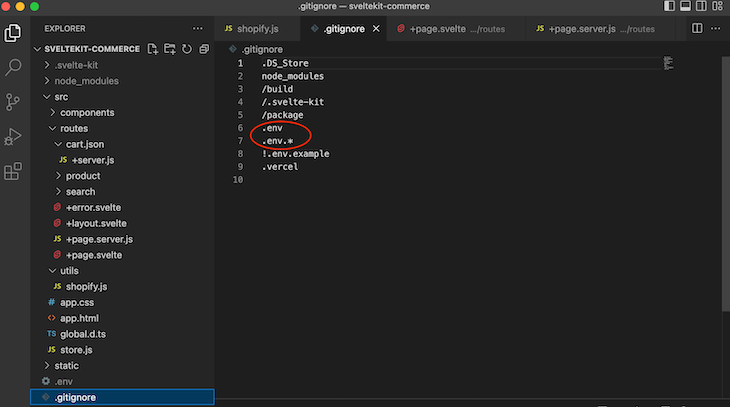
Subsequent, push your Retailer code to GitHub, GitLab, or BitBucket as a result of Vercel will set off automated deployment by way of this medium every time you push an replace to the repository. Ensure that to double-check that you’ve added the .env file to your .gitignore, file so that you don’t by accident push your secrets and techniques to GitHub:
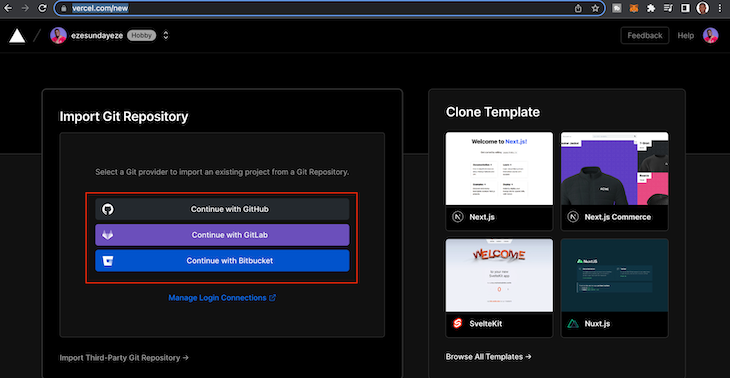
For this step, keep logged into your Vercel account when you go to this https://vercel.com/new. Then, it’s best to see a web page requesting to attach your Git Supplier. Go forward and join and import your mission:
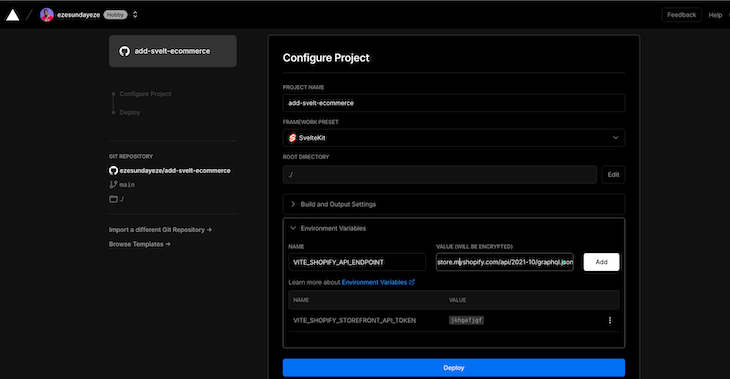
Lastly, configure it to make use of your Setting Variables and click on the Deploy button as proven beneath:
That’s all there may be to it. Simply look forward to the deployment to finish, and it’s best to have your ecommerce retailer prepared to point out the world. That was easy, proper?
Let’s deploy to Netlify as effectively.
The way to deploy your Svelte Commerce to Netlify
Netlify customers get pleasure from comparable advantages as Vercel customers — simple deployment, developer-friendliness, and it shines for frontend purposes and lambda capabilities.
Like we did for Vercel, there may be not a lot distinction with Netlify when it comes to deployment. First, enroll and log in to your Netlify backend.
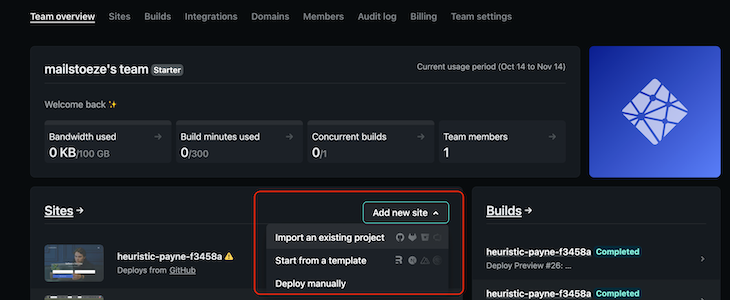
From there, click on the Add new website button and select to import it out of your GitHub profile. Then, you’ll be guided to attach your GitHub repository:
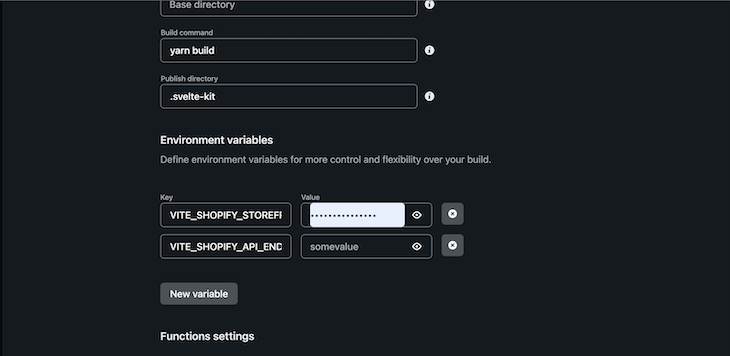
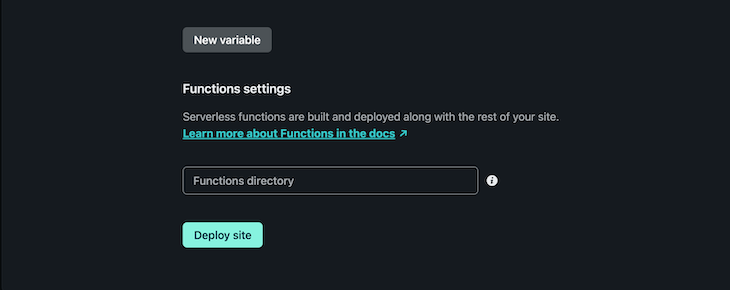
When you choose your repository and import it, click on the superior possibility and add your surroundings variables:
Subsequent, click on the Deploy website button:
Voila! Your ecommerce retailer is prepared.
You’ll be able to all the time work to enhance your ecommerce retailer by leveraging all of Svelte’s options and making the most of the free options that the Shopify API gives.
Conclusion
Constructing a full-scale ecommerce retailer takes time and comes with some monetary and psychological burdens. If you’re making an attempt to construct a customized ecommerce retailer for your corporation or a shopper, and also you wish to do it quick with out compromising safety or high quality, then Svelte Commerce might be your greatest guess.
LogRocket: See the technical and UX causes for why customers don’t full a step in your ecommerce move.

LogRocket is sort of a DVR for net and cellular apps and web sites, recording actually every part that occurs in your ecommerce app. As an alternative of guessing why customers don’t convert, LogRocket proactively surfaces the basis reason for points which can be stopping conversion in your funnel, reminiscent of JavaScript errors or useless clicks. LogRocket additionally displays your app’s efficiency, reporting metrics like shopper CPU load, shopper reminiscence utilization, and extra.
Begin proactively monitoring your ecommerce apps — attempt without cost.
