
On this put up, you’ll learn to deform a mesh in Unity utilizing varied strategies so that you could choose essentially the most appropriate one to your mission whenever you want a selected or comparable function in your sport. We are going to implement an impact utilizing a primary perform to displace vertices that resemble ripples on water.
Soar forward:
Why use mesh deformation?
There are many options that require mesh deformation in a sport, together with grass swaying within the wind, character interactions, waves within the water, and even terrain options like snow crushing underneath a personality’s foot. I might go on, but it surely’s apparent that utilizing mesh deformation is vital in all kinds of video games and genres.
The best way to deform a mesh in Unity
First, we want a sport object with the Deformer element and MeshFilter.
The bottom deformer MonoBehaviour ought to comprise properties and cache the mesh object:
[RequireComponent(typeof(MeshFilter))]
public summary class BaseDeformer : MonoBehaviour
{
   [SerializeField] protected float _speed = 2.0f;
   [SerializeField] protected float _amplitude = 0.25f;
   protected Mesh Mesh;

   protected digital void Awake()
   {
       Mesh = GetComponent<MeshFilter>().mesh;
   }
}
To simply modify and calculate the displacement perform, we created a utility class that each one approaches offered right here will use it. This utility class permits us to vary the displacement perform in the identical place concurrently for all strategies:
public static class DeformerUtilities
{
   [BurstCompile]
   public static float CalculateDisplacement(Vector3 place, float time, float velocity, float amplitude)
   {
       var distance = 6f - Vector3.Distance(place, Vector3.zero);
       return Mathf.Sin(time * velocity + distance) * amplitude;
   }
}
On this weblog put up, we’ll deform a mesh utilizing the next strategies:
Mesh deformation with single-threaded implementation
That is the only method for deforming a mesh in Unity. It may be an ideal answer for a small sport that doesn’t have every other performance-based work.
We have to iterate Mesh.vertices over each Replace() and modify them in response to the displacement perform:
public class SingleThreadedDeformer : BaseDeformer
{
   non-public Vector3[] _vertices;

   protected override void Awake()
   {
       base.Awake();
       // Mesh.vertices return a replica of an array, subsequently we cache it to keep away from extreme reminiscence allocations
       _vertices = Mesh.vertices;
   }

   non-public void Replace()
   {
       Deform();
   }

   non-public void Deform()
   {
       for (var i = 0; i < _vertices.Size; i++)
       {
           var place = _vertices[i];
           place.y = DeformerUtilities.CalculateDisplacement(place, Time.time, _speed, _amplitude);
           _vertices[i] = place;
       }

       // MarkDynamic optimizes mesh for frequent updates in response to docs
       Mesh.MarkDynamic();
       // Replace the mesh visually simply by setting the brand new vertices array
       Mesh.SetVertices(_vertices);
       // Have to be referred to as so the up to date mesh is accurately affected by the sunshine
       Mesh.RecalculateNormals();
   }
}
Utilizing C# Job System implementation in Unity
Within the earlier method, we iterated over the vertices array in each body. So, how can we optimize that? Your first thought needs to be to do the work in parallel. Unity permits us to separate calculations over employee threads so we are able to iterate the array in parallel.
Scheduling any work and gathering the consequence onto the primary thread might have a price, so it’s best to profile your actual case in your goal platform each time you do any computational heavy work. After profiling, you may decide whether or not to deform a mesh utilizing the system or through the use of one other methodology.
To make use of the C# Job System, we have to transfer the displacement calculation right into a job.
[BurstCompile]
public struct DeformerJob : IJobParallelFor
{
   non-public NativeArray<Vector3> _vertices;
   [ReadOnly] non-public readonly float _speed;
   [ReadOnly] non-public readonly float _amplitude;
   [ReadOnly] non-public readonly float _time;

   public DeformerJob(float velocity, float amplitude, float time, NativeArray<Vector3> vertices)
   {
       _vertices = vertices;
       _speed = velocity;
       _amplitude = amplitude;
       _time = time;
   }

   public void Execute(int index)
   {
       var place = _vertices[index];
       place.y = DeformerUtilities.CalculateDisplacement(place, _time, _speed, _amplitude);
       _vertices[index] = place;
   }
}
Then, as a substitute of deforming the mesh in Replace(), we schedule the brand new job and attempt to full it in LateUpdate():
public class JobSystemDeformer : BaseDeformer
{
   non-public NativeArray<Vector3> _vertices;
   non-public bool _scheduled;
   non-public DeformerJob _job;
   non-public JobHandle _handle;

   protected override void Awake()
   {
       base.Awake();
       // Equally to the earlier method we cache the mesh vertices array
       // However now NativeArray<Vector3> as a substitute of Vector3[] as a result of the latter can't be utilized in jobs
       _vertices = new NativeArray<Vector3>(Mesh.vertices, Allocator.Persistent);
   }

   non-public void Replace()
   {
       TryScheduleJob();
   }

   non-public void LateUpdate()
   {
       CompleteJob();
   }

   non-public void OnDestroy()
   {
     // Be certain to dispose all unmanaged sources when object is destroyed
       _vertices.Dispose();
   }

   non-public void TryScheduleJob()
   {
       if (_scheduled)
       {
           return;
       }

       _scheduled = true;
       _job = new DeformerJob(_speed, _amplitude, Time.time, _vertices);
       _handle = _job.Schedule(_vertices.Size, 64);
   }

   non-public void CompleteJob()
   {
       if (!_scheduled)
       {
           return;
       }

       _handle.Full();
       Mesh.MarkDynamic();
       // SetVertices additionally accepts NativeArray<Vector3> so we are able to use in right here too
       Mesh.SetVertices(_vertices);
       Mesh.RecalculateNormals();
       _scheduled = false;
   }
}
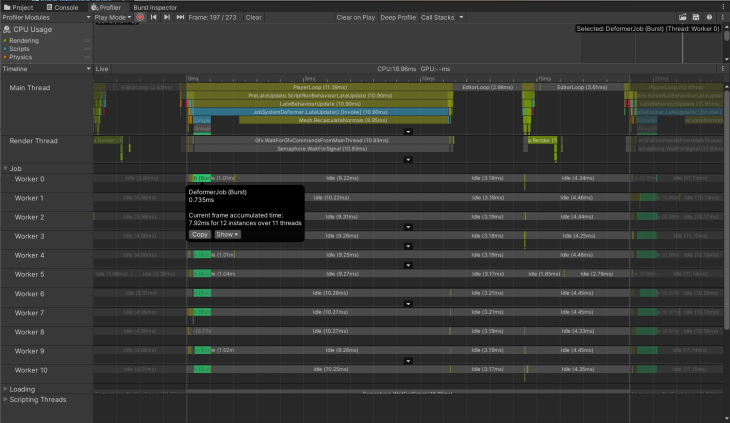
You possibly can simply verify if employee threads are busy within the Profiler:
Mesh deformation with MeshData implementation
MeshData is a comparatively new API that was added to Unity v2020.1. It offers a solution to work with meshes inside jobs, which permits us to eliminate the information buffer NativeArray<Vector3> _vertices.
This buffer was required as a result of mesh.vertices return a replica of an precise array, so it was cheap to cache this information and reuse the gathering.
As a substitute, MeshData returns a pointer to the precise mesh information. From right here, we are able to replace the mesh each body and get the pointer to the brand new information subsequent body earlier than scheduling a brand new job — with no efficiency penalties associated to allocating and copying giant arrays.
So, the earlier code transforms into:
Extra nice articles from LogRocket:
[BurstCompile]
public struct DeformMeshDataJob : IJobParallelFor
{
   public Mesh.MeshData OutputMesh;
   [ReadOnly] non-public NativeArray<VertexData> _vertexData;
   [ReadOnly] non-public readonly float _speed;
   [ReadOnly] non-public readonly float _amplitude;
   [ReadOnly] non-public readonly float _time;

   public DeformMeshDataJob(
       NativeArray<VertexData> vertexData,
       Mesh.MeshData outputMesh,
       float velocity,
       float amplitude,
       float time)
   {
       _vertexData = vertexData;
       OutputMesh = outputMesh;
       _speed = velocity;
       _amplitude = amplitude;
       _time = time;
   }

   public void Execute(int index)
   {
       var outputVertexData = OutputMesh.GetVertexData<VertexData>();
       var vertexData = _vertexData[index];
       var place = vertexData.Place;
       place.y = DeformerUtilities.CalculateDisplacement(place, _time, _speed, _amplitude);
       outputVertexData[index] = new VertexData
       {
           Place = place,
           Regular = vertexData.Regular,
           Uv = vertexData.Uv
       };
   }
}
Right here is how we get all the information wanted to schedule the job:
non-public void ScheduleJob()
{
...
   // Will likely be writing into this mesh information
   _meshDataArrayOutput = Mesh.AllocateWritableMeshData(1);
   var outputMesh = _meshDataArrayOutput[0];
   // From this one
   _meshDataArray = Mesh.AcquireReadOnlyMeshData(Mesh);
   var meshData = _meshDataArray[0];
   // Set output mesh params
   outputMesh.SetIndexBufferParams(meshData.GetSubMesh(0).indexCount, meshData.indexFormat);
   outputMesh.SetVertexBufferParams(meshData.vertexCount, _layout);
   // Get the pointer to the enter vertex information array
   _vertexData = meshData.GetVertexData<VertexData>();
   _job = new DeformMeshDataJob(
       _vertexData,
       outputMesh,
       _speed,
       _amplitude,
       Time.time
   );

   _jobHandle = _job.Schedule(meshData.vertexCount, _innerloopBatchCount);
}
You might have seen that we get meshData.GetVertexData<VertexData>(), in addition to the vertices array.
[StructLayout(LayoutKind.Sequential)]
public struct VertexData
{
   public Vector3 Place;
   public Vector3 Regular;
   public Vector2 Uv;
}
This lets us set all of the vertex information within the output mesh information contained in the job. Opposite to the prior strategies the place we modify the mesh instantly and the vertex information is already there, the output mesh information doesn’t comprise the vertex information contained in the job when created. When utilizing this construction, make it possible for it comprises all the information your mesh has; in any other case, calling GetVertexData<T>() might fail or produce undesirable outcomes.
For instance, this one will work as a result of it matches all vertex parameters:
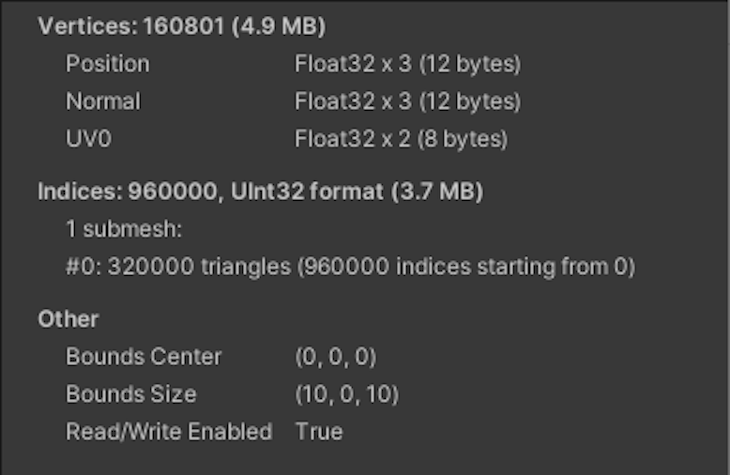
Nevertheless, this instance will fail due to a tangent:
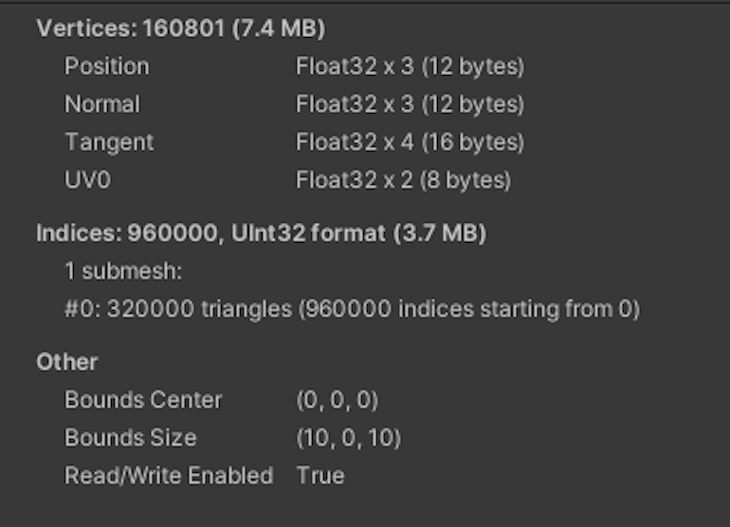
In case you want tangents, then you must lengthen VertexData with the extra subject. The identical goes for any property you add to a mesh.
After finishing the job, we apply the information within the following approach:
non-public void UpdateMesh(Mesh.MeshData meshData)

           MeshUpdateFlags.DontNotifyMeshUsers);
       Mesh.MarkDynamic();
       Mesh.ApplyAndDisposeWritableMeshData(
           _meshDataArrayOutput,
           Mesh,
           MeshUpdateFlags.DontRecalculateBounds
Right here is the complete script:
public class MeshDataDeformer : BaseDeformer
{
   non-public Vector3 _positionToDeform;
   non-public Mesh.MeshDataArray _meshDataArray;
   non-public Mesh.MeshDataArray _meshDataArrayOutput;
   non-public VertexAttributeDescriptor[] _layout;
   non-public SubMeshDescriptor _subMeshDescriptor;
   non-public DeformMeshDataJob _job;
   non-public JobHandle _jobHandle;
   non-public bool _scheduled;

   protected override void Awake()
   {
       base.Awake();
       CreateMeshData();
   }

   non-public void CreateMeshData()
   {
       _meshDataArray = Mesh.AcquireReadOnlyMeshData(Mesh);
       _layout = new[]
       {
           new VertexAttributeDescriptor(VertexAttribute.Place,
               _meshDataArray[0].GetVertexAttributeFormat(VertexAttribute.Place), 3),
           new VertexAttributeDescriptor(VertexAttribute.Regular,
               _meshDataArray[0].GetVertexAttributeFormat(VertexAttribute.Regular), 3),
           new VertexAttributeDescriptor(VertexAttribute.TexCoord0,
               _meshDataArray[0].GetVertexAttributeFormat(VertexAttribute.TexCoord0), 2),
       };
       _subMeshDescriptor =
           new SubMeshDescriptor(0, _meshDataArray[0].GetSubMesh(0).indexCount, MeshTopology.Triangles)
           {
               firstVertex = 0, vertexCount = _meshDataArray[0].vertexCount
           };
   }

   non-public void Replace()
   {
       ScheduleJob();
   }

   non-public void LateUpdate()
   {
       CompleteJob();
   }

   non-public void ScheduleJob()
   {
       if (_scheduled)
       {
           return;
       }

       _scheduled = true;
       _meshDataArrayOutput = Mesh.AllocateWritableMeshData(1);
       var outputMesh = _meshDataArrayOutput[0];
       _meshDataArray = Mesh.AcquireReadOnlyMeshData(Mesh);
       var meshData = _meshDataArray[0];
       outputMesh.SetIndexBufferParams(meshData.GetSubMesh(0).indexCount, meshData.indexFormat);
       outputMesh.SetVertexBufferParams(meshData.vertexCount, _layout);
       _job = new DeformMeshDataJob(
           meshData.GetVertexData<VertexData>(),
           outputMesh,
           _speed,
           _amplitude,
           Time.time
       );

       _jobHandle = _job.Schedule(meshData.vertexCount, 64);
   }

   non-public void CompleteJob()
   {
       if (!_scheduled)
       {
           return;
       }

       _jobHandle.Full();
       UpdateMesh(_job.OutputMesh);
       _scheduled = false;
   }

   non-public void UpdateMesh(Mesh.MeshData meshData)

           MeshUpdateFlags.DontResetBoneBounds
}
Deforming mesh with the compute shader implementation
One other solution to deform mesh is by splitting the work over employee threads. We will even improve parallelize computation by offloading it to the GPU, which performs parallel work.
Right here, the workflow is much like the job system method — we have to schedule a chunk of labor, however as a substitute of utilizing a job, we’re going to use a compute shader and ship the information to the GPU.
First, create a shader that makes use of RWStructuredBuffer<VertexData> as the information buffer as a substitute of NativeArray. Aside from the information buffer and syntaxes, the code is comparable:
#pragma kernel CSMain

struct VertexData
{
   float3 place;
   float3 regular;
   float2 uv;
};

RWStructuredBuffer<VertexData> _VertexBuffer;
float _Time;
float _Speed;
float _Amplitude;

[numthreads(32,1,1)]
void CSMain(uint3 id : SV_DispatchThreadID)
{
   float3 place = _VertexBuffer[id.x].place;
   const float distance = 6.0 - size(place - float3(0, 0, 0));
   place.y = sin(_Time * _Speed + distance) * _Amplitude;
   _VertexBuffer[id.x].place.y = place.y;
}
Take note of VertexData, which is outlined on the high of the shader. We want its illustration on the C# facet too:
[StructLayout(LayoutKind.Sequential)]
public struct VertexData
{
   public Vector3 Place;
   public Vector3 Regular;
   public Vector2 Uv;
}
Right here, we create the request _request = AsyncGPUReadback.Request(_computeBuffer); in Replace() and gather the consequence if it’s prepared in LateUpdate():
public class ComputeShaderDeformer : BaseDeformer
{
   [SerializeField] non-public ComputeShader _computeShader;
   non-public bool _isDispatched;
   non-public int _kernel;
   non-public int _dispatchCount;
   non-public ComputeBuffer _computeBuffer;
   non-public AsyncGPUReadbackRequest _request;

   non-public NativeArray<VertexData> _vertexData;

   // Cache property id to stop Unity hashing it each body underneath the hood
   non-public readonly int _timePropertyId = Shader.PropertyToID("_Time");

   protected override void Awake()
   {
       if (!SystemInfo.supportsAsyncGPUReadback)
       {
           gameObject.SetActive(false);
           return;
       }

       base.Awake();
       CreateVertexData();
       SetMeshVertexBufferParams();
       _computeBuffer = CreateComputeBuffer();
       SetComputeShaderValues();
   }

   non-public void CreateVertexData()
   {
     // Can use right here MeshData to fill the information buffer actually quick and with out producing rubbish
       _vertexData = Mesh.AcquireReadOnlyMeshData(Mesh)[0].GetVertexData<VertexData>();
   }

   non-public void SetMeshVertexBufferParams()
   {
       var structure = new[]
       {
           new VertexAttributeDescriptor(VertexAttribute.Place,
               Mesh.GetVertexAttributeFormat(VertexAttribute.Place), 3),
           new VertexAttributeDescriptor(VertexAttribute.Regular,
               Mesh.GetVertexAttributeFormat(VertexAttribute.Regular), 3),
           new VertexAttributeDescriptor(VertexAttribute.TexCoord0,
               Mesh.GetVertexAttributeFormat(VertexAttribute.TexCoord0), 2),
       };
       Mesh.SetVertexBufferParams(Mesh.vertexCount, structure);
   }

   non-public void SetComputeShaderValues()
   {
       // No have to cache these properties to ids, as they're used solely as soon as and we are able to keep away from odd reminiscence utilization
       _kernel = _computeShader.FindKernel("CSMain");
       _computeShader.GetKernelThreadGroupSizes(_kernel, out var threadX, out _, out _);
       _dispatchCount = Mathf.CeilToInt(Mesh.vertexCount / threadX + 1);
       _computeShader.SetBuffer(_kernel, "_VertexBuffer", _computeBuffer);
       _computeShader.SetFloat("_Speed", _speed);
       _computeShader.SetFloat("_Amplitude", _amplitude);
   }

   non-public ComputeBuffer CreateComputeBuffer()
   {
       // 32 is the dimensions of 1 ingredient within the buffer. Has to match dimension of buffer sort within the shader
       // Vector3 + Vector3 + Vector2 = 8 floats = 8 * 4 bytes
       var computeBuffer = new ComputeBuffer(Mesh.vertexCount, 32);
       computeBuffer.SetData(_vertexData);
       return computeBuffer;
   }

   non-public void Replace()
   {
       Request();
   }

   non-public void LateUpdate()
   {
       TryGetResult();
   }

   non-public void Request()
   {
       if (_isDispatched)
       {
           return;
       }

       _isDispatched = true;
       _computeShader.SetFloat(_timePropertyId, Time.time);
       _computeShader.Dispatch(_kernel, _dispatchCount, 1, 1);
       _request = AsyncGPUReadback.Request(_computeBuffer);
   }

   non-public void TryGetResult()
   {
       if (!_isDispatched || !_request.performed)
       {
           return;
       }

       _isDispatched = false;
       if (_request.hasError)
       {
           return;
       }

       _vertexData = _request.GetData<VertexData>();
       Mesh.MarkDynamic();
       Mesh.SetVertexBufferData(_vertexData, 0, 0, _vertexData.Size);
       Mesh.RecalculateNormals();
   }

   non-public void OnDestroy()
   {
       _computeBuffer?.Launch();
       _vertexData.Dispose();
   }
}
Utilizing Vertex Shader implementation in Unity
All earlier strategies used totally different strategies to change information on the primary or employee threads and on the GPU. Ultimately, the information was handed again to the primary thread to replace MeshFilter.
Typically, you’ll have to replace the MeshCollider in order that Physics and Rigidbodies will work along with your modified mesh. However what if there isn’t any want to change the Collider?
Think about that you simply solely want a visible impact utilizing mesh deformation, corresponding to leaves swaying within the wind. You possibly can’t add many bushes if each leaf goes to participate in physics calculations in each body.
Fortunately, we are able to modify and render a mesh with out passing the information again to the CPU. To do this, we’ll add a displacement perform to the Vertex Shader. This can be a game-changer for efficiency as a result of passing a considerable amount of information normally turns into a bottleneck in your sport.
After all, one buffer with mesh information won’t make a big distinction. Nevertheless, as your sport expands, it’s best to at all times profile to make sure that it gained’t find yourself passing tons of various information for various options to the GPU and finally turn out to be a bottleneck.
To provide an analogous impact in a shader, create a floor shader within the menu.
Subsequent, we’ll add our properties to the Properties block:
[PowerSlider(5.0)] _Speed ("Velocity", Vary (0.01, 100)) = 2
[PowerSlider(5.0)] _Amplitude ("Amplitude", Vary (0.01, 5)) = 0.25
By default, there isn’t any Vertex Shader perform within the floor shader. We have to add vertex:vert to the floor definition:
#pragma floor surf Commonplace fullforwardshadows vertex:vert addshadow
Moreover, addshadow is required for the floor shader to generate a shadow cross for brand new vertices’ positions as a substitute of the unique ones.
Now, we are able to outline the vert perform:
SubShader
{
...
       float _Speed;
       float _Amplitude;


       void vert(inout appdata_full information)
       {
           float4 place = information.vertex;
           const float distance = 6.0 - size(information.vertex - float4(0, 0, 0, 0));
           place.y += sin(_Time * _Speed + distance) * _Amplitude;
           information.vertex = place;
       }
...
}
That’s it! Nevertheless, you may discover that as a result of we don’t use MonoBehaviour, there’s nowhere to name RecalculateNormals(), and the deformation appears uninteresting. Even when we had a separate element, calling RecalculateNormals() wouldn’t assist as a result of deformation solely happens on the GPU — which means that no vertices information is handed again to the CPU. So, we’ll have to do it.
To do that, we are able to use the traditional, tangent, and bitangent vectors. These vectors are orthogonal to one another. As a result of regular and tangent are within the information, we calculate the third one as bitangent = cross(regular, tangent).
Provided that they’re orthogonal and that regular is perpendicular to the floor, we are able to discover two neighboring factors by including tangent and bitangent to the present place.
float3 posPlusTangent = information.vertex + information.tangent * _TangentMultiplier;
float3 posPlusBitangent = information.vertex + bitangent * _TangentMultiplier;
Don’t neglect to make use of a small multiplier in order that factors are close to the present vertex. Subsequent, modify these vectors utilizing the identical displacement perform:
float getOffset( float3 place)
{
   const float distance = 6.0 - size(place - float4(0, 0, 0, 0));
   return sin(_Time * _Speed + distance) * _Amplitude;
}

void vert(inout appdata_full information)
{
   information.vertex.y = getOffset(information.vertex);
...
   posPlusTangent.y = getOffset(posPlusTangent);
   posPlusBitangent.y = getOffset(posPlusBitangent);
...
   float3 modifiedTangent = posPlusTangent - information.vertex;
   float3 modifiedBitangent = posPlusBitangent - information.vertex;
   float3 modifiedNormal = cross(modifiedTangent, modifiedBitangent);
   information.regular = normalize(modifiedNormal);
}
Now, we subtract the present vertex from modified positions to get a brand new tangent and bitangent.
Ultimately, we are able to use the cross product to seek out the modified regular.
float3 modifiedTangent = posPlusTangent - information.vertex;
float3 modifiedBitangent = posPlusBitangent - information.vertex;
float3 modifiedNormal = cross(modifiedTangent, modifiedBitangent);
information.regular = normalize(modifiedNormal);
This methodology is an approximation, but it surely offers believable sufficient outcomes to make use of in loads of circumstances.
Lastly, right here is the complete shader:
Shader "Customized/DeformerSurfaceShader"
{
   Properties
   {
       _Color ("Coloration", Coloration) = (1,1,1,1)
       _MainTex ("Albedo (RGB)", 2D) = "white" {}
       _Glossiness ("Smoothness", Vary(0,1)) = 0.5
       _Metallic ("Metallic", Vary(0,1)) = 0.0
       [PowerSlider(5.0)] _Speed ("Velocity", Vary (0.01, 100)) = 2
       [PowerSlider(5.0)] _Amplitude ("Amplitude", Vary (0.01, 5)) = 0.25
       [PowerSlider(5.0)] _TangentMultiplier ("TangentMultiplier", Vary (0.001, 2)) = 0.01
   }
   SubShader
   {
       Tags
       {
           "RenderType"="Opaque"
       }
       LOD 200

       CGPROGRAM
       #pragma floor surf Commonplace fullforwardshadows vertex:vert addshadow

       #pragma goal 3.0

       sampler2D _MainTex;

       struct Enter
       {
           float2 uv_MainTex;
       };

       half _Glossiness;
       half _Metallic;
       fixed4 _Color;
       float _Speed;
       float _Amplitude;
       float _TangentMultiplier;

       float getOffset( float3 place)
       {
           const float distance = 6.0 - size(place - float4(0, 0, 0, 0));
           return sin(_Time * _Speed + distance) * _Amplitude;
       }

       void vert(inout appdata_full information)
       {
           information.vertex.y = getOffset(information.vertex);


           float3 posPlusTangent = information.vertex + information.tangent * _TangentMultiplier;
           posPlusTangent.y = getOffset(posPlusTangent);
           float3 bitangent = cross(information.regular, information.tangent);


           float3 posPlusBitangent = information.vertex + bitangent * _TangentMultiplier;
           posPlusBitangent.y = getOffset(posPlusBitangent);


           float3 modifiedTangent = posPlusTangent - information.vertex;
           float3 modifiedBitangent = posPlusBitangent - information.vertex;
           float3 modifiedNormal = cross(modifiedTangent, modifiedBitangent);
           information.regular = normalize(modifiedNormal);
       }

       void surf(Enter IN, inout SurfaceOutputStandard o)
       {
           fixed4 c = tex2D(_MainTex, IN.uv_MainTex) * _Color;
           o.Albedo = c.rgb;
           o.Metallic = _Metallic;
           o.Smoothness = _Glossiness;
           o.Alpha = c.a;
       }
       ENDCG
   }
   FallBack "Diffuse"
}
Evaluating performances of mesh deformation strategies in Unity
To match all approaches, we’re going to use the Efficiency Testing package deal by Unity.
Let’s take a look at a primary take a look at that permits us to run the pattern app for 500 frames. From there, we’ll collect body instances to see the median body time for every method that we’ve mentioned. We will additionally use a easy WaitForSeconds(x) enumerator, however it will yield a special quantity of samples within the run for every method as a result of body instances differ.
[UnityTest, Performance]
public IEnumerator DeformableMeshPlane_MeshData_PerformanceTest()
{
   yield return StartTest("Pattern");
}

non-public static IEnumerator StartTest(string sceneName)
{
   yield return LoadScene(sceneName);
   yield return RunTest();
}

non-public static IEnumerator LoadScene(string sceneName)
{
   yield return SceneManager.LoadSceneAsync(sceneName);
   yield return null;
}

non-public static IEnumerator RunTest()
{
   var frameCount = 0;
   utilizing (Measure.Frames().Scope())
   {
       whereas (frameCount < 500)
       {
           frameCount++;
           yield return null;
       }
   }
}
For example, I ran the take a look at go well with on the next configuration:
Intel Core i7-8750H CPU 2.20GHz (Espresso Lake), 1 CPU, 12 logical and 6 bodily cores
NVIDIA GeForce GTX 1070
The mesh underneath take a look at has 160,801 vertices and 320,000 triangles.
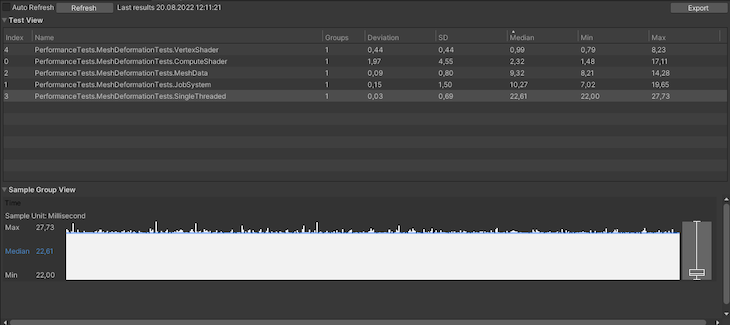
Conclusion
It’s clear that Vertex Shader is the winner right here. Nevertheless, it can’t cowl all use circumstances that different strategies can, together with updating a mesh Collider with the modified information.
Coming in second place is the compute shader, as a result of it passes modified mesh information to the CPU, permitting it for use in a greater diversity of circumstances. Sadly, it’s not supported on cellular earlier than OpenGL ES v3.1.
The worst-performing method we checked out was the single-threaded one. Though it’s the easiest methodology, it will possibly nonetheless match into your body price range in case you have smaller meshes or are engaged on a prototype.
MeshData looks like a balanced method in the event you’re focusing on low-end cellular gadgets. You need to verify within the runtime if the present platform helps compute shaders, after which choose MeshData or the compute shader deformer.
Ultimately, you have to at all times profile your code earlier than deciding about performance-critical components of your sport, so take a look at your use case on a goal platform when choosing any of those strategies. Take a look at the complete repository on GitHub.
LogRocket: Full visibility into your net and cellular apps

LogRocket is a frontend utility monitoring answer that permits you to replay issues as in the event that they occurred in your individual browser. As a substitute of guessing why errors occur, or asking customers for screenshots and log dumps, LogRocket permits you to replay the session to rapidly perceive what went improper. It really works completely with any app, no matter framework, and has plugins to log further context from Redux, Vuex, and @ngrx/retailer.
Along with logging Redux actions and state, LogRocket information console logs, JavaScript errors, stacktraces, community requests/responses with headers + our bodies, browser metadata, and customized logs. It additionally devices the DOM to report the HTML and CSS on the web page, recreating pixel-perfect movies of even essentially the most advanced single-page and cellular apps.
