
WebRTC (internet real-time communication) is an open-source venture that permits internet purposes to seize and stream audio and video streams. The expertise is accessible on all fashionable browsers and main native platforms. It’s developed and maintained by firms like Google, Apple, Microsoft, and so forth.
At this level, WebRTC is a well-established expertise and is the de facto strategy to construct video conferencing purposes.
Constructing our demo: A React Native chat software
We’ll construct a React Native software utilizing the react-native-webrtc plugin. As we implement the app, we are going to study the basics of WebRTC.
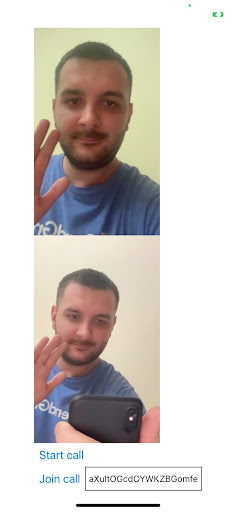
Right here is the ultimate model of the app. It’s really a video name initiated on my cellphone and answered on my laptop computer. After beginning the webcam, we are able to start a brand new video name or be part of an current one.
If we begin the decision, we get a singular ID. Another person can be part of that decision by typing this ID within the textual content field and urgent the Reply Name button. The code for this entire venture is accessible right here.
Set up
First, let’s create a clean React Native venture:
npx react-native init ReactNativeWebRTCExample
Then, we have to set up react-native-webrtc:
npm set up react-native-webrtc
To complete the set up, we’ve a number of further steps relying on the platform.
iOS implementation
Set up CocoaPods:
npx pod-install
Replace permissions in Information.plist file:
<key>NSCameraUsageDescription</key>
<string>Digital camera permission description</string>
<key>NSMicrophoneUsageDescription</key>
<string>Microphone permission description</string>
Android implementation
Equally, on Android, we have to request these permissions within the AndroidManifest.xml file:
    <uses-permission android:title="android.permission.ACCESS_NETWORK_STATE" />
    <uses-permission android:title="android.permission.BLUETOOTH" />
    <uses-permission android:title="android.permission.CAMERA" />
    <uses-permission android:title="android.permission.INTERNET" />
    <uses-permission android:title="android.permission.MODIFY_AUDIO_SETTINGS" />
    <uses-permission android:title="android.permission.RECORD_AUDIO" />
    <uses-permission android:title="android.permission.SYSTEM_ALERT_WINDOW" />
    <uses-permission android:title="android.permission.WAKE_LOCK" />
We additionally have to allow Java 8 assist by including the next code to android/app/construct.gradle, contained in the Android part:
compileOptions {
        sourceCompatibility JavaVersion.VERSION_1_8
        targetCompatibility JavaVersion.VERSION_1_8
}
And we’re accomplished with the set up.
Creating the real-time chat app
Subsequent, we have to create an occasion of RTCPeerConnection that can handle the connection between the native pc and a distant peer.
Though the info transmission is peer-to-peer, we do want some servers. One in every of them is the ICE (Interactive Connectivity Institution) server. To ascertain a peer-to-peer connection, two purchasers have to discover a strategy to uncover one another. Due to NAT, this may be tough, so the ICE server is chargeable for doing all of the work for us. Fortunately, Google supplies ICE servers free of charge:
//App.js

  const [remoteStream, setRemoteStream] = useState(null);
  const [localStream, setLocalStream] = useState(null);
  const [webcamStarted, setWebcamStarted] = useState(false);
  const [channelId, setChannelId] = useState(null);
  const laptop = useRef();
  const servers = {
    iceServers: [
      {
        urls: [
          'stun:stun1.l.google.com:19302',
          'stun:stun2.l.google.com:19302',
        ],
      },
    ],
    iceCandidatePoolSize: 10,
  };
Right here we declare the configuration for the ICE server. We’re additionally declaring some state variables that we are going to use quickly.
Within the subsequent step, we are going to seize the native stream from the consumer’s digital camera and add it to the RTCPeerConnection. The MediaDevices interface supplies entry to linked media inputs like cameras and microphones. By calling the mediaDevices.getUserMedia() technique, we ask the consumer to grant permission to entry these media inputs. We’re additionally updating the native and distant tracks (audio and video tracks):
const startWebcam = async () => {
    laptop.present = new RTCPeerConnection(servers);
    const native = await mediaDevices.getUserMedia({
      video: true,
      audio: true,
    });
    laptop.present.addStream(native);
    setLocalStream(native);

    const distant = new MediaStream();
    setRemoteStream(distant);

    // Push tracks from native stream to look connection
    native.getTracks().forEach(observe => {
      laptop.present.getLocalStreams()[0].addTrack(observe);
    });

    // Pull tracks from peer connection, add to distant video stream
    laptop.present.ontrack = occasion => {
      occasion.streams[0].getTracks().forEach(observe => {
        distant.addTrack(observe);
      });
    };

    laptop.present.onaddstream = occasion => {
      setRemoteStream(occasion.stream);
    };
  };
At this level, we created an RTCPeerConnection to handle our peer-to-peer connection. We captured the video and audio stream from the native peer and added that stream to the RTCPeerConnection.
We at the moment are prepared to connect with one other peer. For this, we want a signaling server. Its job is to function an middleman to let two friends set up a connection. As an initiator, you should sign your provide of beginning a name. Different friends can even should sign that they need to hook up with your particular video name.
WebRTC doesn’t have an opinion on how you can do the signaling. We are able to do it by way of WebSockets, HTTP, or no matter we like. On this demo, we are going to use Firebase Firestore as a signaling server.
Connecting to Firebase and dealing with Firestore isn’t within the scope of this text, so I’ll allow you to create the Firebase purposes and hook up with them from React Native. I’ll use https://rnfirebase.io/ to work together with Firebase.
With all these in place, we are able to now create the perform that can provoke a name:
   const startCall = async () => {
    const channelDoc = firestore().assortment('channels').doc();
    const offerCandidates = channelDoc.assortment('offerCandidates');
    const answerCandidates = channelDoc.assortment('answerCandidates');

    setChannelId(channelDoc.id);

    laptop.present.onicecandidate = async occasion => {
      if (occasion.candidate) {
        await offerCandidates.add(occasion.candidate.toJSON());
      }
    };

    //create provide
    const offerDescription = await laptop.present.createOffer();
    await laptop.present.setLocalDescription(offerDescription);

    const provide = {
      sdp: offerDescription.sdp,
      sort: offerDescription.sort,
    };

    await channelDoc.set({provide});

    // Pay attention for distant reply
    channelDoc.onSnapshot(snapshot => {
      const information = snapshot.information();
      if (!laptop.present.currentRemoteDescription && information?.reply) {
        const answerDescription = new RTCSessionDescription(information.reply);
        laptop.present.setRemoteDescription(answerDescription);
      }
    });

    // When answered, add candidate to look connection
    answerCandidates.onSnapshot(snapshot => {
      snapshot.docChanges().forEach(change => {
        if (change.sort === 'added') {
          const information = change.doc.information();
          laptop.present.addIceCandidate(new RTCIceCandidate(information));
        }
      });
    });
  };
I do know it is a lot, however let’s attempt to break it down.
In Firestore, we preserve a doc, channels, with all of the communication channels. Every channel ID represents a singular name ID. As a part of the signaling mechanism, we create two sub-collections: offerCandidates and answerCandidates.
The createOffer() technique initiates the creation of an SDP provide for the aim of beginning a brand new WebRTC connection to a distant peer. We write this provide to the channel’s doc on Firestore. We then pay attention for channelDoc updates. After receiving a solution provide, we create an RTCSessionDescription object. Negotiating a connection between two friends entails exchanging RTCSessionDescription objects backwards and forwards.
If a brand new doc will get added to the answerCandidates sub-collection, it signifies that somebody has answered, so we add that new candidate to the RTCPeerConnection.
Equally, let’s implement the perform used to reply a name:
const joinCall = async () => {
    const channelDoc = firestore().assortment('channels').doc(channelId);
    const offerCandidates = channelDoc.assortment('offerCandidates');
    const answerCandidates = channelDoc.assortment('answerCandidates');

    laptop.present.onicecandidate = async occasion => {
      if (occasion.candidate) {
        await answerCandidates.add(occasion.candidate.toJSON());
      }
    };

    const channelDocument = await channelDoc.get();
    const channelData = channelDocument.information();

    const offerDescription = channelData.provide;

    await laptop.present.setRemoteDescription(
      new RTCSessionDescription(offerDescription),
    );

    const answerDescription = await laptop.present.createAnswer();
    await laptop.present.setLocalDescription(answerDescription);

    const reply = {
      sort: answerDescription.sort,
      sdp: answerDescription.sdp,
    };

    await channelDoc.replace({reply});

    offerCandidates.onSnapshot(snapshot => {
      snapshot.docChanges().forEach(change => {
        if (change.sort === 'added') {
          const information = change.doc.information();
          laptop.present.addIceCandidate(new RTCIceCandidate(information));
        }
      });
    });
  };
On this case, we create an answerOffer and replace the channelDoc in Firestore. We additionally pay attention for any adjustments within the offerCandidates sub-collection. Kind of, we’re mirroring the beginning name conduct.
Ultimately, we have to name these features once we need to begin or be part of a name:
<KeyboardAvoidingView fashion={types.physique} conduct="place">
      <SafeAreaView>
        {localStream && (
          <RTCView
            streamURL={localStream?.toURL()}
            fashion={types.stream}
            objectFit="cowl"
            mirror
          />
        )}

        {remoteStream && (
          <RTCView
            streamURL={remoteStream?.toURL()}
            fashion={types.stream}
            objectFit="cowl"
            mirror
          />
        )}
        <View fashion={types.buttons}>
          {!webcamStarted && (
            <Button title="Begin webcam" onPress={startWebcam} />
          )}
          {webcamStarted && <Button title="Begin name" onPress={startCall} />}
          {webcamStarted && (
            <View fashion={{flexDirection: 'row'}}>
              <Button title="Be a part of name" onPress={joinCall} />
              <TextInput
                worth={channelId}
                placeholder="callId"
                minLength={45}
                fashion={{borderWidth: 1, padding: 5}}
                onChangeText={newText => setChannelId(newText)}
              />
            </View>
          )}
        </View>
      </SafeAreaView>
Conclusion
WebRTC is a strong expertise, and utilizing react-native-webrtc we are able to construct React Native purposes with the identical APIs obtainable on browsers.
You possibly can strive it out your self with the code for this venture.
LogRocket: Immediately recreate points in your React Native apps.

LogRocket is a React Native monitoring answer that helps you reproduce points immediately, prioritize bugs, and perceive efficiency in your React Native apps.
LogRocket additionally helps you improve conversion charges and product utilization by exhibiting you precisely how customers are interacting together with your app. LogRocket’s product analytics options floor the the reason why customers do not full a selected circulation or do not undertake a brand new characteristic.
Begin proactively monitoring your React Native apps — strive LogRocket free of charge.
