Layouts could be described as containers that home the View objects — resembling buttons, textual content fields, pictures, and extra — that we see on an app UI. They outline how views are organized and displayed on an app UI.
Jetpack Compose, Android’s trendy UI toolkit, offers some frequent structure varieties for builders to make use of. Nonetheless, you may also use Jetpack Compose to create custom-made layouts primarily based in your wants.
Let’s study extra about customized layouts for Android apps and tips on how to create them utilizing Jsatisetpack Compose. On this article:
Why it’s best to know tips on how to create customized layouts
Jetpack Compose provides many developer instruments for constructing sooner Android apps, together with varied structure choices. Typically you possibly can implement the design necessities for an app’s UI utilizing these current layouts in Jetpack Compose.
Nonetheless, these current layouts don’t all the time fulfill venture design necessities. In such circumstances, it’s best to know tips on how to create a customized structure to suit your venture’s precise necessities.
Overview of layouts in Jetpack Compose
Some frequent layouts in Jetpack Compose are:
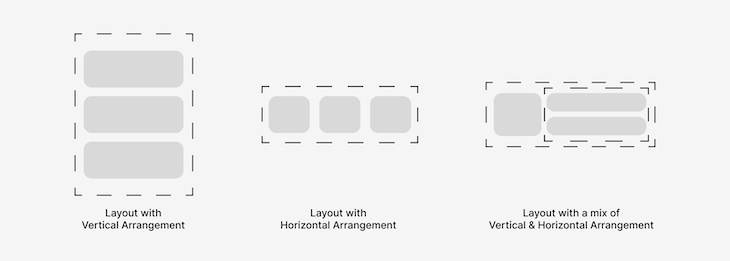
Field: a structure that locations its views on high of one otherColumn: a structure that locations its views in a vertical sequenceRow: a structure that locations its views in a horizontal sequenceConstraintLayout: a structure that locations its views relative to others
Just lately, LazyVerticalGrid and LazyHorizontalGrid, which had been grid layouts underneath testing, had been totally launched.
Together with this replace got here an thrilling new structure referred to as LazyLayout. This can be a structure that solely composes and lays out presently wanted gadgets — in different phrases, gadgets that may be seen on a tool display at a cut-off date.
You need to use lazy layouts to construct environment friendly scrollable layouts. LazyLayout variations embrace:
I do know you’ve got seen the phrase “lazy” so much, and no, it doesn’t imply these layouts are unwilling to carry out their capabilities (like a few of us 🙃). As an alternative, it merely means a lazy structure will carry out its operate solely when needed. In different phrases, it’s actually environment friendly.
This effectivity is why lazy layouts are used for layouts that intend on displaying giant variety of views, permitting them to be simply organized and scrollable within the type of lists and grids.
Steps to construct a customized structure in Jetpack Compose
So that you can successfully perceive the method of constructing your individual structure, I’ll use a easy instance. We are going to construct a structure I wish to name a ReverseFlowRow.
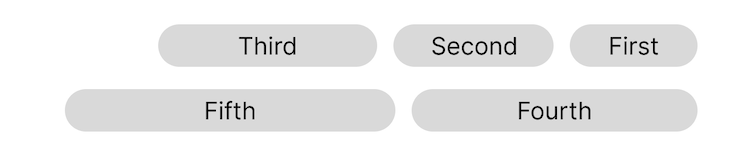
This structure merely locations its views subsequent to one another, shifting on to the subsequent line when the present line is stuffed up. Nonetheless, it begins arranging its views from the top place to the beginning place of the display — in different phrases, from proper to left:
Such a structure is what I really feel must be used for Jetpack Compose’s AlertDialog buttons to fulfill Materials Design tips.
At the moment, an identical structure is getting used, but it surely goes from the beginning place to the top place of the display, which doesn’t fulfill these tips. You possibly can discover the difficulty I filed on it with IssueTracker.
Extra nice articles from LogRocket:
The idea behind Jetpack Compose layouts for Android apps
To show views on the display, Jetpack Compose composes the UI tree of nodes (which characterize views), lays out every view within the UI tree, and attracts every of them to the display.
For the needs of this text, we’re solely within the laying out of views, since we are able to deal with making a customized structure throughout this course of. The method of laying out the views inside a structure occurs in three steps:
- Measuring all views within the structure (i.e. the youngsters)
- Deciding what measurement the structure must be
- Inserting the youngsters inside the boundaries of the structure
Utilizing the Structure composable
In Jetpack Compose, laying out views could be achieved utilizing the Structure composable, which is outlined as:
@Composable inline enjoyable Structure(
    content material: @Composable @UiComposable () -> Unit,
    modifier: Modifier = Modifier,
    measurePolicy: MeasurePolicy
)
The content material parameter specifies the view or views (known as Composables) you wish to be on this structure. The modifier parameter is used to outline some modifications to the structure, which could be handed from the mum or dad view or composable.
A very powerful a part of the code above is MeasurePolicy, which defines the measurement of kid views, the dimensions of the structure, and the inserting of the kid views within the structure.
So our ReverseFlowRow will begin off as this:
@Composable
enjoyable ReverseFlowRow(
    content material: @Composable () -> Unit
) = Structure(content material) { measurables, constraints ->
    // measuring kids, structure sizing, and inserting kids takes place right here.
}
You could discover we represented MeasurePolicy as a lambda. That is attainable as a result of MeasurePolicy is a purposeful interface.
Additionally within the code above, measurables is the record of youngsters that must be measured, whereas constraints is the structure boundaries from the mum or dad.
Measuring all views within the customized structure
We measure every little one with constraints by calling measure(constraints) on every of them. This returns a Placeable, which corresponds to a baby structure that may be positioned by its mum or dad structure.
val placeables = measurables.map { measurable ->
    // Measure every little one.
    measurable.measure(constraints)
}
Observe that we used the mum or dad’s constraints when measuring every little one. This permits every little one to have the ability to all the house within the mum or dad if attainable.
Including measurement constraints to the customized structure
Subsequent, we outline the dimensions of the structure by calling the structure() technique and specifying a minimum of its width and peak.
structure(constraints.maxWidth, constraints.maxHeight) {
   // Placement of youngsters happens right here.
}
Right here we used the utmost width and peak of the mum or dad’s constraint. Due to this fact, relying on the mum or dad constraints, this structure could or could not take up all the display.
Inserting views inside the structure
Lastly, we place the measured kids, additionally referred to as Placeable parts, within the structure by calling the placeRelative() technique.
This technique must be used if you wish to routinely mirror your structure when the gadget’s structure route adjustments — in different phrases, from left-to-right to right-to-left and vice versa.
Observe that you would be able to get the present LayoutDirection inside the structure() receiver. This may be helpful if you do not need to routinely mirror your structure when a structure route adjustments, however moderately, determine the way you wish to place your views in every structure route.
If you do not need your structure to be routinely mirrored primarily based on structure route, use the place() technique as an alternative.
// Observe the x and y co-ordinates we've got positioned kids as much as.
var yPosition = 0
var xPosition = constraints.maxWidth

// Place kids within the mum or dad structure.
placeables.forEach { placeable ->
    if (placeable.width < xPosition) {
        // There's nonetheless sufficient house within the present row so as to add the subsequent little one.
        xPosition -= placeable.width
    } else {
        // Area left within the present row isn't sufficient for the kid.
        // Transfer to the subsequent row.
        yPosition += placeable.peak
        xPosition = constraints.maxWidth - placeable.width
    }
    // Place little one on the display.
    placeable.placeRelative(xPosition, yPosition)
}
As you possibly can see, we have to hold monitor of the x and y coordinates used to point the place a placement ought to begin for every little one. This can allow us to put one little one subsequent to a different in addition to know when to maneuver on to the subsequent line or row.
Ultimate Jetpack Compose venture code for customized Android app structure
Our full structure will seem like this:
@Composable
enjoyable ReverseFlowRow(
    mainAxisSpacing: Dp,
    crossAxisSpacing: Dp,
    content material: @Composable () -> Unit
) = Structure(content material) { measurables, constraints ->
    // 1. The measuring section.
    val placeables = measurables.map { measurable ->
        measurable.measure(constraints)
    }

    // 2. The sizing section.
    structure(constraints.maxWidth, constraints.maxHeight) {
        // 3. The location section.
        var yPosition = 0
        var xPosition = constraints.maxWidth

        placeables.forEach { placeable ->
            if (placeable.width < (xPosition + mainAxisSpacing.roundToPx())) {
                xPosition -= (placeable.width + mainAxisSpacing.roundToPx())
            } else {
                yPosition += (placeable.peak + crossAxisSpacing.roundToPx())
                xPosition = constraints.maxWidth - placeable.width - mainAxisSpacing.roundToPx()
            }
            placeable.placeRelative(xPosition, yPosition)
        }
    }
}
Did you discover I added two new properties: mainAxisSpacing and crossAxisSpacing? These are used so as to add spacing between every little one within the structure within the horizontal and vertical instructions, respectively.
Testing our customized structure
To preview our structure, we are able to wrap it inside a composable operate that’s annotated with @Preview. This allows us to run a pattern of the structure with out the additional configuration required for an Android software. Additionally, let’s add some textual content views/composables inside our structure to see the way it shows them:
@Preview
@Composable
enjoyable ReverseFlowRowPreview() {
    ReverseFlowRow(mainAxisSpacing = 16.dp, crossAxisSpacing = 16.dp) {
        Textual content("First", fontSize = 20.sp, fashion = TextStyle(background = Colour.Crimson))
        Textual content("Second", fontSize = 20.sp, fashion = TextStyle(background = Colour.LightGray))
        Textual content("Third", fontSize = 20.sp, fashion = TextStyle(background = Colour.Blue))
        Textual content("Fourth", fontSize = 20.sp, fashion = TextStyle(background = Colour.Inexperienced))
        Textual content("Fifth", fontSize = 20.sp, fashion = TextStyle(background = Colour.Grey))
        Textual content("Sixth", fontSize = 20.sp, fashion = TextStyle(background = Colour.Yellow))
        Textual content("Seventh", fontSize = 20.sp, fashion = TextStyle(background = Colour.Cyan))
        Textual content("Eight", fontSize = 20.sp, fashion = TextStyle(background = Colour.Magenta))
        Textual content("Ninth", fontSize = 20.sp, fashion = TextStyle(background = Colour.DarkGray))
    }
}
Operating the preview yields the next:
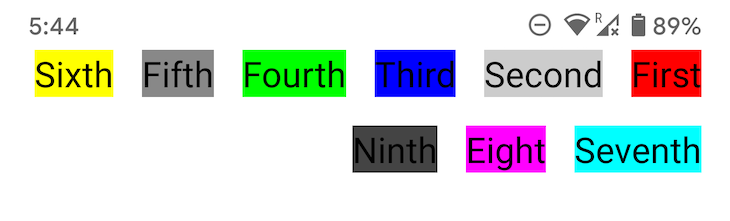
Though we used textual content views/composables on this instance, this practice Jetpack Compose structure will work with different Jetpack Compose composables as properly. You may as well use the ideas and observe the steps we lined on this tutorial to create your individual customized structure.
Conclusion
That is just about what creating your individual structure entails. This instance considers a daily case situation, just like the structure required for the buttons of an AlertDialog, however it may be improved to cater to extra case situations, resembling a state of affairs the place kids have completely different sizes.
If you happen to use the ReverseFlowRow structure we created as is with kids of various sizes, there can be some overlap amongst them. Some further code is required to accommodate such a case. If you want to deal with this mini-challenge, put up the up to date code within the feedback under!
I’m excited to see your options. Within the meantime, you possibly can study extra about Jetpack Compose subjects resembling theming to enhance your Android app growth abilities.
LogRocket: Full visibility into your net and cellular apps

LogRocket is a frontend software monitoring resolution that allows you to replay issues as in the event that they occurred in your individual browser. As an alternative of guessing why errors occur, or asking customers for screenshots and log dumps, LogRocket enables you to replay the session to rapidly perceive what went unsuitable. It really works completely with any app, no matter framework, and has plugins to log further context from Redux, Vuex, and @ngrx/retailer.
Along with logging Redux actions and state, LogRocket information console logs, JavaScript errors, stacktraces, community requests/responses with headers + our bodies, browser metadata, and customized logs. It additionally devices the DOM to document the HTML and CSS on the web page, recreating pixel-perfect movies of even essentially the most complicated single-page net and cellular apps.
