
No matter the kind of software that you’re constructing in Unity, there’s a excessive likelihood that you’ll use some person interface (or UI for brief). Nevertheless, so simple as this job will be, holding a clear and dependable system on your UI parts isn’t so trivial. As a matter of truth, just a few mistaken steps can shortly undermine future adjustments and generate hours of overwork and revision.
To save lots of you from spending all that vitality with unproperly constructed UI, this text goes via the primary steps on studying what Unity provides so far as UI parts adopted by a easy workflow to develop your interface construction and, lastly, easy methods to use free belongings and different Unity instruments to boost its visible parts.
Organising the Setting
Earlier than heading into the UI parts, it’s usually useful to first regulate Unity’s structure for extra productive growth. There are two steps I like to think about when doing that: organising the Scene view and Sport view side-by-side, so I can change UI parts concurrently as I see the consequence, and altering the Sport view to the correct decision whereas I’m working.
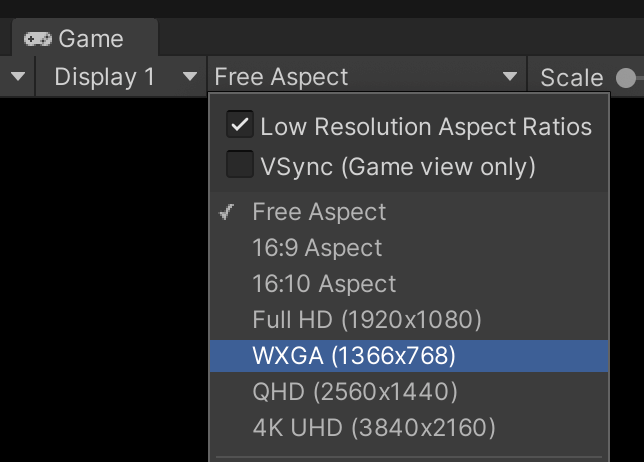
Sometimes, the Sport view is ready to Free Facet by default. By clicking on the decision possibility, you possibly can change it to match both the goal’s decision (1366×768 or 1920×1080) or the goal’s facet ratio (16×9 or 18×9). As we’ll see, this step is essential to adequately assess your progress whereas engaged on the UI.
In addition to caring for the Unity panels composition, a brand new Unity scene has parts that significantly distract from a clear UI. These are largely the digicam, gentle, and skybox.
Ranging from the Digicam part, chargeable for rendering the Sport view, I usually change the Clear Flags to Strong Colour (which removes Unity’s commonplace skybox from the Sport view) and alter the Background to match the background colour I need. Discover this step is paramount for menus and different scenes by which the skybox is pointless. In addition to that, eradicating the skybox adjustments your software aesthetics away from a tough prototype.
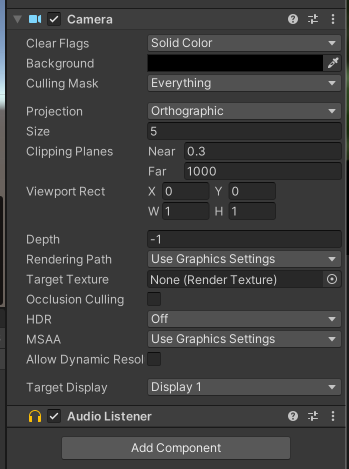
Furthermore, I usually do just a few additional steps when working completely for a menu kind of scene, be it an additive scene or not, by adjusting the digicam settings for culling and projection.
Culling is said to visibility culling methods utilized by Unity to optimize its rendering efficiency. The Culling Masks selects which objects ought to be rendered or not by the digicam. In a UI scene, I usually hold solely the UI-related objects within the Culling Masks to keep away from leftover rendering objects and different helper sport objects by mistake.
The Occlusion Culling is a visibility culling approach accomplished by Unity to take away from the renderer objects at present hidden by different objects in entrance of them. For menu scenes, I choose to maintain this selection off since this isn’t more likely to occur on any scale that may very well be helpful, nor would it not work for 2D scenes.
Moreover, I usually take away the default Mild from the scene for the reason that UI parts won’t be affected by it. As for the skybox, we may additionally open the Lighting tab and alter it, which is commonly pointless since we already disabled it with the digicam choices.
UI Canvas
Unity UI parts should be positioned in a selected sport object known as Canvas. All UI parts are sport objects positioned as youngsters of the Canvas. The order of those sport objects within the Canvas hierarchy issues.
Parts will likely be drawn of their order: the primary aspect will likely be drawn first, then the second, and so forth. If two parts share the identical space on the display screen, the newest within the hierarchy will likely be drawn on high of the others.
After including a Canvas sport object to your scene, some sport parts will likely be connected to it robotically, together with a Canvas part. To keep away from confusion between sport objects and scripts, I usually rename my Canvas sport object to match its accountability, resembling MenuCanvas or PauseCanvas.
Utilizing just one Canvas on your complete UI is feasible, however it’s important to think about the results. Unity updates and redraws the Canvas each time one in every of its parts is up to date (resembling highlighting a button or transferring a slider). In case your Canvas is advanced and accommodates many parts, any runtime change will be expensive to your efficiency.
For that, contemplate having a number of Canvases for various obligations and replace types (for instance, holding regularly animated objects in a separate Canvas from static objects). To safeguard your hierarchical construction, additionally it is attainable to nest Canvases.
Extra nice articles from LogRocket:
Earlier than including content material to our Canvas(es), two settings require some consideration.
Canvas Render Mode
The Canvas Render Mode defines how the Canvas will likely be rendered within the scene. There are three sorts of render modes: Overlay, Display screen Area, and World Area.
Overlay merely renders the canvas on high of the sport display screen, bypassing the digicam and post-processing results. Display screen Area, alternatively, renders the canvas primarily based on a given distance to the sport’s digicam. Thus, Display screen Area render mode appears extra like it’s positioned within the sport world, with parts doubtlessly displaying up on high of the UI. Furthermore, since Display screen Area renders in accordance with a digicam, it’s affected by the digicam’s setup (resembling perspective and subject of view), in addition to post-processing results.
Lastly, World Area deserves an article by itself. World Area renders the Canvas as if it’s a 3D aspect within the sport world. It’s usually used once we wish to have UI parts popping up on high of 3D objects or to design a diegetic interface. For this text, we aren’t discussing the World Area render mode additional.
Usually, for menus and different UI canvases, we use both Overlay or Display screen Area, relying on whether or not we wish the UI to be affected by the digicam and post-processing results. In a while, we’ll focus on conditions by which we would select one over the opposite.
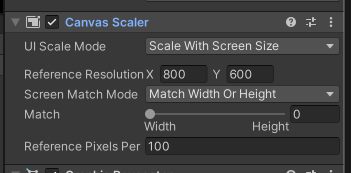
Canvas Scaler
The Canvas Scaler isn’t a default part of the Canvas sport object, however it’s one which deserves to be thought-about, particularly when constructing functions for a number of resolutions. Given the present decision, the Canvas Scaler makes use of a reference decision to scale the UI parts and match them to the present one.
For instance, if the Canvas Scaler makes use of a reference decision of 200×400 and the present decision of 400×800, it’ll scale the parts twice. If the present decision doesn’t match the reference facet ratio, the Canvas Scaler makes use of the Match property to resolve which measurement to make use of as the first level: width, when it’s set to 0, or top, when it’s set to 1. Values between 0 and 1 will match width and top proportionally.
UI Panels, Photographs, Buttons, and Texts
As for the opposite Unity programs manipulated within the Scene view and Hierarchy view, the Unity UI system can also be primarily based on sport objects. Though completely different sport objects are listed beneath the UI menu in Unity, there are primarily 4 which might be repeatedly used to make any kind of UI. These are Photographs, Buttons, Textual content, and Panels. A lot of the others, resembling Sliders and Enter Fields, are primarily mixtures of those 4 with extra scripts.
UI Photographs
The Picture is a noninteractive graphical aspect within the UI. Photographs are used extensively by different parts to have a visible illustration. Unity additionally accommodates a Uncooked Picture part which primarily differs from common Photographs by accepting any kind of textures, whereas Photographs solely settle for Sprite belongings.
Recurrently, Photographs are used extra usually than Uncooked Photographs as a result of their options. Notably, the function to Protect Facet, which forces the displayed graphic to maintain its facet ratio whatever the Picture properties on the display screen, resembling its scaling.
UI Texts
Initially, Unity had a Textual content part that was used to show non-interactive textual content parts on the display screen. Relying on which model of Unity you utilize, it’ll doubtless nonetheless be introduced (even when deprecated or set to Legacy). From Unity’s 2021 onwards, the instructed different for Texts is to make use of TextMeshPro parts.
The core functionalities of each parts are very related, together with altering the textual content font, measurement, show choices, and colour. TextMeshPro provides many extra choices for displaying the textual content, however they require you to transform your Font recordsdata into particular TextMeshPro Font belongings.
UI Buttons
Buttons are interactive parts on the UI which invoke Unity Occasions when clicked. Sometimes, Buttons have an Picture part that controls the Button’s visible transitions, resembling hovering the mouse on high or altering its colour whereas clicking on them.
Nevertheless, that’s not necessary, and it’s attainable so as to add a Button part to UI parts with out an Picture part.
Including interplay to a Unity Button could be very easy and requires that new occasions are added to the Unity Occasion listing beneath the Button part.
It’d sound foolish, however many builders neglect {that a} Unity Button can be utilized for a number of occasions without delay, resembling activating a script and taking part in a sound. You simply want so as to add these occasions to the Button’s occasion listing.
UI Panels
The Panel is definitely extra of an organizational instrument somewhat than a part itself. To be extra exact, the Panel is simply an Picture with default settings for its show. We regularly use Panels to pack and manage the hierarchy of parts within the scene, somewhat than to attain any explicit performance. Furthermore, Panels are good candidates to position controlling scripts, since they’re usually on the head of their hierarchies.
Different UI parts
As stated earlier than, there are different UI parts with appreciable significance, however they’re usually utilized in particular situations, such because the Masks part or the Canvas Group. For this text, we’re specializing in essentially the most used parts for normal UI implementation, however it’s suggested to check and follow the usage of these different instruments, as they may turn out to be useful to hurry up your growth course of.
Rect Transforms and Anchors
Completely different from common 3D sport objects which comprise a Remodel part to retailer the sport object’s transformations within the 3D area, objects that belong to the Unity UI have a Rect Remodel part.
Rect Transforms will be understood because the 2D equivalents of the Remodel and work equally for scaling and rotation operations.
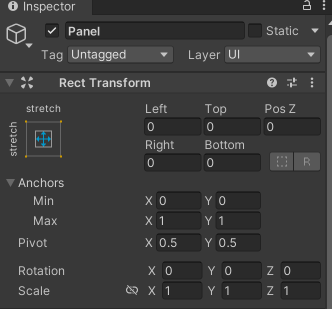
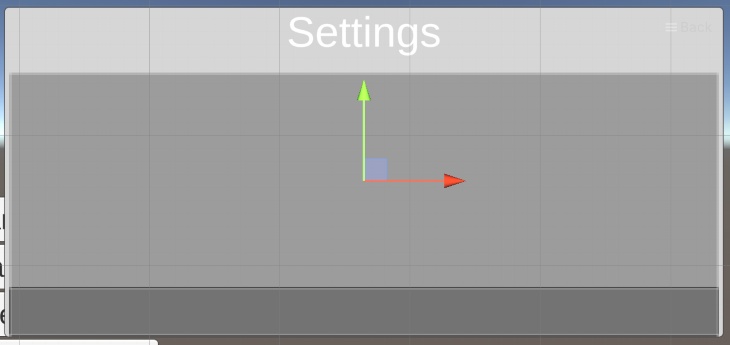
The Rect Remodel part instructions how UI parts are displayed on the Canvas, in addition to how they’re positioned and anchored within the structure. The Anchors are a set of two 2D positions that decide the reference the Rect Remodel will use to show its content material.
As seen within the picture above, the Anchors will be accessed within the part by adjusting the minimal and most values for X and Y. These values are normalized, i.e., from 0 to 1, the place 0 means the 0 % of the display screen and 1 means one hundred pc of the display screen. An Anchor that goes from Min(0,0) and Max(1,1) covers the horizontal x one hundred pc of the display screen and the vertical y one hundred pc of the display screen.
By parenting Rect Transforms, the Anchors not check with all the display screen however to all the space of its mother and father. For instance, if my display screen is 800×600 and my Anchors are the identical because the picture above (Min(0,0) and Max(1,1)), then my part will span over 800 by 600 models. Nevertheless, whether it is parented to an object that takes half of the display screen horizontally and vertically (400×300), then these similar Anchors will now span over 400 by 300 models.
Anchor Presets
Anchors don’t essentially want to regulate the width and top of their parts. The truth is, they’ll both function guides for the content material space in addition to simply management a reference level from which its content material should align itself. By altering the Anchors, the Rect Remodel part will change its labels to match the kind of anchoring used.
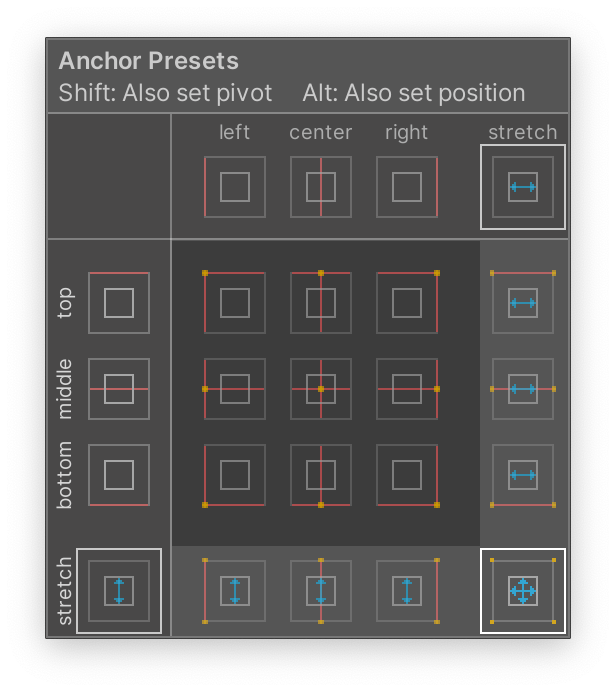
To facilitate our work, Unity already has a sequence of Anchor Presets that save us time from manually setting the Anchors for all our parts. The Anchor Presets will be discovered by clicking the Anchor picture on the higher left nook of the Rect Remodel.
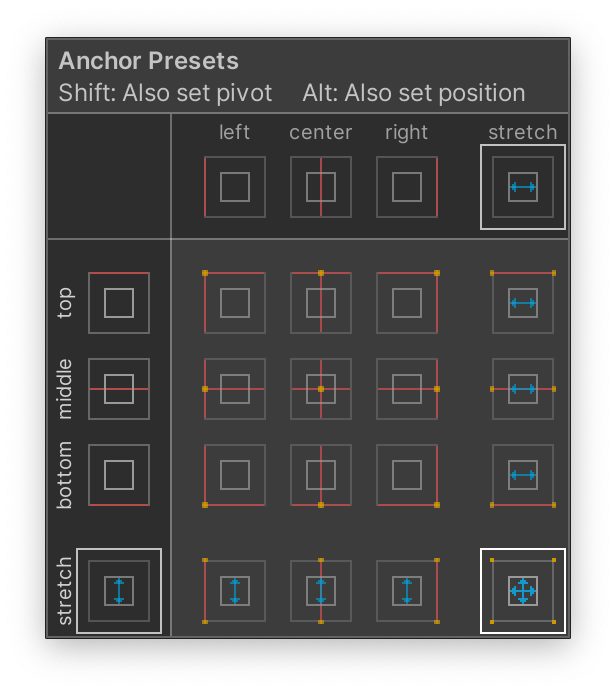
When the values for min and max match in both x, y, or each, the corresponding label on the Rect Remodel will change accordingly. Allow us to focus on the three important variations we are able to discover by working with the Anchors:
-
- Min and max Anchor values are the identical: The Rect Remodel controls one anchored place, the offset from this anchored place, and the particular width and top the content material will span on the display screen. Within the Anchor Presets, these are the entire choices within the middle
- Min and max Anchor values are the identical: The Rect Remodel controls one anchored place, the offset from this anchored place, and the particular width and top the content material will span on the display screen. Within the Anchor Presets, these are the entire choices within the middle
- Min Anchor is ready to 0, and Max Anchor is ready to 1: The Rect Remodel will cowl 100% of the given axis (Stretch). If utilized in mixture with the earlier one, it’ll end in one of many lateral choices introduced within the Anchor Presets. If utilized by each, then it’ll consequence within the backside proper preset. The axis set to Stretch may have its corresponding values to characterize an offset. The axis set to not Stretch (when Min and Max are the identical) will characterize an offset on the opposite axis and measurement (width for x and top for y)
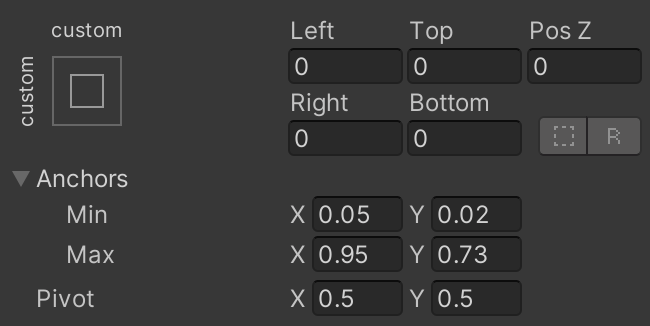
- Min and Max’s Anchors are set to values between 0 and 1 (inclusive): If the values are set to completely different values, resembling 0.02 for the Min and 0.73 for the Max for y, for instance, then we now have a Customized Preset. With these values, the Rect Remodel will begin at 2 % of the display screen (or father or mother) and span till 73 % of it, spanning over 71 %. N.B., when utilizing Customized Presets, all the time hold the opposite attributes (Left, Proper, Prime, Backside) to 0.
There are various choices in combining Anchors to design the structure of our UI. An important key level whereas anchoring is to make use of Anchors (and Presets) to arrange the place the weather ought to be on the display screen and the way they need to behave because the display screen measurement adjustments.
Additionally, contemplate that even when your display screen measurement stays the identical throughout your growth, it is vitally doubtless that you’ll transfer parts round and alter their sizes. For that, the right use of Anchors will make sure that your operations will hold the anticipated guidelines and behaviors.
Furthermore, contemplate that the parenting Rect Transforms is a vital step that may inherit the anchoring and positioning of the father or mother objects. If a given Rect Remodel is anchored able with a sure width and top, its youngster objects will take that as their space and are certain to vary if the father or mother adjustments too. That’s at first a degree to think about and watch out about, however later a step in the direction of effectivity, since we are able to merely inherit particular placement and stretching from the mother and father and construct our UI parts assuming solely their native wants.
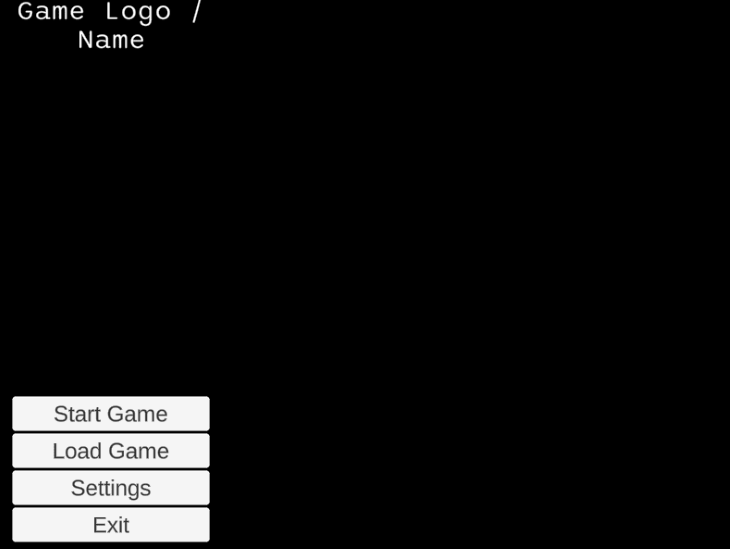
To higher perceive this course of and good practices in constructing a UI, allow us to now mock up the primary menu of a sport utilizing the abovementioned parts. Initially, we’ll design the parts and placements with solely the essential Unity UI default belongings. Then we’ll use free Asset Retailer belongings to mock up a ultimate UI.
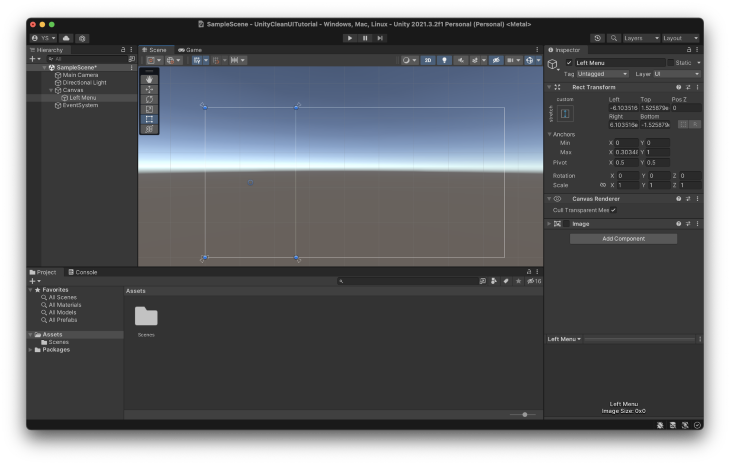
Usually, step one I take whereas designing a menu is to create panels that may divide the display screen for the primary parts of the menu. Since we’re mocking the primary menu, we may have a left panel to carry the menu and the sport’s emblem.
As said beforehand, Panels are nothing greater than Photographs with default values. Since we don’t want the pictures for these preliminary panels, I usually disable the Picture part. I choose to disable it as a substitute of eradicating it as a result of I activate it to test overlaps and visible artifacts.
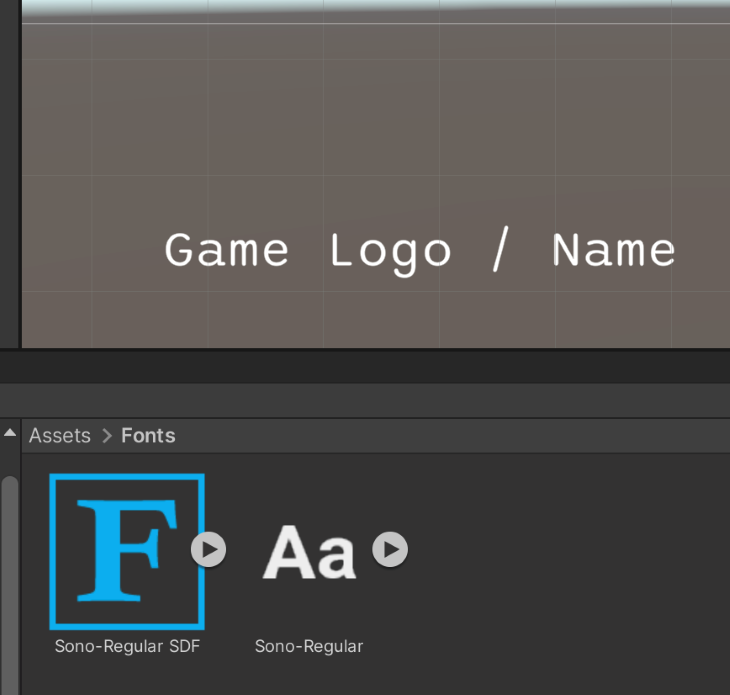
As a placeholder for the sport’s emblem, I’m utilizing a easy TextMeshPro part. As said beforehand, this part requires you to generate a font asset. That may be accomplished by merely right-clicking a font file in your Mission view adopted by Create > TextMeshPro > Font Asset.
We use a mix of parts for the menu buttons to provide us higher flexibility and simpler upkeep. First, as a substitute of putting them instantly on the left panel we created, it’s best to create one other panel only for the buttons.
Parenting panels to carry particular content material
Through the use of parenting panels we are able to extra exactly management the world of all buttons concurrently as a substitute of one after the other. If we have to transfer all buttons, as an illustration, so as to add one other part under them (or above), we are able to obtain it by merely transferring their father or mother panel.
Moreover, we must always have the ability to transfer all parts throughout the new panel for no matter cause, whereas the content material will nonetheless abide by how the panel is being displayed and stretched on the display screen.
On the whole, it’s all the time a good suggestion to group your content material into particular panels and make the hierarchy primarily based on these assortments of panels. As any change is critical, all parented panels will hold their explicit anchors concerning their mother and father. Thus, making use of a major change to any content material is pointless, as it’ll hold anchoring.
It’s important to vary the anchors to attain any of those operations. Altering different parts won’t essentially keep the identical habits in eventual decision adjustments or updates within the UI. For that, I normally suggest the usage of customized Anchors, as seen above, in order that precisely all operations are carried out accordingly to all parts.
Auto structure instruments
The opposite approach employed to maintain all buttons constant is the usage of auto layouts. Extra particularly, I added a Vertical Format Group, which robotically organizes youngster parts so as, on high of one another.
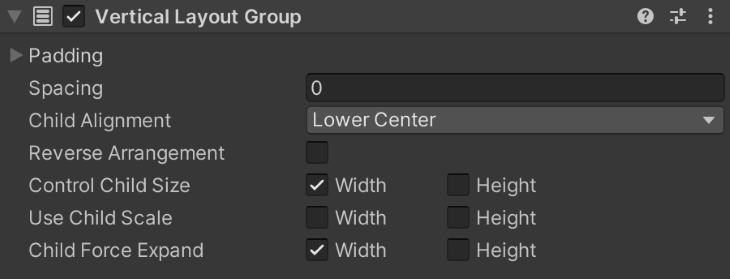
Through the use of the properties to Management Little one Dimension and Little one Drive Increase, which respectively management the dimensions of every aspect and whether or not they need to utterly increase to fill within the father or mother, we are able to simply acquire a great presentation.
Furthermore, we don’t want to use any adjustments to newly added buttons. After we add a brand new button, it’ll observe the orders specified on the Vertical Format Group and behave visually just like the others. So long as there’s area for brand new buttons, this method means that you can have easy-to-expand menus with ease.
The hierarchy to this point
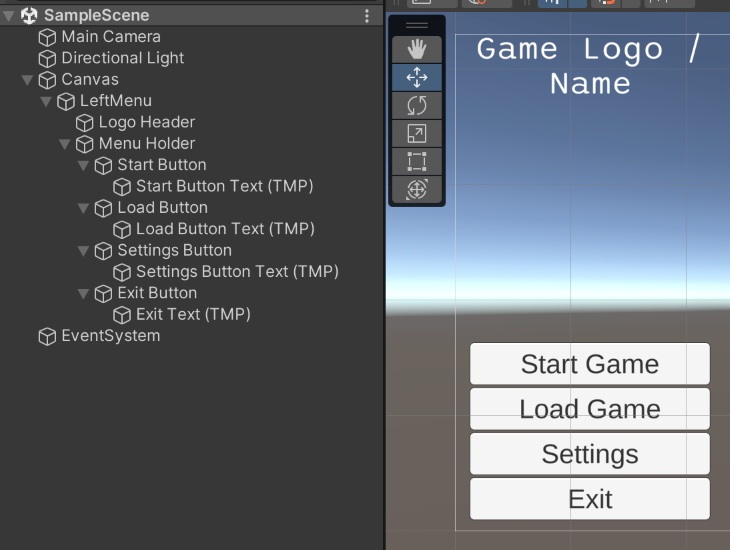
By following the earlier steps, we must always have a hierarchy just like the one above. Discover that as new content material is added, new panels are launched to regulate them. Additionally, parts that aren’t visually linked in teams, resembling the sport emblem and the primary menu, are stored as siblings within the hierarchy, and not using a parent-child relation.
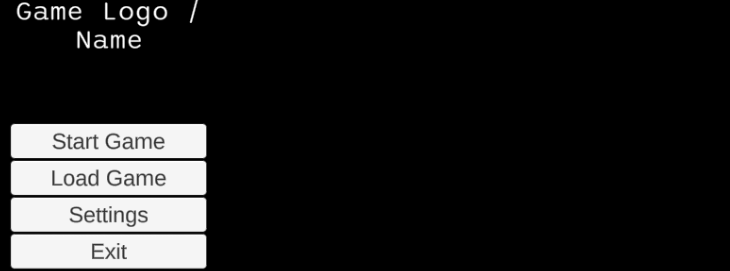
The photographs under present how the UI reacts once we change the decision to 4:3 and eight:3.
Including one other window
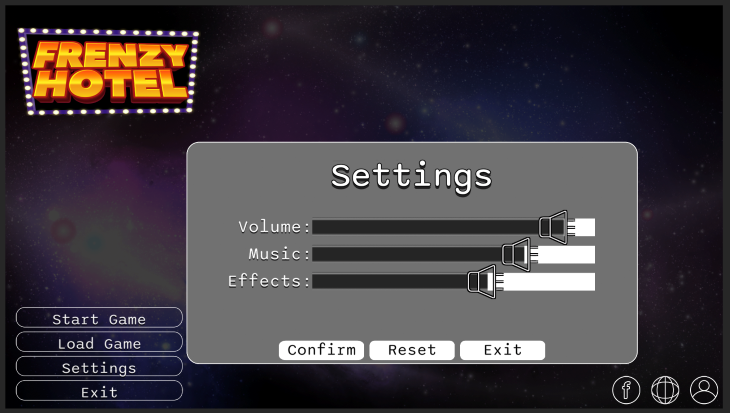
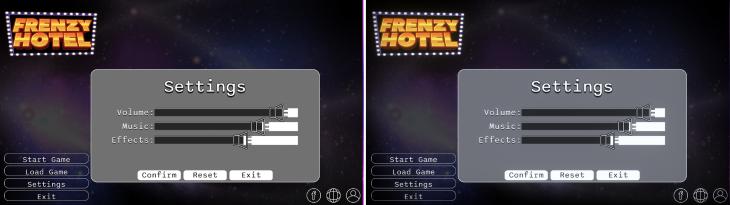
A standard function in this sort of menu is to produce other home windows popping as much as show extra info and functionalities. For our instance, allow us to see how we may obtain it by utilizing these similar earlier steps to attain a Settings window just like the one displayed under.
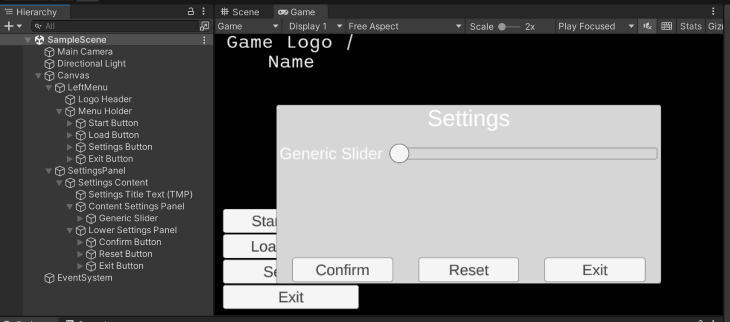
Settings window panel
For the reason that Settings window takes its personal area on the display screen, it makes extra sense to maintain it separate from the Left Menu hierarchy. With that, we are able to set its anchors in accordance with all the canvas, as a substitute of associated to the Left Menu. We will try this by making a Panel as a baby of the Canvas.
Within the case of Window kind of UI parts, I usually create a baby Panel throughout the Window panel to carry its content material. That is usually useful if I resolve to vary the borders of the window or use completely different graphics for its background and foreground.
Keep in mind that the rule of thumb we are sometimes utilizing for panels is to create extra panels within the hierarchy each time we wish to group objects that share the identical intent or function. On this explicit case, we wish to create a brand new panel to carry the entire window’s content material.
We apply the identical precept when creating panels for the separate sorts of content material contained in the window. As seen within the pictures earlier than, we wish some kind of Settings space, with sliders, and a Affirmation space, with buttons.
Again to Auto Layouts
For each the Settings space and the Affirmation space, we are able to use Auto Layouts once more to shortly permit them to increase/shrink in content material as needed. To be extra exact, for the Settings space, we are able to use one other Vertical Format Group to deal with the sliders and different attainable settings options we would need, whereas for the Affirmation space we are able to use a Horizontal Format Group to deal with the buttons horizontally.
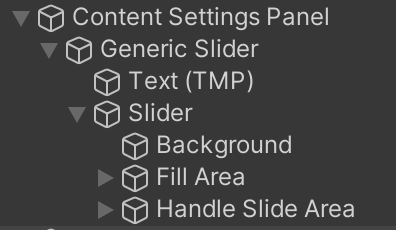
Sliders
The one part from this window we didn’t focus on earlier than is the Slider part. The slider is a Unity part that allow us management a numeric worth utilizing a predefined vary. It permits us to pick the vary (which isn’t restricted by 0 and 1) and add a number of Unity Occasions which might be known as each time the slider adjustments.
The slider is a composition of different parts we mentioned earlier than, resembling Panels and Photographs. Additionally it is a great instance of easy methods to manage your hierarchy to attain related outcomes. To attain the filling impact because the deal with is moved, the Slider makes use of an attention-grabbing Picture property known as Fill.
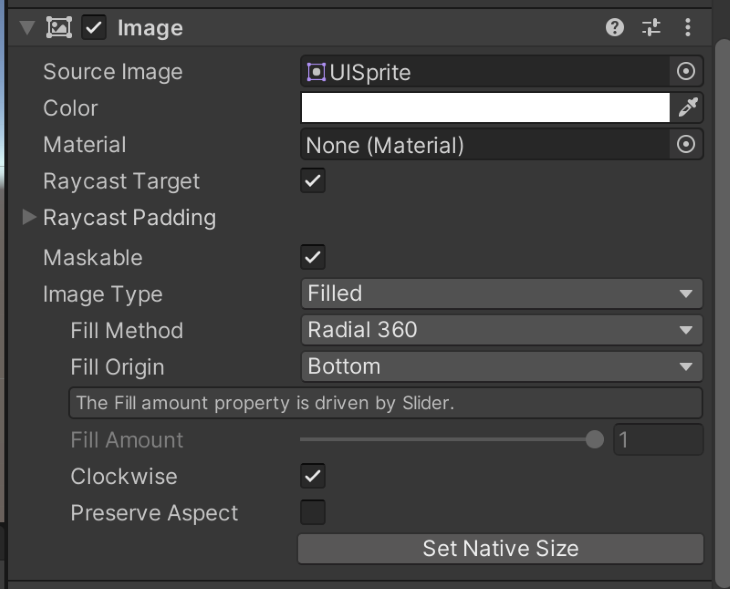
To manage the picture fill in different contexts, it’s important to change the Picture Sort to Stuffed. That can show the particular Fill properties, resembling how a lot the picture is being stuffed in. Though on this context the picture’s fill is being dealt with by the Slider part, you need to use it in different contexts. For instance, to make a loading bar or a well being bar.
Sadly, the Slider part doesn’t include inbuilt textual content such because the Toggle or the Button parts. On this case, to attain the textual content label subsequent to the slider, the method used was to first create a brand new Panel to carry all of the slider’s content material (Slider and Textual content) after which add the Textual content and the Slider as youngster objects of this Panel.
If you’re repeatedly including new Sliders to this menu, it might be clever to make it a prefab.
The picture under reveals what the hierarchy for the Slider and its content material appears like.
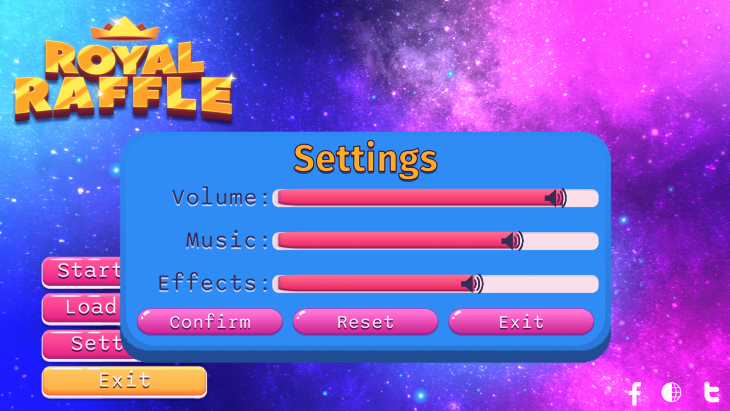
Changing belongings
Now that we now have a base menu, it’s straightforward to switch its pictures and parts to mock up a correct sport UI. The picture under reveals what this similar structure, with minor changes and additions, would appear like if we have been to make use of the free belongings Darkish Theme UI, 2D Emblem Templates, and Free Galaxy Background.
Discover that the primary adjustments accomplished have been to switch the TextMeshPro with an Picture, so I may use a emblem, and so as to add a brand new panel within the backside proper nook for social media buttons.
The identical course of may very well be accomplished with different belongings utilizing the identical base. Following you possibly can see one other model of this UI utilizing the free belongings from Additional Clear UI, 2D Informal UI HD, and KartInnka Buttons Set.
In the event you’ve learn any of my different posts, you recognize I’m an enormous fan of utilizing post-processing results to boost the visible high quality of my initiatives. For this one, it’s not completely different. Nevertheless, allow us to bear in mind that there’s an vital UI-specific resolution to be made earlier than going additional: the Canvas Renderer kind.
As said beforehand, Canvas has a selected render methodology that influences whether or not the Canvas will be affected by post-processing or not. In order for you parts to be affected by post-processing, set their Canvas to be within the render mode Display screen Area. In any other case, use Overlay.
For this challenge, I used Bloom, Vignette, and Colour Grading to enhance the visible cohesion and high quality of the menus. Beneath there are pictures of the earlier than and after for each UIs.
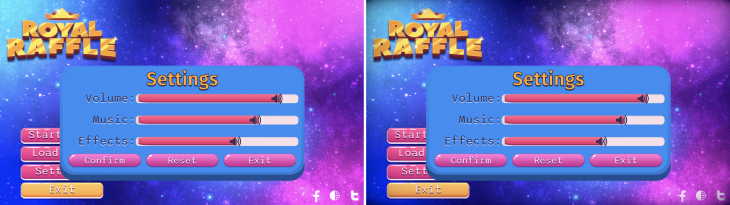
As you possibly can see, the post-processing results assist to deliver the colours collectively, which reinforces the sensation of a cohesive UI. Furthermore, it helps to deliver that additional taste to shiny parts (like the sport’s emblem with the Bloom impact) and focus the person (utilizing the Vignette to darker the perimeters).
Thanks for studying, and let me know if you need extra Unity UI and UI parts methods for quick growth and prototyping. You’ll be able to see extra of my work at www.dagongraphics.com.
LogRocket proactively surfaces and diagnoses an important points in your apps and web sites

1000’s of engineering and product groups use LogRocket to cut back the time it takes to know the foundation reason for technical and usefulness points. With LogRocket, you’ll spend much less time on back-and-forth conversations with prospects and take away the limitless troubleshooting course of. LogRocket means that you can spend extra time constructing new issues and fewer time fixing bugs.
Be proactive – strive LogRocket immediately.
