
Phoenix is the most cherished framework by builders in 2022, and by some margin too. It’s nice for internet improvement as a part of the Elixir ecosystem and its reliability and scalability make it a good selection for any challenge.
On this tutorial, we’ll discover what Elixir is, the Phoenix internet framework, and the best way to construct REST API with Elixir and Phoenix in your tasks.
Skip forward
What’s Elixir and the Phoenix internet framework?
Elixir is a purposeful, dynamically-typed language that’s constructed on high of Erlang. Jose Valim, who developed Elixir, labored on the Ruby on Rails group and created it when he was making an attempt to resolve efficiency bottlenecks with Ruby on Rails and Erlang.
Because of this, the syntax of Elixir has many similarities with Ruby on Rails syntax.
Elixir is especially used to create extremely scalable purposes which are fault-tolerant and simply maintainable. Among the key options of Elixir are:
- It compiles the code into byte code that runs on Erlang VM
- It emphasizes greater order features and recursions
- Highly effective sample matching
- It’s a dynamically typed language, so it checks all the kinds at runtime moderately than compile time
Advantages of Elixir
Since Elixir is constructed on high of BEAM, an Erlang VM, it has some key traits that assist to construct nice apps. These traits are:
- Concurrency: Elixir makes use of course of threads for execution. These threads are remoted, CPU-based, and talk by messages
- Scalability: Scaling an Elixir software is straightforward because it makes use of light-weight threads that may run with few processes
- Reliability: Constructing fault-tolerant purposes is among the principal options of Elixir. When an Elixir software fails in manufacturing, the supervisor system restarts the light-weight course of shortly, which reduces downtime
Relating to constructing internet purposes, it’s tough to construct primary functionalities from scratch each time, which is the place the Phoenix internet framework comes into the image.
Introduction to Phoenix
Phoenix is an online framework within the Elixir ecosystem. It comes with modules out-the-box that assist construct extremely scalable and fault-tolerant purposes. Phoenix is a Mannequin-View-Controller (MVC) framework much like Ruby on Rails and Django.
One of many killer options of Phoenix framework is LiveView. Phoenix LiveView is a library that’s constructed on high of Phoenix which helps in constructing real-time purposes with out writing client-side JavaScript. It calculates the web page adjustments and push updates by WebSocket.
How Phoenix works
Plugs are the fundamental factor of Phoenix. Plugs are a specification for composing an online software with features — Phoenix receives an incoming request and converts it into Conn, which is an information construction that handles requests and responses in HTTP connections.
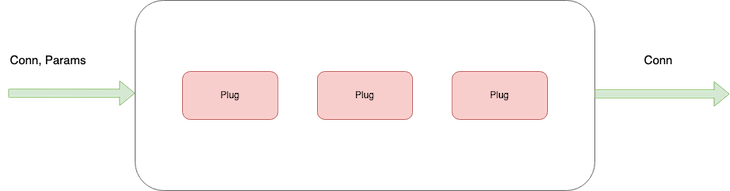
Conn information construction is handed by a number of plugs to finish the performance and return a response. To simplify it:
- Receives a request
- Converts it to
conn - Passes by a number of plugs
- Returns response
Lifecycle of Phoenix requests
As we’ve famous, an incoming request in phoenix goes by a number of plugs to return the required response — let’s look into the main points of the plugs and course of:
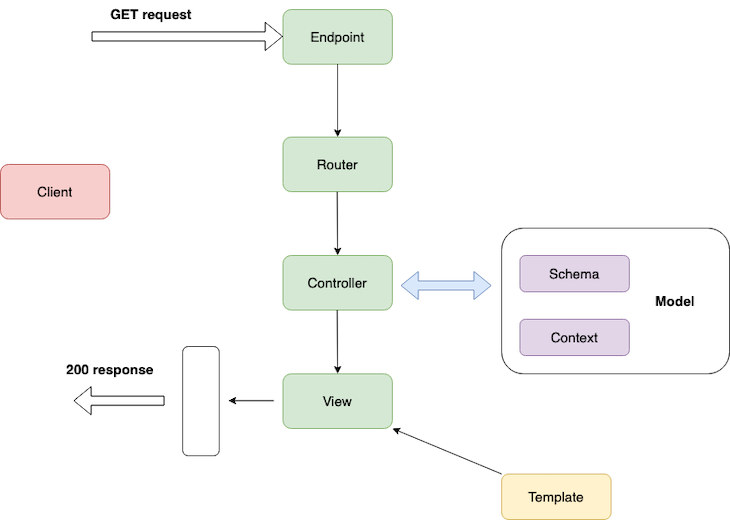
Phoenix receives a request on the endpoint and the endpoint converts it right into a Conn information construction, forwarding it to the router.
The router pipelines the Conn information construction into the controller, and the controller interacts with the mannequin to fetch information from the database and render it utilizing templates. Templates could be HTML or JSON recordsdata. Right here, the endpoint, router, and controllers are plugs — every little thing in Phoenix is a composable operate that transforms information into completely different construction.
Making a REST API utilizing Elixir and Phoenix
Now we’re aware of the Phoenix internet framework, let’s construct a REST API with Elixir and Phoenix to make use of for a challenge. Right here, we’re going to create a REST API which delivers customers data to a Postgres database.
The API will serve person data beneath /api/customers, with GET, PUT, POST, DELETE requests.
To do that, we have to create database schema with required fields which are saved within the database:
id→ Major key within the desk.identify→ String accommodates person identify.e-mail→ Electronic mail subject, it ought to be distinctive.function→ Consumer function.handle→ Consumer handle.
Conditions
Earlier than you proceed additional, I’d advocate you meet the next conditions:
- Fundamental understanding of the Elixir syntax. You possibly can seek advice from the official docs to get began with the syntax
- Set up Elixir in your machine. We are going to talk about the best way to set up Elixir within the upcoming part
- Have Postgres put in in your machine. Alternatively, you possibly can run Postgres utilizing Docker (which is what we will probably be doing on this tutorial)
- Having the Postman shopper or an alternative choice to take a look at APIs
Getting began
At the start, let’s set up Elixir in your machine. To put in elixir on macOS, you should use Homebrew package deal supervisor.
Putting in Elixir on macOS
Earlier than set up, replace Homebrew utilizing:
$ brew replace
After this, you possibly can set up Elixir utilizing the next:
$ brew set up elixir
You additionally want to put in the Elixir package deal supervisor Hex. Run the next command to put in Hex:
$ combine native.hex
To confirm that the set up is profitable, you possibly can run this to test the model:
$ elixir -v

(Observe: For different working methods, you possibly can refer the Elixir official information that gives a easy step-by-step information for set up)
Putting in Phoenix
Now we’ve put in Elixir, Let’s bootstrap a challenge utilizing the Phoenix framework to construct a REST API.
$ combine archive.set up hex phx_new 1.5.3
This installs Phoenix 1.5.3 in your machine. To create a brand new challenge, you have to run the next command within the terminal:
$ combine phx.new users_api --no-html --no-webpack --binary-id

$ cd users_api
It will create a users_api listing, with all of the boilerplate for a Phoenix software. It follows a listing construction like this:
├── _build
├── property
├── config
├── deps
├── lib
│   ├── hi there
│   ├── hi there.ex
│   ├── hello_web
│   └── hello_web.ex
├── priv
└── take a look at
(Observe: The official Phoenix docs clarify the listing construction intimately, and you’ll seek advice from it right here)
The --no-html and --no-webpack parameters instruct the command to not generate HTML recordsdata and static property since we’re solely constructing a REST API.
--binary-id will configure Ecto to make use of a UUID for database schemas comparable to main key values.
Now, we’ll scaffold the appliance with boilerplate code. Let’s run the Postgres database and join the appliance to the database.
Extra nice articles from LogRocket:
Arrange and configure database
Firstly, ensure you set up Docker in your machine. Working Postgres through Docker is straightforward; simply want run the next command:
$ docker run --name phoenix-postgres -e POSTGRES_USER=postgres -e POSTGRES_PASSWORD=postgres -p 5500:5432 -d postgres
Right here, we specify --name for the Docker container and atmosphere for POSTGRES_USER and POSTGRES_PASSWORD. We additionally have to map the port by specifying -p . Lastly, we pull the Docker picture in indifferent mode.
As soon as Postgres is up and operating, we configure the database within the Phoenix software. Phoenix supplies a config listing to setup databases, cron jobs, loggers, and stack traces within the software.
To configure the database within the improvement atmosphere, change config/dev.exs with Postgres database credentials.
# Configure your database
config :users_api, UsersApi.Repo,
  username: "postgres",
  password: "postgres",
  database: "users_api_dev",
  hostname: "localhost",
  port: "5500",
  show_sensitive_data_on_connection_error: true,
  pool_size: 10
After this, you possibly can create a database for the event atmosphere like so:
$ combine ecto.create
And you may drop the database utilizing this:
$ combine ecto.drop
Schema and migration
When you create a database and configure it within the software, you have to mannequin the info to entry it contained in the app.
Phoenix contexts
Earlier than we begin with schema design, it’s essential to learn about Phoenix contexts. Contexts are modules that group the associated functionalities collectively. While you design an software, Phoenix helps to group modules primarily based on the context. Consider it like domains in Area-Pushed Design.
Context will group completely different modules collectively primarily based on the functionalities.
To present an instance, Elixir Logger.data/1 is made up of a number of modules, however we will entry these modules in a single Logger module context.
To create context for modeling, you should use the Phoenix generator command within the software:
$ combine phx.gen.context Admin Consumer customers
  identify:string e-mail:string:distinctive function:string handle:string
Right here, we have now:
Admin, as a context’s module identifyConsumer, because the schema’s module identifyCustomers, because the database desk identify
To outline the customers subject and its sort whereas producing the database desk, you possibly can seek advice from the schema subject definition from the hex docs.
When you run the command, it can create lib/admin/person.ex, which accommodates the schema definition.
defmodule UsersApi.Admin.Consumer do
  use Ecto.Schema
  import Ecto.Changeset
  @primary_key {:id, :binary_id, autogenerate: true}
  @foreign_key_type :binary_id
  schema "customers" do
    subject :handle, :string
    subject :e-mail, :string
    subject :identify, :string
    subject :function, :string
    timestamps()
  finish
  @doc false
  def changeset(person, attrs) do
    person
    |> solid(attrs, [:name, :email, :role, :address])
    |> validate_required([:name, :email, :role, :address])
    |> unique_constraint(:e-mail)
  finish
finish
It additionally scaffolds the REST API for the customers module in users_api/admin.ex.
defmodule UsersApi.Admin do
  @moduledoc """
  The Admin context.
  """
  import Ecto.Question, warn: false
  alias UsersApi.Repo
  alias UsersApi.Admin.Consumer
  @doc """
  Returns the listing of customers.
  ## Examples
      iex> list_users()
      [%User{}, ...]
  """
  def list_users do
    Repo.all(Consumer)
  finish
  @doc """
  Will get a single person.
  Raises `Ecto.NoResultsError` if the Consumer doesn't exist.
  ## Examples
      iex> get_user!(123)
      %Consumer{}
      iex> get_user!(456)
      ** (Ecto.NoResultsError)
  """
  def get_user!(id), do: Repo.get!(Consumer, id)
  @doc """
  Creates a person.
  ## Examples
      iex> create_user(%{subject: worth})
      {:okay, %Consumer{}}
      iex> create_user(%{subject: bad_value})
      {:error, %Ecto.Changeset{}}
  """
  def create_user(attrs  %{}) do
    %Consumer{}
    |> Consumer.changeset(attrs)
    |> Repo.insert()
  finish
  @doc """
  Updates a person.
  ## Examples
      iex> update_user(person, %{subject: new_value})
      {:okay, %Consumer{}}
      iex> update_user(person, %{subject: bad_value})
      {:error, %Ecto.Changeset{}}
  """
  def update_user(%Consumer{} = person, attrs) do
    person
    |> Consumer.changeset(attrs)
    |> Repo.replace()
  finish
  @doc """
  Deletes a person.
  ## Examples
      iex> delete_user(person)
      {:okay, %Consumer{}}
      iex> delete_user(person)
      {:error, %Ecto.Changeset{}}
  """
  def delete_user(%Consumer{} = person) do
    Repo.delete(person)
  finish
  @doc """
  Returns an `%Ecto.Changeset{}` for monitoring person adjustments.
  ## Examples
      iex> change_user(person)
      %Ecto.Changeset{information: %Consumer{}}
  """
  def change_user(%Consumer{} = person, attrs  %{}) do
    Consumer.changeset(person, attrs)
  finish
finish
Working migration
To run the migration for the outlined information schema, you have to run the next command:
$ combine ecto.migrate
When you run the migration, it can create a desk within the database with the outlined fields, as within the schema.
Scaffolding Controller and View
Now, we have now the database schema and mannequin outlined within the software, we have to wire it with Controller and View to return the response.
To generate Controller and View for a selected module, Phoenix supplies a generator command that may generate boilerplate code:
$ combine phx.gen.json Admin Consumer customers
  identify:string e-mail:string:distinctive function:string handle:string --no-context --no-schema
The above command generates:
- A CRUD Controller for the customers at
lib/users_api_web/controllers/users_controller.ex - View, to render customers’ JSON at
lib/users_api_web/view/users_view.ex
We additionally point out --no-context and --no-schema, since we already generated them whereas creating the database schema.
Phoenix additionally supplies users_api_web/controllers/fallback_controller.ex to deal with errors and fallbacks for any failures. We are able to edit them to deal with completely different error codes. For instance, you possibly can edit fallback controllers to deal with UnAuthorized errors.
defmodule MyFallbackController do
  use Phoenix.Controller

  def name(conn, {:error, :not_found}) do
    conn
    |> put_status(:not_found)
    |> put_view(MyErrorView)
    |> render(:"404")
  finish

  def name(conn, {:error, :unauthorized}) do
    conn
    |> put_status(403)
    |> put_view(MyErrorView)
    |> render(:"403")
  finish
finish
By default, Phoenix configures the fallback controller in the primary controller — you possibly can change them in users_api_web/controllers/user_controller.ex.
action_fallback UsersApiWeb.FallbackController
When you create a controller and consider, you have to add a route for the controller in lib/users_api_web/router.ex.
defmodule UsersApiWeb.Router do
  use UsersApiWeb, :router
  pipeline :api do
    plug :accepts, ["json"]
  finish
  scope "/api", UsersApiWeb do
    pipe_through :api
    get "/customers", UserController, :index
    put "/customers", UserController, :edit
    submit "/customers", UserController, :create
    delete "/customers", UserController, :delete
  finish
  # Allows LiveDashboard just for improvement
  #
  # If you wish to use the LiveDashboard in manufacturing, you need to put
  # it behind authentication and permit solely admins to entry it.
  # In case your software doesn't have an admins-only part but,
  # you should use Plug.BasicAuth to arrange some primary authentication
  # so long as you're additionally utilizing SSL (which you need to anyway).
  if Combine.env() in [:dev, :test] do
    import Phoenix.LiveDashboard.Router
    scope "https://weblog.logrocket.com/" do
      pipe_through [:fetch_session, :protect_from_forgery]
      live_dashboard "/dashboard", metrics: UsersApiWeb.Telemetry
    finish
  finish
finish
As you possibly can see, you possibly can group completely different routes right into a single endpoint. Right here, we nest all of the /customers routes inside /api scope. Inside /api scope, we configure CRUD for the Customers API.
There may be one other simplified model for configuring a CRUD request for a module. We are able to use assets from the Phoenix router module:
assets "/customers", UserController
By configuring its assets like this; it simplifies all of the requests in a single line.
 scope "/api", UsersApiWeb do
    pipe_through :api
    assets "/customers", UserController, besides: [:new, :edit]
Now, you possibly can run the appliance utilizing the next:
$ combine phx.server

Conclusion
And also you’re performed! Thanks for following together with this tutorial, I hope you discovered it helpful and be happy to submit your findings within the feedback beneath. You possibly can take a look at the API at http://localhost:4000, and you’ll refer the whole code for this tutorial right here.
