
In the event you randomly choose a couple of video games, every would most likely have a distinct artwork fashion and mechanics, a distinct story, and even no story in any respect, however there’s one factor they’d all have in frequent: all video games have to learn and deal with inputs from units like keyboard, mouse, gamepad, joystick, VR controllers, and so forth.
On this put up, I’ll present you tips on how to construct a third-person controller in Unity with the brand new Enter System package deal along with a comply with digicam pushed by Cinemachine, one other highly effective package deal by Unity Applied sciences.
Our third-person controller will deal with inputs from a keyboard and mouse and a typical gamepad, and since the brand new enter system in Unity is kind of good, as you’ll quickly see, including help for one more enter machine wouldn’t require any further code.
On prime of that, you’ll see tips on how to arrange idle, run, soar, and fall animations and tips on how to easily transition amongst them. We’re going to implement the core of the controller as a state machine with a give attention to clear structure and extendability.
In case you’ve by no means heard about state machines or the state design sample earlier than, concern not, I’ll clarify all the things step-by-step. Nevertheless, I’ll assume you could have a fundamental understanding of C# and OOP ideas like inheritance and summary lessons.
By the tip of this put up, you’ll have the ability to simply lengthen our controller with your individual states and also you’ll have below your belt a design sample you’ll discover helpful in many various contexts.
Talking of design patterns, other than the state sample we’ll use additionally one other one, in recreation improvement quite common, if not the commonest: the observer sample.
The outdated versus the brand new Unity enter system
Earlier than we begin constructing our participant controller, let’s briefly discuss in regards to the distinction between the brand new and the outdated Unity enter system. I’m not going to repeat what you may learn within the documentation, however somewhat spotlight the primary distinction.
In the event you’ve been working with Unity earlier than, you most likely already know tips on how to use the outdated enter system. While you need some code to be executed each body solely when a given key’s pressed, you do it like this:
void Replace()
{
  if (Enter.GetKeyDown(KeyCode.Area))
  {
    // Code executed each body when Area is pressed
  }
}
You can also make it a little bit bit higher by binding keys and axes with names in Venture Settings > Enter Supervisor to then write your script like this as a substitute:
{
  if (Enter.GetKeyDown("Leap"))
  {
    // Code executed each body when key certain to "Leap" is pressed
  }
}
And while you need to learn values from the axes, you are able to do it like this:
void Replace()
{
  float verticalAxis = Enter.GetAxis("Vertical");
  float horizontalAxis = Enter.GetAxis("Horizontal");

  // Do one thing with the values right here
}
It’s fairly easy, proper? The brand new enter system is a little bit bit extra sophisticated however brings a variety of benefits. I feel you’ll totally respect them by the tip of this tutorial. For now, I’m going to call just some:
- The event-based API replaces polling of states within the
Replacetechnique, which brings higher efficiency - Including help for a brand new enter machine doesn’t require further coding, which is nice, particularly for cross-platform video games
- The brand new enter system comes with a strong set of debugging instruments
The gist of the brand new enter system lies in an abstraction layer added between enter units and actions and the event-based API. You create an Enter Motion asset, which bind inputs with actions by way of UI within the editor, and let Unity generate the API for you.
Then you definately write a easy class that implements IPlayerActions to offer enter occasions and values for a participant controller to devour, and that’s precisely what we’re going to do on this weblog put up.
Creating a brand new Unity venture
If you wish to comply with alongside, and I encourage you to take action, I like to recommend utilizing Unity 2021.3.6f1. Create a brand new empty 3D venture and initially, go to Window > Bundle Supervisor. Choose Unity Registry from the Packages dropdown checklist, sort Cinemachine within the search area, choose the package deal, and hit set up. Then do the identical for the InputSystem package deal.
Whereas putting in the InputSystem, Unity will immediate you to restart. After that, return to the Bundle Supervisor window, choose Packages: In Venture, and make sure each packages had been put in.
Extra nice articles from LogRocket:
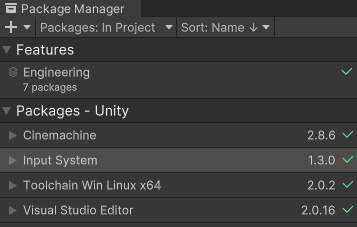
You can even take away the opposite packages, besides the code integration help on your IDE. In my case, it’s the Visible Studio Editor package deal.
Establishing enter system
To arrange the brand new Unity enter system, we first have to bind inputs to actions. For that, we want a .inputactions asset. Let’s add one by right-clicking within the Venture tab and deciding on Create > Enter Actions.
Title it Controls.inputactions and open the window for binding inputs by double clicking on this new asset.
Within the prime proper nook click on on All Management Schemes, and from the menu that pops up choose Add Management Scheme…, title the brand new scheme Keyboard and Mouse, and by way of the plus image on the backside of the empty checklist, add Keyboard after which Mouse enter units.
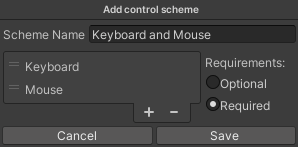
Repeat the method from the earlier paragraph, however this time title the brand new scheme as Gamepad and likewise add the Gamepad to the enter units checklist. Additionally, choose Non-compulsory from the 2 requirement choices.
Again within the Controls (Enter Motion) window, click on within the leftmost column labeled as Motion Maps to a plus image and title the newly added file as Participant. The center column is the place we’re now going to bind inputs with actions.
One motion is already added, it’s labeled as New Motion. Proper-click on that motion and rename it to Leap, then unfold it with the little triangle icon, choose the binding <No Binding>, and within the Binding Properties on the suitable column, click on on the dropdown icon subsequent to Path.
You may both discover Area within the Keyboard part or click on on the Pay attention button and easily press the spacebar in your keyboard. Again in binding properties, under Path, tick the Keyboard and Mouse below Use in management scheme. Discover these are the schemes we’ve added beforehand.

Area is now assigned to the soar motion, however we additionally need one other binding for a gamepad. Within the Actions column, click on on the plus image. Choose Add binding, and within the Path, set Button South from the Gamepad part. This time, below the Use in management scheme, tick Gamepad.
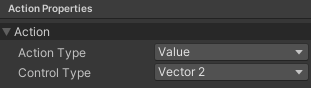
Let’s add one other motion, this time for motion. With the plus image subsequent to the Motion label, add the brand new motion and title it Transfer. Preserve the Transfer motion chosen and in the suitable column, change Motion Sort to Worth and Management Sort to Vector 2.
The primary binding slot, once more labeled by default as <No Binding>, has been already added. Let’s use it for the gamepad as a result of for the keyboard, we’re going so as to add a distinct sort of motion. In Path, discover and assign the Left Stick from the Gamepad part.
Now, with the plus image subsequent to the Transfer motion, add a brand new binding, however this time choose Add Up/Down/Left/Proper Composite. You’ll be able to hold the title of the brand new binding as a 2D Vector, what’s essential is to assign a key for every element.
Assign W, S, A, and D for Up, Down, Left, and Proper respectively, or arrow keys, should you want that. Don’t neglect to tick Keyboard and Mouse below the Use in management scheme for every of them.
The final motion we have to add is to rotate the digicam with a purpose to go searching. Let’s title this motion Look. For this motion, additionally set Motion Sort to Worth and Management Sort to Vector. For the Keyboard and Mouse management scheme, bind Delta from the Mouse part, which is the quantity of change within the X and Y positions of the mouse from the earlier to the present body, and for the Gamepad scheme, bind the Proper Stick.
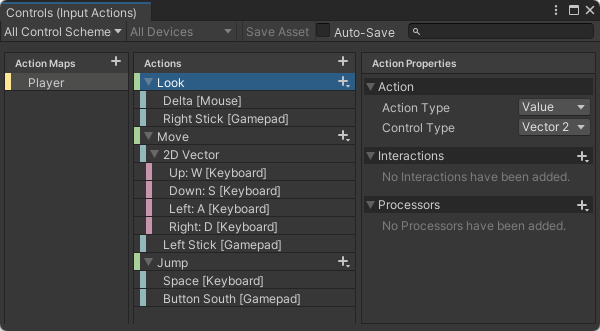
We now have all of the enter bindings for the keyboard and mouse and for the gamepad setup. The very last thing we have to do within the Controls (Enter Motion) window is to click on on the Save Asset button.
Discover that once we saved the asset, Unity generated a Controls.cs file for us within the Belongings folder, proper subsequent to Controls.inputactions. We’re going to want the code that has been generated on this file whereas constructing our InputReader class, which we’re going to do within the subsequent part.
Constructing an InputReader class
Thus far we’ve been working solely within the Unity editor. Now it’s time to put in writing some code. Create a brand new C# script in your property and title it InputReader. The InputReader class ought to inherit from MonoBehavior as a result of we’re going to connect it as a element to our Participant recreation object, later once we’ll have one.
Aside from that, the InputReader will implement Controls.IPlayerActions interface. This interface has been generated for us by Unity, once we saved Controls.inputactions asset on the finish of the earlier part.
As a result of we created Look, Transfer and Leap actions, the interface defines OnLook, OnMove, and OnJump strategies with a context parameter of sort InputAction.CallbackContext.
Do you recall I wrote the brand new Unity enter system is event-based? That is it. We outline in our InputReader class a member MoveComposite of sort Vector2 and we implement OnMove like this:
public void OnMove(InputAction.CallbackContext context)
{
  MoveComposite = context.ReadValue<Vector2>();
}
Every time an enter we certain for Transfer motion (W, S, A, D keys and Proper Stick on a gamepad) is registered, this OnMove is named. From an occasion in that generated code, and from the context parameter that’s handed, we then learn the enter worth.
When, for instance, a W key’s pressed, the worth from the context assigned to our MoveComposite can be 0 on the x-axis and 1 on the y-axis. Once we press each W and A, it will likely be -1 on x, and 1 on y, and once we launch the keys, values on each axes can be 0.
OnLook can be applied in the identical approach and equally additionally the OnJump technique, with a little bit distinction that as a substitute of assigning the worth, we’re going to boost an occasion within the InputReader itself:
public void OnJump(InputAction.CallbackContext context)
{
  if (!context.carried out)
    return;

  OnJumpPerformed?.Invoke();
}
Discover that we return early from the operate if the context.carried out is false. With out that, the OnJumpPerformed occasion could be known as twice: as soon as once we press the spacebar and likewise once we launch it. We don’t need to soar once more after releasing the spacebar.
We additionally use a null conditional operator (?.) to skip over invoke when there’s no handler registered on the OnJumpPerformed occasion. In such a case, the item is null. In the event you want throwing an exception when no handler is registered on OnJumpPerformed, take away the operator, leaving simply OnJumpPerformed.Invoke();
Right here is your complete code of the InputReader.cs file:
utilizing System;
utilizing UnityEngine;
utilizing UnityEngine.InputSystem;

public class InputReader : MonoBehaviour, Controls.IPlayerActions
{
    public Vector2 MouseDelta;
    public Vector2 MoveComposite;

    public Motion OnJumpPerformed;

    non-public Controls controls;

    non-public void OnEnable()
    {
        if (controls != null)
            return;

        controls = new Controls();
        controls.Participant.SetCallbacks(this);
        controls.Participant.Allow();
    }

    public void OnDisable()
    {
        controls.Participant.Disable();
    }

    public void OnLook(InputAction.CallbackContext context)
    {
        MouseDelta = context.ReadValue<Vector2>();
    }

    public void OnMove(InputAction.CallbackContext context)
    {
        MoveComposite = context.ReadValue<Vector2>();
    }

    public void OnJump(InputAction.CallbackContext context)
    {
        if (!context.carried out)
            return;

        OnJumpPerformed?.Invoke();
    }
}
OnEnable and OnDisable strategies are known as when a recreation object on which the script is connected as a element is enabled and disabled respectively. Once we run our recreation, OnEnable is named as soon as proper after Awake. For extra info, see Order of execution for occasion capabilities in Unity documentation.
What’s essential right here is creating an occasion of the Management class, which Unity generated primarily based on Management.inputactions asset and Participant motion map. Discover how the names match and the way we cross the occasion of this (InputReader) to the SetCallbacks technique. Listen additionally to once we Allow and Disable the motion map.
Establishing a Participant
For our Participant recreation object, we want a rigged humanoid mannequin with idle, run, soar, and fall animations. Obtain this Spacesuit.fbx mode made by Quaternius and all animations (.anim recordsdata) from right here.
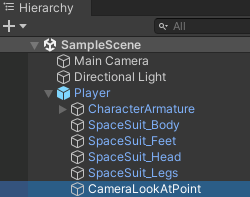
Transfer .fbx and all .anim recordsdata someplace contained in the Belongings folder in your venture. Then, drag and drop Spacesuit.fbx into your scene and rename the Spacesuit recreation object within the Hierarchy tab to the Participant.
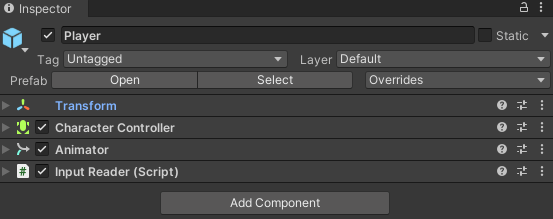
Preserve the Participant recreation object chosen and within the Inspector tab, add Character Controller, Animator, and our InputReader as parts.
Earlier than we proceed to the following part, right-click within the Hierarchy tab, and from the context menu add 3D Object > Dice. Transfer this dice under the participant and alter its scale to create some floor. If you want, it’s also possible to add some extra cubes and construct a couple of platforms from them.
Establishing Character Controller
A Character Controller element permits us to do motion constrained by collisions with out having to cope with a rigidbody, as said within the Unity documentation. Which means we have to arrange its collider, which is visualized within the Scene tab as a inexperienced wireframe capsule.
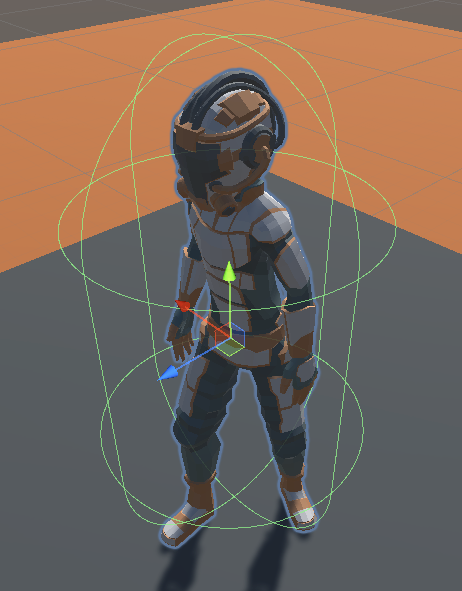
For this explicit character mannequin, the nice values for the collider place and form are Middle X: 0, Y: 1, Z: 0.12, Radius 0.5, and Top 1.87. You’ll be able to hold the opposite properties on their default values.

Now right-click on the Participant within the Hierarchy and choose Create Empty; this may create an empty recreation object with only a Remodel element as a toddler object of the Participant. Rename it to CameraLookAtPoint and set within the Inspector its Y-position to 1.5. You’ll see why we try this proper within the subsequent part.
Establishing Cinemachine
Cinemachine is a really highly effective Unity package deal. It lets you create, amongst different issues, a free-look comply with digicam with superior options like impediment avoidance completely within the editor UI, with none coding. And that’s precisely what we’re going to do now!
Proper-click within the Hierarchy tab and add Cinemachine > FreeLook Digital camera. The CMFreeLook object that has been added to our scene shouldn’t be a digicam itself, however somewhat a driver for the Fundamental Digital camera. Within the runtime, it units the place and rotation of the primary digicam.
Whereas the CMFreeLook object is chosen, drag and drop from the Hierarchy tab to the Inspector tab, below the CinemachineFreeLook element, our Participant to the Observe property and its youngster object CameraLookAtPoint to Look At.
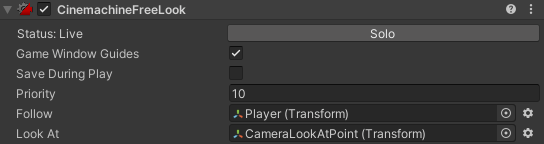
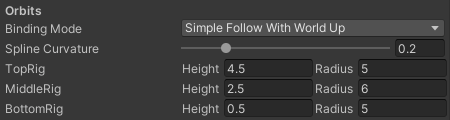
Now scroll down and arrange values for prime, center, and backside digicam rigs. Set the TopRig Top to 4.5 and Radius to 5, MiddleRig to 2.5 and 6, and BottomRig to 0.5 and 5.
Discover within the Scene view, that there are three crimson circles round our participant linked vertically with a spline when CMFreeLook is chosen. These circles are the highest, center, and backside rigs.
The vertical spline is a digital rail for the digicam, which can slide up and down once we transfer our mouse vertically, and your complete spline will rotate round these circles when shifting the mouse horizontally.
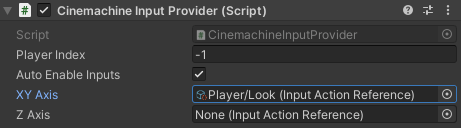
And with the brand new Enter System, it’s tremendous straightforward to attach these mouse inputs with the digicam. All you must do is so as to add the Cinamechine Enter Supplier element to the CMFreeLook object and assign Participant/Look (Enter Motion Reference) from our Management.inputactions asset to the XY Axis property.
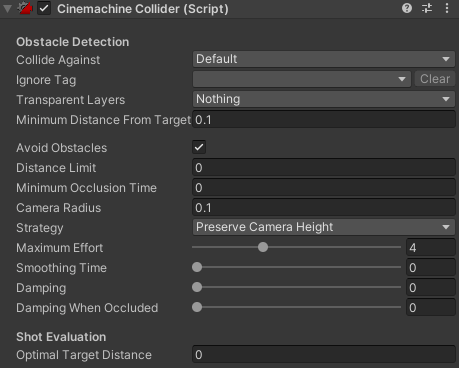
To complete the Cinemachine setup, add the final element to CMFreeLook: the Cinemachine Collider. It will make the digicam keep away from obstacles as a substitute of clipping by way of. You’ll be able to hold all its values as they’re.
And that’s our participant digicam arrange with Cinemachine, completely with out coding. In the event you play the sport now, you need to have the ability to rotate the digicam across the participant utilizing the mouse or the left stick on a gamepad.
Nevertheless, that is actually simply the tip of the iceberg. Sensible individuals from Unity Applied sciences invested a variety of time into this package deal, and you may learn extra about it within the Cinemachine part on the Unity web site.
Establishing the Animator
The very last thing we have to do earlier than we begin constructing our customized state machine from scratch within the subsequent part is to arrange an animator.
Within the Animator, we’re going to create one Mix Tree for clean transitions between Idle and Transfer animations and add two standalone animations for Leap and Fall.
In the event you’ve been working with Animator in Unity earlier than, you most likely know this Animator can also be a state machine, however you is perhaps stunned that we gained’t add any transitions between Mix Tree and the animations. That could be a legitimate strategy right here as a result of later we’re going to provoke transitions amongst these animations in our personal state machine.
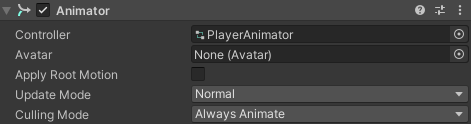
First, we have to create an Animator Controller asset. Proper-click within the venture tab and choose Cinemachine > Animator Controller. Title this new asset PlayerAnimator.
Now choose within the Hierarchy tab our Participant recreation object and within the Inspector, drag the asset to the Controller slot of the Animator element.
Now, within the menu bar go to Window > Animation > Animator. In the event you haven’t downloaded animation recordsdata (.anim) already, obtain them now.
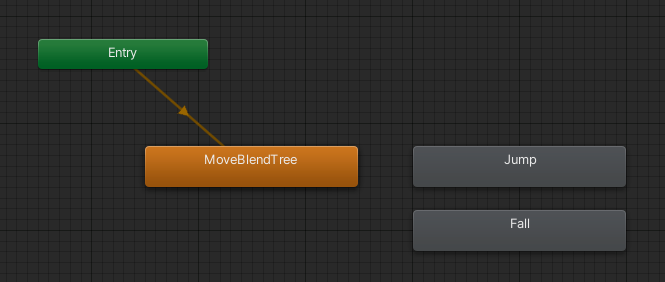
Let’s begin by creating a mix tree for transitions between Idle and Transfer animations. Proper-click contained in the griddled house within the Animator window and choose Create State → From New Mix Tree.
That is our first state and Unity routinely marked it because the default one with the orange shade. Once we run the sport, the Animator instantly units the present state to this. It’s additionally illustrated within the UI with the orange arrow pointing from Entry to our Mix Tree state.
Choose the Mix Tree state and within the Inspector tab, rename it to MoveBlendTree. Watch out to not make any typos and title it precisely as you see right here, a good suggestion could be to repeat and paste the title from right here, as a result of later we’re going to reference it from in code by this title.
Within the left panel of the Animator window, change from the Layers to Parameters tab, click on on the plus image, choose float as the kind of the parameter and title the brand new parameter MoveSpeed. Once more, be sure the title is appropriate, for a similar cause as with the title of the mix tree.

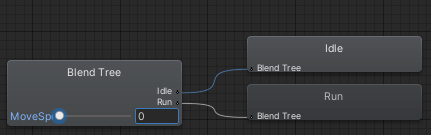
Now double-click on the MoveBlendTree, which opens one other layer. Then choose the gray field labeled as Mix Tree (it also needs to have a slider labeled as MoveSpeed and an enter field with 0 in it) and within the Inspector click on on the little plus image below the empty checklist of motions and click on on Add Movement Area.
Do it as soon as extra to get one other slot after which drag and drop from the downloaded animations (.anim recordsdata) the Idle into the primary one and the Run to the second.
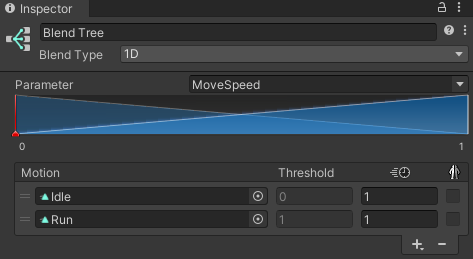
Mix bushes are all about combining extra animations right into a remaining animation. Right here we now have two animations and one parameter MoveSpeed. When the MoveSpeed is 0, the ultimate animation is all Idle and no Run. When MoveSpeed is 1, then it will likely be the precise reverse. And with the worth of 0.5, the ultimate animation would be the mixture of each, 50% of Idle and 50% of Run.
Think about you’re standing nonetheless after which you must run someplace. There’s a particular motion you must do to transition from standing nonetheless to operating, proper? That’s precisely what we’re going to make use of this Mix Tree for once we’ll be setting the worth of MoveSpeed from our code within the subsequent part.
In the intervening time, we’re virtually executed with the Animator. We simply want so as to add standalone animations for leaping and falling. That’s a lot simpler — return from MoveBlendTree to Base Layer and simply drag and drop Leap and Fall animations onto the Animator window.
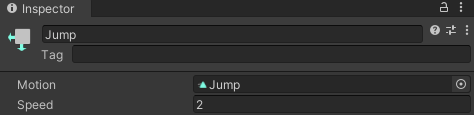
I’ve made the Leap animation purposely too gradual, so you may see how one can tweak the velocity of any animation in Unity. Click on on the Leap animation within the Animator window and within the Inspector, change the worth of the Pace property from 1 to 2. The animation can be performed twice as quick.
Constructing a state machine
Till now, we’ve spent more often than not within the Unity editor. The ultimate a part of this tutorial can be all about coding. As I wrote at first, we’re going to make use of one thing known as the state sample, which is carefully associated to state machines.
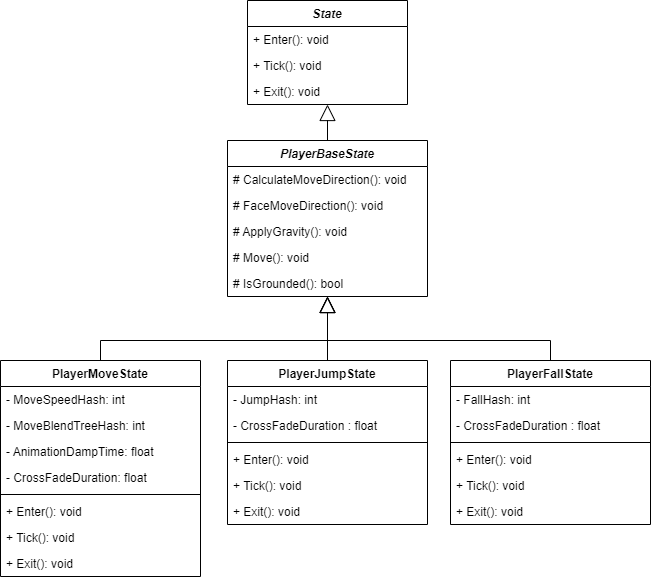
To start out, we’re going to put in writing a pure summary State class (a category that has solely summary strategies with no implementations and no knowledge). From this class, we inherit an summary PlayerBaseState class and supply concrete strategies with logic helpful in concrete states that may inherit from this class.
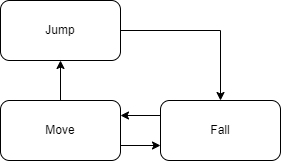
These can be our states: PlayerMoveState, PlayerJumpState, and PlayerFallState. They every will implement Enter, Tick, and Exit strategies otherwise.
All lessons, the relations amongst them, their members, and strategies are illustrated within the following UML class diagram. The members of concrete states like CrossFadeDuration, JumpHash, and others are for transitions between animations.
The state machine itself will include two lessons. The primary one can be StateMachine. This class will inherit from MonoBehavior and can have core logic for switching states and executing their Enter, Exist, and Tick strategies.
The second class can be PlayerStateMachine; this one will inherit from StateMachine and thus not directly additionally from MonoBehavior. We’re going to connect PlayerStateMachine as one other element to our Participant recreation object. That’s why we want it to be a MonoBehavior.
The PlayerStateMachine can have public references to different parts and different members we’ll use in states by way of state machine cases we’ll cross from states.
If that is new to you and also you’re confused, don’t fear — look carefully on the following diagram and the earlier one, pause, and give it some thought for some time. In the event you’re nonetheless confused, simply proceed and I’m certain you’ll wrap your head round it when you’ll be writing the code.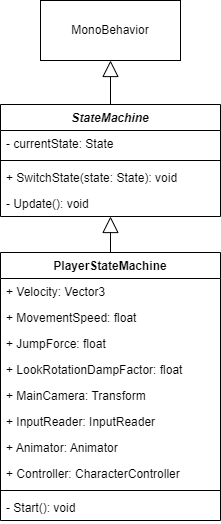
Effectively, sufficient concept, let’s get coding! Create a brand new C# script and title it State. It will likely be tremendous easy. The whole code is simply this:
public summary class State
{
    public summary void Enter();
    public summary void Tick();
    public summary void Exit();
}
Now add the StateMachine class, which is the category that along with the State class kinds the essence of the state sample:
utilizing UnityEngine;

public summary class StateMachine : MonoBehaviour
{
    non-public State currentState;

    public void SwitchState(State state)
    {
        currentState?.Exit();
        currentState = state;
        currentState.Enter();
    }

    non-public void Replace()
    {
        currentState?.Tick();
    }
}
You’ll be able to see the logic could be very easy. It has one member, the currentState of sort State, and two strategies, one for switching states whereas calling the Exit technique on the present state earlier than switching to a brand new one after which calling Enter now on the brand new state.
The Replace technique comes from MonoBehavior and it’s known as by the Unity engine as soon as per body, thus the Tick technique of the at the moment assigned state can be additionally executed each body. Listen additionally to the utilization of the null conditional operator.
One other class we’re going to implement would be the PlayerStateMachine. You is perhaps asking why making a PlayerStateMachine and never utilizing the StateMachine itself as a element of our Participant.
The explanation behind this, and partially additionally behind a PlayerBaseState as a direct guardian of different states somewhat than the State itself, lies in reusability. The state machine could be helpful sometimes additionally for enemies.
Enemies would use the identical core state sample logic, however their states would have totally different dependencies and logic. You don’t need to combine them with dependencies and logic for the participant.
For enemies, you’d implement totally different EnemyStateMachine and EnemyBaseState as a substitute of PlayerStateMachine and PlayerBaseState, however the core concept behind it as being states of a state machine could be the identical.
Nevertheless, that might be outdoors the scope of this tutorial, so let’s get again to our participant and add the PlayerStateMachine class:
utilizing UnityEngine;

[RequireComponent(typeof(InputReader))]
[RequireComponent(typeof(Animator))]
[RequireComponent(typeof(CharacterController))]
public class PlayerStateMachine : StateMachine
{
    public Vector3 Velocity;
    public float MovementSpeed { get; non-public set; } = 5f;
    public float JumpForce { get; non-public set; } = 5f;
    public float LookRotationDampFactor { get; non-public set; } = 10f;
    public Remodel MainCamera { get; non-public set; }
    public InputReader InputReader { get; non-public set; }
    public Animator Animator { get; non-public set; }
    public CharacterController Controller { get; non-public set; }

    non-public void Begin()
    {
        MainCamera = Digital camera.essential.remodel;

        InputReader = GetComponent<InputReader>();
        Animator = GetComponent<Animator>();
        Controller = GetComponent<CharacterController>();

        SwitchState(new PlayerMoveState(this));
    }
}
Utilizing the RequireComponent attributes shouldn’t be obligatory, however it’s follow. The PlayerStateMachine as a element on the Participant recreation object wants InputReader, Animator, and CharacterController parts to be connected to the Participant as effectively.
Not having them would end in a runtime error. With the RequireComponent attribute, we are able to catch the eventual situation sooner, in compile time, which is usually higher. Plus Unity editor will routinely add all required parts to a recreation object while you add one that’s embellished like this and likewise prevents you from by accident eradicating them.
Discover how we assign references to required parts utilizing the GetComponent technique within the Begin technique. The Begin is named as soon as when Unity masses a scene. Within the Begin technique, we additionally assign a reference to the Remodel element of the primary digicam, so we are able to in participant states entry its place and rotation.
From states, we’ll be accessing all these members by way of PlayerStateMachine. That’s why we cross a reference to the this occasion once we create a brand new PlayerMoveState occasion whereas passing it as an argument to the SwitchState technique.
You may say the PlayerMoveState is the default state of the PlayerStateMachine and we but have to implement it, however earlier than we do, we’re first going to implement its guardian, the PlayerBaseState class:
utilizing UnityEngine;

public summary class PlayerBaseState : State
{
    protected readonly PlayerStateMachine stateMachine;

    protected PlayerBaseState(PlayerStateMachine stateMachine)
    {
        this.stateMachine = stateMachine;
    }

    protected void CalculateMoveDirection()
    {
        Vector3 cameraForward = new(stateMachine.MainCamera.ahead.x, 0, stateMachine.MainCamera.ahead.z);
        Vector3 cameraRight = new(stateMachine.MainCamera.proper.x, 0, stateMachine.MainCamera.proper.z);

        Vector3 moveDirection = cameraForward.normalized * stateMachine.InputReader.MoveComposite.y + cameraRight.normalized * stateMachine.InputReader.MoveComposite.x;

        stateMachine.Velocity.x = moveDirection.x * stateMachine.MovementSpeed;
        stateMachine.Velocity.z = moveDirection.z * stateMachine.MovementSpeed;
    }

    protected void FaceMoveDirection()
    {
        Vector3 faceDirection = new(stateMachine.Velocity.x, 0f, stateMachine.Velocity.z);

        if (faceDirection == Vector3.zero)
            return;

        stateMachine.remodel.rotation = Quaternion.Slerp(stateMachine.remodel.rotation, Quaternion.LookRotation(faceDirection), stateMachine.LookRotationDampFactor * Time.deltaTime);
    }

    protected void ApplyGravity()
    {
        if (stateMachine.Velocity.y > Physics.gravity.y)
        {
            stateMachine.Velocity.y += Physics.gravity.y * Time.deltaTime;
        }
    }

    protected void Transfer()
    {
        stateMachine.Controller.Transfer(stateMachine.Velocity * Time.deltaTime);
    }
This class is a little bit bit longer than the earlier ones as a result of it accommodates all of the frequent logic for different states. I’m going to elucidate the logic from prime to backside, technique by technique, beginning with the constructor.
The constructor accepts the PlayerStateMachine after which assigns the reference to the stateMachine. Within the protected CalculateMoveDirection, we then calculate the route of participant motion primarily based on the orientation of the digicam and enter values from InputReader.MoveComposite, which is about by W, S, A, and D keys or the Left Stick on a gamepad.
Nevertheless, we don’t transfer the participant within the calculated route on this technique instantly. We set the Velocity x and z values to respective values of calculated route, multiplied by the MovementSpeed.
Within the FaceDirection technique, we rotate the participant so it’s at all times dealing with the route of motion, which is the route from Velocity, with the y worth zeroed, as a result of we don’t need our participant to be tilted up and down.
We set the rotation of the Remodel element of our participant by way of stateMachine as a result of we are able to get the reference to the Remodel element from another element on a recreation object, and PlayerStateMachine can be one in every of them.
The rotation worth itself is calculated utilizing Slerp and LookRotation strategies, that are offered by Unity as static strategies of the Quaternion class. A spherical interpolation is a operate that wants a begin and a goal rotation, and a t worth for interpolation.
We’re going to name CalculateMoveDirection and FaceMoveDirection from the Tick technique in PlayerMoveState, and to realize clean and framerate unbiased rotation, we cross our LookRotationDampTime multiplied by Time.deltaTime.
Within the ApplyGravity, if the Velocity y worth is bigger than Physics.gravity.y, we constantly add its worth multiplied by Time.deltaTime. The y worth of gravity is in Unity by default set to -9.81.
It will trigger the participant to be continually pulled to the bottom. You’ll see the impact within the PlayerJumpState and PlayerFallState, however we’re going to name this technique additionally in PlayerMoveState, to maintain the participant grounded.
The Transfer is the tactic the place we really transfer the participant utilizing its CharacterController element. We merely transfer the participant within the route of the Velocity multiplied by delta time.
Subsequent, we’re going so as to add the primary concrete state implementation, the PlayerMoveState:
utilizing UnityEngine;

public class PlayerMoveState : PlayerBaseState
{
    non-public readonly int MoveSpeedHash = Animator.StringToHash("MoveSpeed");
    non-public readonly int MoveBlendTreeHash = Animator.StringToHash("MoveBlendTree");
    non-public const float AnimationDampTime = 0.1f;
    non-public const float CrossFadeDuration = 0.1f;

    public PlayerMoveState(PlayerStateMachine stateMachine) : base(stateMachine) { }

    public override void Enter()
    {
        stateMachine.Velocity.y = Physics.gravity.y;

        stateMachine.Animator.CrossFadeInFixedTime(MoveBlendTreeHash, CrossFadeDuration);

        stateMachine.InputReader.OnJumpPerformed += SwitchToJumpState;
    }

    public override void Tick()
    {
        if (!stateMachine.Controller.isGrounded)
        {
            stateMachine.SwitchState(new PlayerFallState(stateMachine));
        }

        CalculateMoveDirection();
        FaceMoveDirection();
        Transfer();

        stateMachine.Animator.SetFloat(MoveSpeedHash, stateMachine.InputReader.MoveComposite.sqrMagnitude > 0f ? 1f : 0f, AnimationDampTime, Time.deltaTime);
    }

    public override void Exit()
    {
        stateMachine.InputReader.OnJumpPerformed -= SwitchToJumpState;
    }

    non-public void SwitchToJumpState()
    {
        stateMachine.SwitchState(new PlayerJumpState(stateMachine));
    }
}
The MoveSpeedHash and MoveBlendTreeHash integers are numerical identifiers of the MoveSpeed parameter and MoveBlendTree in our Animator. We’re utilizing a static technique from the Animator class StringToHash to transform strings into “distinctive” numbers.
I’ve put distinctive into quotes as a result of theoretically, a hash algorithm can produce the identical outcomes for 2 totally different enter strings. That’s one thing generally known as a hash collision. Right here it’s only a aspect observe, and you actually don’t have to fret about it. The prospect is extraordinarily small.
In the event you look down the place we set a float worth of our MoveSpeed parameter, stateMachine.Animator.SetFloat(MoveSpeedHash…, you may see how we use this hash to determine the title of the MoveSpeed parameter.
The explanation for not utilizing the string "MoveSpeed" instantly is as a result of evaluating integers is far more performant than evaluating strings. Though it’s potential to cross a string to Animator.SetFloat technique — and in our little instance it doesn’t make a lot of a distinction, comparatively talking — I needed you to point out the right, extra performant approach.
Let’s head again to the highest of the PlayerMoveState class. From the general public constructor, we cross stateMachine to the bottom constructor; that’s the constructor of the guardian class, the PlayerBaseState.
Then we now have the Enter technique, the one known as as soon as when the state machine units the state as the present state. Right here, we set the y worth of the Velocity vector to the y worth of Physics.gravity vector, as a result of we would like our participant to be continually pulled down.
Then we crossfade our Animator to MoveBlendTree state in a set time, which in our case leads to a clean transition between the autumn animation and a outcome animation of MoveBlendTree once we’ll be later switching from PlayerFallState again to PlayerMoveState.
We additionally register the SwitchToJumpState technique to the OnJumpPerformed occasion in our InputReader. Once we press the spacebar or South Button on a gamepad, SwitchToJumpState can be known as, which, as you may see on the very backside, within the physique of that operate, switches the state machine into a brand new PlayerJumpState.
Within the Exit operate, the one which is named earlier than the state machine switches the state to a brand new one, we merely unsubscribe that SwitchToJumpState technique from the occasion, to interrupt the connection between enter and motion.
That leaves us with the Tick technique, which is executed each body. First, we test if the participant is grounded. If not, the participant ought to begin falling, thus we instantly change our present state within the state machine to PlayerFallState, passing the stateMachine a constructor parameter.
If the participant is grounded, we name CalculateMoveDirection, FaceMoveDirection, and Transfer strategies from PlayerBaseState, the guardian class of this, and shortly additionally of the opposite two states, which we but have to implement.
We already understand how these strategies work from once we had been implementing them some time in the past. Right here we’re simply calling them, each body, time and again one after one other till the state is modified.
Lastly, we set the MoveSpeed parameter of our Animator based on the squared magnitude of MoveComposite from our InputReader.
We use squared magnitude as a result of we’re not within the precise worth; we simply have to know if the worth is 0 or not, and calculating the magnitude from squared magnitude requires an additional step, the sq. root. That is nearly squeezing a little bit little bit of efficiency, saving a couple of cycles each body, when the Tick technique is executed.
If the worth is 0, we set the MoveSpeed parameter additionally to 0, in any other case, we set it to 1, successfully transitioning in our MoveBlendTree from Idle to Run animation. The opposite parameters, AnimationDampTime and Time.deltaTime, make this transition clean and framerate unbiased.
We’re virtually executed; we simply have to implement the PlayerJumpState and PlayerFallState. Let’s begin with the latter:
utilizing UnityEngine;

public class PlayerJumpState : PlayerBaseState
{
    non-public readonly int JumpHash = Animator.StringToHash("Leap");
    non-public const float CrossFadeDuration = 0.1f;

    public PlayerJumpState(PlayerStateMachine stateMachine) : base(stateMachine) { }

    public override void Enter()
    {
        stateMachine.Velocity = new Vector3(stateMachine.Velocity.x, stateMachine.JumpForce, stateMachine.Velocity.z);

        stateMachine.Animator.CrossFadeInFixedTime(JumpHash, CrossFadeDuration);
    }

    public override void Tick()
    {
        ApplyGravity();

        if (stateMachine.Velocity.y <= 0f)
        {
            stateMachine.SwitchState(new PlayerFallState(stateMachine));
        }

        FaceMoveDirection();
        Transfer();
    }

    public override void Exit() { }
}
You’ll be able to see at first look that this one is way easier. On the prime, we now have our hash for Leap string, the title of the standalone animation for leaping within the Animator, and we cross the stateMachine occasion by way of constructors. That is nothing new for us.
Within the Enter technique, other than crossfading the animation to the Leap, equally, as we crossfaded within the PlayerMoveState, we set Velocity to a new Vector3 that has the identical x and z values and the present velocity, however the y worth is about to the JumpForce.
Then, within the Tick technique, once we name the Transfer, our Participant is pulled up as a result of the Velocity y worth is now constructive, however we additionally name ApplyGravity so its worth is slowly decreased each body, and as soon as it will get to 0 or under, we change to the PlayerFallState.
FaceMoveDirection shouldn’t be obligatory right here; it’s somewhat beauty. Personally, I discover it nicer when the participant at all times faces the route of shifting even whereas leaping.
What’s obligatory is offering overwrites of all summary strategies of an summary guardian class until the kid class can also be summary, which it isn’t, so we now have to offer an implementation for the Exit technique, even when it doesn’t do something.
If you consider it, it is smart: what could be known as from the SwitchState technique on currentState.Exit() whereas exiting from this state?
We’re getting actually shut now to the whole implementation, and the final state, PlayerFallState, is even the most straightforward one:
utilizing UnityEngine;

public class PlayerFallState : PlayerBaseState
{
    non-public readonly int FallHash = Animator.StringToHash("Fall");
    non-public const float CrossFadeDuration = 0.1f;

    public PlayerFallState(PlayerStateMachine stateMachine) : base(stateMachine) { }

    public override void Enter()
    {
        stateMachine.Velocity.y = 0f;

        stateMachine.Animator.CrossFadeInFixedTime(FallHash, CrossFadeDuration);
    }

    public override void Tick()
    {
        ApplyGravity();
        Transfer();

        if (stateMachine.Controller.isGrounded)
        {
            stateMachine.SwitchState(new PlayerMoveState(stateMachine));
        }
    }

    public override void Exit() { }
}
This time, within the Enter technique, we crossfade into the Fall standalone animation and we’re setting the preliminary Velocity worth to 0 on the y axis. Then within the Tick technique, we name ApplyGravity and Transfer, which pulls our participant down till it hits the bottom and we change the state to PlayerMoveState once more.
And that’s it. Our third-person controller primarily based on a state machine that permits our participant to transition by way of transfer, soar, and fall states is completed.
The very last thing we have to do is to return to the Unity editor and use it by including the StateMachine.cs script as a element to the Participant recreation object.

The entire Unity venture from this tutorial is obtainable for you on GitHub.
Conclusion
In the event you’re a newbie with Unity and this was your first encounter with most or all of what we’ve coated and also you managed to get it working, effectively executed! Pat your self on the again, as a result of that’s not a small achievement and also you’ve discovered loads.
Aside from the state sample, we’ve seen the observer sample, we discovered tips on how to work with the brand new Unity Enter System, tips on how to use Cinemachine, and Animator, and likewise tips on how to work with the CharacterController element.
And most significantly, we’ve seen tips on how to put all this collectively to construct an simply extendable third-person participant controller. Talking of extendability, I’d like to depart you a small problem ultimately. Attempt to implement a PlayerDeadState by yourself.
A touch for the problem: create a HealthComponent class with a Well being property, connect it to the Participant recreation object and retailer a reference to it within the PlayerStateMachine. Then use the observer sample. When the Well being property reaches zero, invoke an occasion that switches the state to the PlayerDeadState from any state.
LogRocket proactively surfaces and diagnoses a very powerful points in your apps and web sites

1000’s of engineering and product groups use LogRocket to cut back the time it takes to know the basis explanation for technical and value points. With LogRocket, you’ll spend much less time on back-and-forth conversations with clients and take away the limitless troubleshooting course of. LogRocket lets you spend extra time constructing new issues and fewer time fixing bugs.
Be proactive – strive LogRocket right now.
