
To discover hundreds of ECG recordings on Physionet

On this publish, I’ll share the method of constructing an interactive dashboard (app) in Plotly Sprint to discover a large on-line dataset. We shall be utilizing electrocardiogram (ECG) recordings from the Icentia11k database on Physionet [1,2], used with permission. The intention of this publish is to assist inexperienced persons construct their first dashboard, while motivating extra skilled readers to construct dashboards for large on-line datasets like Physionet.
The app we’ll be constructing is presently hosted on Heroku — test it out right here (it might take a minute besides up). The supply code for the app is offered at this Github repository, in addition to code for sequential variations of the app proven on this article.
This publish is organised as follows:
- Motivation: the electrocardiogram (ECG) as big-data
- First steps: capabilities for loading and plotting information
- Sprint boilerplate code: operating our first app
- Including elements: figures
- Including elements: dropdown menus
- Dashboard structure
- Callback capabilities: getting app elements to speak to 1 one other
- Internet hosting our app for the world to see!
The electrocardiogram (ECG) is a handy, non-invasive strategy to monitor coronary heart well being. With the arrival of wearable units, ECGs might be taken for a number of days at a time, permitting an unprecedented quantity of information to be collected.
How a lot information, precisely? A typical ECG is recorded at round 250Hz (i.e. 250 measurements per second). If a affected person wears a monitor for 7-days straight, the monitor will generate 7*24*60*60*250=151,200,000 information factors!
Physionet has a public database of multi-day ECG recordings from 11,000 sufferers, made accessible by the corporate Icentia. Now we’re on the order of 10¹² information factors. I believe it’s honest to say this places us into the realm of “massive information”.
Plotting such a large quantity of information straight is impractical. The ECG plotted over a single hour, not to mention a complete week, returns a wall of ink:
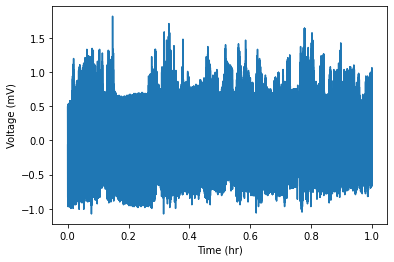
That is the place interactive visualisations come in useful. They permit us to seamlessly zoom and pan throughout totally different sections of the document. On this means, we are able to view ECG behaviour anyplace within the document, however on the extra acceptable time scale of seconds versus hours. Integrating this right into a dashboard, we are able to then add different options akin to dropdown packing containers to pick out between totally different sufferers. Furthermore, we are able to add different panels to view options of the affected person apart from the ECG. If this sounds fascinating, please learn on as we construct a (minimal) dashboard to discover affected person coronary heart dynamics within the Physionet database.
Earlier than we create the dashboard, we must always write down capabilities to load and current the info as we wish to see it on our dashboard. For those who’d wish to observe together with the code, arrange a digital surroundings in a brand new listing (utilizing e.g. venv) and set up the Python packages numpy, pandas, plotly, sprint, and wfdb. This may be achieved with
Now create a Python script known as app.py and import the packages as follows
The Physionet database accommodates ECG information in two types: 1) the uncooked sign and a pair of) beat annotations. We are going to show each on our dashboard.
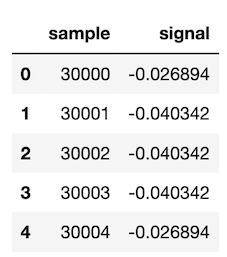
Loading the uncooked ECG sign. The database accommodates 11,000 sufferers, with every affected person having round 50 segments of ECG. Making use of the Python package deal wfdb, we are able to write a operate to load ECG information for a particular affected person, phase, and time interval:
For instance, let’s load the ECG of affected person 18, phase 0, between minutes 2 and three:
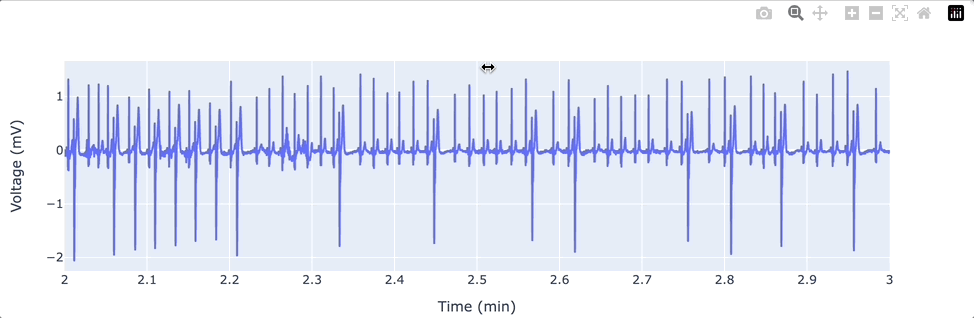
This retrieves the ECG information from Physionet with a one-liner! We now desire a operate to create an interactive visualisation of this information in Plotly:
Executing this operate with fig = make_ecg_plot(df_ecg) now produces an object that can develop into a element of our dashboard. To view this determine it can save you it with fig.write_html('my_fig.html') and open it in an online browser. You need to see one thing like this:
As now we have seen, an ECG plot turns into very dense once we wish to view it over very long time intervals. It turns into extra handy to focus solely on beat annotations:
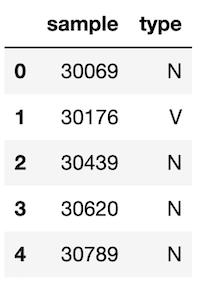
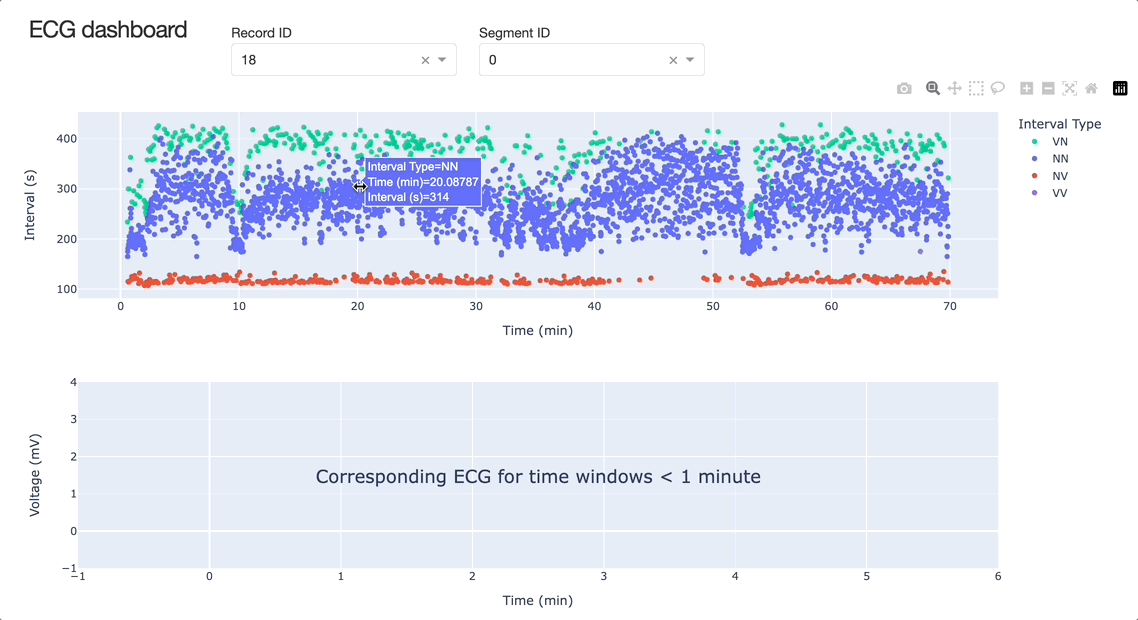
Loading beat annotations. These information comprise the time of incidence and sort of every coronary heart beat within the document. We are going to limit our focus to regular sinus beats (labelled ’N’) and untimely ventricular complexes (labelled ‘V’). As earlier than, we write a operate to load this information:
Let’s load the identical part of ECG as earlier than. This time obtain the beat sort that happens at a particular pattern quantity:
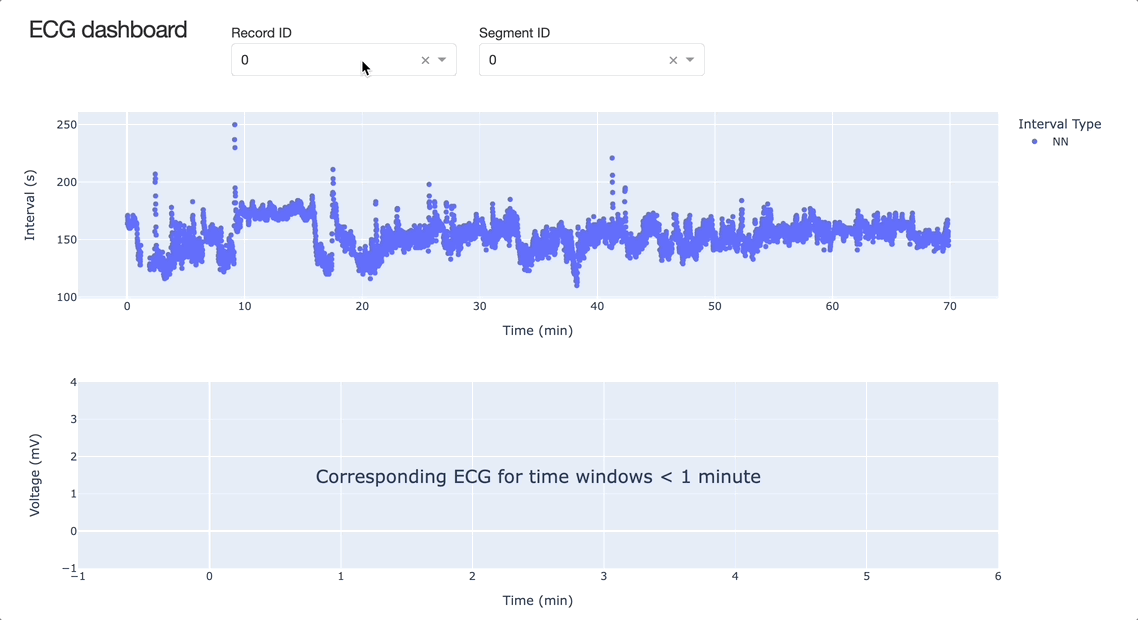
We’ll visualise this information by plotting the time elapsed between consecutive beats:
Now operating make_beat_interval_plot(df_beats) returns the next determine, which corresponds to the uncooked ECG determine proven earlier:
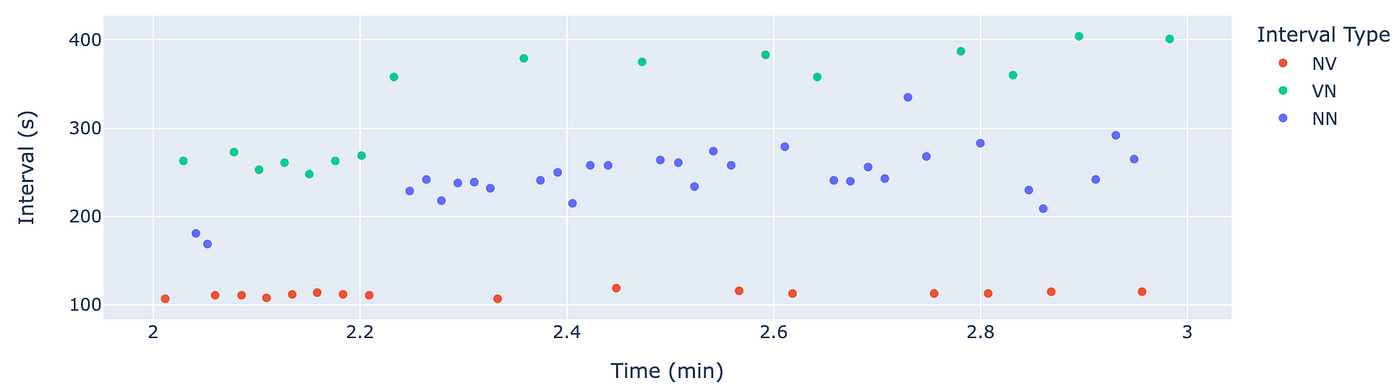
Word that this plot accommodates a lot much less information. We are going to due to this fact use this sort of plot to scan ECGs over very long time intervals, and use the uncooked ECG plot proven earlier to research coronary heart dynamics that happen over shorter time intervals.
Now that now we have capabilities to extract and plot our information, it’s time to begin really constructing the app!
We’ll use the next boilerplate code as a place to begin:
The external_stylesheets property permits us to make use of a pre-defined CSS configuration. We are going to use the Sprint Styleguide supplied by Chris Parmer.
For those who save this Python script as app.py and run it with python app.py, it’s best to see the message
Sprint is operating on http://127.0.0.1:8050/
Now go to http://127.0.0.1:8050/ in your net browser and it’s best to see the textual content ‘My Dashboard’. If that’s the case, you’ve obtained a dashboard up and operating! It’s now time to begin constructing it up.
We’ll start by including the figures we made earlier. For now, we’ll make the figures for a default affected person and phase quantity (finally we will change this with callback capabilities, which we’ll outline later). This default affected person shall be displayed when the consumer first boots up the app.
We’ve now made the determine objects, however with a view to a present a determine on a Sprint app, now we have to place it inside a content material divider (Div) within the app.structure . The order during which we record our elements is the order during which they may seem on the app. We additionally assign an id to every determine, which can develop into essential once we get to callback capabilities.
Placing the code collectively to date (app_v1.py) and operating it ought to produce an app that appears like the next:
There are a lot of choices accessible for dropdown menus in Sprint. The important thing issues to specify are the id, the default worth, and naturally, the choices.
The next code would create a dropdown field with choices starting from 0–10999, which can be utilized to pick out the affected person quantity in our database.
Word now we have taken the default worth to be affected person 0, which is in keeping with our default figures earlier.
Identical to figures, the dropdown menus are thought-about elements of the app and have to be positioned in a Div. We are going to embody a title for the dropdown menu utilizing an additional html element. The complete Div seems to be like
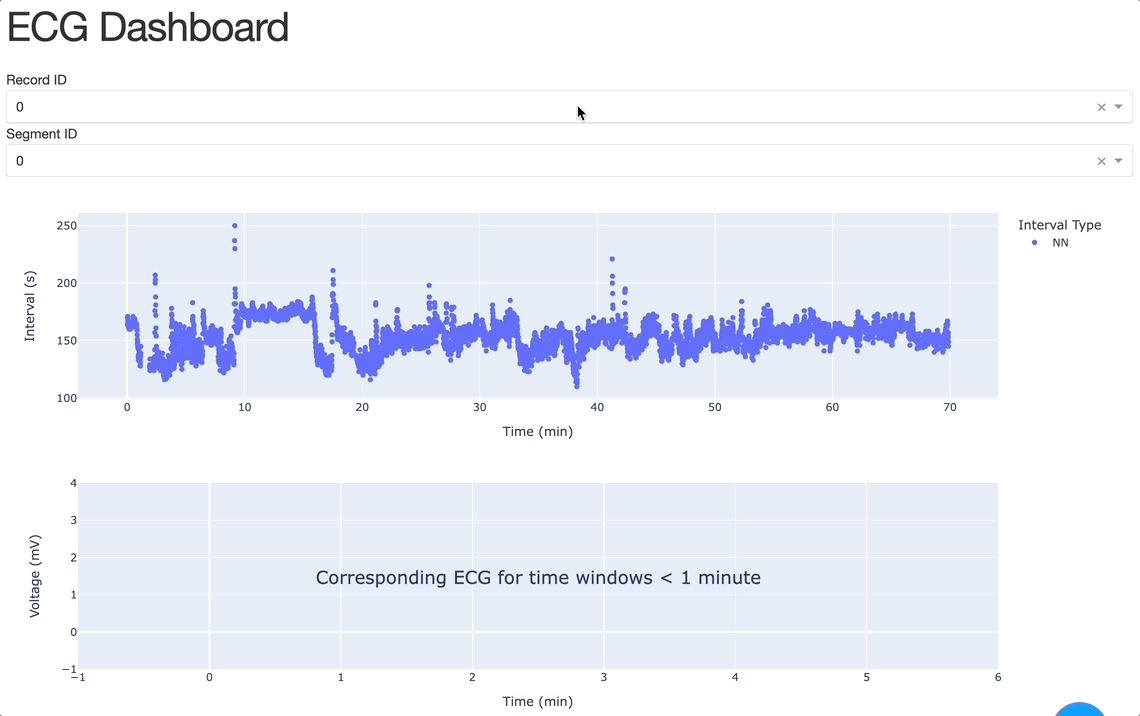
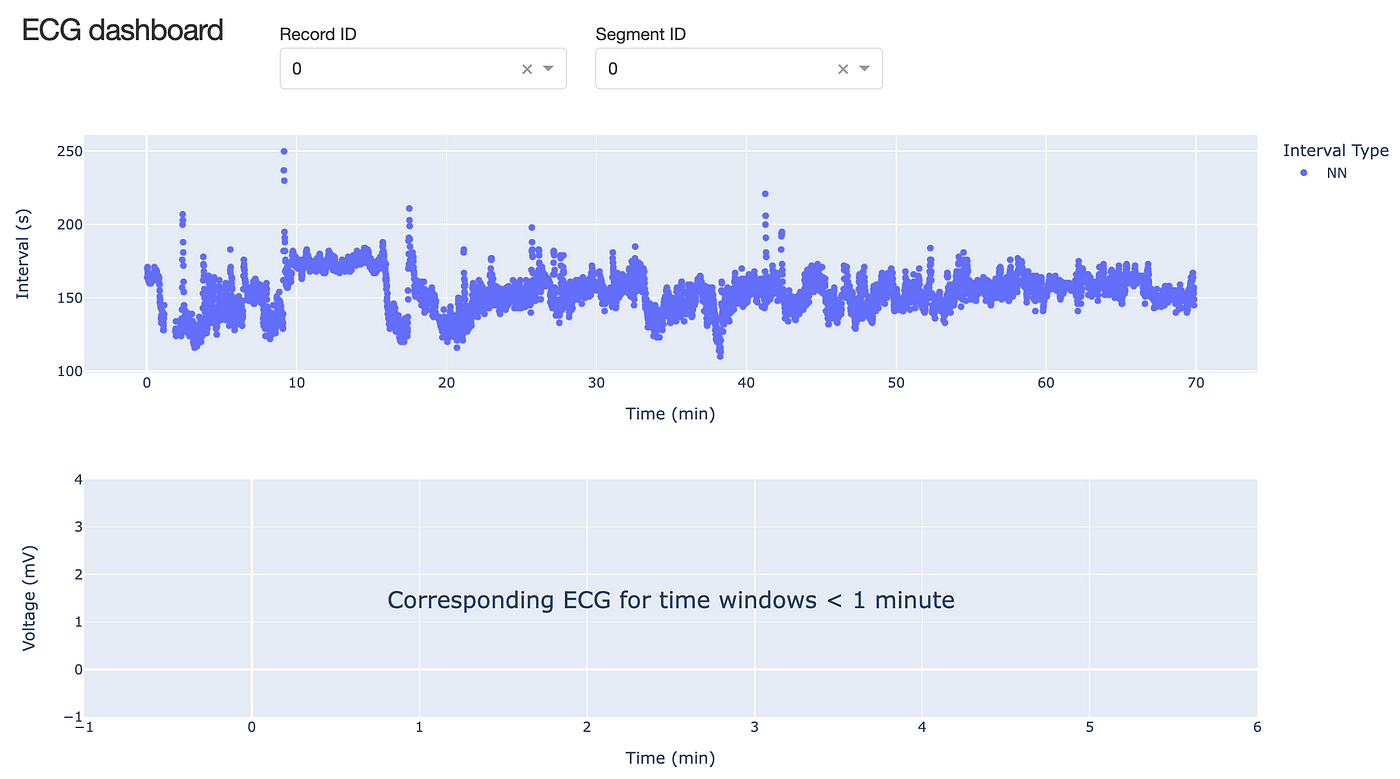
We are able to create an analogous Div containing a dropdown menu for the phase variety of the ECG. Itemizing these Divs inside our app.structure, provides an up to date model of the app (app_v2.py), which seems to be like this:
The present structure of our app isn’t preferrred. The dropdown menus are unnecessarily broad and poorly positioned. Thankfully, we are able to modify the structure properties of every Div utilizing the type property. This takes in any quantity CSS property/worth pairs, of which there are many.
For this app, we’ll alter the peak, width and padding of the Divs to reorganise the structure. They are often assigned as an absolute worth, or as a share based mostly on the scale of the customers display.
Let’s place the title and two dropdown menus on the identical degree on the high of the app. We are going to set the width of the title Div to 200px, which is sufficiently broad to comprise the textual content, and the width of the dropdown Divs to twenty% the width of the customers display. We are going to set a hard and fast top of 60px. The choice 'show’:’inline-block’ places the dividers inline.
Our app.structurenow seems to be like this:
Making this adjustment to the code (app_v3.py ) produces an app that appears like this:
Now we’ve obtained the structure sorted, let’s begin connecting the totally different elements of our app. At the moment the dropdown menus are disconnected from the remainder of the app. It’s time to introduce callback capabilities.
Callback capabilities are some of the highly effective options of dashboards. They permit a consumer to acquire dwell updates to the dashboard as they work together with it.
When writing a callback operate, one wants to consider carefully about what the Enter and the Output of the operate must be. For instance, a change to the worth in one among our dropdown menus must be mirrored in our plots. Right here, the Enter could be the brand new worth within the dropdown menu, and the Output could be the plot.
Callback capabilities are listed after app.structure. Their fundamental construction is as follows:
The half inside @app.callback is called the operate decorator. It hyperlinks the enter and output of the operate to elements of the app utilizing their related id and property.
The output_id and input_id are the IDs that we already set for every element of our app. For instance, the ID of our dropdown menu for the sufferers is 'dropdown_patient_id'.
The input_property and output_property are the properties of that element that we want to seize. Widespread examples embody 'worth' for choosing the worth of a dropdown menu and 'determine' for choosing a Plotly determine object. We can even see 'relayoutData' for particularly capturing the present structure of a Ploty determine.
For extra particulars on callback capabilities, try the Sprint tutorial.
For our app, we’ll write two callback capabilities. The primary will join the dropdown menus beat interval plot. The second will join the structure of the beat interval plot to the ECG plot.
i) Callback operate for modifications within the dropdown menus
When a consumer modifications the worth in one among our dropdown menus, we wish the beat interval plot to replace accordingly. This can contain loading the suitable information from Physionet after which creating the plot. That is what the callback operate will do.
What’s the enter and output for this callback operate? Effectively, our enter is the 'worth' coming from the dropdown menu with ID 'dropdown_record_id' or ID 'dropdown_segment_id'. The output goes to be the 'determine' property of our determine with ID 'fig_intervals'.
Subsequently the callback decorator (the bit earlier than the operate) is
Now to write down the operate — that is principally implementing capabilities now we have already written. Given a affected person ID, we want to load the suitable information from Physionet, after which make the beat interval plot:
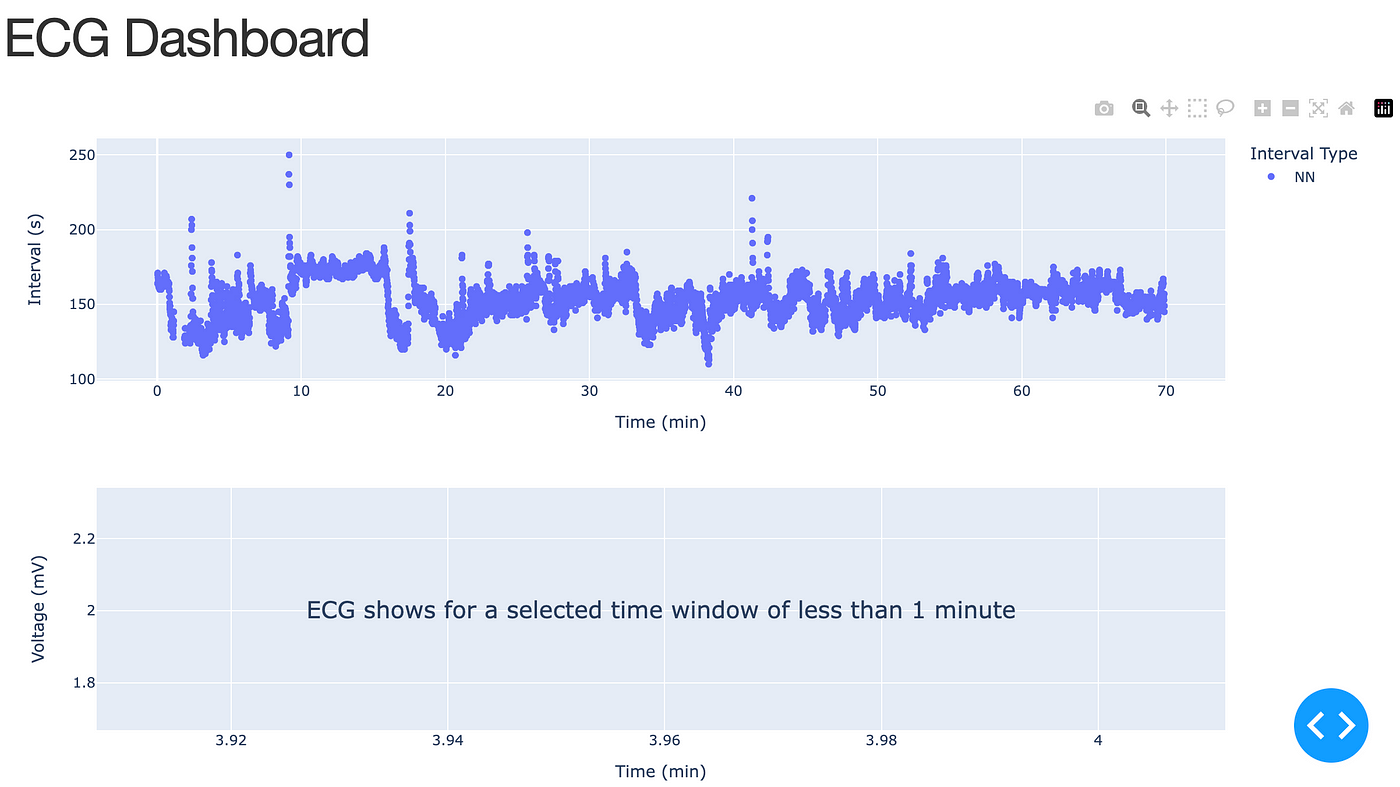
Working the app now (app_v4.py), we see that updating the dropdown menus has the specified impact — we are able to now view the beat interval plot for any of the 11,000 sufferers on this database!
ii) Callback operate for modifications in plot structure
Lastly we’re going to deliver the ECG plot into the image. We wish this plot to show when the consumer selects a small enough time window within the beat interval plot. So we’ll write a callback operate that detects modifications within the structure information of the beat interval plot.
This structure information is obtained from the property 'relayoutData' of a Plotly determine. This callback operate can even require the present values within the dropdown menus with a view to load the suitable ECG information. The decorator for this operate is due to this fact
When this operate is triggered, we wish it to load and plot the ECG information supplied:
- The set off was as a result of a change within the bounds of the x-axis of
fig_intervals. - The brand new bounds lead to a time window lower than 1 minute lengthy
If the set off was as a result of different clicks (akin to altering the dropdown menus or different structure choices), we are able to use exceptions.PreventUpdate() to ‘cancel’ the callback operate. That is integrated (with sure nuances I received’t go into) within the operate under:
Working the app with this new callback operate (app_v5.py ), we’re now in a position to have a look at the ECG plot for time home windows shorter than 1 minute:
With this callback operate, the app solely hundreds the high-resolution ECG information when it’s really helpful to look at (over brief time intervals), saving on processing time.
We are able to run our app regionally for private use no drawback. Nevertheless, because it stands it’s not straightforward to share with collaborators until they’re keen to arrange their very own digital surroundings and run it by means of Python. The great thing about these Sprint apps is that we are able to host them, making them accessible to anybody with an web connection!
We are going to host our app with Heroku, a cloud platform who present free internet hosting non-commercial apps. Right here, I’ll take you thru the steps to get this app hosted which observe these directions supplied by Sprint.
- Join for an account with Heroku — it has a free tier!
2. Set up the Heroku CLI. This enables us to work together with Heroku from our command line.
3. Make a clear listing in your app.py file, and initialise it as a git repository with
git init
4. Create a digital surroundings and activate it. We are going to use the venv module to create a digital surroundings known as venv.
python -m venv venv
supply venv/bin/activate
5. Set up app dependencies. It’s a good suggestion to first replace pip with
pip set up --upgrade pip
As now we have seen, our app requires the next Python packages:
pip set up numpy
pip set up pandas
pip set up plotly
pip set up sprint
pip set up wfdb
We additionally require the gunicorn package deal, which permits all these Python processes to run on the Heroku servers.
pip set up gunicorn
6. Create a necessities.txt file. The Python packages we simply put in and their dependencies must be listed in a necessities.txt file. This may be achieved with the command
pip freeze > necessities.txt
7. Create a .gitignore file. This means which information we are not looking for git to trace. We are able to create and open the file with
contact .gitignore
open .gitignore
Now enter the next strains for the information we won’t observe:
venv
*.pyc
.DS_Store
.env
8. Create a Procfile. That is required for deployment. Create the file and open it utilizing
contact Procfile
open Procfile
and enter the next textual content
net: gunicorn app:server
You need to now have a listing that accommodates app.py, necessities.txt, .gitignore, Procfile, and venv. If that’s the case, you’re prepared ship this app to Heroku!
9. Create Heroku app. Create a brand new app with the Heroku CLI with the command
heroku create ecg-dashboard-medium
the place ecg-dashboard-medium is the title of your app. For those who head over to your Heroku apps, it’s best to now see your app listed.
10. Commit modifications and push the git repository to Heroku. That is achieved with
git add .
git commit -m "Our first deployment to Heroku"
git push heroku essential
Close to the top of the terminal output, it’s best to see
https://ecg-dashboard-medium.herokuapp.com/ deployed to Heroku
That’s the URL in your app! For those who go to it it’s best to see your app up and operating.
Congratulations for making it to the top! On this publish, now we have seen methods to construct and deploy a dashboard in Plotly Sprint from begin to end. This concerned writing capabilities to load and plot our information, incorporating our figures as elements of our app, setting the structure, writing callback capabilities, and eventually, deploying our app to a public server. I encourage you to go and construct your personal app now — good luck!
Thanks to Icentia for offering permission for the Icentia11k dataset for use for this publication. All photographs until in any other case famous are by the writer.
[1] Tan, S., Ortiz-Gagné, S., Beaudoin-Gagnon, N., Fecteau, P., Courville, A., Bengio, Y., & Cohen, J. P. (2022). Icentia11k Single Lead Steady Uncooked Electrocardiogram Dataset (model 1.0). PhysioNet.
[2] Goldberger, A., Amaral, L., Glass, L., Hausdorff, J., Ivanov, P. C., Mark, R., … & Stanley, H. E. (2000). PhysioBank, PhysioToolkit, and PhysioNet: Parts of a brand new analysis useful resource for advanced physiologic alerts. Circulation [Online]. 101 (23), pp. e215–e220.
