
This weblog describes the steps required so as to add a steady integration and steady supply (CI/CD) pipeline to an present bucket in Amazon Easy Storage Service (Amazon S3) on the Amazon Net Providers (AWS) Cloud.
This weblog makes use of GitHub as a supply supplier. The pipeline is initiated when new gadgets are dedicated, and the adjustments are then mirrored within the S3 bucket.
The Weblog will cowl the creation of an AWS Account to Routinely deploy the static web site from Github to S3 utilizing AWS CodePipeline.
Clarification about Instruments
-
AWS CodePipeline – A steady supply service you should use to mannequin, visualize, and automate the steps required to launch your software program. You may shortly mannequin and configure the completely different levels of a software program launch course of.
CodePipeline automates the steps required to launch your software program adjustments repeatedly. -
Amazon S3 – A extremely scalable object storage service. It may be used for a variety of storage options, together with web sites, cell purposes, backups, and knowledge lakes.
Stipulations and limitations
Stipulations
- An lively AWS account
- Information of Amazon S3 and AWS CodePipeline
- A static web site
- A GitHub repository
Limitations
- This course of is really helpful for displaying read-only content material. It is not really helpful for accumulating or transferring delicate info, as a result of Amazon S3 makes use of the HTTP protocol.
- Web sites constructed utilizing PHP, JSP, or APS.NET will not be supported, as a result of Amazon S3 does not assist server-side scripts.
Structure:

Step 1: AWS Account Creation
Create an AWS Account by signing up from right here: aws.amazon.com
Step 2: Account Signal Up
After Profitable Signup, Login to the Console
Step 3: S3 Bucket Creation
Go to the Amazon S3 bucket and create a brand new S3 Bucket for internet hosting/importing content material. S3 is a world service therefore distinctive bucket identify is required.
Enter a Distinctive DNS-Compliant identify, globally distinctive as a result of the namespace is shared by all AWS Accounts.
Select both the default AWS Area or choose a particular Area for the place your bucket will likely be primarily based.

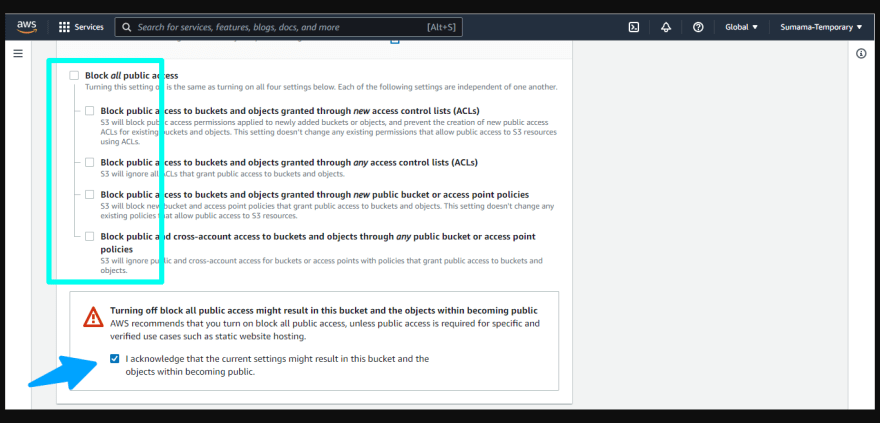
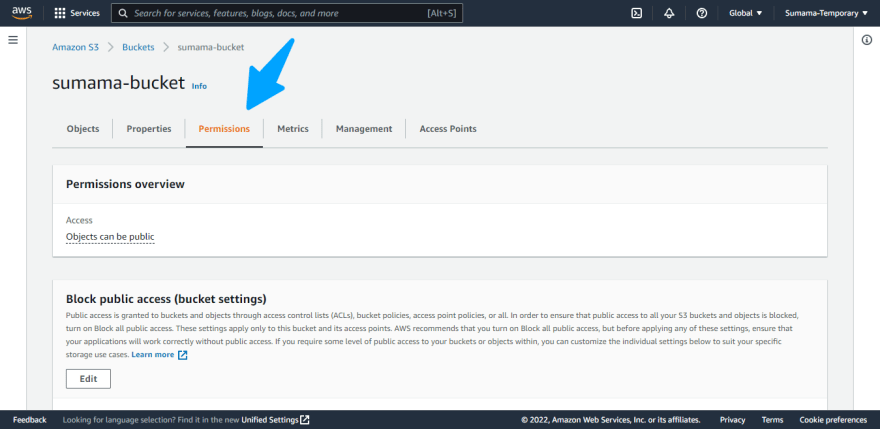
Set Permissions by permitting public entry to your bucket by selecting Permissions after which selecting Edit. Select Off for Block all public entry. By default, this test field is chosen for safety functions. Select Save and evaluation the data earlier than selecting to Create a bucket. This closes the pop-up and creates the bucket.
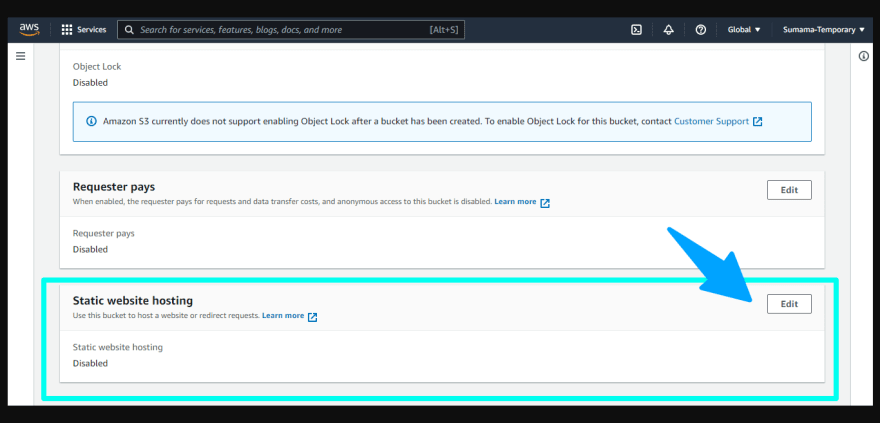
Step 4: Configuration of S3 Bucket for Static Web site Internet hosting
The subsequent step is configuring the Bucket for static web site internet hosting.
Within the S3 Console, choose by clicking the bucket you simply created.
Within the Properties tab for the S3 bucket, select Static web site internet hosting by clicking edit.
Choose “Allow” from Static Web site Internet hosting.
Choose “Host a static web site” from the Internet hosting kind.
Specify file names and extensions for the house web page and error web page (for instance, index.html and error.html). Be sure that the basis folder incorporates these information and that they function touchdown pages.
Click on Save Modifications.

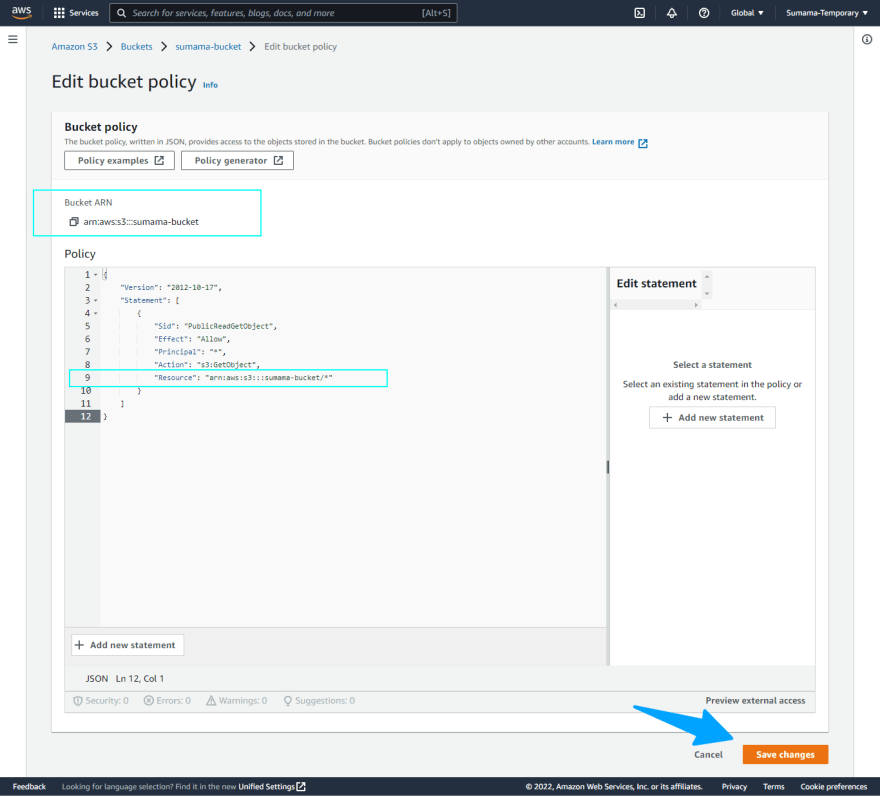
Step 5: Including the Bucket Coverage
Create a bucket coverage in order that different AWS purposes can entry and carry out actions in your bucket. Within the Permissions tab, select Bucket coverage.
Within the Bucket Coverage editor, paste the bucket coverage supplied the right here:
Make sure that to Change “arn:aws:s3:::instance.com/” together with your BUCKET ARN. Make sure that /* is on the finish of your Bucket ARN in commas
{
    "Model": "2012-10-17",
    "Assertion": [
        {
            "Sid": "PublicReadGetObject",
            "Effect": "Allow",
            "Principal": "*",
            "Action": [
                "s3:GetObject"
            ],
            "Useful resource": [
                "arn:aws:s3:::example.com/*"
            ]
        }
    ]
}
Click on Save to use the Coverage
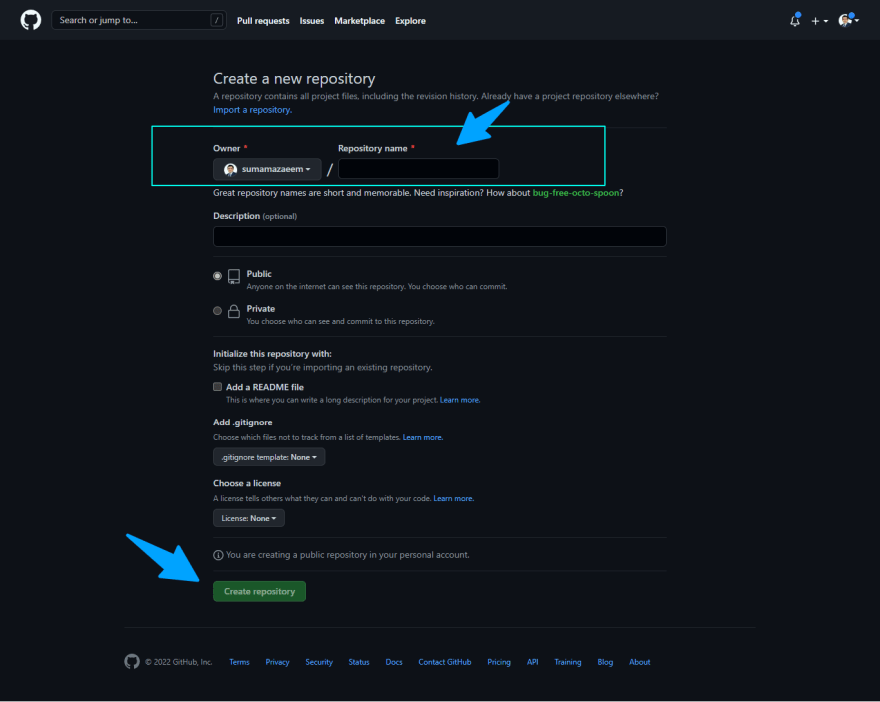
Step 6: Making a GITHUB Repository
Create a repository and push your preliminary object or add the file to it. (e.g. HTML file and so forth) to the repository.
Keep in mind which department you’re utilizing, for simplicity, I’ll use the principle department.
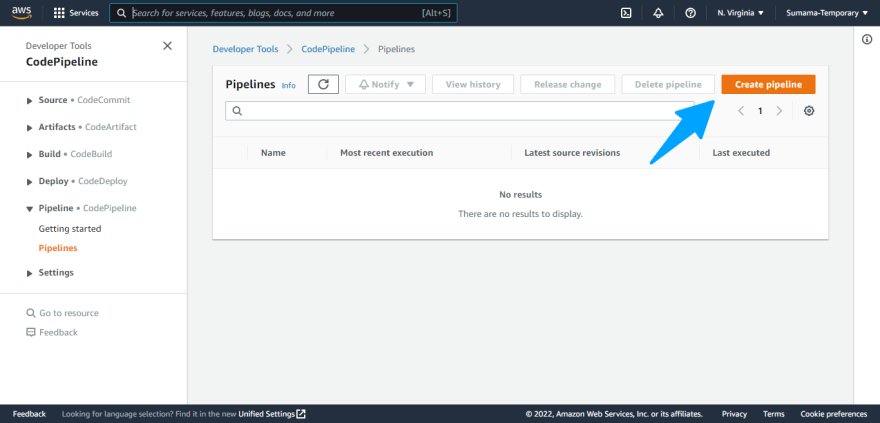
Step 7: Creating the Pipeline
Sign up to the AWS Administration Console and open the AWS CodePipeline console. Select Create pipeline.
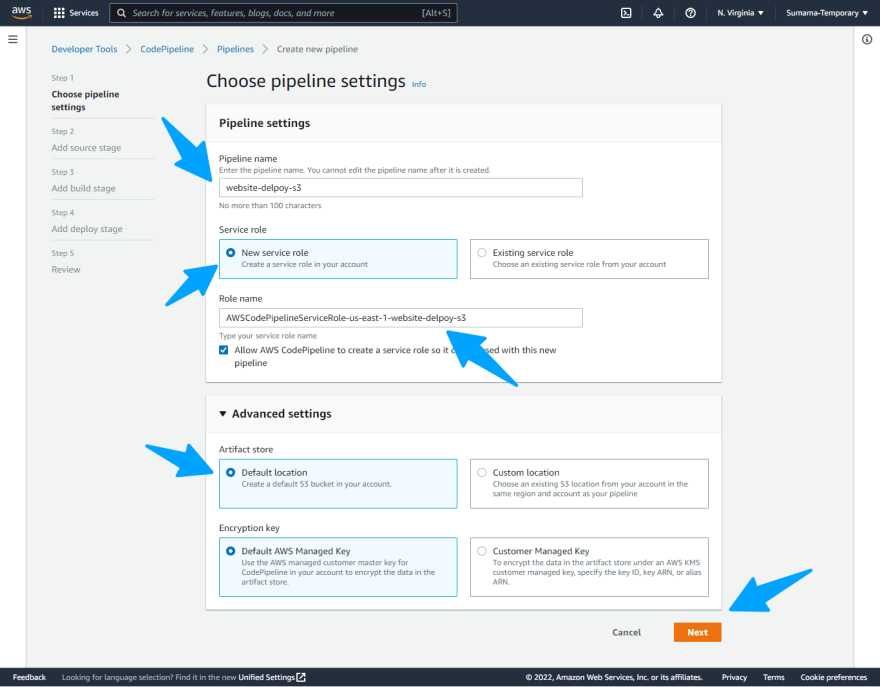
Give the pipeline a helpful identify corresponding to website-delpoy-s3
Choose New service position corresponding to: AWSCodePipelineServiceRole-us-east-1-website-delpoy-s3
Artifact retailer: Select the Default location choice
Click on Subsequent to proceed to the subsequent phase
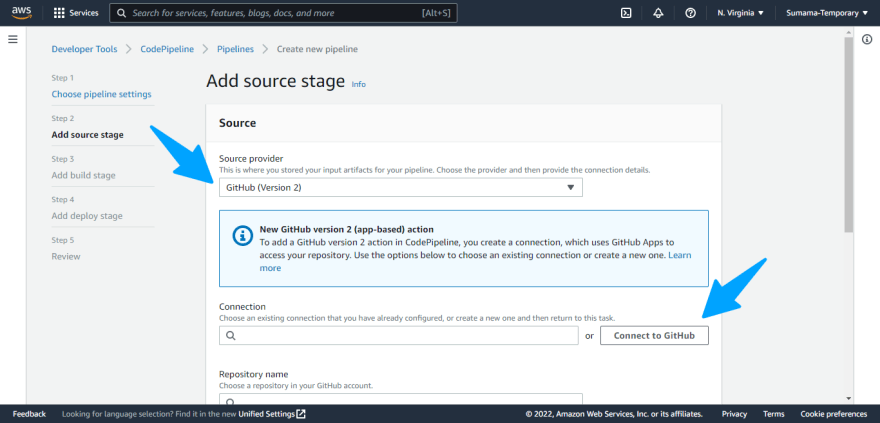
Step 8: Including the Supply Stage
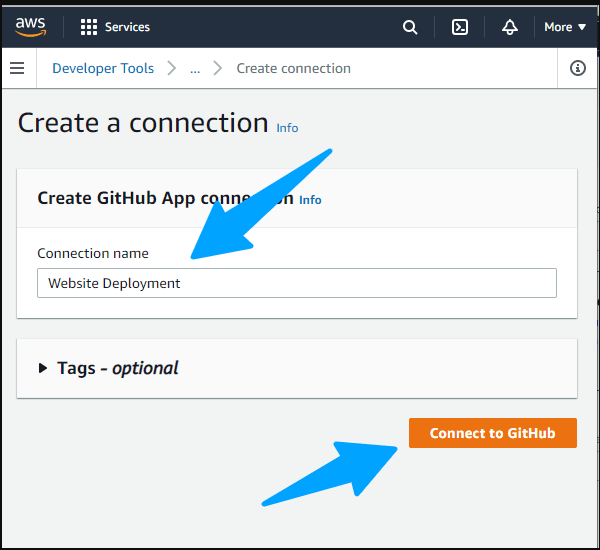
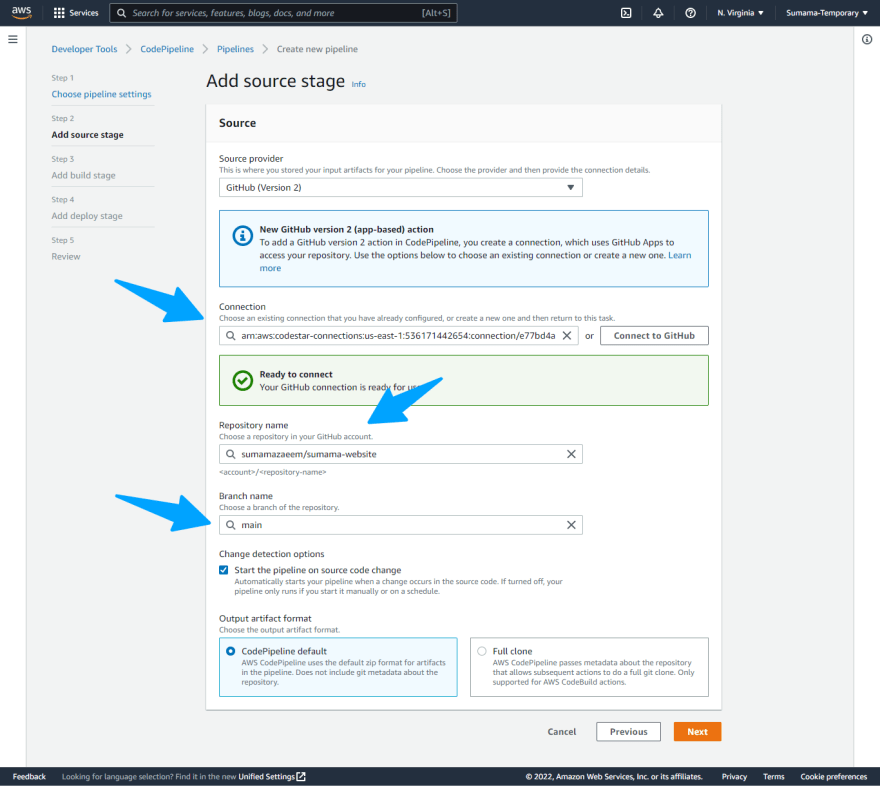
Choose Github Model 2 from the supply supplier.
Click on Hook up with Github to proceed Subsequent.
Write the identify of the connection. Click on Join.
Choose the apps if accessible or click on set up a brand new app and connect with the Github.
After a Profitable connection,
Choose the repository identify, the department(I’m utilizing the principle one), retaining different choices default, click on subsequent.
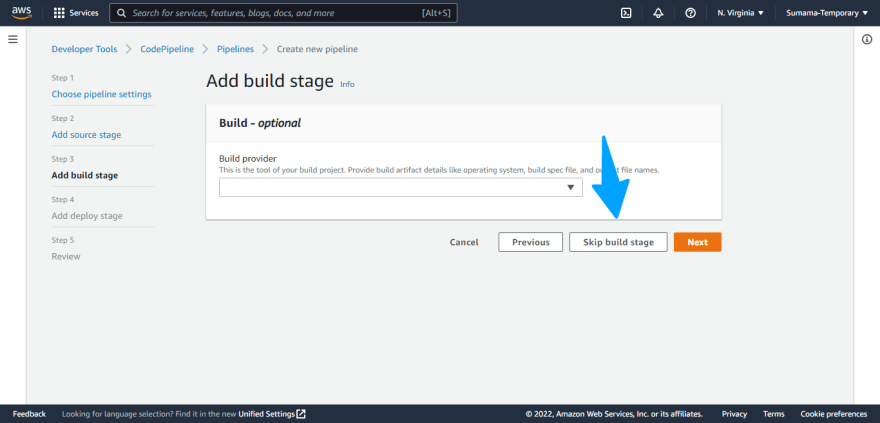
Step 9: Construct Part
Skip the Construct part. You need to use AWS Codebuild to compile typescript or any mission that should construct earlier than deploying. We skip this as a result of the repo incorporates static web site content material.
Step 10: Deploy Stage
Choose the Deploy supplier: Choose Amazon S3
Bucket: Choose the bucket configured for the static web site.
Extract file earlier than deploying: You will need to test this as a result of the code pipeline compresses the artifact.
No extra configurations are wanted. Hit the Subsequent button.

You may return and alter the configuration should you made any mistake on the Evaluate step. Hit the Create Pipeline button.
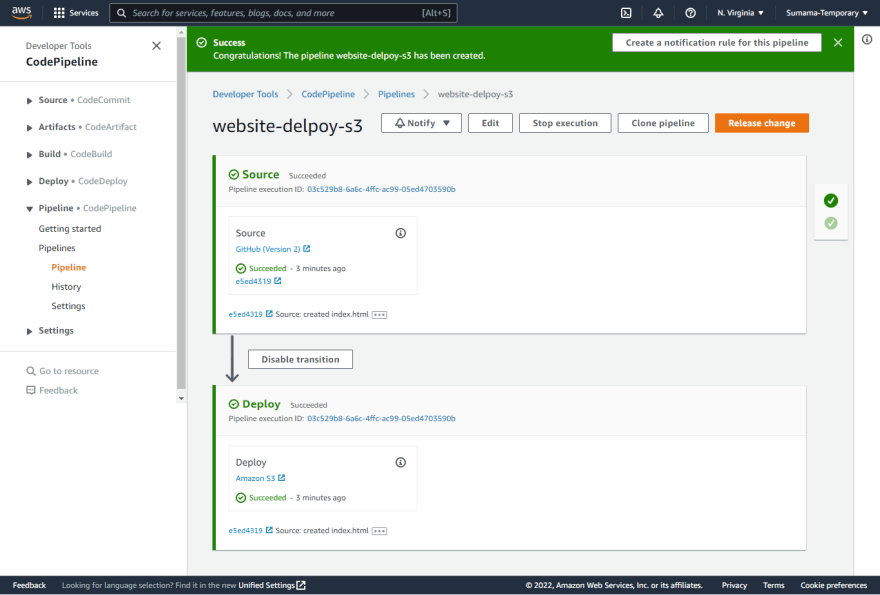
In case your pipeline was created efficiently, you’ll obtain two inexperienced ticks on each Supply and Deploy.
Time to check in case your pipeline works.
Push a file to GitHub and CodePipeline ought to decide it up and deploy these additions/updates and deploy that on the S3 bucket, mechanically.
This pipeline will price solely $1 per 30 days and prices provided that a deployment occurred.
Cleanup: Delete the pipeline you simply created.
Observe Sumama Zaeem on LinkedIn
