I had a child in the beginning of the 12 months.
Maintain for applause
Effectively, not me personally, however my spouse did.
I solely let you know this with a view to let you know that I took an image of my spouse each week that she was pregnant.
We thought possibly it’d be attention-grabbing to look again at these photos at some point. She wore the identical outfit and confronted the identical path for every image, though the background often modified. In an try to be much less neurotic about issues in my life, I intentionally didn’t use a tripod or attempt to get the image from the very same angle and distance.
In the long run, a baby was born, and I instantly forgot about stated photos as a result of who cares about such issues at 4 within the morning?
Effectively, a while has handed, and the child’s sleeping by the evening.
Maintain for applause
I now have some free time and thought it’d be cool to make an animation of these being pregnant photos. Given my photographic imperfectionism, I wanted to crop, rotate, and align the photographs for the animation. In fact, I didn’t wish to do that manually. How lengthy might it take to automate?
…
Clearly, it took for much longer to automate than to do manually, however now I get to speak about how I made this video utilizing Differentiable, Semantic Picture Registration with Kornia.
Notice: As with most of my weblog posts, I wrote this one in a jupyter pocket book. I’m going to reference a bundle referred to as alignimation within the code. That is only a small library I made to accommodate my code and make this weblog publish extra readable.
Photograph Ops
To know the issue at hand, let’s take a look at two completely different photographs that I wish to align:
%config InlineBackend.figure_format = 'retina'

from pathlib import Path

import alignimation
import kornia as Okay
import matplotlib.pyplot as plt
import torch
import torch.nn.purposeful as F
imgs = alignimation.io.load_images(Path("body_pics"))
fig, axs = plt.subplots(1, 2)
axs[0].imshow(Okay.tensor_to_image(imgs[0]))
axs[1].imshow(Okay.tensor_to_image(imgs[22]))
axs[0].axis("off")
axs[1].axis("off")
fig.tight_layout()
None
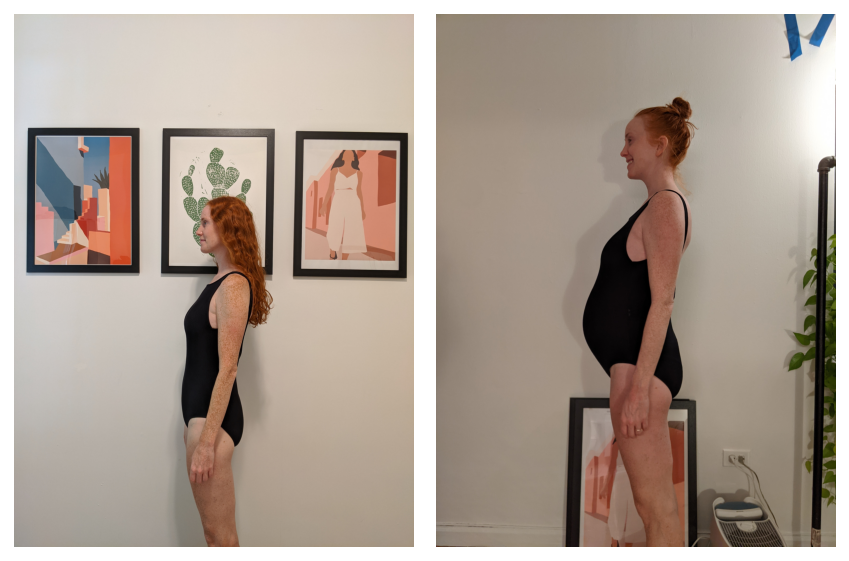
The aim right here is to change both image in such a approach that the our bodies are registered with one another. You can think about a number of completely different operations that one might carry out on the picture to make this occur: you possibly can shift the picture in a path, you possibly can zoom in or out, and you may rotate the picture. (You can additionally do different believable issues like shear the picture, however we’ll ignore these operations).
A picture is a 3D matrix (or tensor in fashionable phrases). There’s a peak and width dimension for every pixel, after which 3 channel dimensions (crimson, inexperienced, and blue).
print(kind(imgs[0]))
print(imgs[0].form)
<class 'torch.Tensor'>
torch.Measurement([1, 3, 4032, 3024])
On this planet of linear algebra, the operations that we wish to carry out are well-known matrix transformations: translation, scaling, and rotation. These might be achieved purely in numpy or with a bunch of different libraries.
So nice, we will work out easy methods to remodel the photographs, however how a lot can we remodel every picture?
Differentation by Differentiation
A pair years in the past, I gave a discuss at SciPy about all of the non deep studying explanation why deep studying frameworks are thrilling. A kind of causes is automated differentiation: so long as you possibly can specific your “mannequin” utilizing the deep studying framework, then you possibly can optimize all kinds of goal features with out having to put in writing any calculus.
Getting again to our automated picture registration drawback, if I can
- Outline my picture transformations utilizing a deep studying framework
- Provide you with an goal perform that describes how registered two photographs are
then I can optimize that goal perform with a view to discover the optimum picture transformation parameters.
In direction of the tip of that discuss I gave, I point out how it will be actually nice if we rebuilt all kinds of particular function libraries on high of deep studying frameworks in order that we get the good thing about automated differentiation, together with all kinds of different issues like GPU speedups.
kornia is strictly a type of libraries that I hoped could be constructed. kornia offers most of the options of “classical” laptop imaginative and prescient libraries like OpenCV and the MATLAB Picture Processing Toolbox, nevertheless it’s constructed on high of PyTorch. Crucially, the entire picture transformations in kornia are differentiable PyTorch modules.
What’s the Goal?
A easy goal perform to optimize could be absolutely the (L1) distinction between each pixel of two completely different photographs. When the photographs are aligned, the pixels would presumably have related values. Thus, we might reduce this goal perform.
Whereas I used to be engaged on this undertaking, a brand new model of kornia was launched which had performance for precisely this: the ImageRegistrator module learns a mannequin of picture transformations with a view to reduce the L1 loss between two photographs.
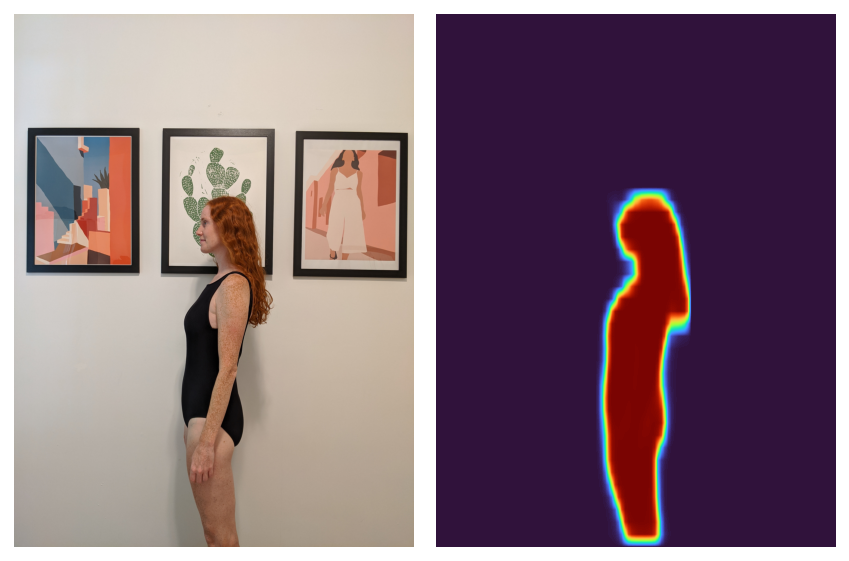
Whereas this may work for my use case, I used to be nervous that the background of my photographs would intervene with optimizing the alignment of my spouse. Fortunately, since we’re already utilizing PyTorch, we will use torchvision to simply pick the physique in a picture.
from torchvision.fashions.detection import maskrcnn_resnet50_fpn

segmentation_model = maskrcnn_resnet50_fpn(
    pretrained=True, progress=False
)
segmentation_model = segmentation_model.eval()
person_index = (
    alignimation.constants.COCO_INSTANCE_CATEGORY_NAMES.index("particular person")
)
masks = alignimation.base.get_segmentation_masks(
    torch.cat([imgs[0], imgs[22]]),
    segmentation_model,
    "cpu",
    person_index
)
fig, axs = plt.subplots(1, 2)
axs[0].imshow(Okay.tensor_to_image(imgs[0]))
axs[1].imshow(
    Okay.tensor_to_image(masks[0]), cmap=plt.get_cmap("turbo")
)
axs[0].axis("off")
axs[1].axis("off")
fig.tight_layout()
None
Now that we will pick the physique, the recipe is:
- Create the “segmentation masks” akin to the physique within the picture.
- Match an
ImageRegistratorto align the segmentation masks. - Use the skilled
ImageRegistratorto register the precise picture.
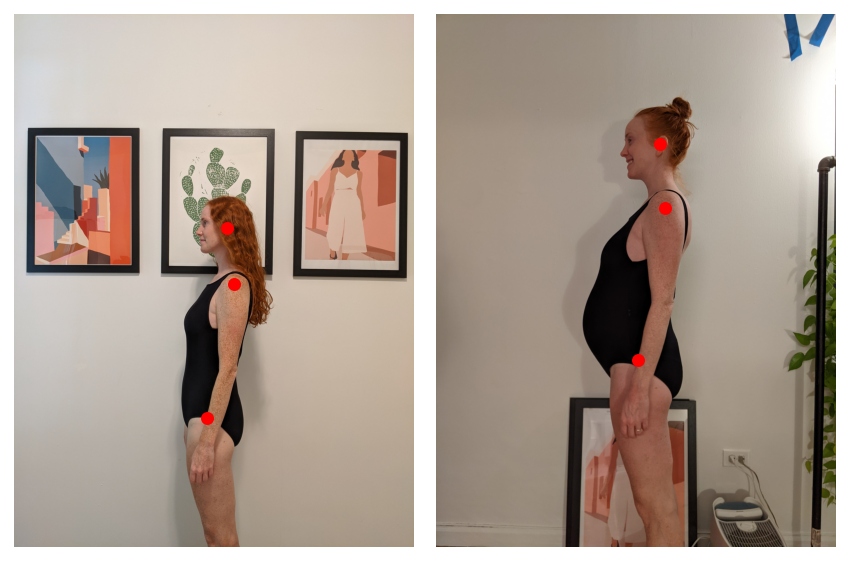
Bear in mind once I stated I used to be attempting to be much less neurotic? Sadly, that each one went out the window once I began writing code. I nervous that my spouse’s altering physique would have an effect on the alignment of the segmentation masks as the middle of mass will get pulled to the le– I imply, because the child grows. Additionally, my spouse’s hair is usually up and typically down, and the segmentation masks contains the hair.
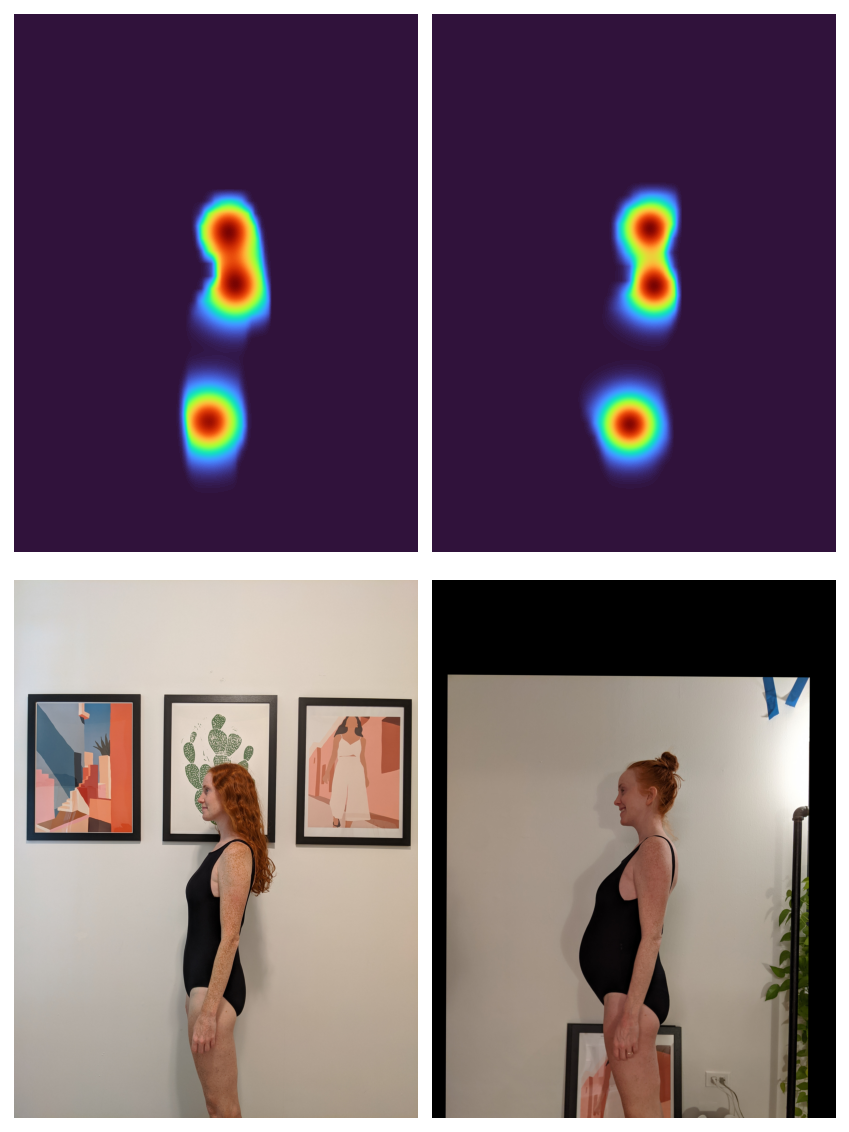
The best way to align simply the physique and neither the newborn nor the hair? Once more, torchvision to the rescue. Utilizing a keypoint mannequin, we will pick the left ear, shoulder, and hip.
from torchvision.fashions.detection import keypointrcnn_resnet50_fpn
keypoint_model = keypointrcnn_resnet50_fpn(
    pretrained=True, progress=False
)
keypoint_model = keypoint_model.eval()
keypoint_names = ["left_ear", "left_shoulder", "left_hip"]
keypoint_indices = [
    alignimation.constants.BODY_KEYPOINT_NAMES.index(k)
    for k in keypoint_names
]
keypoints = alignimation.base.get_keypoints(
    keypoint_model,
    torch.cat([imgs[0], imgs[22]]),
    "cpu",
    1,
    keypoint_indices
)
fig, axs = plt.subplots(1, 2)
axs[0].imshow(Okay.tensor_to_image(imgs[0]))
axs[0].scatter(
    x=keypoints[0, :, 0],
    y=keypoints[0, :, 1],
    s=30,
    marker="o",
    coloration="crimson",
)
axs[1].imshow(Okay.tensor_to_image(imgs[22]))
axs[1].scatter(
    x=keypoints[1, :, 0],
    y=keypoints[1, :, 1],
    s=30,
    marker="o",
    coloration="crimson",
)
axs[0].axis("off")
axs[1].axis("off")
fig.tight_layout()
None
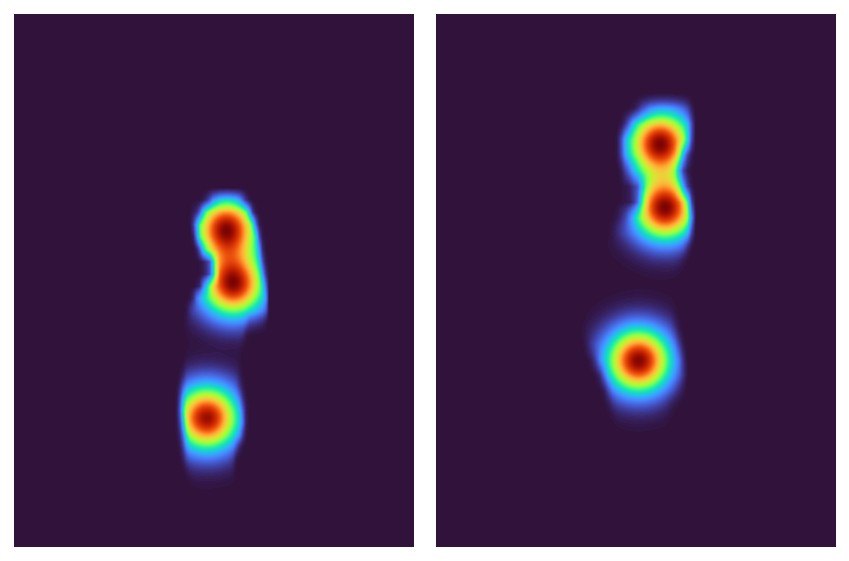
It might be arduous to optimize the registration of three particular person factors, so let’s interpolate between the segmentation masks and the keypoints: I’m going to create 2D Gaussians round every keypoint after which multiply these by the segmentation masks. This could all make for a pleasant, easy optimization.
gaussians = alignimation.base.make_keypoint_gaussians(
    keypoints, imgs[0].form[-2:]
)
gaussian_masks = masks * gaussians
fig, axs = plt.subplots(1, 2)
axs[0].imshow(
    Okay.tensor_to_image(gaussian_masks[0].sum(dim=0, keepdim=True)),
    cmap=plt.get_cmap("turbo"),
)
axs[1].imshow(
    Okay.tensor_to_image(gaussian_masks[1].sum(dim=0, keepdim=True)),
    cmap=plt.get_cmap("turbo"),
)
axs[0].axis("off")
axs[1].axis("off")
fig.tight_layout()
None
All that’s left now’s to lastly register the 2 masks with one another. Consistent with our easy optimization directive, we’ll use an L2 loss.
registrator = Okay.geometry.ImageRegistrator(
    "similarity", tolerance=1e-8, loss_fn=F.mse_loss
)
_ = registrator.register(gaussian_masks[[1]], gaussian_masks[[0]])
After becoming the mannequin to register the 2 masks, it may be used to register the 2 photographs.
with torch.inference_mode():
    aligned_mask = registrator.warp_src_into_dst(gaussian_masks[[1]])
    aligned_img = registrator.warp_src_into_dst(imgs[22])
fig, axs = plt.subplots(2, 2, figsize=(6, 8))
axs = axs.flatten()
axs[0].imshow(
    Okay.tensor_to_image(gaussian_masks[0].sum(dim=0, keepdim=True)),
    cmap=plt.get_cmap("turbo"),
)
axs[1].imshow(
    Okay.tensor_to_image(aligned_mask[0].sum(dim=0, keepdim=True)),
    cmap=plt.get_cmap("turbo"),
)
axs[2].imshow(Okay.tensor_to_image(imgs[0]))
axs[3].imshow(Okay.tensor_to_image(aligned_img))
for ax in axs:
    ax.axis("off")
fig.tight_layout()
None
Huzzah! With a view to make the “alignimation” on the high of this publish, I adopted the above course of for all of my photographs.
As a bonus, since I already had the physique segmentation masks, I can hackily take away the background:
Fleeting Youth
As I used to be engaged on this, I noticed that this code may very well be reused for any state of affairs the place one needs to align a bunch of keypoints or segmentation masks. Albeit approach creepy and surveillance-y, one might pick facial keypoints and align a bunch of images of the identical particular person.
Talking of surveillance, I retailer all of my photographs in Google Pictures. Along with storing photos that I take with my cellphone, I’ve additionally uploaded a bunch of outdated digital photos going again to someday circa 2000.
An alarming however handy function of Google Pictures is that it’s going to mechanically begin detecting completely different peoples’ faces in your photos and create albums containing solely photos of this particular person. The algorithm is surprisingly good and has been in a position to comply with me by time and hair.
I downloaded > 1,000 photos of myself going again 20 years and determined to make an animation of myself growing older all through the years. As traditional, this slight variation on the aforementioned alignment activity ended up being more-than-slightly difficult.
Facial Consciousness
The method for aligning my face is much like the earlier course of:
- Pick my face within the photographs
- Pick facial keypoints.
- Make 2D Gaussian masks across the facial keypoints.
- Register the Gaussian masks after which remodel the unique picture.
Nevertheless, as a result of these have been photographs “within the wild” somewhat than photographs that I explicitly took in the identical approach, the primary two steps have been extra concerned.
Noteably lacking from torchvision are any pretrained fashions for detecting faces or facial keypoint (I assume that is on function?). As a substitute, I used facenet-pytorch to detect all faces in every picture. Every detected face will get a bounding field and a set of facial “landmarks” (aka keypoints) akin to each eyes, the nostril, and each corners of the lips.

With this instrument in my toolbox, my course of then regarded like:
- Detect all faces in all photographs.
- Pick my face in every picture.
- Pick my facial keypoints.
- Throw out photographs the place I’m not dealing with ahead.
I picked out my face within the picture by first establishing embeddings for all detected faces in all photographs utilizing the final layer of a pretrained mannequin. I then contructed an embedding to signify myself by taking the typical of all embeddings. Since I’m in each picture, I must “dominate” the typical. I then look by every picture and discover the face embedding that’s closest to mine and assume that that’s me.
I decide whether or not or not I’m dealing with ahead by measuring the gap between my nostril and both eye. If one eye is quite a bit nearer to my nostril than the opposite eye, then I assume I’m wanting sideways and throw out the picture. I additionally do the identical verify for the gap between my lip corners and nostril. This heuristic fails for eventualities the place I’m wanting down or up.
All Collectively Now
After following the above course of to extract my face’s keypoints from each picture, I can then feed the photographs and keypoints into my authentic semantic picture registration process and get a last “alignimation” of 20 years of Ethans.
