
The simplest option to discover ways to code is by constructing real-life functions and placing your self by means of precise undertaking work. You’ll perceive the syntax higher, be taught to analysis extra successfully, change into a greater problem-solver, hone your UI/UX design expertise, and perceive the nuances that merely watching a tutorial gained’t present you.
Retaining this in thoughts, let’s construct a resume builder app utilizing React Native. On this tutorial, you’ll be taught some vital sensible expertise and methods for cell growth.
Leap forward:
Resume builder app undertaking overview
A resume, or CV, is a doc utilized by an individual to current their expertise, work expertise, and accomplishments to a potential employer. Resume builder apps make it simpler to take action by prompting the consumer to fill in varied fields with the suitable info, then producing a clear, styled resume with that info.
On this undertaking, we are going to create a resume builder app in React Native. The app’s consumer interface will embody two screens.
The primary display screen will include varied enter fields containing prompts for the consumer to supply info related to their resume, together with their title, contact particulars, and previous work expertise:
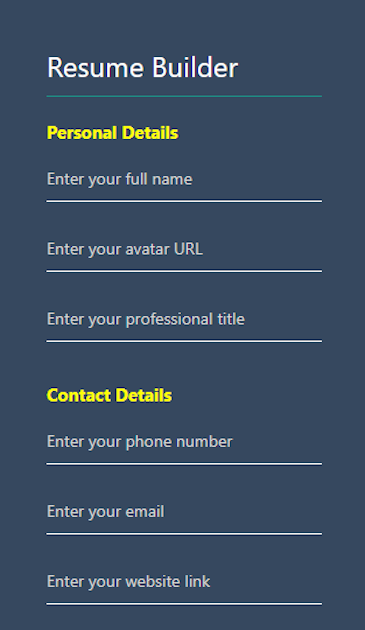
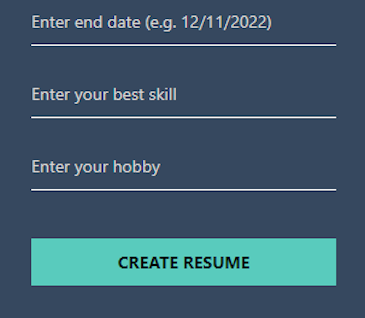
Relying on the scale of the consumer’s system, the variety of fields proven within the viewport at any given time might range. As soon as the consumer scrolls to the top of the shape, they need to see a button to submit their info:
After the consumer submits the shape, we’ll gather all that info and show the resume on a second display screen, as proven within the picture beneath:

See the full supply code for this undertaking on Expo Snack.
Creating the shape inputs for gathering consumer knowledge
At this level, you need to have your Expo Snack undertaking able to edit. If that’s the case, create a brand new folder named display screen within the root folder of your undertaking. Subsequent, create two information within the display screen folder — ResumeForm.js and ShowCV.js.
Inside ResumeForm.js, begin by importing React, the useState() Hook, and the assorted elements for constructing out the UI, then outline a barebone ResumeForm element operate as follows:
import * as React from 'react';
import { Textual content, View, StyleSheet, TextInput, Button, TouchableOpacity } from 'react-native';
import { useState } from 'react'


export default operate ResumeForm({ navigation }) {
    return (
        // JSX goes right here
    )
}
Earlier than we begin specifying the weather to render in return, let’s outline the element state with the useState() Hook.
Add the next code simply earlier than the return assertion:
  const [userDetails, setUserDetails] = useState({
    fullName: '',
    avatarUrl: '',
    profTitle: '',
    phoneNo: '',
    e-mail: '',
    web site: '',
    firm: '',
    jobTitle: '',
    jobStartDate: '',
    jobEndDate: '',
    expertise: '',
    profSummary: '',
    certificates: '',
    collegeName: '',
    colStartDate: '',
    colEndDate: '',
    ability: '',
    pastime: ''
  });
This object accommodates the knowledge the consumer is required to supply through the shape inputs. In the intervening time, it’s all empty. However we’ll use the setter methodology — setUserDetails — to populate every state department because the consumer sorts into their corresponding kind inputs.
Subsequent, within the return assertion, create the container <View> factor and a title textual content inside it:
<View type={kinds.container}>
   <View type={kinds.header}>
      <Textual content type={kinds.headerText}>Resume Builder</Textual content>
   </View>

   // Enter teams will go right here
</View>
Now we have to begin creating the totally different enter teams.
Creating the assorted resume enter teams
The primary enter group is for gathering the consumer’s private info — title, avatar URL, and job title.
We’re gathering the info utilizing React Native’s TextInput factor. Right here’s the code to realize this, which you need to add contained in the container View:
<View type={kinds.particulars}>
         <Textual content type={kinds.titleText}>Private Particulars</Textual content>
          <TextInput
            type={kinds.textinput}
            placeholder="Enter your full title"
            worth={userDetails.fullName}
            onChangeText={(e) => {
              setUserDetails(userDetails => ({
                ...userDetails, ...{'fullName': e}
              }));
            }}
          />
          <TextInput
            type={kinds.textinput}
            placeholder="Enter your avatar URL"
            worth={userDetails.avatarUrl}
            onChangeText={(e) => {
              setUserDetails(userDetails => ({
                ...userDetails, ...{'avatarUrl': e}
              }));
            }}
          />
          <TextInput type={kinds.textinput}
            placeholder="Enter your skilled title"
            worth={userDetails.profTitle}
            onChangeText={(e) => {
                setUserDetails(userDetails => ({
                  ...userDetails, ...{'profTitle': e}
                }));
              }}
          />
</View>
Every TextInput has an onChangeText property, which updates the state in real-time because the consumer sorts into the shape enter. Every setUserDetails name updates solely the corresponding department within the state.
Let’s take a look at the third kind enter group as one other instance. The third kind group is for gathering the consumer’s work expertise info — earlier job, begin and finish date, and an outline of that job expertise:
<View type={kinds.particulars}>
         <Textual content type={kinds.titleText}>Earlier Job</Textual content>
          <TextInput
            type={kinds.textinput}
            placeholder="Enter firm title"
            worth={userDetails.firm}
            onChangeText={(e) => {
              setUserDetails(userDetails => ({
                ...userDetails, ...{'firm': e}
              }));
            }}
          />
          <TextInput type={kinds.textinput} placeholder="Enter job title" worth={userDetails.jobTitle}
          onChangeText={(e) => {
              setUserDetails(userDetails => ({
                ...userDetails, ...{'jobTitle': e}
              }));
            }}
          />
          <TextInput type={kinds.textinput} placeholder="Enter begin date (e.g. 11/11/2022)" worth={userDetails.jobStartDate}
          onChangeText={(e) => {
              setUserDetails(userDetails => ({
                ...userDetails, ...{'jobStartDate': e}
              }));
            }}
          />
          <TextInput type={kinds.textinput} placeholder="Enter finish date (e.g. 12/11/2022)" worth={userDetails.jobEndDate}
          onChangeText={(e) => {
              setUserDetails(userDetails => ({
                ...userDetails, ...{'jobEndDate': e}
              }));
            }}
          />
          <TextInput type={kinds.textinput} placeholder="Describe your expertise" worth={userDetails.expertise}
          onChangeText={(e) => {
              setUserDetails(userDetails => ({
                ...userDetails, ...{'expertise': e}
              }));
            }}
          />
 </View>
To maintain issues easy, we used TextInput for the dates. You may combine a React Native date picker library like react-native-date-picker to make the undertaking extra fascinating.
The second and fourth kind teams use the identical format as those lined thus far, so I’ve excluded them to maintain issues brief. You may discuss with the Expo Snack repo to see what else we included on this instance resume builder app.
Creating the button to submit resume info
Under the shape enter teams, let’s create the button for submitting the shape utilizing React Native’s Button element:
  <Button
        title="Create Resume"
         type={kinds.button}
         onPress={() => navigation.navigate('ShowCV', userDetails)}
         >
  </Button>
Right here, we specified that when the consumer presses the button, we wish to navigate them to the ShowCV display screen, passing alongside the consumer’s resume info because the parameter. We are going to render the resume particulars to the consumer on the ShowCV display screen.
We’ll create ShowCV.js within the subsequent part. However first, let’s add some styling to our React Native resume builder app.
Beneath the Resume operate, paste the next stylesheet to make the shape look higher:
const kinds = StyleSheet.create({
  cont: {
    flex: 1,
    backgroundColor: '#36485f',
    paddingLeft: 40,
    paddingRight: 40,
    paddingTop: 40
  },
  header: {
    marginBottom: 20,
    alignSelf: 'stretch'
  },
  particulars: {
    marginBottom: 15
  },
  headerText: {
    fontSize: 24,
    shade: '#fff',
    borderBottomColor: '#199187',
    paddingBottom: 10,
    borderBottomWidth: 1
  },
  titleText: {
    fontWeight: 'daring',
    shade: 'yellow',
    fontSize: 15,
    marginBottom: 10
  },
  textinput: {
    alignSelf: 'stretch',
    top: 40,
    shade: '#d3d3d3',
    marginBottom: 20,
    borderBottomColor: '#f8f8f8',
    borderBottomWidth: 1
  },
  button: {
    alignSelf: 'stretch',
    alignItems: 'middle',
    padding: 10,
    backgroundColor: '#59cbbd',
    marginTop: 5,
    marginBottom: 20,
  }
});
Your software ought to now seem like this:
Subsequent up, let’s create ShowCV.js.
Rendering the resume
On this part, we’ll create the ShowCV display screen to indicate the consumer their full resume. Go into your screens/ShowCV.js file and embody the next code:
import * as React from 'react';
import { Textual content, View, StyleSheet, TextInput, Button, TouchableOpacity } from 'react-native';
import { useState } from 'react'


export default operate ShowCV({ route }) {
    let dataObj = route.params

    return (
        <View type={kinds.container}>
           <View type={kinds.header}>
              <Textual content type={kinds.headerText}>Your Resume</Textual content>
           </View>

           // Resume particulars go right here
        </View>
    )
}
When navigating from one display screen to a different, the vacation spot display screen has entry to the foundation object. We’ll arrange React Navigation within the subsequent part.
Contained in the ShowCV operate above, we assigned the route.params object handed from the ResumeForm display screen to a brand new variable.
Subsequent, render the main points on the display screen, beginning with the consumer’s private particulars — title, avatar picture, and job title:
<View type={kinds.particulars}>
         <Textual content type={kinds.titleText}>Private Particulars</Textual content>
         <Picture
          supply={{ uri: dataObj.avatarUrl }}
          type={{ width: 80, top: 80 }}
          />
          <Textual content type={kinds.textual content}>
            <Textual content type={kinds.key}>Identify: </Textual content>
            <Textual content>{dataObj.fullName}</Textual content>
          </Textual content>

          <Textual content type={kinds.textual content}>
            <Textual content type={kinds.key}>Skilled Title: </Textual content>
            <Textual content>{dataObj.profTitle}</Textual content>
          </Textual content>
</View>
We get the picture URL from the avatarUrl property, the title from the fullName property, and the title from the profTitle property.
The remainder of the shape teams are rendered in an analogous manner. We nest two Textual content components inside the primary one. One accommodates the title of the property, reminiscent of Skilled Title. The opposite accommodates the precise worth from dataObj, reminiscent of Internet Developer.
As soon as once more, you possibly can discuss with the Expo Snack undertaking to get the total supply code.
Whenever you’re finished with the view, the following step is to make it look good. Paste the next stylesheet code beneath the ShowCV operate:
const kinds = StyleSheet.create({
  cont: {
    flex: 1,
    backgroundColor: '#36485f',
    paddingLeft: 40,
    paddingRight: 40,
    paddingTop: 40
  },
  header: {
    marginBottom: 20,
    alignSelf: 'stretch'
  },
  particulars: {
    marginBottom: 15
  },
  headerText: {
    fontSize: 24,
    shade: '#fff',
    borderBottomColor: '#199187',
    paddingBottom: 10,
    borderBottomWidth: 1
  },
  titleText: {
    fontWeight: 'daring',
    shade: 'yellow',
    fontSize: 15,
    marginBottom: 10
  },
  key: {
    fontWeight: 'daring'
  },
  textual content: {
     shade: '#d3d3d3',
  }
});
Each screens are actually set. The following step is to create a display screen navigator in App.js to attach each screens collectively.
Connecting the 2 screens
Inside App.js, begin by importing the next dependencies:
import * as React from 'react';
import ResumeForm from './screens/ResumeForm'
import ShowCV from './screens/ShowCV'

import { NavigationContainer } from "@react-navigation/native"
import { createNativeStackNavigator } from "@react-navigation/native-stack"
On strains two and three, we imported the 2 screens we simply created. Then, we imported NavigationContainer from @react-navigation/native and createNativeStackNavigator from @react-navigation/native-stack to assist us join the screens.
Extra nice articles from LogRocket:
We have to set up each of these libraries earlier than we are able to use them.
If you happen to’re following this tutorial on Expo Snack, you’ll get a message on the backside of the display screen prompting you to put in each libraries. Settle for all of the prompts, together with the prompts to put in react-native-screens and react-native-safearea — each are wanted for react-navigation to work.
Subsequent, name createNativeStackNavigator to retrieve the Stack:
const Stack = createNativeStackNavigator()
This Stack permits you to “stack up” the screens you wish to transition between in your app.
Create the App element operate and return each screens within the <Stack.Navigation> as proven beneath. Be sure that to wrap the Stack.Navigator within the <NavigationProvider> or it gained’t work:
export default operate App() {
  return (
    <NavigationContainer>
      <Stack.Navigator>
        <Stack.Display screen
          title="Resume"
          element = {ResumeForm}
        />

        <Stack.Display screen
          title="ShowCV"
          element = {ShowCV}
        />
      </Stack.Navigator>
    </NavigationContainer>
  );
}
The ResumeForm display screen is positioned on high of the stack, that means the app will first render the ResumeForm element when it finishes loading.
Now every part is about. You may check the app by filling out the shape and clicking the Create Resume button. It is best to see all the knowledge within the ShowCV display screen as follows:
Conclusion
Now you recognize all it takes to construct a resume builder app in React Native. We lined the method for navigating between screens in React Native functions.
I like to recommend that you just simply don’t cease right here — construct on this React Native tutorial to customise and improve this resume builder app. For instance, you possibly can validate the shape inputs to guarantee that they’re crammed earlier than the shape might be submitted.
Additionally, you possibly can combine a date picker library like react-native-date-picker to implement customized guidelines for the beginning and finish dates in your kind or be sure that the dates are legitimate. Each are nice alternatives to be taught new issues.
Thanks for following and have an ideal week.
LogRocket: Immediately recreate points in your React Native apps.

LogRocket is a React Native monitoring answer that helps you reproduce points immediately, prioritize bugs, and perceive efficiency in your React Native apps.
LogRocket additionally helps you improve conversion charges and product utilization by displaying you precisely how customers are interacting along with your app. LogRocket’s product analytics options floor the explanation why customers do not full a specific move or do not undertake a brand new function.
Begin proactively monitoring your React Native apps — attempt LogRocket free of charge.
