
Constructing customized admin panels for every Node.js mission is usually a time-consuming process for a developer, particularly given the variety of tasks they deal with. Consequently, there’s a rising demand for different instruments designed to cut back the developer’s workload.
This text highlights the options of an open supply Node.js admin panel that guarantees to just do that: AdminJS. The tutorial portion of this put up will show tips on how to use AdminJS to construct a full-stack software.
Soar forward:
What’s AdminJS?
AdminJS, beforehand referred to as AdminBro, is an open supply administrative panel interface tailor-made to fulfill the wants of Node.js purposes. This interface eliminates the effort and time required to develop a customized admin web page. As a substitute, customers can simply view and handle content material with the AdminJS UI.
AdminJS is constructed with React and gives a spread of customizability, it additionally supplies a REST API that may be built-in into different purposes.
Why use AdminJS?
With AdminJS, customers can shortly construct and arrange administrative dashboards and purposes. That can assist you consider whether or not you must think about AdminJS on your software wants, right here’s a abstract of its options:
- Straightforward integration with different purposes: AdminJS might be simply built-in into a number of different purposes equivalent to SQL and NoSQL knowledge sources and frameworks like Categorical.js, NestJS, and Fastify
- Doesn’t impose its database schema on the consumer: AdminJS helps a wide range of ORMs and ODMs, enabling customers to attach with their database of alternative
- Backend agnostic: Customers can create, learn, replace, and delete content material whatever the alternative of information supply
- Superior filtering characteristic: Customers can simply hint particular search queries by making use of a number of standards to shortly filter out undesirable outcomes
- Versatile consumer administration: Totally different authorization ranges might be set for customers. This characteristic may create roles and might limit particular actions, equivalent to knowledge modification, to specific customers
- Straightforward customization: The visible look of the AdminJS UI might be modified to fulfill consumer wants
- Customizable options: A number of commonplace options, like file add, bulk edits, export, consumer profile, and password hashing, might be utilized to knowledge sources; customers may create distinctive traits as desired
Establishing a brand new mission
To begin with AdminJS, we’ll want to put in the AdminJS core bundle and set it up with a plugin and adapter of our selecting. For this tutorial, we’ll use the Categorical.js plugin and MongoDB adapter.
To put in the AdminJS core bundle in your native machine, navigate to the listing of your alternative and open up a CLI. Within the command line, use one of many following instructions to put in AdminJS with npm or Yarn:
npm init
//choose default choices and fill out fields as desired
npm i adminjs
yarn init
//choose default choices and fill out fields as desired
yarn add adminjs
Including the Categorical.js plugin
So as to add the Categorical plugin, we’ll use one of many following instructions within the CLI:
npm i @adminjs/specific # for Categorical server
yarn add @adminjs/specific # for Categorical server
Including the MongoDB adapter
Subsequent, we’ll add the MongoDB adapter to our software with one of many following instructions:
npm i @adminjs/mongoose mongoose # for Mongoose
yarn add @adminjs/mongoose mongoose # for Mongoose
With our set up accomplished, we are able to end our setup by connecting the put in plugin and adapter to our AdminJS bundle. First, we’ll set up Categorical.js:
//npm
npm i specific tslib express-formidable express-session

//yarn
yarn add specific tslib express-formidable express-session
Subsequent, we’ll arrange a easy software with Categorical. Within the file listing, we’ll create a brand new file, App.js, and add the next:
const AdminJS = require('adminjs')
const AdminJSExpress = require('@adminjs/specific')
const specific = require('specific')

const PORT = 3000

const startAdminJS = async () => {
  const app = specific()

  const admin = new AdminJS({})

  const adminRouter = AdminJSExpress.buildRouter(admin)
  app.use(admin.choices.rootPath, adminRouter)

  app.pay attention(PORT, () => {
    console.log(`Listening on port ${PORT}, AdminJS server began on URL: http://localhost:${PORT}${admin.choices.rootPath}`)
  })
}

startAdminJS()
Right here we created a easy AdminJS interface. On this tutorial, we’ll add a MongoDB knowledge supply, add authentication to our AdminJS UI, and use the database to create a easy software.
Creating the weblog mannequin
We’ll be utilizing MongoDB as the information supply for our AdminJS panel. As a prerequisite, we’ll have to create a database on MongoDB and join our software to it with the Mongoose adapter.
To get began, log into MongoDB and choose Create Group:
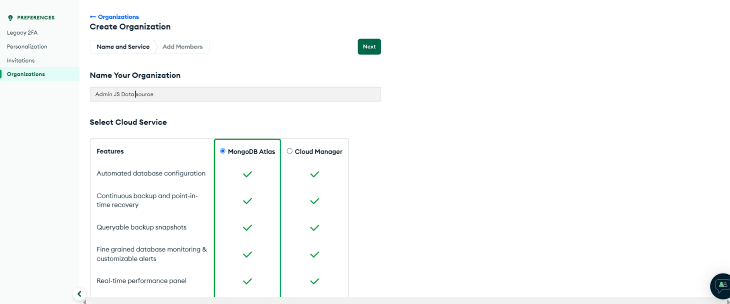
Right here we created a company named “AdminJS knowledge supply”. Subsequent, we’ll add a brand new mission to our group; we’ll identify the mission “Books Mannequin”:

Subsequent, we’ll be prompted to create a brand new database. For this tutorial, we’ll construct a shared cluster referred to as “Books”.
Now, we’ll create admin credentials for the cluster, and add the localhost URL to the IP handle discipline. To get connection credentials, click on on Join and choose join with MongoDB native adapters. Within the full-stack software, we are able to discover the distinctive URI to attach our app to the database.
Within the software’s working listing, we’ll create a bookModel folder and a e-book.mannequin.js file. In e-book.mannequin.js file, we’ll outline the schema for our database:
const mongoose = require('mongoose');
const BookSchema = new mongoose.Schema({
    title: { kind: String },
    writer: { kind: String },
});
const E-book = mongoose.mannequin('E-book', BookSchema);

module.exports = {
    BookSchema,
    E-book,
}
The BookModel outlined schema may have the next fields: title and writer.
Creating sources
Subsequent, we’ll add the mannequin created within the earlier part to our app.js file, join our software to MongoDB, and create an AdminJS occasion.
To do that, make the next modifications to the app.js file:
//earlier libraries import
const mongoose = require("mongoose");
const AdminJSMongoose = require("@adminjs/mongoose");
const { E-book } = require("./bookModel/e-book.mannequin.js");

AdminJS.registerAdapter({
  Useful resource: AdminJSMongoose.Useful resource,
  Database: AdminJSMongoose.Database,
})

//port

const startAdminJS = async () => {
  const app = specific();
  const mongooseDB = await mongoose
    .join(
      "mongodb+srv://ZionDev:[email protected]/?retryWrites=true&w=majority",
      {
        useNewUrlParser: true,
        useUnifiedTopology: true,
      }
    )
    .then(() => console.log("database related"))
    .catch((err) => console.log(err));

  const BookResourceOptions = {
    databases: [mongooseDB],
    useful resource: E-book,
  };

  const adminOptions = {
    rootPath: "/admin",
    sources: [BookResourceOptions],
  };

  const admin = new AdminJS(adminOptions);
    //different code
Right here we added the E-book mannequin as a useful resource to AdminJS. We additionally added the MongoDB database so that it’s going to robotically replace as we carry out CRUD operations in AdminJS.
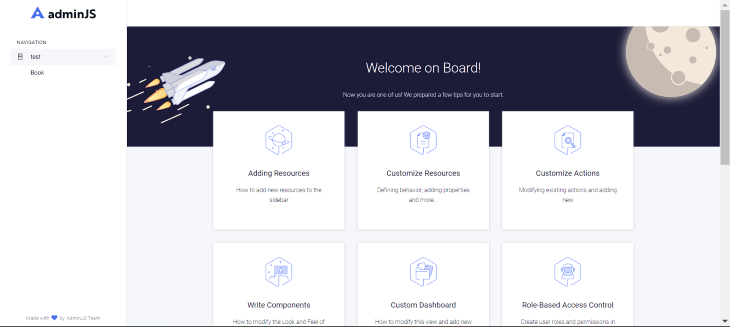
If we run the appliance with the node App.js command, we’ll get the AdminJS default display and the E-book mannequin will seem within the navigation part:
Creating motion handlers
AdminJS supplies the next actions: record, search, new, present, edit, delete, and bulk delete. It additionally permits the consumer to outline customized actions when required. Actions to be created might be positioned in two classes:
- Actions that run on the backend and don’t show seen UI
- Actions that render parts
Each actions are related in that they’re created in the identical sample. The numerous distinction between each patterns is the addition of a part props. Let’s take a look at how we are able to make each sorts of actions.
Backend actions
To create these actions, we’ll use the next syntax:
const BookResourceOptions = {
    useful resource: E-book,
    choices: {
      actions: {
        GetJsonData: {
          actionType: "document",
          part: false,
          handler: (request, response, context) => {
            const { document, currentAdmin } = context;
            console.log("document", document);
            return {
              document: document.toJSON(currentAdmin),
              msg: "Good day world",
            };
          },
        },
      },
    },
  };
Right here, we added a customized motion to the BookResourceOption. The above command has the part property set to false. Therefore, no part will probably be rendered and the motion will run on the backend. The ensuing output would be the chosen document’s knowledge.
Actions with seen UI
Subsequent, we’ll have to create a part that the motion will render. Then, we’ll add the designed part to the part property discipline.
For instance, suppose we’ve got the next customized React part:
import React from 'react'
import { ActionProps } from 'adminjs'

const ShowRecord = (props) => {
  const { document } = props

  return (
    <Div>
      <h1>It is a easy part</h1>
    <p>Under are our information</p>
    <span>
      {JSON.stringify(document)}
    </span>
    </Div>
  )
}

export default ShowRecord
As soon as it’s created, we are able to add it to the part property, like so:
part: AdminJS.bundle('./ShowRecord'),
Including consumer authentication
AdminJS can add consumer authentication for viewing and managing content material; this may also help higher safe knowledge and limit undesirable entry. We will add authentication to our AdminJS software with the specific plugin. To take action, we’ll make the next modification to the App.js file:
//different code

//login particulars
const DEFAULT_ADMIN = {
  e-mail: '[email protected]',
  password: 'administrator',
}

// deal with authentication
const authenticate = async (e-mail, password) => {
  //situation to test for proper login particulars
  if (e-mail === DEFAULT_ADMIN.e-mail && password === DEFAULT_ADMIN.password) {
    //if the situation is true
    return Promise.resolve(DEFAULT_ADMIN)
  }
  //if the situation is fake
  return null
}
Lastly, we’ll exchange AdminJS buildRouter with the buildAuthenticatedRouter and cross the authentication credentials to it:
const adminRouter = AdminJSExpress.buildAuthenticatedRouter(
    admin,
    {
      authenticate,
      cookieName: "AdminJS",
      cookiePassword: "Secret",
    },
    null,
    {
      retailer: mongooseDB,
      resave: true,
      saveUninitialized: true,
      secret: 'Secret',
      identify: 'adminjs',
    }
  );
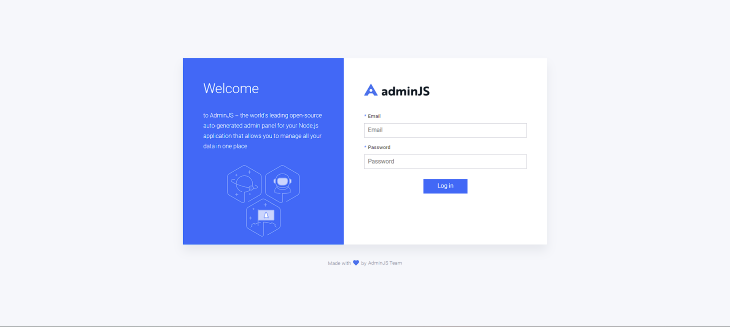
With this, we get a login web page to entry the AdminJS occasion:
Establishing the frontend
Subsequent, we’ll construct a e-book record software with Subsequent.js and Axios, join the AdminJS interface to the appliance, and show saved content material. To entry the AdminJS content material, we’ll create an API request to the URL occasion working on the backend.
Within the api listing, we’ll create a file: getBooks.js. Subsequent, we’ll make an API request to the Books useful resource on this file. The API endpoint for sources takes the next syntax:
.../api/sources/{resourceId}/actions/{motion}
On this case, our useful resource id is E-book, and the motion to be carried out is record. This motion will return all knowledge saved within the useful resource. Add the next code to the getBooks.js file:
import axios from "axios";

export default async operate handler(req, res) {
  await axios
    .get("http://localhost:3000/admin/api/sources/E-book/actions/record")

    .then((response) => {
      return res.standing(200).json(response.knowledge.information);
    })
    .catch((error) => {
      console.log(error);
    });
}
The above code returns a response containing our useful resource knowledge. We will entry this knowledge as static props on the frontend in our index.js file:
export default operate Residence(props) {
  console.log(props);
  return (
    <div type={{show:"flex", alignItems:"heart", top:"100vvh", paddingTop:"55px", flexDirection:"column"}}>
      <h1>E-book Listing Utility</h1>
      <div type={{marginTop:"34px"}} >
        {/* e-book Listing container */}
        {props.books.map((e-book) => {
          return (
            <div type={{show:"flex", flexDirection:"column", border:"1px strong black", width:"500px", padding:"10px", margin:"10px"}}>
              <h2>{e-book.params.title}</h2>
              <p>{e-book.params.writer}</p>
            </div>
          );
        }
        )}
      </div>
    </div>
  )
}

export const getStaticProps = async () => {
  const res = await fetch('http://localhost:3001/api/getBooks');
  const knowledge = await res.json();
  return {
    props: { books: knowledge }
  }
}
We use getStaticProps to fetch knowledge from the API route and cross it as a props. Then, we are able to entry this prop on the frontend and return the title and writer for every array aspect within the response.
Testing the appliance
To check our software, we’ll create entries utilizing the AdminJS occasion:
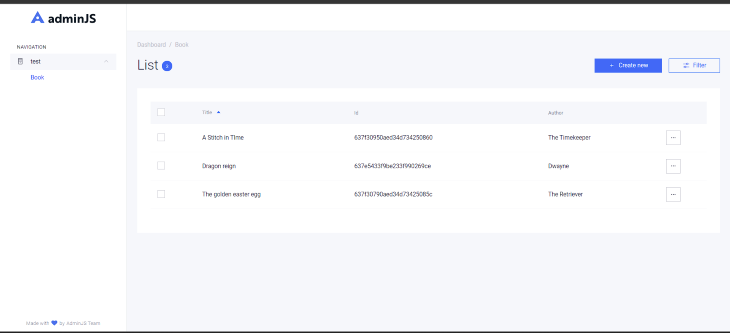
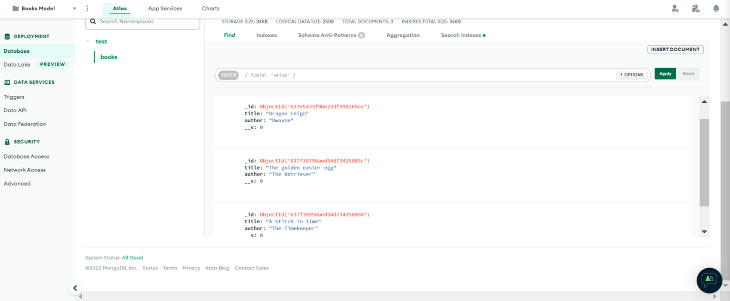
There are three entries within the above dashboard record, every containing a e-book title and writer. If we navigate to the MongoDB Books assortment on MongoDB Atlas, we are able to see the information produced by the Create operation carried out within the AdminJS occasion:
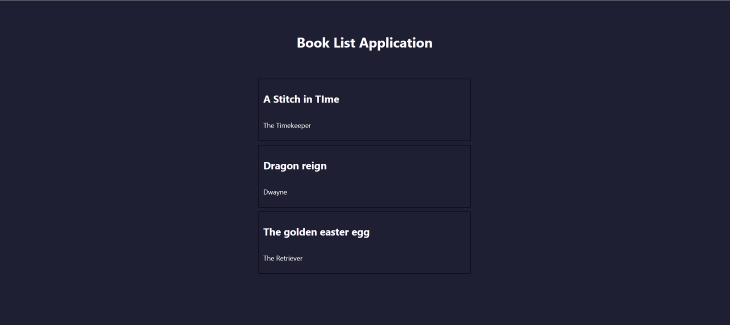
Now, once we run our Subsequent.js software, we get the next end result:
Conclusion
On this tutorial, we launched AdminJS, reviewed its many options, after which used it to construct a full-stack Node.js software with Categorical.js and MongoDB. How will you utilize AdminJS in your subsequent mission?
200’s solely  Monitor failed and sluggish community requests in manufacturing
Deploying a Node-based internet app or web site is the simple half. Ensuring your Node occasion continues to serve sources to your app is the place issues get harder. For those who’re fascinated with making certain requests to the backend or third celebration companies are profitable, attempt LogRocket.  https://logrocket.com/signup/
LogRocket is sort of a DVR for internet and cell apps, recording actually all the things that occurs whereas a consumer interacts along with your app. As a substitute of guessing why issues occur, you’ll be able to mixture and report on problematic community requests to shortly perceive the foundation trigger.
LogRocket devices your app to document baseline efficiency timings equivalent to web page load time, time to first byte, sluggish community requests, and likewise logs Redux, NgRx, and Vuex actions/state. Begin monitoring without cost.
