
One of the crucial vital facets of a banking app is safety. Everyone desires to maintain their wealth in a secure place. In immediately’s world, cash drives nearly all the pieces, and we at all times need entry to our money. Nicely, how can we try this? One of the crucial widespread strategies is utilizing the machine we take in every single place: our telephones.
So, if we need to make an software that manages the customers’ cash, now we have to make sure it’s as safe as doable. On this article, we are going to be taught in regards to the important facets of constructing safe cellular banking apps with Flutter and have a look at pattern codes on find out how to obtain them utilizing the Flutter framework.
Soar forward:
Talk securely utilizing Flutter
Cellular banking purposes usually talk with backend servers. One of the crucial vital issues to contemplate is utilizing a safe layer for this communication. Fortunately, HTTPS involves the rescue and prevents others from sniffing the info we ship and obtain from our backend system.
HTTPS works the identical approach as the straightforward HTTP does, however inserts a safe layer between the TCP communication layer and the HTTPS protocols TLS or SSL.
Utilizing HTTPS with Flutter
Safe Sockets Layer, SSL was the primary definition of how messages could be secured in community communication. After a few iterations, Transport Layer Safety TSL was outlined and changed SSL. TLS defines a safe communication technique for client-server purposes. It offers private and non-private key pairs to safe the messages between the shopper and the server.
When the shopper connects to the server, it is going to obtain its public key. Each message that the shopper sends to the server is encrypted based mostly on the general public key. Solely the server, which has the non-public key, can decrypt the messages. If someone can sniff the community communication, they received’t have the ability to learn the unique content material of the request.
How can we use this in our software? It’s simple. We’ll solely talk with APIs that present HTTPS entry factors. That’s it; we’re performed, proper? Nicely, sadly, not.
To ensure that an endpoint with HTTPS could be trusted, the server ought to present a certificates signed by trusted certificates authorities. Browsers examine this and resolve whether or not the endpoint has a legitimate, trustable certificates. Based mostly on this, they’ll present the consumer a warning.
When constructing Flutter purposes that talk with a server via HTTPS, we are able to depend on packages like http and dio. The one factor we have to do is to make use of a URL beginning with HTTPS in our requests.
An instance with dio ought to appear like this:
var response = await Dio().get('https://www.google.com');
Generally, the backend system can use a self-signed certificates. This occurs if you construct your personal backend and run it in your machine whereas growing. A self-signed certificates means it’s signed by you, not by a trusted authority.
It’s simple and free to create however doesn’t present safety. So, you’re going to get an exception if you need to talk with such an API. You possibly can bypass the examine of the certificates validity by assigning a customized certificates callback to your HTTP shopper:
(dio.httpClientAdapter as DefaultHttpClientAdapter).onHttpClientCreate  = (shopper) {
  shopper.badCertificateCallback=(X509Certificate cert, String host, int port){
    if(kDebugMode){ // Settle for it solely in debug mode.
      return true;
    }
    return false;
  };
};
Securely retailer information utilizing Flutter packages
Not each software desires to retailer its information outdoors the machine. If you wish to maintain all the pieces on the consumer’s telephone and nonetheless retailer the info securely, you will have some form of encrypted information storage. It’s additionally useful to have a spot to retailer tokens, which offers entry to your API. The next packages may help in Flutter:
Implementing the flutter_secure_storage package deal
The flutter_secure_storage package deal offers a key-value retailer the place you may maintain your little secrets and techniques, which will likely be encrypted. It is vitally much like shared_preferences, with the extra safety layer.
Let’s see an instance:
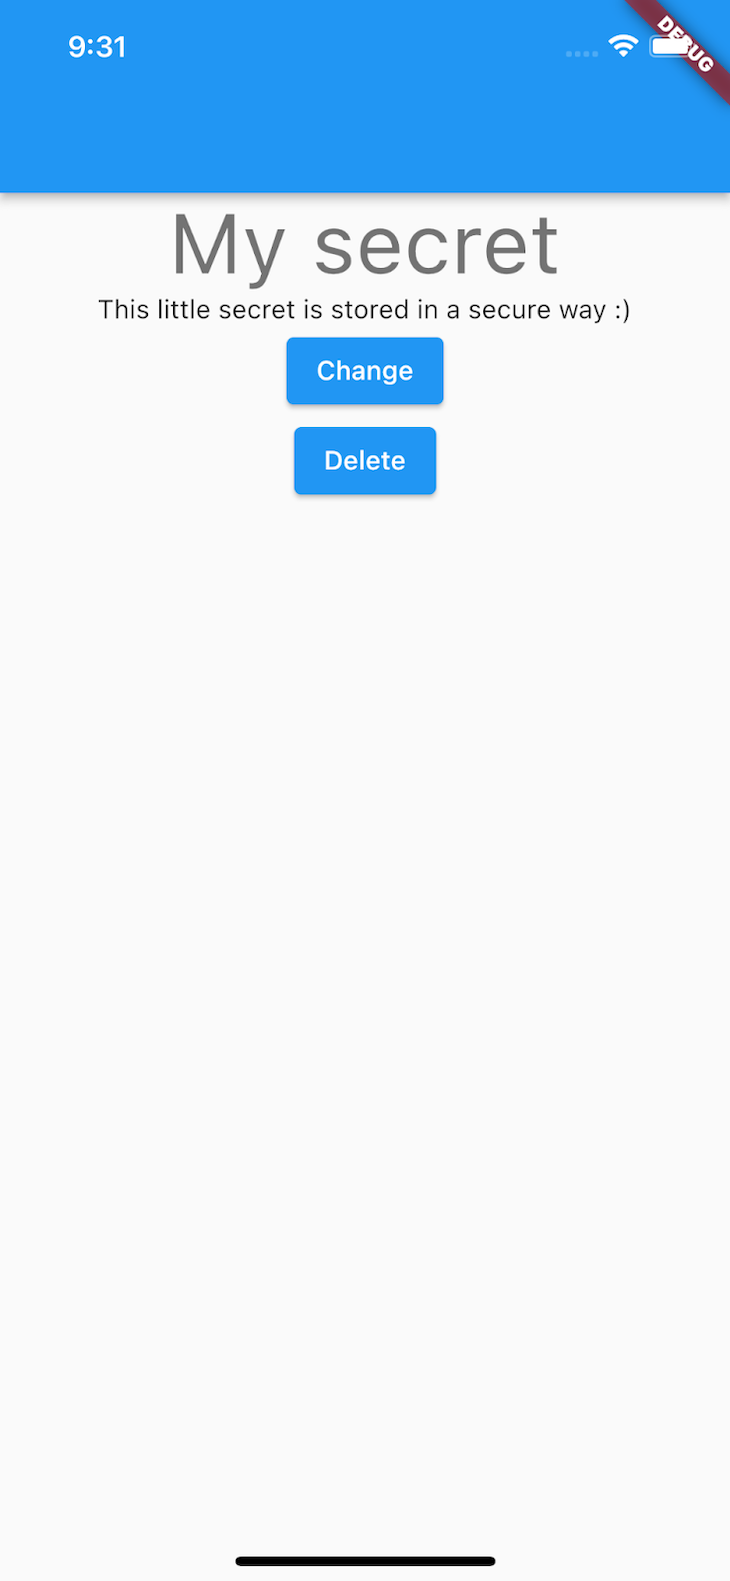
The next widget shows and modifies our little secret:
// my_secret.dart
import 'package deal:flutter/materials.dart';

/// This widget shows and modifies your little secret.
class MySecret extends StatelessWidget {
  const MySecret({
    tremendous.key,
    required this.readMySecret,
    required this.changeMySecret,
    required this.deleteMySecret,
  });

  /// A callback that may learn the key.
  ultimate Future<String?> Operate() readMySecret;

  /// A callback that may change the worth of the key.
  ultimate Future<void> Operate() changeMySecret;

  /// A callback that may delete your secret.
  ultimate Future<void> Operate() deleteMySecret;

  @override
  Widget construct(BuildContext context) {
    return Middle(
      little one: Column(
        kids: [
          Text(
            'My secret',
            style: Theme.of(context).textTheme.headline3,
          ),
          FutureBuilder(
            future: readMySecret(),
            builder: (context, snapshot) {
              if (snapshot.connectionState == ConnectionState.done) {
                return Text(snapshot.data ?? 'Provide your little secret');
              }
              return const CircularProgressIndicator();
            },
          ),
          ElevatedButton(
            onPressed: changeMySecret,
            child: const Text('Change'),
          ),
          ElevatedButton(
            onPressed: deleteMySecret,
            child: const Text('Delete'),
          ),
        ],
      ),
    );
  }
}
Let’s use the widget above and configure it with the flutter_secure_storage functionalities:
 // secure_storage_demo.dart
import 'package deal:flutter/materials.dart';
import 'package deal:flutter_secure_storage/flutter_secure_storage.dart';
import 'package deal:secure_banking_app/change_secret_dialog.dart';
import 'package deal:secure_banking_app/my_secret.dart';

const _mySecretValueKey = 'mySecretValue';

/// Shows the utilization of the flutter_secure_storage instance.
class SecureStorageDemo extends StatefulWidget {
  const SecureStorageDemo({tremendous.key});

  @override
  State<SecureStorageDemo> createState() => _SecureStorageDemoState();
}

class _SecureStorageDemoState extends State<SecureStorageDemo> {
  /// Create a brand new occasion of the safe storage
  late ultimate _secureStorage = const FlutterSecureStorage();

  /// Modifications the present secret worth by displaying an edit dialog
  Future<void> _changeMySecret() async {
    ultimate scaffoldMessenger = ScaffoldMessenger.of(context);

    /// Learn the precise worth
    ultimate currentSecret = await _secureStorage.learn(key: _mySecretValueKey);
    // Show a dialog with a textual content discipline the place the consumer can change their secret.
    ultimate newSecret = await showDialog(
      context: context,
      builder: (context) => ChangeSecretDialog(
        currentSecret: currentSecret,
      ),
    );
    if (newSecret != null) {
      // Save the key worth within the safe storage.
      await _secureStorage.write(key: _mySecretValueKey, worth: newSecret);
      setState(() {});
      scaffoldMessenger.showSnackBar(
        const SnackBar(
          content material: Textual content(
            'Your little secret is up to date.',
          ),
        ),
      );
    }
  }

  /// Removes the present worth.
  Future<void> _deleteMySecret() async {
    ultimate scaffoldMessenger = ScaffoldMessenger.of(context);
    // Deletes a key from the safe storage.
    await _secureStorage.delete(key: _mySecretValueKey);
    setState(() {});
    scaffoldMessenger.showSnackBar(
      const SnackBar(
        content material: Textual content(
          'Your little secret is eliminated.',
        ),
      ),
    );
  }

  @override
  Widget construct(BuildContext context) {
    return MySecret(
      readMySecret: () => _secureStorage.learn(key: _mySecretValueKey),
      changeMySecret: _changeMySecret,
      deleteMySecret: _deleteMySecret,
    );
  }
}
It is vitally simple to make use of the library; you simply need to import it and create a brand new occasion to the safe storage:
import 'package deal:flutter_secure_storage/flutter_secure_storage.dart';

late ultimate secureStorage = const FlutterSecureStorage();
If you need to entry a price within the safe storage saved underneath a selected key, you may name:
ultimate currentSecret = await secureStorage.learn(key: _mySecretValueKey);
To alter it, you may write a brand new worth. Beware, if the worth is null, it is going to delete the important thing from the storage:
await secureStorage.write(key: _mySecretValueKey, worth: newSecret);
Or you may take away your little secret from the storage by:
await secureStorage.delete(key: _mySecretValueKey);
Utilizing the Flutter biometric_storage package deal
The biometric_storage offers a really comparable method with some further options. It might probably retailer small information much like the flutter_secure_storage package deal however optionally secures it with a biometric lock. The consumer can solely entry the info within the storage in the event that they unlock it with their fingerprint, face id, pin, or sample. You’ll have to observe the set up steps for every platform to make use of the package deal in your app.
We will reuse the MySecret widget to show and modify the secrets and techniques in our biometric storage. We simply have to create the callbacks for the operations:
// biometric_storage_demo.dart
import 'package deal:biometric_storage/biometric_storage.dart';
import 'package deal:flutter/materials.dart';
import 'package deal:secure_banking_app/my_secret.dart';

import 'change_secret_dialog.dart';

const _myStorageName="mystorage";

/// Shows the content material of the key storage and offers operations to
/// change its worth.
class BiometricStorageDemo extends StatelessWidget {
  const BiometricStorageDemo({tremendous.key});

  @override
  Widget construct(BuildContext context) {
    return FutureBuilder(
      // Let's examine whether or not the machine helps the biometric storage.
      future: BiometricStorage().canAuthenticate(),
      builder: (context, snapshot) {
        if (snapshot.connectionState == ConnectionState.performed) {
          if (snapshot.information != CanAuthenticateResponse.success) {
            return const Middle(
              little one: Textual content('Cannot use biometric storage'),
            );
          }
          // We've got the performance, present the content material.
          return _BiometricStorageProvider(
            builder: (secureStorage) => _BiometricStorageDemoPage(
              secureStorage: secureStorage,
            ),
          );
        }
        return const Middle(
          little one: CircularProgressIndicator(),
        );
      },
    );
  }
}

/// Gives a safe storage via its builder.
class _BiometricStorageProvider extends StatelessWidget {
  const _BiometricStorageProvider({
    Key? key,
    required this.builder,
  }) : tremendous(key: key);

  /// Bulder operate that gives entry to the safe storage.
  ultimate Widget Operate(BiometricStorageFile) builder;

  @override
  Widget construct(BuildContext context) {
    return FutureBuilder(
        future: BiometricStorage().getStorage(_myStorageName),
        builder: (context, snapshot) {
          if (snapshot.connectionState == ConnectionState.performed &&
              snapshot.hasData) {
            return builder(snapshot.information!);
          }
          return const Middle(
            little one: CircularProgressIndicator(),
          );
        });
  }
}

/// Shows the content material of the safe storage and operations to control
/// it.
class _BiometricStorageDemoPage extends StatefulWidget {
  const _BiometricStorageDemoPage({
    tremendous.key,
    required this.secureStorage,
  });

  ultimate BiometricStorageFile secureStorage;

  @override
  State<_BiometricStorageDemoPage> createState() =>
      _BiometricStorageDemoPageState();
}

class _BiometricStorageDemoPageState extends State<_BiometricStorageDemoPage> {
  /// Modifications the present secret worth by displaying an edit dialog
  Future<void> _changeMySecret() async {
    ultimate scaffoldMessenger = ScaffoldMessenger.of(context);

    /// Learn the precise worth
    ultimate currentSecret = await widget.secureStorage.learn();
    // Show a dialog with a textual content discipline the place the consumer can change their secret.
    ultimate newSecret = await showDialog(
      context: context,
      builder: (context) => ChangeSecretDialog(
        currentSecret: currentSecret,
      ),
    );
    if (newSecret != null) {
      // Save the key worth within the safe storage.
      await widget.secureStorage.write(newSecret);
      setState(() {});
      scaffoldMessenger.showSnackBar(
        const SnackBar(
          content material: Textual content(
            'Your little secret is up to date.',
          ),
        ),
      );
    }
  }

  /// Removes the present worth.
  Future<void> _deleteMySecret() async {
    ultimate scaffoldMessenger = ScaffoldMessenger.of(context);
    // Deletes a key from the safe storage.
    await widget.secureStorage.delete();
    setState(() {});
    scaffoldMessenger.showSnackBar(
      const SnackBar(
        content material: Textual content(
          'Your little secret is eliminated.',
        ),
      ),
    );
  }

  @override
  Widget construct(BuildContext context) {
    return MySecret(
      readMySecret: widget.secureStorage.learn,
      changeMySecret: _changeMySecret,
      deleteMySecret: _deleteMySecret,
    );
  }
}
The package deal handles secrets and techniques in a file-based approach. It might probably create an encrypted file that’s protected by your biometrics, and you may put any string into it. If you wish to retailer a number of values, it’s a must to create numerous storages. This differs from the flutter_secure_storage package deal, the place you may add a number of values with totally different keys to the shop.
The very first thing we must always do is to examine whether or not the machine has any assist for biometric authentication with BiometricStorage().canAuthenticate(), // Verify whether or not the machine helps biometric auth.
If the machine helps it, we have to create a brand new storage utilizing BiometricStorage().getStorage(_myStorageName). This may create a myStorageName file encrypted and guarded by biometrics. It can save you any string into this storage. Should you want different sorts, it’s a must to present the conversion from and to sort String.
You possibly can learn the info from the storage with await secureStorage.learn() and alter the worth with write() await widget.secureStorage.write(newSecret);.
Should you don’t need to maintain your secret, you may take away it through the use of await widget.secureStorage.delete();.
Integrating Hive into your Flutter software
The packages talked about earlier than are nice after we solely need to retailer a small quantity of knowledge, like tokens or passwords. However generally, we’d like a technique to retailer greater than that. if we’re going to encrypt all of our information, we are able to use the hive database in our software.
Hive is a key-value database that gives quick entry to your information and is written in dart. It is vitally simple to combine it right into a Flutter software.
Hive works with packing containers that are much like Map buildings. When you create a field, you may put and get the values based mostly on its key. A field can include any sort of worth, however you may limit it to just one sort:
var field = await Hive.openBox('account');
await field.put('stability', 42.0);
double stability = field.get('stability');
await field.shut();
Hive also can work with customized objects and offers a code generator to make your life simpler:
@HiveType(typeId: 0)
class Account extends HiveObject {

  @HiveField(0)
  double stability;
}

ultimate account = Account();
account.stability = 42.0;
field.add(account); // Hive assigns a key robotically

account.stability = 21.0;
account.save();
You possibly can inform Hive to encrypt the content material of a field if you open it:
ultimate encryptedBox= await Hive.openBox(
  'account',
  encryptionCipher: HiveAesCipher('encryption key'),
);
Hive will solely encrypt the info, not the keys. You will want to make use of the identical encryption key as a result of Hive doesn’t examine it when it opens the field. You possibly can generate a brand new one with the next:
ultimate key = Hive.generateSecureKey();
Since that you must have the identical key even after the appliance is closed and opened once more, you will have to retailer it securely. You need to use, for instance, the flutter_secure_storage for it.
Let’s see an entire instance:
import 'dart:convert';

import 'package deal:flutter/materials.dart';
import 'package deal:flutter_secure_storage/flutter_secure_storage.dart';
import 'package deal:hive_flutter/hive_flutter.dart';

const _boxName="account";
const _encryptionKey = 'boxEncryptionKey';
const _balanceKey = 'stability';

class HiveDemo extends StatelessWidget {
  const HiveDemo({tremendous.key});

  /// Opens the Hive field
  Future<void> _openBox() async {
    // Initialize Hive for Flutter
    await Hive.initFlutter();
    // Learn the important thing used for encryption.
    const secureStorage = FlutterSecureStorage();
    String? encryptionKey = await secureStorage.learn(key: _encryptionKey);
    if (encryptionKey == null) {
      // Create a brand new key if it doesn't exists.
      ultimate key = Hive.generateSecureKey();
      // Add it to the safe storage.
      await secureStorage.write(
        key: _encryptionKey,
        worth: base64UrlEncode(key),
      );
    }
    // Learn the important thing from the safe storage.
    ultimate key = await secureStorage.learn(key: _encryptionKey);
    ultimate encryptionKeyBytes = base64Url.decode(key!);
    // Open the field with the encryption key.
    await Hive.openBox<double>(
      _boxName,
      encryptionCipher: HiveAesCipher(encryptionKeyBytes),
    );
  }

  @override
  Widget construct(BuildContext context) {
    return FutureBuilder(
      future: _openBox(),
      builder: (context, snapshot) {
        if (snapshot.connectionState == ConnectionState.performed) {
          return const _HiveDemoContent();
        }
        return const Middle(
          little one: CircularProgressIndicator(),
        );
      },
    );
  }
}

/// Shows the stability and modifies it.
class _HiveDemoContent extends StatelessWidget {
  const _HiveDemoContent({tremendous.key});

  @override
  Widget construct(BuildContext context) {
    // ValueListenableBuilder reacts to modifications within the given field.
    // It should run its builder technique when any worth within the field modifications.
    return ValueListenableBuilder(
      valueListenable: Hive.field<double>(_boxName).listenable(),
      builder: (context, field, little one) => Middle(
        little one: Column(
          mainAxisAlignment: MainAxisAlignment.middle,
          kids: [
            Text(
              'Balance',
              style: Theme.of(context).textTheme.headline3,
            ),
            // Get the current value of the balance from the box.
            Text(
              box.get(_balanceKey, defaultValue: 0.0).toString(),
            ),
            ElevatedButton(
              onPressed: () {
                // Get the balance value from the box.
                final balance = box.get(_balanceKey, defaultValue: 0.0);
                // Update it with the new value.
                box.put(_balanceKey, balance! + 5.0);
              },
              child: const Text('Add $5'),
            )
          ],
        ),
      ),
    );
  }
}
The crucial half right here is the way you open your field. The _openBox() technique tries to learn the important thing we used beforehand for the encryption through the use of the flutter_secure_storage package deal. If the important thing doesn’t exist, we create a brand new one and put it aside within the storage. As soon as now we have the important thing, we open the field. If the field is open, we are able to begin to use it. The ValueListenableBuilder can watch a field for modifications and replace the UI via its builder technique. All the info we put within the field will likely be encrypted so no one can learn the bodily file that shops the field’s content material on the file system.
Safe your Flutter app by locking your software
When managing delicate information, for instance, managing the consumer’s cash, it’s important to not enable anyone to enter the appliance. Storing its information in an encrypted approach makes it secure to not enable studying the info outdoors of the appliance. You need to use the machine’s biometric lock to stop entry to the app’s options. You possibly can add such authentication to your Flutter app through the use of the local_auth package deal. Comply with the platform-specific set up directions of the package deal earlier than you begin to use it:
// local_auth_demo.dart
import 'package deal:flutter/materials.dart';
import 'package deal:flutter/companies.dart';
import 'package deal:local_auth/local_auth.dart';

/// Shows delicate data solely after the consumer has authenticated with
/// biometrics.
class LocalAuthDemo extends StatefulWidget {
  const LocalAuthDemo({tremendous.key});

  @override
  State<LocalAuthDemo> createState() => _LocalAuthDemoState();
}

class _LocalAuthDemoState extends State<LocalAuthDemo> {
  ultimate auth = LocalAuthentication();

  /// Verify whether or not the machine helps authentication
  Future<bool> _isLocalAuthAvailableOnDevice() async {
    /// Verify whether or not the machine is able to utilizing biometrics
    ultimate isSupported = await auth.isDeviceSupported();
    if (!isSupported) {
      return false;
    }
    attempt {
      /// Verify whether or not it's configured on the machine.
      return auth.canCheckBiometrics;
    } on PlatformException catch (e) {
      return false;
    }
  }

  @override
  Widget construct(BuildContext context) {
    return FutureBuilder(
      future: _isLocalAuthAvailableOnDevice(),
      builder: (context, snapshot) {
        if (snapshot.connectionState == ConnectionState.performed) {
          if (snapshot.hasData && snapshot.information!) {
            return _LocalAuthenticator(auth: auth);
          }
          return const Middle(
            little one: Textual content(
              'Cannot authenticate with biometrics. PLease allow it in your machine.',
            ),
          );
        }
        return const Middle(
          little one: CircularProgressIndicator(),
        );
      },
    );
  }
}

/// Does the authentication and shows the delicate data based mostly on its
/// consequence
class _LocalAuthenticator extends StatelessWidget {
  const _LocalAuthenticator({
    tremendous.key,
    required this.auth,
  });

  ultimate LocalAuthentication auth;

  /// Authenticate the consumer with biometrics. The tactic will likely be chosen by
  /// the OS.
  Future<bool> _authenticate() => auth.authenticate(
        localizedReason: 'Please auth your self',
        choices: const AuthenticationOptions(
          stickyAuth: true,
        ),
      );

  @override
  Widget construct(BuildContext context) {
    return FutureBuilder(
      future: _authenticate(),
      builder: (context, snapshot) {
        if (snapshot.connectionState == ConnectionState.performed) {
          if (snapshot.information!) {
            return const Middle(
              little one: Textual content('Welcome! You possibly can see your delicate information.'),
            );
          }
          return const Middle(
            little one:
                Textual content('Sorry, however you aren't allowed to entry to this web page.'),
          );
        }
        return const Middle(
          little one: CircularProgressIndicator(),
        );
      },
    );
  }
}
When utilizing the local_auth package deal, now we have to examine whether or not the machine is able to biometric authentication and is configured accurately:
// Verify whether or not the machine is able to utilizing biometrics
ultimate isSupported = await auth.isDeviceSupported();
// ...
attempt {
  /// Verify whether or not it's configured on the machine.
  return auth.canCheckBiometrics;
} on PlatformException catch (e) {
  return false;
}
As soon as we all know we are able to use biometrics, we are able to authenticate the consumer with the authenticate() operate:
await authenticate(
  localizedReason: 'Please auth your self',
  choices: const AuthenticationOptions(
    stickyAuth: true,
  ),
);
Disguise delicate data to safe your Flutter app
One other crucial facet of a safe software is to cover delicate information when the app isn’t working. Normally, there’s a preview of the appliance when the consumer switches among the many working apps. With the secure_application package deal, you may add an overlay to your app to cover its content material when the app is within the background.
Along with the overlay, the package deal will lock totally different elements of the appliance, so when the consumer comes again, they should unlock it. The unlock mechanism could be applied by us, for instance, with local_auth or with any sort of authentication move. As soon as we are able to grant entry to the consumer, we are able to unlock the hidden content material. Let’s see it in motion:
// secure_application.dart
import 'package deal:flutter/materials.dart';
import 'package deal:secure_application/secure_application.dart';

class SecureApplicationDemo extends StatelessWidget {
  const SecureApplicationDemo({tremendous.key});

  @override
  Widget construct(BuildContext context) {
    // Wrap the appliance and mark it as a safe one.
    return SecureApplication(
      nativeRemoveDelay: 800,
      // This callback technique will likely be referred to as when the app turns into accessible once more
      // and its content material was hidden with an overlay. We will present logic to
      // unlock the content material once more. Right here we are able to use any auth logic, for instance
      // biometrics with the local_auth package deal.
      onNeedUnlock: (secureApplicationStateNotifier) {
        print(
          'Must be unlocked. You need to use any auth technique, e.g local_auth to unlock the content material',
        );
        return null;
      },
      little one: _SecureApplicationContent(),
    );
  }
}

class _SecureApplicationContent extends StatefulWidget {
  const _SecureApplicationContent({tremendous.key});

  @override
  State<_SecureApplicationContent> createState() =>
      _SecureApplicationContentState();
}

class _SecureApplicationContentState extends State<_SecureApplicationContent> {
  @override
  void didChangeDependencies() {
    tremendous.didChangeDependencies();
    // Allow the feautre. This may add overlay when our app goes background.
    SecureApplicationProvider.of(context)?.safe();
  }

  @override
  Widget construct(BuildContext context) {
    // Wrap the delicate half with SecureGate.
    // This may conceal the delicate half till we unlock the content material.
    return SecureGate(
      blurr: 60,
      opacity: 0.8,
      // The content material of this builder will likely be displayed after our app
      // comes again to foreground and its content material was hidden with the overlay.
      lockedBuilder: (context, secureApplicationController) => Middle(
        little one: Column(
          mainAxisAlignment: MainAxisAlignment.middle,
          kids: [
            const Text('Content is locked!'),
            ElevatedButton(
              onPressed: () {
                // Unlock the content manually.
                secureApplicationController?.unlock();
              },
              child: Text('Unlock'),
            ),
          ],
        ),
      ),
      little one: const Middle(
        little one: Textual content(
          'Your delicate information',
        ),
      ),
    );
  }
}
The secure_application package deal offers two priceless widgets. The primary one is the SecureApplication, which is answerable for managing the overlay and offering a controller to handle the state of the safety standing. The opposite is SecureGate which hides its kids when the content material is locked. This occurs when the appliance comes again from the background.
You first need to allow the safety function by calling the safe() technique on the controller:
SecureApplicationProvider.of(context)?.safe();
You possibly can entry the controller within the descendant widgets of the SecureApplication. As soon as it’s enabled, it is going to handle the overlay robotically.
You will need to unlock the secured content material via the controller to disclose delicate information. This may be performed within the onNeedUnlock callback of the SecureApplication:
SecureApplication(
      // This callback technique will likely be referred to as when the app turns into accessible once more
      // and its content material was hidden with an overlay. We will present logic to
      // unlock the content material once more. Right here we are able to use any auth logic, for instance
      // biometrics with the local_auth package deal.
      onNeedUnlock: (secureApplicationStateNotifier) {
        // Use any authentication technique.
      },
      little one: _SecureApplicationContent(),
    );
On this callback, you may implement any authentication technique that matches your software. You need to use the local_auth to authenticate the consumer based mostly on biometrics or examine whether or not the saved JWT token continues to be legitimate.
The SecureGate widget has two important attributes:
SecureGate(
      // The content material of this builder will likely be displayed after our app
      // comes again to the foreground and its content material was hidden with the overlay.
      lockedBuilder: (context, secureApplicationController) {
        // Return the widgets proven when it's locked.
        // Unlock the app via the controller.
      },
      little one: ...,
    );
The little one attribute holds the delicate information. Will probably be hidden if the content material is locked. The lockedBuilder callback returns what the consumer ought to see on this case. You possibly can manually unlock the content material via the secureApplicationController parameter.
On this submit, I attempted to gather the totally different safety necessities wanted when implementing a Flutter app that works with delicate information, like a cellular banking app. You will need to make it exhausting to entry the content material, so we have to at all times use HTTPS when speaking with a server. Once we retailer information domestically, we must always attempt to encrypt it and solely enable entry as soon as the consumer verifies themself.
One other vital facet is to cover delicate information whereas the consumer is switching between the working purposes. Thankfully, the nice group of Flutter already made packages that we are able to simply combine into our app to make it safer.
All of the supply code is obtainable right here.
LogRocket: Full visibility into your net and cellular apps

LogRocket is a frontend software monitoring answer that permits you to replay issues as in the event that they occurred in your personal browser. As a substitute of guessing why errors occur, or asking customers for screenshots and log dumps, LogRocket allows you to replay the session to rapidly perceive what went fallacious. It really works completely with any app, no matter framework, and has plugins to log further context from Redux, Vuex, and @ngrx/retailer.
Along with logging Redux actions and state, LogRocket information console logs, JavaScript errors, stacktraces, community requests/responses with headers + our bodies, browser metadata, and customized logs. It additionally devices the DOM to report the HTML and CSS on the web page, recreating pixel-perfect movies of even probably the most complicated single-page and cellular apps.
